ICP DAS USA PFN-2052 Quick start guide

Type
Quick start guide
PFN-2000 Series Modules Quick Start
-
This Quick Start Guide will provide information needed to get started with PFN-2000.
Please also consult the User Manual for detailed information on the setup and use of
PFN-2000.
What’s In the Box ?
In addition to this guide, the package includes the following item:
P
FN-2000 Module Product CD
Technical Support
PFN-2000 User Manual
CD: \fieldbus_cd\profinet\remote io\pfn-2000\manual\
ftp://ftp.icpdas.com/pub/cd/fieldbus_cd/profinet/
remote%20io/pfn-2000/manual/
PROFINET Website
http://www.icpdas.com/products/Industrial/profibus/profinet_intro.htm
Let’s Start
In the following examples the S7-1200 PLC from Siemens is used. The configuration
and communication is done by the program ’’Step 7 V11 (TIA PORTAL)’’ provided
by Siemens. We will establish a PROFINET IO network.
PFN-2000 Series Modules Quick Start (Version 1.00, Feb/2013) PAGE: 1
PFN-2000 Series Modules Quick Start (Version 1.00, Feb/2013) PAGE: 2
In this example, please follow the below configuration to configure the network.
Step 1: Set PC’s IP & Mask (IP=192.168.6.210, Mask=255.255.0.0)
2
Network Confi
g
uration
1
Connectin
g
to Network
,
PC
,
PLC and Power
PC=>
IP: 192.168.6.210
Mask: 255.255.0.0
PFN-2000=>
Device name: pfn-2000
IP: 192.168.6.212
Mask: 255.255.0.0
PLC=>
Device name: plc1
IP: 192.168.6.211
Mask: 255.255.0.0
1. Click “start->Settings->Network Connections”
3. Click “Properties” button
5. Set “Internet Protocol Properties” and then click
“OK” button.
2. Double click “Local Area Connection”
icon
4. Select “Internet Protocol(TCP/IP)” and
click “Properties” button
PFN-2000 Series Modules Quick Start (Version 1.00, Feb/2013) PAGE: 3
Step 2: Set PLC’s name and IP
1. Double Click TIA icon to start Step 7 V11
2. Click “Project view”
3. Search accessible devices
Note: At “Online access”, select network
interface card and expand it=>Double click
“Update accessible devices” icon
4. Select PLC and click “Online &
diagnostics” button
Note: Select PLC by mac address and click
right button=>Click ”Online & diagnostics”
button
5. Set IP and Mask
Note: Select “Functions”=>Set IP=192.168.6.
211 & Mask=255.255.0.0=>Click ”Assign IP
address” button
6. Set device name
Note: Input device name=plc1=>Click
”Assign name” button
Step 3: Set PFN-2000’s name and IP
PFN-2000 Series Modules Quick Start (Version 1.00, Feb/2013) PAGE: 4
1. Search accessible devices
Note: At “Online access”, select network
interface card and expand it=>Double click
“Update accessible devices” icon
2. Select PFN-2000 and click “Online &
diagnostics” button
Note: Select PFN-2000 by mac address and
click right button=>Click ”Online &
diagnostics” button
3. Set IP and Mask 4. Set device name
Note: Select “Functions”=>Set IP=192.168.6.
212 & Mask=255.255.0.0=>Click ”Assign IP
address” button
Note: Input device name=pfn-2000=>Click
”Assign name” button
PFN-2000 Series Modules Quick Start (Version 1.00, Feb/2013) PAGE: 5
In this example, please follow the step to import GSD file.
Step 1: Get GSD file
The GSD file can be obtained from companion CD or our FTP site:
CD: \fieldbus_cd\profinet\remote io\pfn-2000\gsd\
ftp://ftp.icpdas.com/pub/cd/fieldbus_cd/profinet/
remote%20io/pfn-2000/gsd/
Step 2: Import GSD file
3
GSD Im
p
ort
1. Double Click TIA icon to start Step 7 V11
2. Click “Project view”
3. Select “Menu->Options->Install general
station description file (GSD)”
4. Select and install GSD file
Note: Select the GSD file directory=>Select
GSD file of PFN-2000=>Click “Install”
button
In this example, please follow the step to setup project.
Step 1: Create the project
1. Double Click TIA icon to start Step 7 V11
2. Create the Project
Note: Select ”Create new project” => Click
“Create” button
Step 2: Project configuration
4
Pro
j
ect Setu
p
PFN-2000 Series Modules Quick Start (Version 1.00, Feb/2013) PAGE: 6
1. Select ”Configure a device”
2. Select ”Add new device”
Note: Select “Add new device” => Select your
PLC module => Click “Add” button
3. Set the device name of PLC to “plc1”
Note: Select ”Properties” windows => Select
”General” => Input device name = plc1 at
“Project Information”
4. Set the IP and mask of PLC and add a new
subnet
Note: Select ”PROFINET Interface” => Click
”Add new subnet” button at ”Ethernet
addresses” => Input IP=192.168.6.211,
mask=255.255.0.0
5. Add PFN-2000 module
Note: Add PFN-2000 device by Hardware
catalog (Other field devices->PROFINET IO-
>I/O->ICP DAS->PFN-2000)
6. Select PROFINET interface
Note: Click ”Not assigned” text => Select
plc1.PROFINET Interface_1
7. Set device name to “pfn-2000” 8. Set the IP of PFN-2000 module
PFN-2000 Series Modules Quick Start (Version 1.00, Feb/2013) PAGE: 7
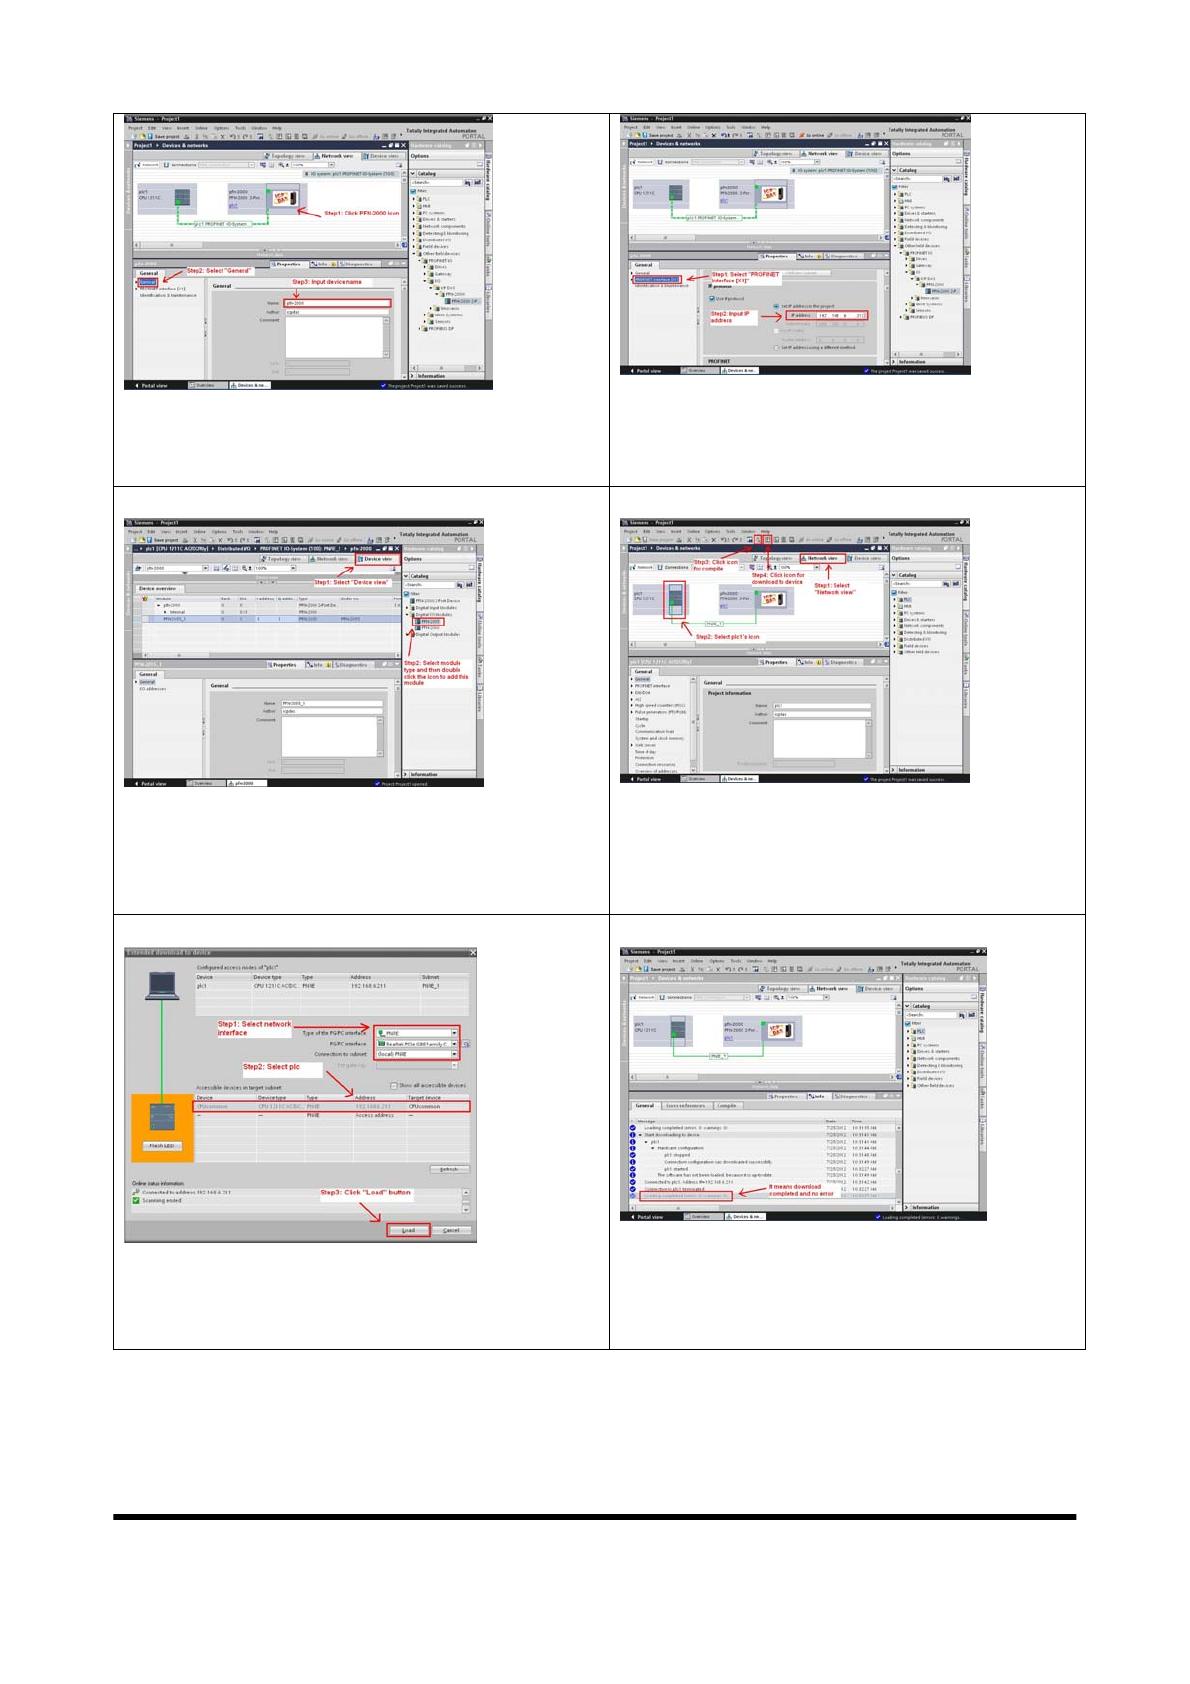
Note: Select PFN-2000 icon => Select
”Properties” => Select ”General” => Input name
= pfn-2000 at ”Project Information”
Note: Select ”PROFINET Interface [X1]” =>
Input IP=192.168.6.212 at ”IP addresses”
9. Select module type of PFN-2000 module
Note: Select ”Device view” windows => Select
PFN-2055 module (Follow the module type of
users to select) at “Hardware catalog” and
double click the icon to add this module
10. Compile and download to device
Note: Select ”Network view” windows =>
Select PLC icon => Click compile icon =>
Click download icon
11. Select network interface and PLC 12. Load completed
Note: Select “Info” windows, it will show
“Load completed (errors: 0, warnings: 0)”
message, it means download completed and no
error.
Note: Select network interface => Select PLC =>
Click “Load” button
At this time, the S1A & S2A LEDs of PFN-2000 module should turn on, it means
the connection between PLC and PFN-2000 module is established.
PFN-2000 Series Modules Quick Start (Version 1.00, Feb/2013) PAGE: 8
  • Page 1 1
  • Page 2 2
  • Page 3 3
  • Page 4 4
  • Page 5 5
  • Page 6 6
  • Page 7 7
  • Page 8 8

ICP DAS USA PFN-2052 Quick start guide

Type
Quick start guide

Ask a question and I''ll find the answer in the document

Finding information in a document is now easier with AI