Page is loading ...
start clock set strong
1-4
timer calc
www.braunhousehold.com/register
Register your product
Coffee maker
KF 7125
Type 3109-T
5713210224_KF_7125_INT_S1.indd 1 08.12.16 08:58
Print Spec J 92194885
Stapled booklet, 148 x 210 mm, 82 p (incl. 6 p cover), 1/1c = black
Deutsch 4
English 9
Français 14
Español 19
Nederlands 24
Dansk 29
Norsk 34
Svenska 39
Suomi 44
Polski 49
Český 54
Slovenský 59
азаша 64
Русский 70
79
De’Longhi-Braun-Household GmbH
Carl-Ulrich-Straße 4
63263 Neu-Isenburg/Germany
5713210224/12.16
DE/UK/FR/ES/NL/DK/NO/SE/FI/
PL/CZ/SK/KZ/RU/Arab
5713210224_KF_7125_INT_S2.indd 1 08.12.16 08:59
start
tim
e
1
2
AM
start
clock
set strong
1-4
timer
calc
5
3
6
7
1
4
click!
8
9
A
10
8
6
4
2
2-10
C
!
*
* not included
AM
A
M
b
re
w
c
l
o
c
k
s
e
t
str
ong
1
-
4
ti
mer
c
a
lc
A
M
b
re
w
c
l
o
c
k
s
e
t
str
o
ng
1
-
4
t
i
mer
c
a
lc
1 min.
Auto-off
1 min.
Auto-off
B
AM
start clock set strong 1-4
timer calc
abc de f g
2
3
5713210224_KF_7125_INT_S3.indd 1 08.12.16 08:59
English
9
Our products are engineered to meet the highest
standards of quality, functionality and design. We
hope you thoroughly enjoy the new Braun appliance.
Before use
Please read instructions carefully and
completely before using the appliance.
Caution
•
This appliance can be used by chil-
dren aged from 8 years and above
and persons with reduced physical,
sensory or mental capabilities or lack
of experience and knowledge if they
have been given supervision or in-
struction concerning use of the appli-
ance in a safe way and understand
the hazards involved.
•
Children shall not play with the appli-
ance.
•
Cleaning and user maintenance shall
not be made by children unless they
are older than 8 years and super-
vised.
•
Children younger than 8 years shall
be kept away from the appliance and
its mains cord.
•
If the supply cord is damaged, it must
be replaced by the manufacturer, its
service agent or similarly qualified
persons in order to avoid a hazard.
•
Cleaning of the appliance should fol-
low the instruction in the relevant sec-
tion.
•
Never immerse the unit in water or
other liquids.
•
Caution: During and after operation,
the metal surfaces will get hot. Avoid
touching hot surfaces, especially the
carafe base, to prevent burns or
scalds. Always use the handle to car-
ry the carafe and keep it upright.
•
This appliance is designed for house-
hold use only and for processing nor-
mal household quantities.
•
Before plugging into a socket, check
whether your voltage corresponds
with the voltage printed on the bottom
of the appliance.
•
Only use the appliance with water and
for preparing coffee to avoid any
damage to the appliance.
•
Do not put the carafe on other heated
surfaces (such as stove plates, hot
trays, etc.).
•
Do not use the thermal carafe in a mi-
crowave.
•
Always use cold water to make cof-
fee.
•
Before you start preparing a new pot
of coffee, always allow the coffee
maker to cool down for approx. 5
minutes (switch off the appliance),
otherwise steam can develop when
filling the water tank with cold water.
•
Caution: Hot surfaces! The
carafe stand is subject to resid-
ual heat after the appliance is
switched off.
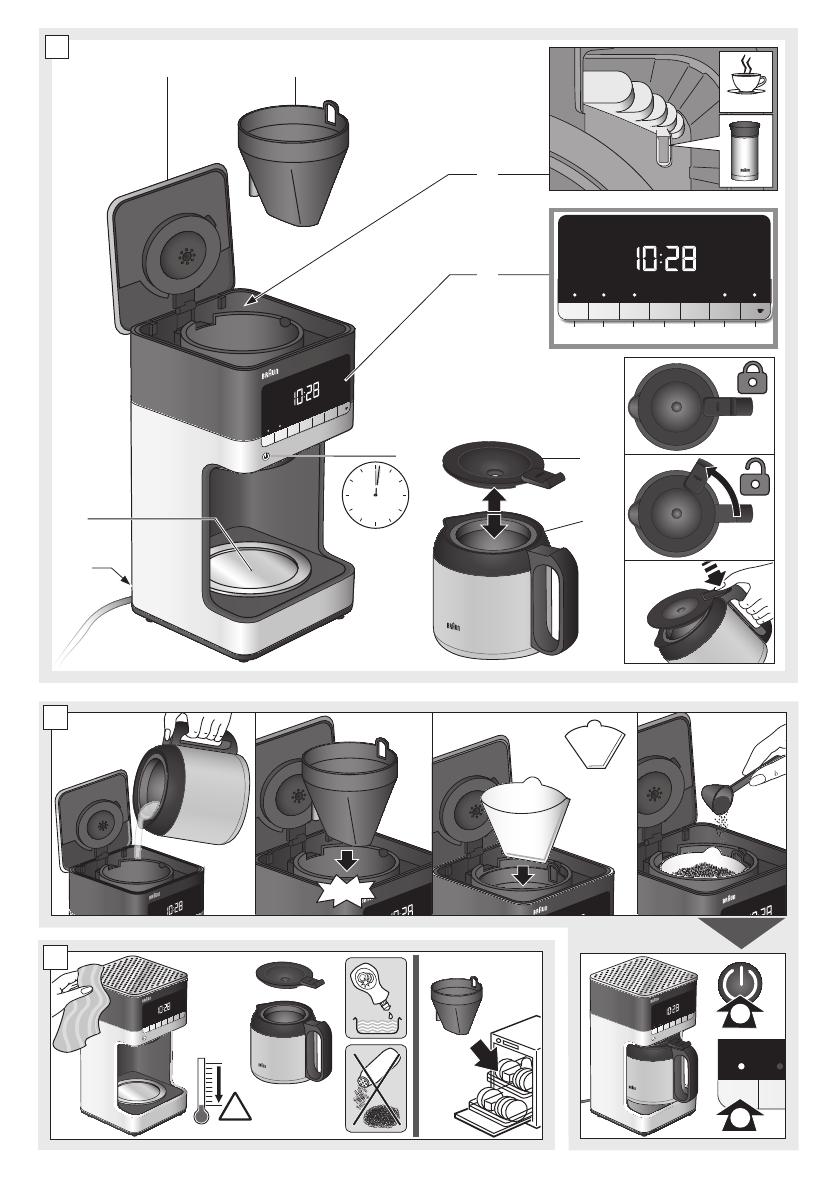
(A) Description
1 On/Off button
2 LED control panel and clock
3 Water reservoir incl. water level indicator (inside)
4 Filter basket with anti-drip system
5 Reservoir cover
6 Carafe stand
7 Cord storage
8 Lid
9 Stainless steel thermal carafe
Maximum capacity: 10 cups = approx. 125 ml coffee
per cup
Unpacking
Take the unit out of the carton.
Remove all pieces of the packing.
Remove any possibly extant labels on the unit (do
not remove the rating plate).
Before first use
Before using the coffee maker for the first time or
after a long period of not using it, run the coffee
maker through a complete brew cycle without
ground coffee. Use a full carafe of fresh cold water.
5713210224_KF_7125_INT_S4-82.indd 9 19.12.16 13:48

10
LED Control Panel
a. start
Use to start the brew cycle.
b. timer
Use to program the start time of the brew cycle.
The Timer can be set for any time, day or night.
c. calc
Use to activate the descaling mode and set the
water hardness level.
d. clock
Displays time of day and use to set time for the
timer.
e. set
Use to program the time of day, timer and water
hardness level.
f. strong
Use to select the brew strength (regular or
strong).
g. 1-4
Use to brew smaller amounts of coffee (up to
4 cups).
Operating Instructions
Switching On/Off
• To switch on the coffee maker, press the On/Off
button (1). The green indicator light will illuminate
indicating that the coffee maker is in «ready»
mode.
• To switch off the coffee maker, press the On/Off
button again. The green indicator light will turn off
indicating that the coffee maker is in «stand by»
mode.
Auto Off Function
For your convenience and also additional safety, the
appliance will switch off automatically 1 minute after
the brewing cycle is complete.
Programming the Coffee Maker
Before programming, always switch on the
coffee maker.
Note: The device features a 60-second power loss
back-up system that remembers all programmed
information, including time of day and the timer in
the event of a tripped breaker, unit is unplugged, or
power failure.
Setting the Time
When the coffee maker is first plugged in or when
power is restored after an interruption, the LED
control panel will start flashing 02:00.
• To set the time, press the CLOCK button (d) for a
minimum of 3 seconds. The LED control panel will
start flashing (24h).
• Press the SET button to select the time format
(24h or 12h). To save the time format and to set
the hours, press the CLOCK button. The hours will
start flashing.
• Press and hold the SET button (e) to scroll
through numbers. Release the button once the
desired hour is displayed.
• To set the minutes, press the CLOCK button. The
LED control panel will start flashing.
• Press and hold the SET button (e) to scroll
through numbers. Release the button once the
desired minute is displayed.
• Press the CLOCK button again to save the desired
time.
• If during the setting process, no button is pressed
for 10 seconds the time currently set will be
saved.
Programming and Activating the Timer
• Press the TIMER button (b) for a minimum of 3
seconds.
• The hours in the LED panel will start flashing.
• To set the hours, press and hold the SET button
(e) to scroll through numbers. Release the button
once the desired hour is displayed.
• To set the minutes, press the TIMER button. The
LED control panel will start flashing.
• Press and hold the SET button (e) to scroll
through numbers. Release the button once the
desired minute is displayed.
• Press the TIMER button again to save the desired
time.
• The pre-set time will disappear after 3 seconds
and the time of day will show on the LED control
panel.
• If during the setting process, no button is pressed
for 10 seconds, the time currently set will be
saved.
This function can only be activated if the timer and
the time of the day have been set.
To activate the timer function:
• Press the TIMER button (b). The green LED above
the button will illuminate and the coffee maker will
start to brew at the pre-set time.
• The pre-set time disappears after 3 seconds.
• When the appliance starts brewing, the green LED
START will continually flash and the LED TIMER
turns off.
• Press the TIMER button (b) again to switch off the
function: the green LED light will disappear.
NOTE: The timer function remains activated even
when the appliance has been switched off (1).
5713210224_KF_7125_INT_S4-82.indd 10 19.12.16 13:48
11
Setting the Water Hardness Level
Set the water hardness level on the coffee maker to
the water hardness level for your local area.
• Press the CALC button (c) for a minimum of 3
seconds.
• The default setting (h3) will start flashing.
• Press the SET button (e) to scroll through the
options (h1 = soft, h2 = normal, h3 = hard) and
select the appropriate water hardness level.
• Press the CALC button again to save the hardness
level.
• The pre-set water hardness disappears after 3
seconds and the time of day will show on the LED
control panel.
1 – 4 Cups Setting
• Press the
button (g). The green LED above
the button will illuminate.
• Press START (a) to start brewing.
• The green LED turns off after the brewing cycle is
finished.
Brew Strength Selector
• Press the STRONG button (f) to select brew
strength «strong».
• The green LED above the button will illuminate.
• If the STRONG button is not pressed, regular
coffee strength is automatically selected.
(B) Making Coffee
• Open the reservoir cover (5).
• When filling the water reservoir (3) with fresh cold
water, refer to the water level indicator (inside the
water reservoir) and fill to the desired number of
cups.
• To prepare the exact amount of coffee for the
Braun Thermal Mug (available separately as
accessory), fill to the corresponding water mark
(330 ml) inside the reservoir.
• Insert a paper filter (cone type # 4) in the filter
basket (4).
• Alternatively you can use the gold tone permanent
filter which is available separately.
• Add the desired amount of ground coffee,
corresponding to the number of cups being
brewed. We recommend using 1 tablespoon or 1
coffee measuring scoop of ground coffee per
cup, but use more or less to suit your taste.
• Close the water reservoir and place the carafe in
its position on the carafe stand (6).
• Plug the cord into an electrical outlet and press
the On/Off button (1).
• Press the START button (a) to start brewing
immediately or press TIMER (b) to commence
brewing at the pre-set time.
• During brewing, the indicator light will flash
continuously. Once the brewing cycle is complete,
the light will turn off.
Note: The anti-drip system halts the flow of coffee
from the filter basket when the carafe is removed, so
a cup can be poured before brewing is finished.
The carafe should be returned to the carafe stand
(maximum 20 seconds) to prevent the filter basket
from overflowing.
For Best Results
• When using paper filters, be sure that it is
completely open and fully inserted in the basket.
It may help to fold and flatten the seams of the
paper filter beforehand.
• Store ground coffee in a cool, dry and dark place
in an airtight container.
• For the best performance from your Braun coffee
maker, descale the unit regularly.
Note: The maximum amount of ground coffee the
coffee maker can take is 10 coffee measuring
scoops or tablespoons.
Descaling
For the best performance from your Braun coffee
maker, descale the unit when the LED CALC (c)
lights up solid green. This indicates it is time to
descale your coffee maker.
Frequency will depend upon the hardness of your
tap water and how often you use the coffee maker.
To set water hardness see «Setting the Water
Hardness Level».
You can use a commercially available decalcifying
agent not affecting aluminum.
We recommend using the Braun Descaling Solution
(can be purchased in stores, through the Braun
website, or by calling Customer Service).
Note: For your convenience, the cleaning cycle is
automatic. The entire cleaning cycle including
rinsing can take up to 45 minutes to complete.
• Follow the package instructions of the
decalcifying agent.
• Place the empty carafe in its position on the
carafe stand (6).
• Press the CALC button (c). The green LED above
the button will start flashing.
• Press START (a) to start the descaling program,
while the green LED is still flashing. Once the
descaling process has started, it is not possible to
stop the program until finished.
• When the descaling program has been
completed, the green LED will turn off.
• Discard the cleaning solution and rinse the carafe
thoroughly with clean water.
• Fill the water reservoir with clean, fresh water (not
exceeding 8 cups). Run the coffee maker through
2 complete brew cycles to flush the unit after
descaling.
5713210224_KF_7125_INT_S4-82.indd 11 19.12.16 13:48

12
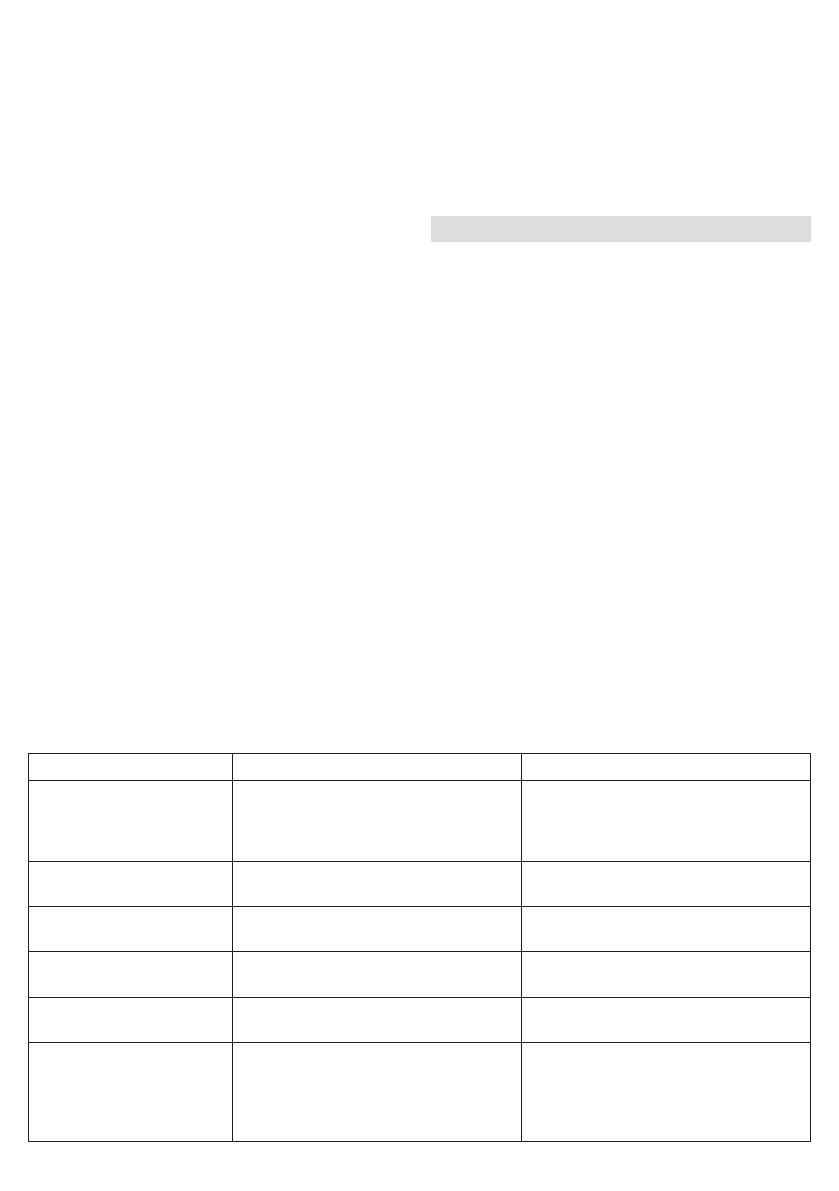
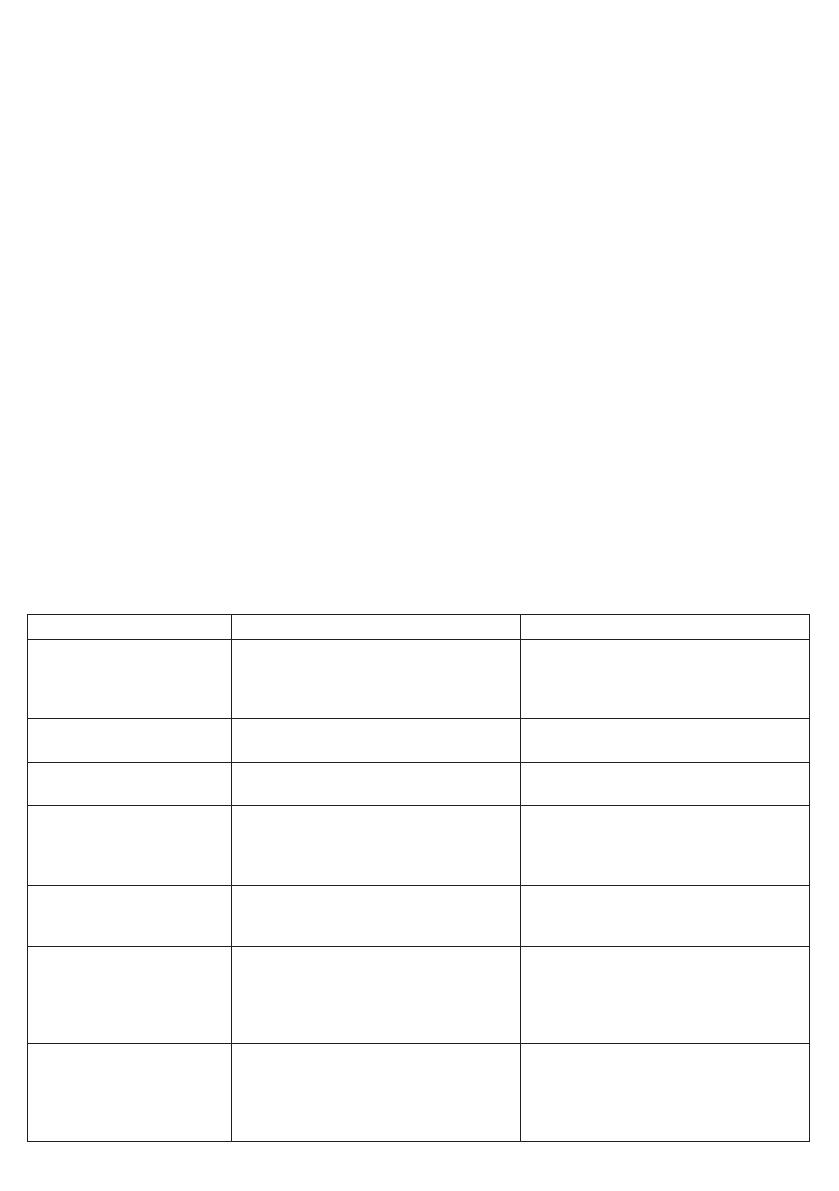
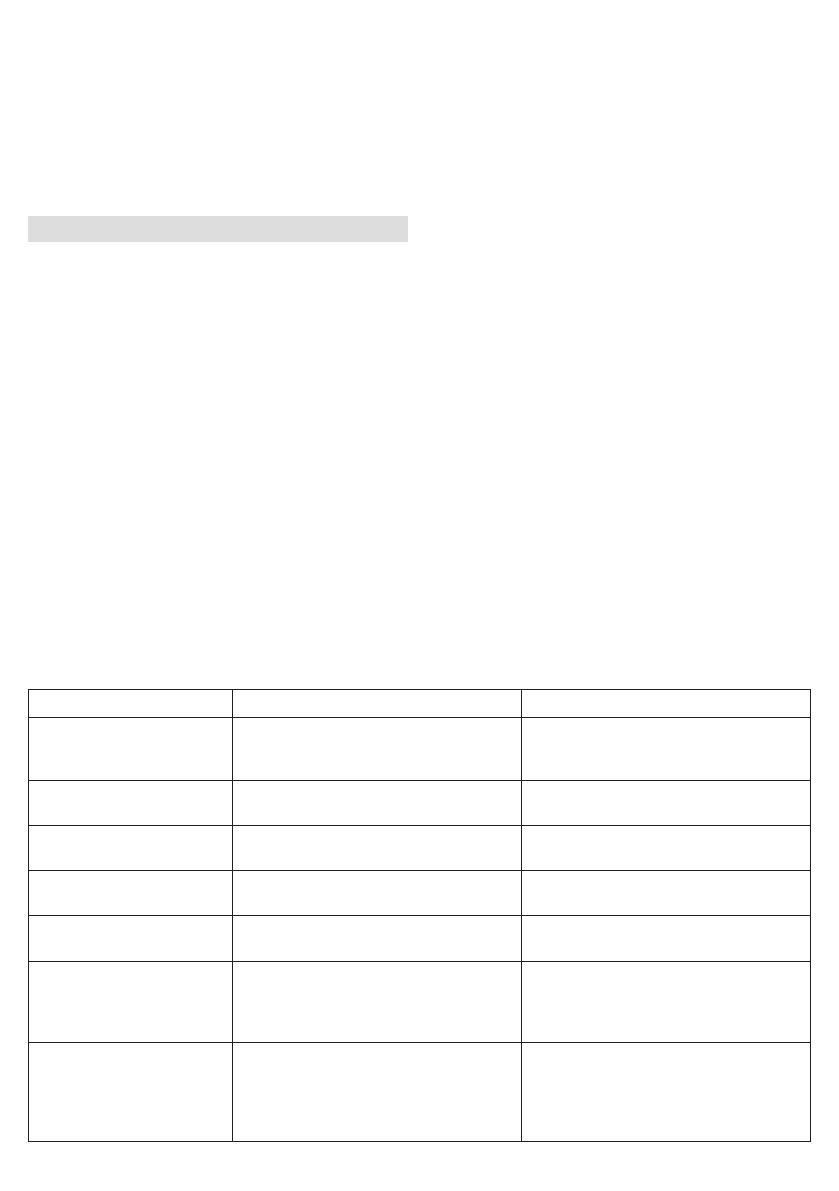
Problem Potential Causes Solution
The ON/OFF switch does
not light up
• The appliance is unplugged
• There was a power outage
• ON/OFF button was not pressed
• Plug unit in
• Wait for power to be restored
• Press ON/OFF button
Display does not show
a time
The appliance is unplugged Plug unit in
Display flashes 02:00 Initial operation or there was a power
outage
Set clock
It is not possible to set
the TIMER
• ON/OFF button is not pressed
• Clock has not been set
• Press ON/OFF button
• Set clock time
It is not possible to
activate the TIMER
• ON/OFF button was not pressed
• The TIMER has not been set
• Press ON/OFF button
• Set the TIMER
The green LED light
above. START does not
light up
• The appliance is unplugged
• There was a power outage
• ON/OFF button was not pressed
and the START button was not
pressed
• Plug unit in
• Wait for power to be restored
press ON/OFF button, followed
by START.
Coffee is not brewing • The appliance is unplugged
• There was a power outage
• START button was not pressed
• There is no water in the reservoir
• Plug unit in
• Wait for power to be restored
• Press START button
• Pour water into the reservoir
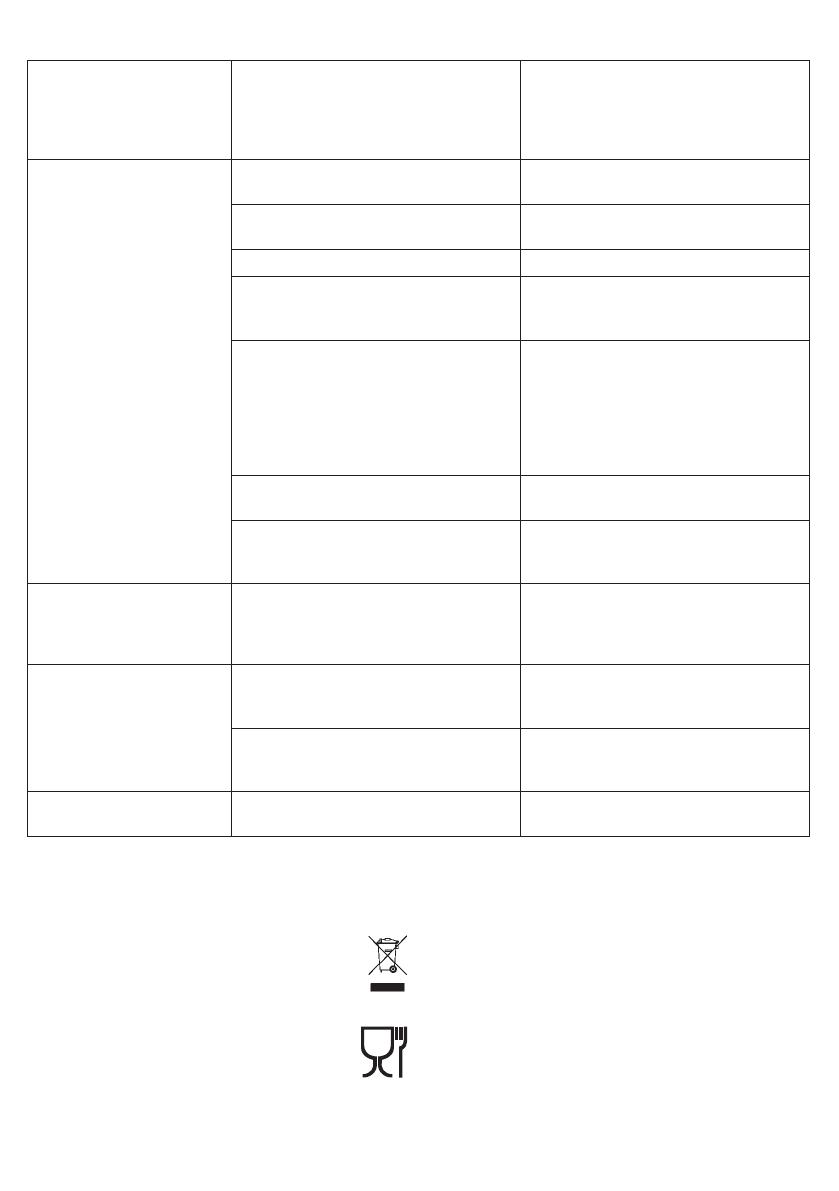
The coffee maker is
overflowing
The filter basket is not properly
inserted
Insert the filter basket correctly
The carafe was not properly
positioned on carafe stand
Be sure the carafe is centered
directly under the filter basket
The lid is not on the carafe Place the lid on the carafe
Carafe was removed for more than 20
seconds while the unit is brewing
Carafe should be replaced promptly
after removing
Using too much coffee grounds
Remove filter from the filter basket. If
using a paper filter, replace with new
one.
Restart the coffee brewing process
with proper amount of coffee grounds
(not more than 10 coffee measuring
scoops or tablespoons)
Using coffee that is too finely Use only coffee that is ground for drip
coffee makers
The coffee flow through the lid is
blocked
Remove the insert from the middle of
the lid. Rinse the lid properly under
running water
Troubleshooting Guide
Repeat the procedure as many times as necessary
in order to reduce the brewing time per cup to a
normal level.
(C) Cleaning and Maintenance
• Always turn the coffee maker off and remove the
plug from the electrical outlet before cleaning.
• Let the appliance cool down.
• Clean the metal surfaces of the thermal carafe
with a damp cloth only. Carafe and lid are not
dishwasher safe.
• Do not use any scouring agents or harsh
cleansers on any part of the coffee maker.
• To clean the base never immerse the unit in water
or other liquids but simply wipe with a clean,
damp cloth and dry before storing.
Subject to change without notice
5713210224_KF_7125_INT_S4-82.indd 12 19.12.16 13:48

13
Coffee is flowing out of
the filter basket onto the
carafe stand when the
carafe is not in place
The filter basket spring popped out
during cleaning
Reattach the spring to the filter
basket
There are coffee grounds
at the bottom of the
carafe
The paper filter was not inserted
correctly into the filter basket
Rinse filter basket, set filter into the
filter basked and restart brewing.
Paper filter collapsed
Remove filter, rinse filter basket and
restart brewing with a new paper filter
Display shows «E01»,
«E02» or «E03»
---- Contact Braun Customer Service
Please do not dispose of the product in the
household waste at the end of its useful life.
Disposal can take place at a Braun Service
Centre or at appropriate collection points
provided in your country.
Materials and accessories coming into
contact with food conform to EEC
regulation 1935/2004.
For UK Only
Guarantee Information
All Braun Household products carry a minimum
guarantee period of two years. The rights and
benefits under this guarantee are additional to your
statutory rights which are not affected.
Please keep your receipt as this will form the
basis of your guarantee.
In the unlikely event of a breakdown you have access
to professional help from our team simply by calling:
02392 392333
For service in the Republic of Ireland please call:
012475471
Braun Household undertakes within the specified
period to repair or replace any part of the appliance,
free of charge (with the exception of any glass or
porcelain-ware incorporated in the product) found
to be defective provided that;
• We are promptly informed of the defect.
• The product is used and maintained in accordance
with the User Instructions.
• The appliance has not been altered in any way or
subjected to misuse or repair by a person other
than an authorised service agent for Braun
Household.
• No rights are given under this guarantee to a
person acquiring the appliance second hand or
for commercial or communal use.
• Any repaired or replaced appliance will be
guaranteed on these terms for the unexpired
portion of the guarantee.
• The need for repair has not been caused by
insufficient aftercare or cleaning: or damage
caused by the chemical or electrochemical
effects of water.
Under no circumstances shall the application of this
guarantee give rise to the complete replacement of
the appliance or entitle the consumer to damages.
Braun Household, New Lane, Havant,
Hampshire PO9 2NH
www.braunhousehold.co.uk
Thank You for choosing Braun. We are confident that
you will get excellent service from this product.
TO IMPROVE YOUR EXPERIENCE
Register now at www.braunhousehold.co.uk
By registering we may send you from time to time
details on exclusive offers, promotions, recipes and
inside tips.
5713210224_KF_7125_INT_S4-82.indd 13 19.12.16 13:48

23
El café se está
derramando
La cesta del filtro no está insertada
correctamente
Inserte la cesta del filtro
correctamente
La jarra no ha sido colocada
correctamente sobre la placa de
apoyo
Asegúrese de que la jarra esté
centrada directamente bajo la cesta
del filtro
La tapa no está en la jarra Coloque la tapa en la jarra
Se ha extraído la jarra durante más
de 20 segundos mientras la unidad
está preparando café
La jarra debería volverse a colocar
rápidamente tras extraerla
Se está usando demasiado café Quite el filtro de la cesta del filtro.
Si está usando un filtro de papel,
sustitúyalo por uno nuevo.
Vuelva a iniciar el proceso de
preparación de café con la cantidad
correcta de café (no más de 10
cucharadas soperas o cacitos de
medición de café)
Se está usando café demasiado
molido
Utilice solamente café molido para
cafeteras de goteo
El flujo de café que pasa a través de
la tapa está bloqueado
Extraiga el accesorio del centro de la
tapa Enjuague la tapa
adecuadamente con agua corriente
El café fluye de la cesta
del filtro a la placa de
apoyo cuando la jarra no
está en su sitio
Se ha salido el muelle de la cesta del
filtro durante la limpieza
Vuelva a colocar el muelle en la cesta
del filtro
Hay café en la parte
inferior de la jarra
El filtro de papel no se insertó
correctamente en la cesta del filtro
Enjuague la cesta del filtro, coloque
el filtro en la cesta y reinicie la
preparación de café.
El filtro de papel se ha hundido
Retire el filtro, enjuague la cesta del
filtro y reinicie la preparación de café
con un nuevo filtro de papel
La pantalla muestra
«E01», «E02» o «E03».
---- Contacte con Atención al cliente de
Braun.
No tire este producto a la basura al final de
su vida útil. Llévelo a un Centro de Asistencia
Técnica Braun o a los puntos de recogida
habilitados por los ayuntamientos.
Los materiales y objetos destinados a entrar en
contacto con alimentos cumplen las
disposiciones del Reglamento europeo
1935/2004.
5713210224_KF_7125_INT_S4-82.indd 23 19.12.16 13:48
27
De frequentie hangt af van de hardheid van uw
leidingwater en hoe vaak u de koffiemachine
gebruikt.
Raadpleeg «Het peil van waterhardheid instellen»
om de waterhardheid in te stellen.
U kunt in de handel verkrijgbaar ontkalkingsmiddel
dat aluminium niet aantast gebruiken.
Het gebruik van Braun ontkalkingsoplossing wordt
aanbevolen (kan worden aangeschaft in winkels, via
de website van Braun of door te bellen naar de
klantenservice).
Opmerking: Voor uw gemak is de reinigingscyclus
automatisch. De volledige reinigingscyclus, inclusief
spoelen, duurt tot 45 minuten.
• Volg de instructies op de verpakking van het
ontkalkingsoplossing.
• Zet de lege karaf op de steun (6).
• Druk op de knop CALC (kalk) (c). De groene led
boven de knop zal beginnen te knipperen.
• Druk op START (a) om te beginnen met het
ontkalkingsprogramma, terwijl de groene led nog
steeds knippert. Zodra het ontkalkingsprogramma
is gestart, kan het niet worden gestopt tot het is
voltooid.
• Wanneer het ontkalkingsprogramma is beëindigd,
gaat de groene led uit.
• Gooi de reinigingsoplossing weg en spoel de
karaf grondig met zuiver water.
• Vul het waterreservoir met zuiver drinkwater (niet
meer dan 8 kopjes). Laat de koffiemachine twee
volledige cycli van koffie zetten doorlopen om de
eenheid te spoelen na het ontkalken.
Herhaal de procedure zo vaak als nodig is om de tijd
voor het koffie zetten per kopje is teruggebracht
naar een normaal niveau.
(C) Reiniging en onderhoud
• Zet de koffiemachine altijd uit en trek de stekker
uit het stopcontact vóór elke reiniging.
• Laat het apparaat afkoelen.
• Reinig de metalen oppervlakken van de
thermoskaraf enkel met een vochtige doek. De
karaf en het deksel zijn niet geschikt voor de
vaatwasser.
• Gebruik geen schurende of bijtende
schoonmaakmiddelen op onderdelen van de
koffiemachine.
• Om de basis te reinigen, mag u de eenheid nooit
onderdompelen in water of andere vloeistoffen.
Veeg ze gewoon af met een schone, vochtige
doek en laat drogen voordat u ze opbergt.
Wijzigingen voorbehouden.
Probleem Mogelijke oorzaak Oplossing
De AAN/UIT-schakelaar
brandt niet
• Stekker zit niet in het stopcontact
• Er vond een stroomuitval plaats
• AAN/UIT-knop werd niet ingedrukt
• Steek de stekker in het
stopcontact
• Wacht tot de stroom is hersteld
• Druk op de AAN/UIT-knop
Het scherm toont geen
tijd
De stekker zit niet in het stopcontact
Steek de stekker in
Op het scherm knippert
02:00
Initiële bediening of er was een
stroomuitval
Stel de klok in
De TIMER kan niet worden
ingesteld
• AAN/UIT-knop wordt niet ingedrukt
• Klok werd niet ingesteld
• Druk op de AAN/UIT-knop
• Stel de tijd van de klok in
De TIMER kan niet
worden geactiveerd
• AAN/UIT-knop werd niet ingedrukt
• TIMER werd niet ingesteld
• Druk op de AAN/UIT-knop
• Stel de TIMER in
Het groene lampje boven
START gaat niet branden
• Stekker zit niet in het stopcontact
• Er vond een stroomuitval plaats
• AAN/UIT-knop werd niet ingedrukt
en de START-knop werd niet
ingedrukt
• Steek de stekker in het
stopcontact
• Wacht tot de stroom is hersteld
Druk eerst op de AAN/UIT-knop,
dan op START
Gids voor het oplossen van problemen
5713210224_KF_7125_INT_S4-82.indd 27 19.12.16 13:48
28
Er wordt geen koffie
gemaakt
• Stekker zit niet in het stopcontact
• Er vond een stroomuitval plaats
• START-knop werd niet ingedrukt
• Er is geen water in het reservoir
• Steek de stekker in het
stopcontact
• Wacht tot de stroom is hersteld
• Druk op de START-knop
• Giet water in het reservoir
De koffiemachine stroomt
over
Het filtermandje is niet juist
ingestoken
Plaats het filtermandje op correcte
wijze
De karaf werd niet juist geplaatst op
de stand
Controleer of de karaf in het midden,
recht onder het filtermandje staat
Het deksel zit niet op de karaf Plaats het deksel op de karaf
De karaf werd meer dan 20 seconden
weggehaald tijdens het zetten van
koffie
De karaf moet snel na het weghalen
terug worden gezet
Gebruik van te veel koffiedik Verwijder het filter uit het filtermandje
Indien u een papierfilter gebruikt,
vervang het dan door een nieuw filter
Start het proces van het koffie
zetten opnieuw met de juiste
hoeveelheid koffiedik (niet meer dan
10 maatschepjes of grote eetlepels)
Gebruik van te fijne koffie Gebruik enkel koffie die is gemalen
voor koffiezetapparaten
De koffiestroom door het deksel is
geblokkeerd
Verwijder het inzetstuk van het
midden van het deksel Spoel het
deksel grondig onder stromend water
Koffie stroomt uit het
filtermandje op de
karafsteun wanneer de
karaf niet is geplaatst
De veer van het filtermandje is tijdens
de reiniging eruit gesprongen
Maak de veer opnieuw vast aan het
filtermandje
Er is koffiedik op de
bodem van de karaf
Het papierfilter werd niet juist in het
filtermandje gestoken
Spoel het filtermandje, plaats het
filter erin en begin het koffie zetten
opnieuw.
Papierfilter ingezakt
Verwijder het filter, spoel het
filtermandje en begin het koffie zetten
opnieuw met een nieuw papierfilter
Scherm toont «E01»,
«E02» of «E03».
---- Neem contact op met de
klantenservice van Braun.
Gooi dit apparaat aan het eind van zijn nuttige
levensduur niet bij het huisafval. Lever deze
in bij een Braun Service Centre of bij de door
uw gemeente aangewezen inleveradressen.
De materialen en voorwerpen bestemd om
in aanraking te komen met levensmidde-
len, zijn conform met de voorschriften
van de Europese richtlijn 1935/2004.
5713210224_KF_7125_INT_S4-82.indd 28 19.12.16 13:48
32
• Rengør metaloverfladerne på termokanden med
en fugtig klud. Kande og låg er ikke egnet til
opvaskemaskine.
• Brug ikke skurepulver eller skrappe
rengøringsmidler på nogen del af kaffemaskinen.
• For at rengøre bunden, må kaffemaskinen aldrig
nedsænkes i vand eller andre væsker, men blot
tørres af med en ren, fugtig klud og tørres før
opbevaring.
Kan ændres uden varsel.
Problem Mulig årsag Løsning
ON/OFF kontakten lyser
ikke op
• Apparatets stik er ikke sat i
• Der har været strømafbrydelse
• Der er ikke trykket på knappen ON/
OFF
• Sæt stikket i
• Vent på at strømmen vender tilbage
• Tryk på knappen ON/OFF
Displayet viser ikke
klokkeslættet
Stikket er ikke sat i
Tilslut enheden
Display blinker 02:00 Første anvendelse eller der har været
strømafbrydelse
Indstil uret.
Det er ikke muligt at
indstille TIMER
• Der er ikke trykket på knappen ON/
OFF
• Uret er ikke indstillet
• Tryk på knappen ON/OFF
• Indstil klokkeslættet
Det er ikke muligt at
aktivere TIMER
• Der er ikke trykket på knappen ON/
OFF
• TIMER er ikke indstillet
• Tryk på knappen ON/OFF
• Indstil TIMER
Det grønne LED-lys over
START lyser ikke op.
• Apparatets stik er ikke sat i
• Der har været strømafbrydelse
• Der er ikke trykket på knappen ON/
OFF og heller ikke på knappen
START
• Sæt stikket i
• Vent på at strømmen vender tilbage
• Tryk på knappen ON/OFF, efterfulgt
af START
Kaffen bliver ikke brygget • Apparatets stik er ikke sat i
• Der har været strømafbrydelse
• Der er ikke trykket på knappen
START
• Der er ikke vand i beholderen
• Sæt stikket i
• Vent på at strømmen vender tilbage
• Tryk på knappen START
• Hæld vand i beholderen
Fejlfinding
5713210224_KF_7125_INT_S4-82.indd 32 19.12.16 13:48
33
Kaffemaskinen løber over.
Filterkurven er ikke sat rigtigt i Indsæt filterkurven korrekt
Kanden er ikke sat rigtigt på
kandepladen
Sørg for, at kanden er centreret
direkte under filterkurven
Låget er ikke på kanden Anbring låget på kanden
Kanden var fjernet i mere end 20
sekunder, mens maskinen bryggede
Kanden skal sættes tilbage med det
samme
Der er brugt for meget kaffe Fjern filteret fra filterkurven. Hvis der
bruges kaffefilter af papir, udskiftes
det med et nyt.
Genstart kaffebrygningen med den
rette mængde kaffebønner (ikke
mere end 10 kaffemåleskeer eller
spiseskefulde)
Brug af kaffe, der er for fint formalet Brug kun kaffe, der er malet til
drypkaffemaskiner
Kaffestrømmen gennem låget er
blokeret
Fjern indsatsen fra midten af låget.
Skyl låget grundigt under rindende
vand
Kaffe flyder ud af
filterkurven og ned på
kandepladen når kanden
ikke er på plads
Filterkurvens fjeder er faldet ud under
rengøring
Sæt fjederen fast på filterkurven igen
Der er kaffegrums i
bunden af kanden
Papirfilteret er ikke indsat korrekt i
filterkurven
Skyl filterkurven, anbring filter i
filterkurven og genstart brygningen.
Papirfilter klappet sammen
Fjern filteret, skyl filterkurven og
genstart brygning med et nyt
papirfilter
Display viser «E01», «E02»
eller «E03».
---- Kontakt Braun Kundeservice.
Apparatet bør efter endt levetid ikke kasseres
sammen med husholdningsaffaldet.
Bortskaffelse kan ske på et Braun
Servicecenter eller passende, lokale
opsamlingssteder.
Materialer og genstande bestemt til kontakt
med fødevarer er i overensstemmelse
med EU-forordning 1935/2004.
5713210224_KF_7125_INT_S4-82.indd 33 19.12.16 13:48

38
Kaffen flommer over
kaffetrakteren
Filterholderen er ikke satt inn riktig Sett inn filterholderen på riktig måte
Kannen var ikke riktig plassert på
kanneplaten
Sørg for at kannen er sentrert direkte
under filterholderen
Lokket er ikke på kannen Plasser lokket på kannen
Kannen ble fjernet i mer enn 20
sekunder mens traktingen pågikk
Kannen må settes inn igjen
umiddelbart etter fjerning
Du bruker for mye kaffegrut
Fjern filteret fra filterholderen. Hvis du
bruker et papirfilter, må det erstattes
med et nytt.
Start kaffetraktingen på nytt med
riktig mengde kaffegrut (ikke mer
enn 10 måleskjeer eller spiseskjeer)
Du bruker kaffe som er for finmalt Bruk bare kaffe som er malt for
kaffetraktere
Kaffens flyt gjennom lokket er
blokkert
Fjern enheten fra midten av lokket.
Skyll lokket grundig under rennende
vann
Kaffen strømmer ut av
filterholderen og på
kanneplaten, når kannen
ikke er på plass
Fjæren til filterholderen spratt ut
under rengjøring
Sett fjæren til filterholderen på plass
igjen
Det er kaffegrut på
bunnen av kannen
Papirfilteret ble ikke satt riktig inn i
filterholderen
Skyll filterholderen, sett filteret inn i
filterholderen og start traktingen på
nytt.
Papirfilteret har falt fra hverandre
Fjern filteret, skyll filterholderen og
start traktingen på nytt med et nytt
papirfilter
Displayet viser «E01»,
«E02» eller «E03».
---- Kontakt Braun kundeservice.
Ikke kast dette produktet sammen med
husholdningsavfall når det skal kasseres.
Det kan leveres hos et Braun servicesenter
eller en miljøstasjon.
Materialer og gjenstander ment for kontakt
med matvarer (food grade) er i samsvar
med EU-forskrift 1935/2004.
5713210224_KF_7125_INT_S4-82.indd 38 19.12.16 13:48

58
Káva vytéká z košíku filtru
na stojan karafy, když není
karafa na místě
Pružina košíku filtru během čištění
vyskočila
Připevněte znovu pružinu na košík
filtru
Na dně karafy je mletá
káva
Papírový filtr nebyl správně vložen do
košíku filtru
Vypláchněte košík filtru, vsaďte filtr
do košíku filtru a spusťte znovu
vaření.
Papírový filtr se sesul
Vyjměte filtr, vypláchněte košík filtru a
spusťte znovu vaření s novým
papírovým filtrem
Displej ukazuje «E01»,
«E02» nebo «E03».
---- Kontaktujte zákaznický servis Braun.
Po skonãení Ïivotnosti neodhazujte prosím
tento v˘robek do bûÏného domovního odpadu.
MÛÏete jej odevzdat do servisního stfiediska
Braun nebo na pfiíslu‰ném sbûrném místû
zfiízeném dle místních pfiedpisÛ.
Materiály a součásti, které jsou určeny pro
styk s potravinami, splňují ustanovení
evropského nařízení 1935/2004.
5713210224_KF_7125_INT_S4-82.indd 58 19.12.16 13:48
62
• Nádržku na vodu naplňte čistou a čerstvou vodou
(neprekročte množstvo 8 šálok). Po odstraňovaní
vodného kameňa spustite na kávovare 2
kompletné cykly varenia, aby ste ho vypláchli.
Postup opakujte toľkokrát, ako bude potrebné, aby
ste skrátili čas varenia na každú šálku na normálnu
úroveň.
(C) Čistenie a údržba
• Pred čistením kávovar vždy vypnite a vytiahnite
zástrčku z elektrickej zásuvky.
• Spotrebič nechajte vychladnúť.
• Kovové povrchy teplotne odolnej karafy čistite
výlučne vlhkou handričkou. Karafa a veko nie sú
vhodné do umývačky riadu.
• Na žiadnu časť kávovaru nepoužívajte žieravý
prípravok alebo drsné čistiace prostriedky.
• Pri čistení základňe spotrebič nikdy neponárajte
do vody alebo iných kvapalín, ale ho utrite čistou a
vlhkou handričkou a pred odložením ho nechajte
vyschnúť.
Zmeny sú vyhradené.
Problém Možná príčina Riešenie
Vypínač sa nerozsvieti • Spotrebič je odpojený
• Vyskytol sa výpadok prúdu
• Nestlačil sa vypínač
• Pripojte zariadenie
• Počkajte na obnovenie napájania
• Stlačte vypínač
Na displeji sa nezobrazuje
čas
Spotrebič je odpojený Pripojte spotrebič
Na displeji bliká 02:00 Úvodné spustenie alebo sa vyskytol
výpadok prúdu
Nastavte hodiny
Nedá sa nastaviť
ČASOVAČ
• Nestlačil sa vypínač
• Nenastavili sa hodiny
• Stlačte vypínač
• Nastavte hodiny
Nedá sa spustiť
ČASOVAČ
• Nestlačil sa vypínač
• Nenastavil sa ČASOVAČ
• Stlačte vypínač
• Nastavte ČASOVAČ
Zelená kontrolka LED nad
tlačidlom START sa
nerozsvieti.
• Spotrebič je odpojený
• Vyskytol sa výpadok prúdu
• Nestlačil sa vypínač a nestlačilo sa
tlačidlo START
• Pripojte spotrebič
• Počkajte na obnovenie napájania
• Stlačte vypínač a následne tlačidlo
START
Káva sa nevarí • Spotrebič je odpojený
• Vyskytol sa výpadok prúdu
• Nestlačilo sa tlačidlo START
• V nádržke sa nenachádza žiadna
voda
• Pripojte spotrebič
• Počkajte na obnovenie napájania
• Stlačte tlačidlo START
• Do nádržky nalejte vodu
Sprievodca riešením problémov
5713210224_KF_7125_INT_S4-82.indd 62 19.12.16 13:48

63
Kávovar preteká
Nie je správne vložený košík na filter Správne vložte košík na filter
Karafa sa správne neumiestnila na
stojane karafy
Uistite sa, že je karafa umiestnená
správne na stred priamo pod košíkom
na filter
Na karafe nie je nasadené veko Na karafu nasaďte veko
Karafa sa počas varenia vybrala na
dlhšie ako 20 sekúnd
Karafa by sa po vybratí mala rýchlo
znovu vložiť naspäť
Používate nadmerné množstvo mletej
kávy
Z košíka na filter vyberte filter. Ak
používate papierový filter, nahraďte ho
novým.
Znovu spustite proces varenia kávy
so správnym množstvom mletej kávy
(nie viac ako 10 odmeriek kávy alebo
polievkových lyžíc)
Používate príliš jemne zomletú kávu Používajte len kávu, ktorá je zomletá
pre odkvapkávacie kávovary
Je zablokovaný prietok kávy cez veko Odpojte vložku zo strednej časti veka.
Veko poriadne vypláchnite pod
tečúcou vodou
Káva vyteká z košíka na
filter na stojan karafy, keď
nie je nasadená karafa
Počas čistenia vyskočila pružinka
košíka na filter
Pružinku opätovne nasaďte na košík
na filter
Na dne karafy sa
nachádza pomletá káva
Do košíka na filter sa správne nevložil
papierový filter
Košík na filter vypláchnite, vložte filter
do košíka na filter a znovu spustite
varenie.
Pretrhol sa papierový filter
Filter vyberte, opláchnite košík na
filter a znovu spustite varenie s novým
papierovým filtrom
Na displeji sa zobrazí
«E01», «E02» alebo «E03».
---- Kontaktujte služby pre zákazníkov
spoločnosti Braun.
Po skonãení Ïivotnosti neodhadzujte zariadenie
do beÏného domového odpadu. Zariadenie
odovzdajte do servisného strediska Braun alebo
na príslu‰nom zbernom mieste zriadenom podºa
miestnych predpisov a noriem.
Materiály a predmety určené pre styk s
potravinami sú v súlade s požiadavkami
európskeho nariadenia 1935/2004.
5713210224_KF_7125_INT_S4-82.indd 63 19.12.16 13:48

65
g. 1-4
Кофені аз млшерде шы^ару _шін >олданыыз
(4 шыны^а дейін).
Пайдалану н"с#аулары
осу/шіру ауыстырып >осу
• Кофе >айнат>ышты >осу _шін, осу/шіру
т_ймесін басыыз (1). Жасыл индикатор
жары^ы жанып, кофе >айнат>ышты «дайын»
режимінде екенін білдіреді.
• Кофе>айнат>ышты шіру _шін, осу/шіру
т_ймесін >айта басыыз. Жасыл индикатор
жары^ы сніп, кофе >айнат>ышты «к_ту»
режимінде екенін білдіреді.
Авто шіру функциясы
Сізге >олайлы болу _шін ж`не >осымша
>ауіпсіздік _шін, кофе >айнату циклы
ая>тал^аннан со 1 минуттан кейін >&рыл^ы
автоматты т_рде шеді.
Кофе#айнат#ышты бадарламалау
Бадарламалаудан б"рын кофе #айнат#ышты
іске #осы0ыз.
Ескертпе: Б&л >&рыл^ыда >уат _зілген кезде
>олдайтын 60 секундтты> резервтік ж_йе бар, ол
то>тан ажырап кеткенде, >&рыл^ыны то>тан
суыр^анда немесе >уат _зілгенде барлы>
ба^дарламалан^ан а>паратты, соны ішінде
т`улік уа>ыты ж`не таймерді жадыда са>тайды.
Уа#ытты орнату
Кофе >айнат>ыш ал^аш>ы рет >уат кзіне
жал^ан^ан кезде немесе кедергіден кейін >уат
кзі >айта >алпына келген кезде, жары>диодты
бас>ару панелі 02:00 санын жыпы>тап крсете
бастайды.
• Са^атты орнату _шін CLOCK (d) т_ймесін кем
дегенде 3 секунд басып т&рыыз.
Жары>диодты бас>ару панелі жыпы>тай
бастайды (24 са^).
• Уа>ыт пішімін тадау _шін SET т_ймесін
басыыз (24 са^ немесе 12 са^). Уа>ыт
форматын са>тау _шін ж`не са^атты орнату
_шін, CLOCK т_ймесін басыыз. Са^ат м`ндері
жыпы>тай бастайды.
• Сандарды кезегімен жылжыту _шін SET
т_ймесін (e) басып &стап т&рыыз. ажетті
са^ат крсетілген с`тте т_ймені босатыыз.
• Минут м`нін орнату _шін CLOCK т_ймесін
басыыз. Жары>диодты бас>ару панелі
жыпы>тай бастайды.
• Сандарды кезегімен жылжыту _шін SET
т_ймесін (e) басып &стап т&рыыз. ажетті
са^ат крсетілген с`тте т_ймені босатыыз.
• ажетті уа>ытты са>тау _шін CLOCK т_ймесін
>айтадан басыыз.
• Егер орнату басында ешбір т_йме 10 секунд
ішінде басылмаса, сол с`тте орнатыл^ан уа>ыт
са>талып >алады.
Таймерді бадарламалау ж9не #осу
• TIMER (Таймер) т_ймесін (b) кем дегенде 3
секунд бойы басыыз.
• Жары>диодты панеліндегі са^ат м`ндері
жыпы>тай бастайды.
• Сандарды кезегімен жылжыту _шін SET
(Орнату) т_ймесін (e) басып &стап т&рып, са^ат
м`нін орнатыыз. ажетті са^ат крсетілген
с`тте т_ймені босатыыз.
• Минут м`нін орнату _шін TIMER т_ймесін
басыыз. Жары>диодты бас>ару панелі
жыпы>тай бастайды.
• Сандарды кезегімен жылжыту _шін SET
т_ймесін (e) басып &стап т&рыыз. ажетті
са^ат крсетілген с`тте т_ймені босатыыз.
• ажетті уа>ытты са>тау _шін TIMER т_ймесін
>айтадан басыыз.
• Алдын ала орнатыл^ан уа>ыт 3 секундтан кейін
жо^алады да, т`улік уа>ыты жары> диодты
ба>ылау панелінде крсетіледі.
• Егер орнату басында 10 секунд ішінде
еш>андай т_йме басылмаса, сол кездегі
орнатулы уа>ыт са>талып >алады.
Б&л функцияны тек таймер мен т`улік уа>ыты
орнатыл^ан кезде ^ана іске >осу^а болады.
Таймер #ызметін #осу Yшін:
• TIMER т_ймесін (b) басыыз. Т_йме _стіндегі
жасыл жары> диоды шам жанады да, кофе
>айнат>ыш алдын ала орнатыл^ан уа>ытта
кофені демдей бастайды.
• Алдын ала орнатыл^ан уа>ыт 3 секундтан кейін
жо^алады.
• &рыл^ы кофені демдей баста^ан кезде, жасыл
т_сті START жары> диодты шамы _здіксіз
жыпы>тай бастайды да ТIMER жары> диоды
снеді.
• Функцияны шіру _шін TIMER т_ймесін (b)
>айтадан басыыз: жасыл жары> диодты
жары> жо^алады.
ЕСКЕРТПЕ: &рыл^ы шіріліп т&р^ан кезде де
таймер >ызметі ж&мыс істей береді (1).
Су кермектігін де0гейін орнату
Кофе >айнат>ышта^ы су кермектігі дегейін
сізді жергілікті айма>та^ы суды кермектік
дегейімен бірдей етіп орнатыыз.
• CALC т_ймесін (c) кем дегенде 3 секунд бойы
басыыз.
• депкі реттеу м`ні (h3) жыпы>тай бастайды.
• Опцияларды айналдыра >арау _шін SET (e)
т_ймесін басыыз (h1 = ж&мса>, h2 = >алыпты,
5713210224_KF_7125_INT_S4-82.indd 65 19.12.16 13:48

66
h3 = кермек) ж`не >ажетті су кермектігі
дегейін тадаыз.
• Кермектік дегейін са>тау _шін CALC т_ймесін
>айтадан басыыз.
• Алдын ала орнатыл^ан су кермектігі 3
секундтан кейін жо^алады да, т`улік уа>ыты
жары> диодты ба>ылау панелінде крсетіледі.
1-4 шыныая#ты орнату
•
т_ймесін (g) басыыз. Т_йме _стіндегі
жасыл жары>диодты шамы жанады.
• Кофе демдей бастау _шін START т_ймесін (a)
басыыз.
• Демдеу циклі ая>тал^аннан кейін жасыл
жары>диодты шамы шеді.
Демдеу #оюлыын та0дау
• Кофе «>ою» болуы _шін STRONG т_ймесін (f)
басыыз.
• Т_йме _стіндегі жасыл жары> диодты шам
жанады.
• Егер STRONG (>ою) т_ймесі басылмаса,
кофені >алыпты >оюлы^ы автоматты т_рде
тадалады.
(B) Кофе #айнату
• Су сауытыны >а>па^ын (5) ашыыз.
• Су сауытына (3) таза суы> су >&й^ан кезде,
кофе >&й^ышты биіктік белгілеріне немесе су
дегейіні индикаторына (су сауытыны
ішінде) назар аударыыз ж`не >ажетті
шыныая> санын >&йыыз.
• Braun саптыая>-термосына (керек-жара>
ретінде блек сатылады) с`йкес млшерде
кофе дайындау _шін суды сауытта^ы тиісті су
белгісіне (330 ml) дейін >&йыыз.
• С_згі себетіні (4) ішіне >а^аз с_згісін
орналастырыыз (_шкір т&рпатты № 4).
• Балама ретінде кп >олданылатын алтын т_сті
т_рін де >олдану^а болады; ол жеке сатылады.
• Демделіп жат>ан шыны санына с`йкес кофе
&нта^ыны >ажетті млшерін >осыыз. Бір
шыныая>>а 1 шай >асы> немесе 1 кофе >асы>
кофе салуды &сынамыз, біра> татымыыз^а
>арай азыра> немесе кбірек салыыз.
• Су сауытын жабыыз да, кофе >&й^ышты
т&^ырында^ы (6) орнына >ойыыз.
• Сымды электр розеткасына с&^ыыз да, осу/
шіру т_ймесін (1) басыыз.
• Демдеуді дереу бастау _шін START т_ймесін (a)
басыыз немесе демдеуді алдын ала
орнатыл^ан уа>ытта бастау _шін TIMER
т_ймесін (b) басыыз.
• Кофе демдеген кезде индикатор жары^ы
_здіксіз жыпы>тап т&рады. Кофе демдеу
ая>тал^аннан кейін жары> снеді.
Ескертпе: Тамшылау^а >арсы ж_йесі с_згі
себетінен келетін а^ысты кофе >&й^ышы алын^ан
кезде то>татады, осылайша, демдеу ая>талмай
т&рып шыны^а кофе >&ю м_мкін болады.
С_згі себеті шамадан тыс толып кетпеуі _шін
кофе >&й^ышты т&^ырына >айта >ою керек (е
кбі 20 секунд).
Н9тижесі тамаша болу Yшін
• а^аз с_згілерін >олдан^ан кезде оларды
толы>тай ашылып ж`не себетті ішіне д&рыс
орналасуына кз жеткізііз. Б&л >а^аз с_згісіні
тігісін алдын ала б_ктеуге ж`не тегістеуге
кмектеседі.
• нта>тал^ан кофені сал>ын, >&р^а> `рі >ара^ы
жерде, ты^ыз жабыл^ан сауытта са>таыз.
• Braun кофе >айнат>ышы барынша жа>сы
ж&мыс істеуі _шін оны `ктен _немі тазартып
отырыыз.
Ескертпе: Кофе >айнат>ыш>а салу^а болатын
&нта>тал^ан кофені е кп млшері – 10 кофе
лшер >асы> немесе ас >асы>.
_кті кетіру
Braun кофе >айнат>ышы барынша жа>сы ж&мыс
істеуі _шін CALC жары> диоды (c) жасыл т_спен
жанып т&р^анда `гінен тазартыыз. Б&л кофе
>айнат>ышты `гін кетіру керек екендігін
білдіреді.
а>ты кетіруді жиілілігі ауыз суыны
>аттылы^ына ж`не кофе >айнат>ышты >олдану
жиілілігіне байланысты болады.
Су кермектігін орнату _шін «Су кермектігін
орнату» тарма^ын >араыз.
кті кетіретін ж`не алюминийге `сер етпейтін
жеке сатылатын заттегін >олдану^а болады.
Braun компаниясыны `кті кетіруге арнал^ан
німін >одану^а кеес береміз (д_кендерден,
Braun веб-сайтынан немесе т&тынушы^а >ызмет
крсету бліміне >оырау шалып, сатып алу^а
болады).
Ескертпе: Ы^айлы болу _шін тазалау автоматты
т_рде орындалады. Толы> тазарту циклы, соны
ішінде шаю 45 минут>а дейін созылуы м_мкін.
• кті кетіру заттегіні сыртында^ы
н&с>аулы>тарын орындаыз.
• Бос кофе >&й^ышты т&^ырда^ы (6) орнына
>ойыыз.
• CALC т_ймесін (c) басыыз. Т_йме _стіндегі
жасыл жары>диодты шамы жыпы>тай
бастайды.
• кті кетіру ба^дарламасын бастау _шін START
(a) т_ймесін басыыз, жасыл т_сті жары>
диодты шам `лі жыпылы>тап т&рады. кті
кетіру бастал^аннан кейін, ол ая>тал^анша
ба^дарламаны то>тату м_мкін емес.
5713210224_KF_7125_INT_S4-82.indd 66 19.12.16 13:48

68
М9селе Ы#тималды себеп Шешімі
ON/OFF (осу/шіру)
т_ймесі жанбайды.
• Аспапты ашасы суырылып
>ал^ан
• уат _зілген
• ON/OFF (>осу/шіру) т_ймесі
басылма^ан
• &рыл^ыны то>>а >осу
• уат >айта берілгенше к_ту
• ON/OFF (>осу/шіру) т_ймесін
басу
Дисплейде уа>ыт
крсетілмейді
&рыл^ы то>тан ажырап >ал^ан &рыл^ыны то>>а >осу
Дисплей 02:00 санын
крсетіп жыпы>тайды
Ал^аш>ы пайдалану немесе электр
>уаты _зілген
Са^атты орнату
TIMER (таймер)
параметрін орнату
м_мкін емес
• ON/OFF (>осу/шіру) т_ймесі
басылма^ан
• Са^ат параметрі орнатылма^ан
• ON/OFF (>осу/шіру) т_ймесін
басу
• Са^ат параметрін орнату
TIMER (таймер)
функциясын іске >осу
м_мкін емес
• ON/OFF (>осу/шіру) т_ймесі
басылма^ан
• TIMER (таймер) параметрі
орнатылма^ан
• ON/OFF (>осу/шіру) т_ймесін
басу
• TIMER (таймер) параметрін
орнату
START т_ймесінен
жо^ары жасыл жары>
диодты шам жанбайды.
• Аспапты ашасы суырылып
>ал^ан
• уат _зілген
• ON/OFF (>осу/шіру) т_ймесі
басылма^ан ж`не START (бастау)
т_ймесі басылма^ан
• &рыл^ыны то>>а >осу
• уат >айта берілгенше к_ту
• ON/OFF (>осу/шіру) т_ймесін,
содан кейін START (бастау)
т_ймесін басу
Кофе >айнап жат>ан жо> • Аспапты ашасы суырылып
>ал^ан
• уат _зілген
• START (бастау) т_ймесі
басылма^ан
• Су ыдысыны ішінде су жо>
• &рыл^ыны то>>а >осу
• уат >айта берілгенше к_ту
• START (бастау) т_ймесін басу
• Су сауытына су >&ю
Кофе >айнат>ыш тасып
кетеді
С_згі себеті д&рыс
орналастырылма^ан
С_згі себетін д&рыс орналастыру
Кофе >&й^ыш т&^ырына д&рыс
>ойылма^ан
Кофе >&й^ышты с_згі себетіні
астына туралап >ою
Кофе >&й^ышты _стінде >а>па^ы
жо>
а>па>ты кофе >&й^ышты _стіне
орнатыыз
&рыл^ыны кофе демдеген кезде
кофе >&й^ыш 20 секундтан астам
уа>ыт>а алын^ан
Кофе >&й^ышты ал^аннан кейін оны
дереу орнына >айта >ою керек.
Тартыл^ан кофені шамадан тыс
пайдалану
С_згіні с_згі себетінен алып
тастаыз. Егер >а^аз с_згісін
>олдансаыз, жаа с_згі салыыз.
Кофе >айнатуды тартыл^ан кофені
д&рыс млшерін (10 кофе лшер
>асы>тан не ас >асы>тан асырмай)
салып >айтадан бастау
Тым &са> тартыл^ан кофені >олдану Тамшы кофе >айнат>ыштарда
>олдану _шін арнайы тартыл^ан
кофені ^ана пайдалану
а>па>тан кофе а^атын жол бітеліп
>ал^ан
а>па>ты ортасында^ы затты
алып тастаыз. а>па>ты а^ып
т&р^ан сумен жа>сылап шаю
А#аулы#тарды жою н"с#аулыы
5713210224_KF_7125_INT_S4-82.indd 68 19.12.16 13:48
/