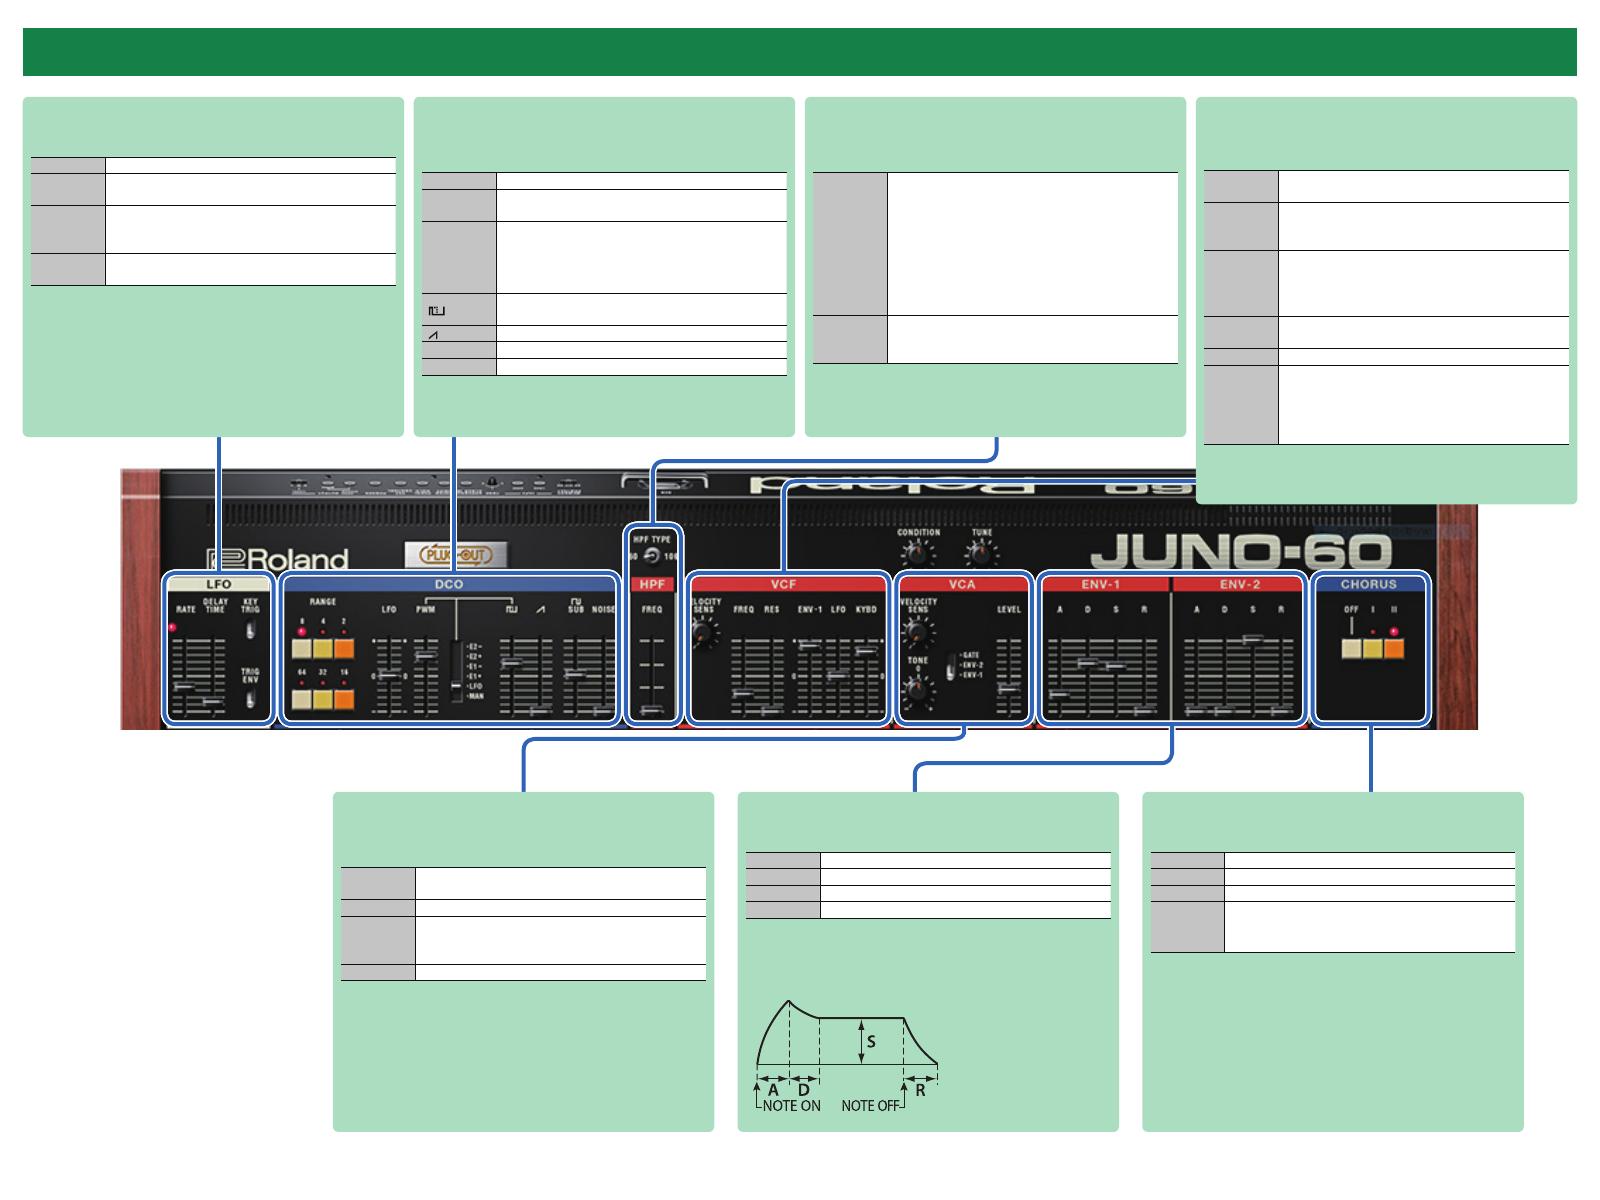
Roland JUNO-60 Owner's manual

Type
Owner's manual

Roland JUNO-60 is a software synthesizer that emulates the classic Roland JUNO-60 synthesizer, providing a wide range of sounds from vintage analog synths to modern digital soundscapes. With its intuitive interface and powerful sound engine, JUNO-60 lets you create and edit sounds with ease. You can use it as a standalone synthesizer or as a plug-in in your DAW.

Roland JUNO-60 is a software synthesizer that emulates the classic Roland JUNO-60 synthesizer, providing a wide range of sounds from vintage analog synths to modern digital soundscapes. With its intuitive interface and powerful sound engine, JUNO-60 lets you create and edit sounds with ease. You can use it as a standalone synthesizer or as a plug-in in your DAW.

© 2021 Roland Corporation
01
Owners Manual
PLUG-OUT Software Synthesizer
JUNO-60
2
Introduction
When using the JUNO-60 for the rst time, you must specify the MIDI Input/Output setting in
the Setting window (p. 10).
For details on the settings for the DAW software that you’re using, refer to the DAWs help or
manuals.
About Trademarks
• VST is a trademark and software of Steinberg Media Technologies GmbH.
• Roland, PLUG-OUT, AIRA are either registered trademarks or trademarks of Roland Corporation in the United States and/or
other countries.
• Company names and product names appearing in this document are registered trademarks or trademarks of their
respective owners.
3
Screen Structure
Main window
This area shows various knobs and sliders
that you can use to edit the sound.
p. 4
Keyboard area
Click here to produce sound.
When a MIDI message is received, the
corresponding key responds.
* Use the mouse wheel to change
the octave shift of the keyboard.
[HELP] button
Displays help.
[ABOUT] button
Here you can view information about
the JUNO-60.
[OPTION] button
Here you can choose skins and use
MIDI Control Mapping.
These settings can be made separately
for each instance of the JUNO-60.
[SETTING] button
Here you can edit the MIDI settings
and the direction of mouse wheel
scrolling (Only on Mac).
These settings are shared by all
instances of the JUNO-60 that you
are using.
[PATCH] button
Selects a patch memory.
The Patch Select window opens.
[SEND] button
Sends the memory to the SYSTEM-8.
[GET] button
Loads the memory currently being
edited in the SYSTEM-8’s PLUG-OUT
mode (temporary) into the JUNO-60.
* These operate only when the SYSTEM-8’s MODEL is JUNO-60.
Patch Memory name
This area shows the name of the
selected patch memory.
[PLUG-OUT] button
Installs the JUNO-60 into the
SYSTEM-8.
[TUNE] knob
Adjusts the overall pitch of the
JUNO-60.
[CONDITION] knob
Specifies the state (condition) of the
analog sound engine circuit that is being
modeled.
Level meter
Displays output levels of the JUNO-60.
p. 6
p. 8
p. 8 p. 8
p. 10
p. 10
4
Main Window
LFO
Here you can create cyclic change (modulation) in the sound.
RATE Determines the speed of the LFO.
DELAY TIME
Specifies the time from when the key is pressed until
the LFO's amplitude reaches the maximum.
KEY TRIG
switch
Specifies whether the LFO cycle starts at the
moment you press the key (ON) or is not
synchronized with the key-press (OFF).
TRIG ENV
switch
If this is ON, the envelope starts repeatedly at
intervals of the LFO cycle.
HPF
This is a high-pass filter that passes the high frequencies and cuts
the low frequencies.
TYPE
Switches between the different high-pass filter
types.
When the type is “60” :
JUNO-60’s high-pass filter
(Lowering the FREQ gives an unfiltered sound.)
When the type is “106” :
JUNO-106’s high-pass filter
(Lowering the FREQ boosts the low-end.)
FREQ
Specifies the cutoff frequency of the high-pass filter.
Frequency components below the cutoff frequency
are cut.
VCF
This is a low-pass filter that passes the low frequencies and cuts the
high frequencies.
VELOCITY
SENS
Adjusts the sensitivity with which the low pass filter
is affected by your keyboard dynamics.
FREQ
Specifies the cutoff frequency of the low-pass filter.
Frequency components above the cutoff frequency
are cut, making the sound mellower.
RES
Resonance boosts the sound in the region of the
filter’s cutoff frequency.
Higher settings produce stronger emphasis, creating
a distinctively “synthesizer-like sound.
ENV-1
Adjusts the depth by which the ENV-1 controls the
cutoff frequency.
LFO Uses the LFO to vary the cutoff frequency.
KYBD
Adjusts the way in which the pitch of the note
affects the cutoff frequency (key follow) when using
the keyboard to control cutoff frequency. Moving
the slider downward causes the cutoff frequency to
fall as you play higher on the keyboard.
DCO
Here you can select the waveform that determines the character of
the sound, and specify its pitch.
RANGE Specifies the octave of the oscillator.
LFO
Allows the LFO to modulate the pitch, producing a
vibrato effect.
PULSE
WIDTH
slider/
switch
When the switch is “MAN” (MANUAL):
Adjusts the value of the pulse width.
When the switch is “LFO”, “E1+”, “E1-”, “E2+”, “E2-”:
Adjusts the modulation depth.
[
]
Adjusts the volume of the Square wave/
Asymmetrical pulse wave.
[
] Adjusts the volume of the Sawtooth wave.
SUB Adjusts the volume of the sub oscillator.
NOISE Adjusts the volume of the noise.
VCA
Here you can adjust the amount of time-varying change (envelope)
for the volume.
VELOCITY
SENS
Adjusts the sensitivity with which the volume is
affected by your keyboard dynamics.
TONE Adjusts the tonal character.
GATE/ENV-
1/ENV-2
switch
Selects whether the volume is controlled by ENV
(envelope) or by the gate signal.
LEVEL Adjusts the volume.
CHORUS
This switches the type of chorus.
OFF Chorus is not applied.
I Chorus 1
II Chorus 2
I + II
Adds an effect similar to a rotary speaker (fast).
(Press and hold either I or II and then drag to the
other button to hold both buttons down.)
ENV-1/2
Here you can create time-varying change (envelope).
A Attack time
D Decay time
S Sustain level
R Release time
5
Screen Structure
TEMPO/KEY ASSIGN
TEMPO
Specifies the tempo of the step sequencer and
arpeggiator. The indicator blinks at the specified
tempo.
TEMPO SYNC
The modulation speed (RATE) of the LFO section
and the delay time (TIME) of the EFFECTS section
are synchronized to the tempo.
MONO Plays monophonically.
UNISON Plays all sounds in unison.
POLY-1
Plays polyphonically.
POLY-2
PORTAMENTO/PITCH BEND/MODULATION
PORTAMEN-
TO
Adjusts the time over which pitch change occurs
when portamento is applied.
LEGATO
Applies portamento only when you play legato
(i.e., when you press the next key before releasing
the previous key).
BEND RANGE Specifies the amount of pitch bend range.
BEND GAIN
Specifies a multiplier for the BEND RANGE,
extending the range of change.
BEND SENS
DCO
Specifies the amount of the pitch change
produced by pitch bend operations.
BEND SENS
VCF
Specifies the amount of the filter change
produced by pitch bend operations.
MOD SENS
DCO
Specifies the amount of the pitch change
produced by modulation operations.
MOD SENS
VCF
Specifies the amount of the filter change
produced by modulation operations.
ARPEGGIO
ARPEGGIO Turns the arpeggio function on/off.
ARP MODE Selects how the arpeggio works.
ARP RANGE
Selects the pitch range of the arpeggio in one-
octave steps.
OTHER
KEY HOLD Turns the key hold function on/off.
OCTAVE
Let you shift the pitch range of the keyboard in
one-octave units.
NAME Specifies the name of the patch.
DISPLAY Displays the patch name.
DEC/INC Selects the previous (next) patch.
EFFECT/DELAY/REVERB
EFFECT TYPE Selects the effect type.
TONE Specifies the tone character of the effect.
DEPTH Specifies the depth of the effect.
DELAY TYPE Switches the delay type.
TIME Adjusts the delay time.
LEVEL Adjusts the volume of delay.
REVERB TYPE Switches the reverb type.
TIME Specifies the reverb time.
LEVEL Specifies the reverb volume.
6
Memory and Bank
1. Click the [PATCH] button.
The Patch Select window opens.
The selected memory is
shown in orange.
[NEW] button
Creates a new empty bank.
[DELETE] button
Deletes the selected bank.
[LOAD] button
Imports a bank.
[SAVE] button
Exports a bank as a file.
[WRITE] button
Saves an edited sound as a memory
in the bank.
[READ] button
Loads a memory from a bank.
[RENAME] button
Renames the selected memory.
[SEND ALL] button
Sends all (64) memories in the bank
to the SYSTEM-8.
[GET ALL] button
Receives all (64) memories stored on
the SYSTEM-8.
NOTE
All 64 memories are received into the currently selected
bank, overwriting the previous contents of that bank. If you
want to keep the state of the bank, create a new bank and
receive the memories into the newly created bank (p. 7).
“ i ” symbol
When you place the mouse cursor
(mouse pointer) over this, a list of
shortcuts appears.
Bank
A set of 64 memories is called a “bank. By switching banks you can
access a large number of memories.
A bank of memories can be saved as a le.
Changing to Other Bank
1. Click the Bank eld.
The bank list window opens.
2. Click the bank that you want to recall.
By pressing the [
H
] [
I
] buttons located at the right of the bank eld, you can switch to the next
or previous bank.
Exporting the Bank
Heres how to export a bank as a le.
1. Click the [SAVE] button.
The le name input window opens.
2. Enter a le name and save.
The le is exported.
Importing a Bank
1. Click the [LOAD] button.
The le selection window opens.
2. Select a le and load it.
The bank is loaded.
Bank
Memory 01
Memory 02
Memory 03
Memory 64
7
Memory and Bank
Creating/Deleting a Bank
Creating a bank
Click the [NEW] button to create a new empty bank.
Deleting a bank
Heres how to delete the selected bank.
1. Select a bank as described in “Changing to Other Bank (p. 6).
2. Click the [DELETE] button.
A conrmation screen appears.
3. Click [OK] to delete the bank.
Renaming a Bank
1. Select a bank as described in “Changing to Other Bank (p. 6).
2. Click
J
located at the left of the bank eld.
3. Edit the name and press the [Return (Enter)] key.
Memory
The JUNO-60 manages 64 memories as one bank.
Loading a Memory
Heres how to load a memory from a bank. When you load a memory, its settings appear in the
edit area and can be edited.
1. Click the number of the memory that you want to load.
2. Click the [READ] button. Or press the [Return (Enter)] key.
The memory is loaded.
* You can also load a memory by double-clicking a memory number.
Saving the Memory
Heres how to save an edited sound as a memory in the bank.
1. Click the number of the memory in which you want to save the sound.
2. Click the [WRITE] button.
The memory is saved in the bank.
Renaming the Memory
1. Click the number of the memory that you want to rename.
2. Click the [RENAME] button.
3. Change the memory name. (Up to 16 letters)
Changing the Order of the Memories
Drag the memory number to change the order of memories.
8
By connecting the SYSTEM-8 to your computer (Mac/Windows), you can use the JUNO-60 in
conjunction with the SYSTEM-8.
The “SYSTEM-8 CTRL shown as a MIDI port is the port used by the JUNO-60.
Do not use this port from your DAW.
Plug-Out
What is a “Plug-out”?
“Plug-out is technology that allows a software synthesizer such
as JUNO-60 to be installed and used in the SYSTEM-8.
5 You can play the JUNO-60 on the SYSTEM-8 by itself, without
using a computer.
5 You can send the settings of the selected bank to the
SYSTEM-8.
5 You can use the knobs and sliders of the SYSTEM-8 to edit the
sound.
Plug-Out Procedure
1. Click the [PLUG-OUT] button.
2. Select a plug-out destination (PLUG-OUT1–PLUG-OUT3) that corresponds to the
desired MODEL button of the SYSTEM-8.
A conrmation message appears.
3. Click the [OK] button.
A progress bar appears, and plug-out processing begins. This takes approximately one minute.
* If the JUNO-60 is already plugged-out to one of the plug-out destinations (PLUG-OUT1–
PLUG-OUT3), you can't plug-out a new instance.
* If another software synthesizer is already plugged-out on the SYSTEM-8, a conrmation
message appears. Click the [OK] button to continue.
Send/Get Memories
1. Connect the SYSTEM-8 to your computer.
2. Turn on the SYSTEM-8’s MODEL [PLUGOUT 1–3] button to which you plugged-out
the JUNO-60.
* In order to send or get a memory, you must rst plug-out (p. 8).
Sending the Memory
You can send the current JUNO-60 memory to the SYSTEM-8 and play it on the SYSTEM-8.
The sound is output from the SYSTEM-8’s OUTPUT jacks.
3. Click the [SEND] button of the JUNO-60.
The memory is transmitted.
Getting the Memory
If you’ve used the SYSTEM-8 to edit a memory of the plugged-out JUNO-60, heres how to load
that memory into the JUNO-60.
4. Click the [GET] button of the JUNO-60.
The memory is loaded.
Playing with the SYSTEM-8
If an error message appears, check the following items.
5 Is the MIDI port specied correctly? (p. 10)
5 Is the SYSTEM-8 connected to your computer?
5 Is the SYSTEM-8’s MODEL [PLUG-OUT 1–3] button turned on?
5 Is the JUNO-60 plugged-out on the SYSTEM-8? (p. 8)
If an error message appears, check the following items.
5 Is the MIDI port specied correctly? (p. 10)
5 Is the SYSTEM-8 connected to your computer?
9
Playing with the SYSTEM-8
MIDI Learn Function
Heres how to associate a MIDI control change with a sound parameter, so that the parameter
can be controlled by that MIDI message.
Procedure
1. Right-click the sound parameter controller (knob or slider).
2. Choose “Learn MIDI CC.
3. Operate your external MIDI device to transmit a control change message.
NOTE
You can’t associate more than one MIDI control change with a single controller. Only the
most recent setting is used.
Cancelling
1. Right-click the sound parameter controller (knob or slider).
2. Choose “Forget MIDI CC.
10
Settings
Option
1. Click the [OPTION] button.
2. Select items.
A
(
is shown for the selected item.
Item Explanation
JUNO-60 Layout
SYSTEM-8 Layout
Changes the layout of the controllers in the main window.
JUNO-60 Layout: The controllers are laid out as they are on the JUNO-60 (original).
SYSTEM-8 Layout: The controllers are laid out as they are on the SYSTEM-8.
Zoom You can change the size (zoom factor) of the main window with the mouse.
Set MIDI Control Mapping for SYSTEM-8
Check this item if you want to use the SYSTEM-8 as a control surface for the JUNO-60.
Here you can make MIDI mapping settings for the buttons and sliders.
Clear MIDI Control Mapping Clears all MIDI control change mapping.
2–8 Voices
Specifies the maximum simultaneous polyphony.
You can reduce the load on the CPU by lowering the polyphony.
Optimize for Lower CPU Usage Turn this ON if CPU usage is high, and clicks or pops occur.
Roland Cloud... Displays the Roland Cloud site.
Authentication... Performs user authentication for the JUNO-60.
Setting
1. Click the [SETTING] button.
The Setting window opens.
* Flip Scroll Direction is only on Mac.
2. Edit the parameters.
Parameter Explanation
MIDI CTRL Input
Choose “SYSTEM-8 CTRL.
MIDI CTRL Output
Flip Scroll Direction
(Only on Mac)
Inverts the direction of rotation when using the mouse wheel to edit a value.
* If multiple instances of the JUNO-60 are running, these settings apply to all instances.
11
Settings
Others
If you want to use the SYSTEM-8 to play the JUNO-60 (plug-in) in your DAW, set the SYSTEM-8’s
menu item “SYSTEM”
0
“SOUND”
0
“Local Sw to “SURFACE.
The internal sound engine of the SYSTEM-8 no longer produces sound; only the JUNO-60 can
produce sound.
For detailes, refer to SYSTEM-8 Reference Manual.
  • Page 1 1
  • Page 2 2
  • Page 3 3
  • Page 4 4
  • Page 5 5
  • Page 6 6
  • Page 7 7
  • Page 8 8
  • Page 9 9
  • Page 10 10
  • Page 11 11

Roland JUNO-60 Owner's manual

Type
Owner's manual

Roland JUNO-60 is a software synthesizer that emulates the classic Roland JUNO-60 synthesizer, providing a wide range of sounds from vintage analog synths to modern digital soundscapes. With its intuitive interface and powerful sound engine, JUNO-60 lets you create and edit sounds with ease. You can use it as a standalone synthesizer or as a plug-in in your DAW.

Ask a question and I''ll find the answer in the document

Finding information in a document is now easier with AI