Page is loading ...

HERB MILL
INSTRUCTION MANUAL
www.epareusa.com
CLEANING AND CARE
CAUTION
This mill fully comes apart for easy cleaning, all components are dish washer safe. Take Full Assembly (1) and unscrew
the Bottom Cap (5) by turning counter-clockwise. Remove Mill Plunger (2) from the top. Remove Inner Casing (4) from the
bottom. The mill slicers on the Inner Casing (4) are not detachable. Wash all components with warm soapy water or place in
the dish washer. To reassemble mill insert Inner Casing (4) into Mill Body (3) and line up the slicer edges into the indents in
the Mill Body (3). Screw on the Bottom Cap (5) clockwise. Re-insert the Mill Plunger (2).
Keep ngers clear when removing and replacing covers. Blades are sharp, keep ngers clear during operation. Do not leave
herbs in mill for extended periods of time as cleaning will become more dicult.
FOR WARRANTY INFORMATION PLEASE VISIT WWW.EPAREUSA.COM/SUPPORT/WARRANTY
ALL RIGHTS RESERVED. COPYRIGHT 2015. EMG GLOBAL LLC
OPERATION
Clean your desired fresh herb and remove leaves from stem. It is recommended to thoroughly dry your herbs before inserting into the
mill. Remove the Mill Plunger (2) from the Full Assembly (1) and ll with your prepared fresh herbs, do not pack the herbs too tightly. Once
lled replace the Mill Plunger (2) and spin alternating from left to right. Fresh milled herbs will dispense from the bottom. For most ideal
operation you may ll multiple mills with various herbs that you will be using during your meal prep and then mill the appropriate herb as
you prepare your meal.
1
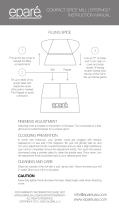
Full Assembly
2 4 53
Mill Plunger Mill Body Inner Casing Bottom Cap
/


