Page is loading ...

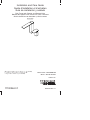
Tools/Outils/Herramientas
Before You Begin
WARNING: Risk of personal injury. Do not install the bath faucet in an area
where it may inadvertently be used for support by the bather.
CAUTION: Risk of property damage. Select a cutting tool appropriate for the
deck/rim surface type. Refer to the surface manufacturer’s instructions for the
proper cutting procedures.
Observe all local plumbing and building codes.
Shut off the main water supply.
Protect the surface of the bath deck/rim during the installation.
Products purchased separately may change the bath faucet placement and
alignment.
The handshower holder with hoses and the handshower are sold separately.
Kohler recommends installing a Sioux Chief 652-A water hammer arrester (or
equivalent) close to the inlet of the diverter valve. This will reduce cavitation and
water hammer when the valve or diverter is activated. Visit Sioux Chief’s website
at www.siouxchief.com for technical and installation information.
Kohler Co. reserves the right to make revisions in the design of faucets without
notice, as specified in the Price Book.
Avant de commencer
AVERTISSEMENT: Risque de blessures corporelles. Ne pas installer le robinet
de la baignoire dans un endroit où il pourrait être utilisé par mégarde en tant que
support par la personne qui prend un bain.
ATTENTION: Risque d’endommagement du matériel. Choisir un outil de coupe
approprié pour le type de surface de comptoir/rebord. Consulter les instructions
du fabricant de la surface pour les procédures de découpe appropriées.
Respecter tous les codes de plomberie et de bâtiment locaux.
Couper l’alimentation d’eau principale.
Protéger la surface du comptoir/de la garniture de la baignoire pendant
l’installation.
Des produits achetés séparément peuvent influencer l’emplacement et l’alignement
du robinet de la baignoire.
Solder
Soudure
Suelda
Plus/Plus/Más:
• Cutting Tool
Outil de découpe
Herramienta de corte
• Reinforcing Material
[3" (7.6 cm) max]
Matériau de renfort
[3" (7,6 cm) max]
Material de refuerzo
[3" (7,6 cm) máx]
Water Hammer
Arrester
Anti coup de bélier
Amortiguador de
golpes de ariete
5/8" OD Copper Tubing
(1/2" Nominal)
Tuyauterie en cuivre
Ø 5/8" Ext (1/2" nominal)
Tubo de cobre de 5/8"
D.E. (1/2" nominal)
1110056-2-C 2 Kohler Co.
Page is loading ...

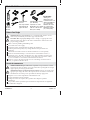
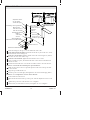
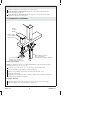
1. Prepare the Site
NOTE: To simplify future servicing, install an access panel to reach the plumbing.
NOTICE: The remote valve may be installed anywhere on the deck. In order to allow
clearance for handle rotation, a minimum distance of 5-3/4″ (14.6 cm) is required
from the center of spout to center of valve.
Determine the mounting hole locations for the handshower holder (not supplied),
spout, and remote valve. Refer to the roughing-in dimensions above and the
roughing-in dimensions packed with the handshower holder for proper placement
and mounting hole diameters.
For a finished bath deck/rim less than 5/8″ (1.6 cm) thick: Install reinforcing
material to the underside of the deck/rim. The combined thickness of the
reinforcing material and the deck/rim must not exceed 3″ (7.6 cm).
CAUTION: Risk of property damage. Select a cutting tool appropriate for the
deck/rim surface type. Refer to the surface manufacturer’s instructions for the
proper cutting procedures.
NOTICE: Do not exceed a 1-1/2″ (3.8 cm) diameter for the spout and remote valve
mounting holes. Maximum contact area is necessary for a successful installation.
Carefully cut mounting holes for the spout, remote valve, and handshower holder.
Install or relocate the water supplies as needed.
Préparer le site
REMARQUE: Pour simplifier l’entretien futur, installer un panneau d’accès pour
atteindre la plomberie.
5-3/4" (14.6 cm)
Min/Min/Mín
7-15/16"
(20.2 cm)
11-1/8" (28.3 cm)
8-1/4" (21 cm)
5-5/16"
(13.5 cm)
4-1/4"
(10.8 cm)
4-9/16"
(11.6 cm)
8-15/16"
(22.7 cm)
2-1/8"
(5.4 cm)
2-3/16"
(5.6 cm)
8"
(20.3 cm)
1-1/2" D.
Ø 1-1/2"
1-1/2" D.
3" (7.6 cm)
Max/Max/Máx
5/8"
(1.6 cm)
Min
Min
Mín
1-1/2" D.
Ø 1-1/2"
1-1/2" D.
3/8" Nominal
1110056-2-C 4 Kohler Co.
Page is loading ...

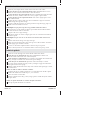
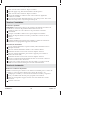
2. Install the Faucet
Insert the O-ring into the groove on the underside of the collar.
From underneath the deck/rim: Thread the nut all the way down the valve. Insert
the diverter into the mounting hole.
From above the deck/rim: With the smaller end of the collar facing down, thread
the collar onto the valve until it stops.
From below the deck/rim: Tighten the nut until the valve is secure.
Using a needle-nose pliers, lift and hold the stem on the diverter. Thread the lift
rod into the stem.
Push the diverter tube down over the lift rod until it bottoms out in the diverter.
NOTE: Do not bend the lift rod during the spout installation.
Make sure the setscrew does not protrude past the inside wall of the spout. Back
it out if needed.
Align the spout with the lift rod.
Slide the spout down and align, then tighten the setscrew. Install the plug button.
NOTE: Do not overtighten the setscrews in the lift knob.
Set the lift knob on the lift rod.
Adjust the lift knob level with top of the spout. Turn the adjustment screw to level
it.
Tighten the top setscrew in the knob. Do not overtighten.
Lift the knob, insert the bottom setscrew, and tighten. Do not overtighten.
Plug Button
Bouchon
Tapón botón
Setscrew
Vis de retenue
Tornillo de fijación
Collar/Collier/Collarín
Washer/Rondelle/Arandela
Nut/Écrou/Tuerca
Diverter/Inverseur/Desviador
Lift Rod/Tige de levage/Tirador
Lift Knob
Bouton de levage
Perilla del tirador
Stem/Tige/Espiga
Setscrews
Vis de retenue
Tornillos de fijación
Diverter Tube
Tube du inverseur
Tubo de desviador
O-Ring
Joint torique
Arosello
Adjustment Screw
Vis de réglage
Tornillo de ajuste
1110056-2-C 6 Kohler Co.
Page is loading ...

Instale la grifería (cont.)
Ajuste el nivel de la perilla del tirador con la parte superior del surtidor. Gire el
tornillos de ajuste para nivelarlo.
Apriete el tornillo de fijación superior en la perilla. No apriete demasiado.
Levante la perilla, inserte el tornillo de fijación inferior y apriete. No apriete
demasiado.
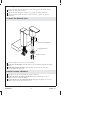
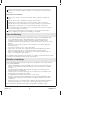
3. Install The Remote Valve
Slide the gasket onto the remote valve assembly.
From above the deck/rim: Insert the remote valve assembly through the mounting
hole.
From underneath the deck/rim: Slide the plate onto the remote valve, then
wrench tighten the three nuts.
Installer la valve à distance
Faire glisser le joint sur l’ensemble de la valve à distance.
À partir du dessus du comptoir/du rebord: Insérer l’ensemble de la valve à
distance à travers l’orifice de fixation.
À partir du dessous du comptoir/du rebord: Faire glisser la plaque sur la valve à
distance, puis serrer les trois écrous à la clé.
Plate/Plaque/Placa
Nut/Écrou/Tuerca
Gasket/Joint/Empaque
1110056-2-C 8 Kohler Co.

Instale la válvula remota
Deslice el empaque en el montaje de la válvula remota.
Desde arriba de la cubierta/borde: Inserte el montaje de la válvula remota a
través del orificio de fijación.
Desde abajo de la cubierta/borde: Deslice la placa en la válvula remota, luego
apriete con una llave las tres tuercas.
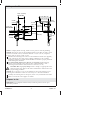
4. Complete the Installation
Connect the Plumbing
NOTE: The illustration shown is a suggested plumbing connection method. Actual
plumbing connections will vary by site.
Verify the spout and remote valve are properly positioned and secure.
Cut and assemble copper tubing to fit the installation.
Install a water hammer arrester near the inlet of the diverter valve.
Solder the connections.
Complete the handshower holder installation. Refer to the installation instructions
packed with the handshower holder.
Installation Checkout
With the supply stops in the closed position, turn on the main water supply.
Open the supply stops. Keep the remote valve closed.
Water Hammer Arrester
Anti coup de bélier
Amortiguador de golpes de ariete
Handle
Poignée
Manija
Remote Valve
Valve à distance
Válvula remota
Check for leaks.
Vérifier s'il y a des fuites.
Verifique que no haya fugas.
Kohler Co. 9 1110056-2-C

Complete the Installation (cont.)
Check for leaks at the connections. Repair as needed.
Open the supply stops, then turn the handle to the ON position.
Check for leaks at the connections. Repair as needed.
Activate the handshower. Check for leaks at the connections. Tighten the
connections as needed.
Turn off water and check that lift knob drops to its normal position. Turn on the
water and verify water is only flowing from the spout.
Terminer l’installation
Connecter la plomberie
REMARQUE: L’illustration fournie est une suggestion de méthode de connexion de
plomberie. Les connexions de plomberie réelles varient selon le site.
Vérifier que le bec et la valve à distance sont positionnées et sécurisées
correctement.
Découper et assembler le tube en cuivre pour l’adapter à l’installation.
Installer un dispositif d’arrêt casse-vide à proximité de la sortie de la valve à
distance.
Souder les connexions.
Terminer l’installation du support de la douchette. Se référer aux instructions
d’installation accompagnant le support de la douchette.
Vérification de l’installation
Avec les arrêts d’alimentation en position fermée, mettre l’alimentation d’eau
principale en marche.
Ouvrir les arrêts d’alimentation. Garder la valve à distance fermée.
Rechercher des fuites au niveau des connexions. Réparer au besoin.
Ouvrir les arrêts d’alimentation, puis tourner la poignée pour la mettre en
position de marche (ON).
Rechercher des fuites au niveau des connexions. Réparer au besoin.
Activer la pomme de douche. Rechercher des fuites au niveau des connexions.
Serrer les connexions selon les besoins.
Couper l’eau et vérifier que le bouton de levage tombe à sa position normale.
Mettre l’eau en marche et vérifier que l’eau coule seulement du bec.
Termine la instalación
Realice las conexiones de plomería
NOTA: La ilustración que se muestra es un método recomendado para la conexión de
plomería. Las conexiones de las tubería reales variarán de un lugar a otro.
Verifique que el surtidor y la válvula remota estén bien colocados y asegurados.
Corte y ensamble el tubo de cobre para que quede en la instalación.
Instale un amortiguador de golpe de ariete cerca de la entrada de la válvula
desviadora.
Suelde las conexiones.
1110056-2-C 10 Kohler Co.

Termine la instalación (cont.)
Termine la instalación del soporte portador de la ducha de mano. Consulte las
instrucciones de instalación que se incluyen con el soporte portador de la ducha
de mano.
Verificación de la instalación
Con las llaves de paso en la posición cerrada, abra el suministro principal de
agua.
Abra las llaves de paso. Mantenga cerrada la válvula remota.
Verifique que no haya fugas en las conexiones. Repare según sea necesario.
Abra las llaves de paso de suministro, luego gire la manija a la posición abierta.
Verifique que no haya fugas en las conexiones. Repare según sea necesario.
Active la ducha de mano. Verifique que no haya fugas en las conexiones. Apriete
las conexiones según sea necesario.
Cierre el agua y verifique que el tirador regrese a su posición normal. Abra el
agua y verifique que el agua fluya solamente por el surtidor.
Care and Cleaning
For best results, keep the following in mind when caring for your KOHLER product:
•
Use a mild detergent such as liquid dishwashing soap and warm water for
cleaning. Do not use abrasive cleaners that may scratch or dull the surface.
•
Carefully read the cleaner product label to ensure the cleaner is safe for use on the
material.
•
Always test your cleaning solution on an inconspicuous area before applying to
the entire surface.
•
Do not allow cleaners to sit or soak on the surface.
•
Wipe surfaces clean and rinse completely with water immediately after cleaner
application. Rinse and dry any overspray that lands on nearby surfaces.
•
Use a soft, dampened sponge or cloth. Never use an abrasive material such as a
brush or scouring pad to clean surfaces.
For detailed cleaning information and products to consider, visit www.kohler.com/clean.
To order Care & Cleaning information, call 1-800-456-4537.
Entretien et nettoyage
Pour de meilleurs résultats, prendre ce qui suit en considération lors de l’entretien de
votre produit KOHLER:
•
Utiliser un détergent doux tel que liquide pour vaisselle et de l’eau chaude pour
nettoyer. Ne pas utiliser de nettoyants abrasifs car ils pourraient rayer ou abîmer
la surface.
•
Lire attentivement l’étiquette du produit de nettoyage pour vérifier qu’il soit
adéquat à utiliser sur le matériau.
•
Toujours tester la solution de nettoyage sur une surface la moins évidente avant
de l’appliquer sur la totalité de la surface.
•
Ne pas permettre aux nettoyants de reposer sur la surface.
•
Essuyer les surfaces et rincer complètement avec de l’eau immédiatement après
l’application du nettoyant. Rincer et sécher tout éclaboussement sur les surfaces
avoisinantes.
•
Utiliser une éponge ou un chiffon doux et humide. Ne jamais utiliser de matériau
abrasif tel qu’une brosse ou une éponge à récurer pour nettoyer les surfaces.
Pour l’information détaillée de nettoyage et des produits à considérer, visiter
Kohler Co. 11 1110056-2-C

Entretien et nettoyage (cont.)
www.kohler.com/clean. Pour commander des informations d’entretien et de nettoyage,
composer le 1-800-456-4537.
Cuidado y limpieza
Para obtener los mejores resultados, tenga presente lo siguiente al limpiar su producto
KOHLER:
•
Para la limpieza, utilice solamente un detergente suave como el jabón líquido para
lavar platos y agua tibia. No utilice limpiadores abrasivos que puedan rayar u
opacar la superficie.
•
Lea atentamente la etiqueta del producto de limpieza para asegurar que no
presente riesgos al usarse en el material.
•
Siempre pruebe la solución de limpieza en un área oculta antes de aplicarla a toda
la superficie.
•
No deje por tiempo prolongado los limpiadores en la superficie.
•
Limpie con un trapo y enjuague completa e inmediatamente con agua después de
aplicar limpiadores. Enjuague y seque las superficies cercanas que se hayan
rociado.
•
Utilice una esponja o trapo suave y húmedo. Para limpiar las superficies nunca
utilice materiales abrasivos como cepillos o estropajos de tallar.
Para obtener información detallada de limpieza y los limpiadores a considerar, visite
www.kohler.com/clean. Para solicitar información sobre el cuidado y la limpieza, llame
al 1-800-456-4537.
Warranty
KOHLER
®
Faucet Lifetime Limited Warranty
Kohler Co. warrants its Faucets* manufactured after January 1, 1997, to be leak and drip
free during normal residential use for as long as the original consumer purchaser owns
his or her home. If the Faucet should leak or drip during normal use, Kohler Co. will,
free of charge, mail to the purchaser the cartridge necessary to put the Faucet in good
working condition. This warranty applies only to Kohler Faucets installed in the United
States of America, Canada or Mexico (″North America″).
Kohler Co. also warrants all other aspects of the faucet or accessories (″Faucet″)*, (except
gold, non-Vibrant
®
, non-chrome finishes) to be free of defects in material and
workmanship during normal residential use for as long as the original consumer
purchaser owns his or her home. This warranty applies only to Kohler Faucets installed
in North America. If a defect is found in normal residential use, Kohler Co. will, at its
election, repair, provide a replacement part or product, or make appropriate adjustment.
Damage to a product caused by accident, misuse, or abuse is not covered by this
warranty. Improper care and cleaning will void the warranty**. Proof of purchase
(original sales receipt) must be provided to Kohler Co. with all warranty claims. Kohler
Co. is not responsible for labor charges, installation, or other incidental or consequential
costs. In no event shall the liability of Kohler Co. exceed the purchase price of the
Faucet.
If the Faucet is used commercially or is installed outside of North America, or if the
finish is gold, non-Vibrant or a painted or powder coated color finish, Kohler Co.
warrants the Faucet to be free from defects in material and workmanship for one (1) year
from the date the product is installed, under Kohler Co.’s standard one-year limited
warranty.
If you believe that you have a warranty claim, contact Kohler Co., either through your
Dealer, Plumbing Contractor, Home Center or E-tailer, or by writing Kohler Co., Attn.:
Customer Care Center, 444 Highland Drive, Kohler, WI 53044, USA. Please be sure to
1110056-2-C 12 Kohler Co.

Warranty (cont.)
provide all pertinent information regarding your claim, including a complete description
of the problem, the product, model number, color, finish, the date the product was
purchased and from whom the product was purchased. Also include your original
invoice. For other information, or to obtain the name and address of the service and
repair facility nearest you, call 1-800-4-KOHLER (1-800-456-4537) from within the USA
and Canada, and 001-800-456-4537 from within Mexico, or visit www.kohler.com within
the USA, www.ca.kohler.com from within Canada, or www.mx.kohler.com in Mexico.
KOHLER CO. AND/OR SELLER ARE PROVIDING THESE WARRANTIES IN LIEU
OF ALL OTHER WARRANTIES, EXPRESSED OR IMPLIED, INCLUDING BUT NOT
LIMITED TO THE IMPLIED WARRANTIES OF MERCHANTABILITY AND
FITNESS FOR A PARTICULAR PURPOSE. KOHLER CO. AND/OR SELLER
DISCLAIM ALL LIABILITY FOR SPECIAL, INCIDENTAL OR CONSEQUENTIAL
DAMAGES. Some states/provinces do not allow limitations of how long an implied
warranty lasts or the exclusion or limitation of such damages, so these limitations and
exclusions may not apply to you. This warranty gives the consumer specific legal
rights. You may also have other rights that vary from state/province to state/province.
This is Kohler Co.’s exclusive written warranty.
*Trend
®
faucets, MasterShowerTM tower, BodySpaTM systems and components;
WaterHaven
TM tower, systems and components; TripointTM faucets, Polished Gold,
non-Vibrant and painted or powder coated finishes, fittings; all items within the ″Fixture
Related″ section of the Kohler Faucets Price Book, drains, Duostrainer
®
sink strainers,
soap/lotion dispensers; and faucets used in commercial settings, and outside North
America, are covered by Kohler Co.’s one-year limited warranty.
**Never use cleaners containing abrasive cleansers, ammonia, bleach, acids, waxes,
alcohol, solvents or other products not recommended for chrome. This will void the
warranty.
Garantie
Garantie limitée à vie du robinet KOHLER®
Kohler Co. garantit que ses Robinets* fabriqués après le 1 Janvier 1997 ne fuient pas et
ne gouttent pas pendant une utilisation normale à domicile, aussi longtemps que
l’acquéreur initial est le propriétaire de la maison. Si le Robinet goutte ou présente des
fuites en cours d’utilisation normale, Kohler Co. vous enverra par courrier, sans frais, la
cartouche nécessaire pour réparer le Robinet. Cette garantie s’applique uniquement aux
robinets Kohler installés aux É.-U., au Canada ou au Mexique (″Amérique du Nord″).
Kohler garantit aussi que toutes les autres caractéristiques du robinet ou accessoires
(″Robinet″)*, (à l’exception des finitions dorées, Vibrants
®
, non-chrome) sont exemptes de
défauts de matériau et de fabrication durant l’utilisation résidentielle normale, tant que
l’acquéreur initial est propriétaire de son domicile. Cette garantie s’applique uniquement
aux Robinets Kohler installés aux Amérique du Nord. Si un défaut est décelé en cours
d’usage normal domestique, Kohler Co. décidera à sa discrétion, de réparer, de
remplacer ou d’effectuer les réglages appropriés. Cette garantie n’offre pas de protection
contre les dommages causés par accident, mauvais usage ou mauvais traitement. Un
entretien et un nettoyage non-appropriés annuleront la garantie**. Une preuve d’achat
(ticket de caisse original) doit être présentée à Kohler Co. avec tous les recours en
garantie. Kohler Co. n’est pas responsable des coûts de main-d’œuvre, d’installation ou
d’autres frais particuliers, accessoires ou indirects. La responsabilité de Kohler Co.
n’excédera en aucun cas le prix d’achat du robinet.
Si le robinet est utilisé commercialement ou s’il est installé hors d’Amérique du Nord, ou
si la finition est dorée, non-Vibrant, peinte ou revêtue d’une poudre, Kohler Co. garantit
le robinet contre toute défectuosité de matériel et de fabrication pour un (1) an à partir
de la date d’installation du produit, sous les termes de la garantie limitée standard d’un
an de Kohler Co.
Kohler Co. 13 1110056-2-C
Page is loading ...
Page is loading ...
Page is loading ...
Page is loading ...
Page is loading ...
Page is loading ...
Page is loading ...
-
 1
1
-
 2
2
-
 3
3
-
 4
4
-
 5
5
-
 6
6
-
 7
7
-
 8
8
-
 9
9
-
 10
10
-
 11
11
-
 12
12
-
 13
13
-
 14
14
-
 15
15
-
 16
16
-
 17
17
-
 18
18
-
 19
19
-
 20
20


Kohler K-14774-4-CP Installation guide
- Type
- Installation guide
- This manual is also suitable for
Ask a question and I''ll find the answer in the document
Finding information in a document is now easier with AI
in other languages
- français: Kohler K-14774-4-CP Guide d'installation
- español: Kohler K-14774-4-CP Guía de instalación
Related papers
-
Kohler 6227-C13-BGD Installation guide
-
-
-
-
-
-
-
-
-
Kohler T13135-3A-CP Installation guide
Other documents
-
Keeney KITNEX76CPDS Installation guide
-
-
H2flo KAR99VTMB Installation guide
-
Rubi RAF21XDK Installation guide
-
-
GROHE 29903000 Installation guide
-
-
Toto Soiree TB960S Installation and Owner's Manual
-
-