Garmin 296 User manual

Category
Navigators
Type
User manual
GPSMAP
®
296 Quick Reference Guide
GPSMAP 296 Keys
IN/OUT—press to zoom in or zoom out on the Map Page.
PAGE—press to cycle through the main pages in sequence and
return the display from a submenu page. Press and hold to switch
between Aviation Mode, Marine Mode, and Automotive Mode.
QUIT—press to cycle through the main pages in reverse
sequence, revert to the previous value in a data entry field, or
cancel a function.
ENTER/MARK—press to select a highlighted option, initiate
entry, and then confirm. Press and hold to mark a waypoint.
MENU—press to view the Options Menu for the current page.
Press twice to open the Main Menu.
DIRECT TO—press to start a Go To using airports, navaids,
recently used waypoints, or user-created waypoints. Press and
hold to display additional information for the current destination
(such as communication frequencies and runway data). While in
Automotive Mode, press and hold for more than one second to
display the Next Turn Page and announce the next turn.
NRST/FIND—press to show the nearest airports, navaids, points
of communication, and airspace boundaries in Aviation Mode.
When pressed multiple times in Aviation Mode, the Find Menu
appears.
POWER—press and hold to turn the unit on or off. Press and
release to adjust the backlighting and external speaker volume.
ROCKER—press up, down, left, or right to select menu options,
enter data, or move the pointer on the Map Page.
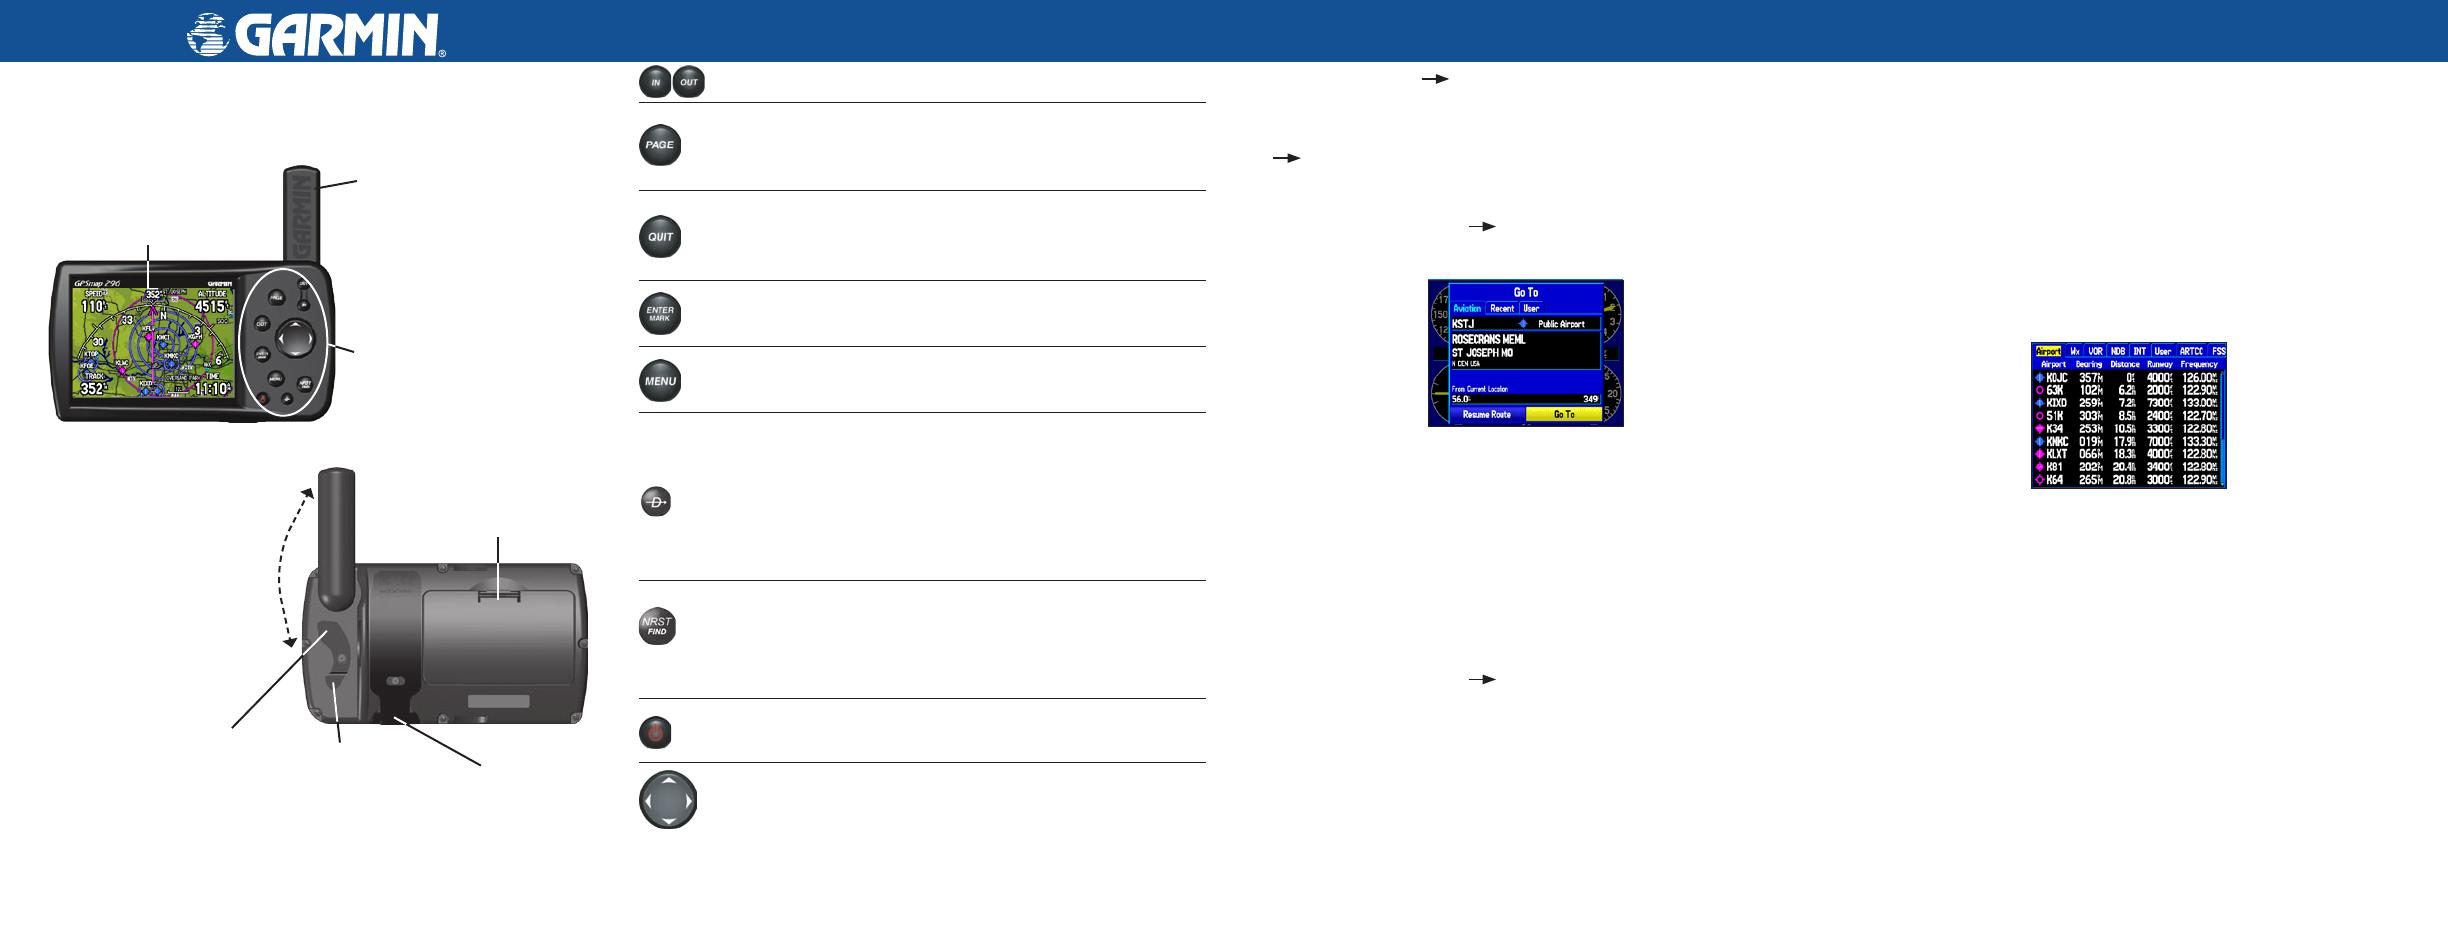
Using the Direct To Key
Press the DIRECT TO
D
key in Aviation Mode to show the Go To
Page. Then select an airport, navaid, recent point, or user-defined point to
navigate to (Go To). In Automotive or Marine Mode, press the DIRECT
TO
D
key to open the Navigation window.
To Go To an airport or navaid:
1. Press the DIRECT TO
D
key to open the Go To Page. Use the
ROCKER to select the Aviation tab.
Go To Page—Aviation tab
2. Select the identifier, facility name, or city field, and press ENTER.
3. Enter the identifier, facility name, or city.
4. Press ENTER when the waypoint is shown and highlighted.
5. With the on-screen Go To button highlighted, press ENTER.
A course is plotted from your present location to the selected
destination.
To Go To recently used waypoint or user-created waypoint:
1. Press the DIRECT TO
D
key to open the Go To Page.
2. Select the Recent or User tab.
3. Highlight a waypoint from the list, and press
ENTER.
4. With the on-screen Go To button highlighted, press ENTER.
A course is plotted from your present location to the selected
destination.
Using the NRST/FIND Key
Press the NRST/FIND key in Aviation Mode to show the Nearest Pages.
Then select an airport, navaid, recent point, or user-defined point
to navigate to (Go To). In Automotive or Marine Mode, press the
NRST/FIND key to open the Find Menu.
To select an item as your destination from the Nearest
Pages:
1. Press the NRST/FIND key.
2. To select a different category, use the ROCKER to select the tab
along the top of the page.
Nearest Page: Airport tab
3. Use the ROCKER to highlight a waypoint on the list, and press
ENTER. The corresponding waypoint information page appears.
For airports, use the ROCKER to select the tabs across the top of
the information pages and show the airport data.
4. Highlight Go To, and press ENTER to navigate to the point. Press
QUIT to return to the Nearest Pages. You can also highlight any
of the on-screen buttons to perform that action, such as Delete or
Show Map.
Backlit keypad for easy
nighttime operation
Antenna
External power
connector under
weather cap
USB
connector
under
weather cap
Port for optional
data card
Battery pack. Press tab down
to remove battery pack for
replacement, if necessary.
256-Color TFT
display
with backlighting
Antenna collapses
for storage. Be sure
the antenna is up
(as shown here)
to receive satellite
signals.
© Copyright 2004, 2005 Garmin Ltd. or its subsidiaries
190-00337-01 Rev B Printed in Taiwan
Creating and Using a Flight Plan (Route)
To create and use a route:
1. Press the MENU key twice to open the Main Menu.
2. Highlight Route from the vertical list of tabs.
3. Highlight the first available blank route slot, and press ENTER.
4. Press ENTER to find items to add to the route.
Route Tab of the
Main Menu
Adding Points to the route.
Identifier
Facility
Name
City
5. Select the identifier, facility name, or city field, and press ENTER.
Enter the identifier, facility name, or city.
6. Press ENTER when the point is shown.
7. With the on-screen OK button highlighted, press ENTER. The point
is added to the route.
8. When you are finished adding points to your route, press QUIT to
view the Route tab again. Your new route is highlighted.
9. Press MENU, select Activate Route, and press ENTER to start
navigating your route.
Selecting an Approach
To select and start an approach from the Active Route or
Active Go To Page:
1. Press PAGE until the Active Route or Active Goto Page appears.
2. Press MENU.
3. Highlight Select Approach using the ROCKER.
4. Use the ROCKER to highlight an approach, and press ENTER. A
“Vectors?” window appears
5. Use the ROCKER to select Yes, and press ENTER. The GPSMAP
296 removes the destination airport from the Go To Page (not from
your flight plan/route), and replaces it with the approach waypoints.
To select and navigate an approach for the destination
airport:
1. Press the DIRECT TO
D
key to open the Go To Page.
2. Press MENU to open the options menu. Highlight Select Approach,
and press ENTER.
3. Use the ROCKER to select the approach from the pop-up window,
and press ENTER.
Go To Page
Selecting an Approach
Go To Page
Options Menu
4. A “Vectors?” window appears. Use the ROCKER to select Yes, and
press ENTER. The GPSMAP 296 removes the destination airport
from the Go To Page (not from your flight plan/route), and replaces
it with the approach waypoints.
Marking a Waypoint
To mark your present location:
1. Press and hold the ENTER/MARK key until the New Waypoint
Page appears.
2. To accept the waypoint with the default name and symbol, highlight
OK, and press ENTER/MARK.
To change the information on the New Waypoint Page, highlight
the appropriate field, and press ENTER/MARK. After entering and
confirming your changes, highlight OK, and press ENTER/MARK.
New Waypoint Page
To create a new waypoint using the Map Page:
1. Press PAGE until the Map Page appears.
2. Move the pointer to the map location or feature.
3. Press and quickly release the ENTER key to capture the pointer’s
location. The New Map Waypoint Page appears.
If you have highlighted a map feature, an information page appears
after you press ENTER. Use the ROCKER to highlight Save, and
press ENTER to save the item as a waypoint.
4. To accept the waypoint with the default name and symbol, highlight
OK, and press ENTER.
To change any information on the New Map Waypoint Page,
highlight the appropriate field, and press ENTER. After entering and
confirming your changes, highlight OK, and press ENTER.
Finding a Automobile or Marine Item
When in Automotive or Marine Mode, pressing NRST/FIND shows
the Find Menu. To view the Find Menu in Aviation Mode, press the
NRST/FIND key multiple times.
To find a
waypoint or other item from your current location:
1. From any page, press NRST/FIND.
2. Highlight a category from the list, and press ENTER.
3. Highlight an item from the list, and press ENTER.
Find Menu Navaid Search Result
To activate a Go To from the Find Menu:
1. Select a waypoint or point of interest as previously described, and
press ENTER. The Waypoint Review Page automatically appears.
2. With the Go To button highlighted, press ENTER to begin
navigation.
  • Page 1 1
  • Page 2 2

Garmin 296 User manual

Category
Navigators
Type
User manual

Ask a question and I''ll find the answer in the document

Finding information in a document is now easier with AI