
X750-005 26 2
X750216-1602
ECHO, INCORPORATED
400 Oakwood Road, Lake Zurich, Illinois 60047-1564
Phone : 847-540-8400
OPERATOR’S MANUAL
TRIMMER/
BRUSHCUTTER
SRM-400U
WARNING DANGER
READ INSTRUCTIONS CAREFULLY AND FOLLOW RULES FOR
SAFE OPERATION.
FAILURE TO DO SO COULD RESULT IN SERIOUS INJURY.
Printed in Japan 0504rd 0419 ES

2
INTRODUCTION
The ECHO Trimmer/Brushcutter, model SRM-400U
is lightweight, high performance gasoline powered
rotary trimmer which is designed for brushcutting,
weed control and grass trimming in areas which are
difficult to control by any other means. The trimmer
is equipped with a safety shoulder harness, and the
excellent balance characteristics plus the available
power, ensures comfortable operation.
RULES FOR SAFE OPERATION .......................................................................................................... 3
NOMENCLATURE HAVE PARTS .......................................................................................................... 4
TECHNICAL DATA................................................................................................................................. 4
ASSEMBLING ....................................................................................................................................... 5
OPERATION.......................................................................................................................................... 7
MAINTENANCE AND CARE ................................................................................................................. 16
TROUBLE SHOOTING.......................................................................................................................... 18
LONG TERM STORAGE ....................................................................................................................... 20
CONTENTS
The engine exhaust from this
product contains chemicals known
to the State of California to cause
cancer, birth defects or other
reproductive harm.
WARNING
This manual provides the information necessary for
assembly, adjustment, operation and maintenance
of your unit.
Copyright © 2002 All Rights Reserved.
Locate this safety decal on your unit. The complete unit illustration found in the “NOMENCLATURE”
section, will help you locate them. Make sure the decal is legible and that you understand and follow
the instructions on them. If a decal cannot be read, a new one can be ordered from your ECHO dealer.
Safety decal: Part number 890160-54130
Safety decal: Part number 890228-09560
Safety decal: Part number 890177-51330

3
SAFETY INSTRUCTIONS
1. Do Not operate the unit when you are
fatigued.
2. Do Not operate if other people or animals
are in the work area.
3. Do Not operate the unit without the shield
correctly in position.
4. Do Not operate in a confined area. Carbon
monoxide exhaust gas is highly poisonous.
5. Do Not operate the unit while you are
smoking.
6. Always wear eye protection goggles when
operating the unit.
7. Always hold the unit firmly with both hands
and with fingers and thumbs encircling the
handles.
8. Always obey local ordinances regulating the
use of internal combustion engines in your
area.
9. Always use the cutting attachments as
approved and supplied by ECHO Inc. for
your unit.
10. Always remain alert when operating the unit
to avoid possible injury to yourself and other
people.
11. Always wear the shoulder harness when
operating the unit.
12. Do not operate the unit while under the
influences of drugs or alcohol.
WARNING DANGER
1. Do Not smoke while handling gasoline.
2. Do Not refuel a hot engine. Wait unit it cools.
3. Do Not overfill the tank. Spilled fuel must be
wiped up.
4. Always stop the engine when refueling.
5. Always remove the fuel cap slowly in order
to relieve any pressure build up in the tank.
6. Always restart the engine at least 3 m
(10 feet) away from the refueling point.
7. Always store gasoline in an approved
container.
RULES FOR SAFE OPERATION
ATTENTION
For your protection when operating this unit,
comply with all Safety Rules as listed in the
Operator’s Manual. (Replacement manuals are
available from your ECHO dealer.)
1. Do not operate unless the debris shield and
safety harness are in good condition and
properly installed.
2. Do not operate if other persons or animals are
in the work area.
3. Do not operate without eye protection goggles
available from your ECHO dealer.
WARNING DANGER
SERIOUS INJURY MAY RESULT FROM THE
IMPROPER USE OF STEEL BLADES.
COMPLY WITH ALL SAFETY INSTRUCTIONS
LISTED IN THE OPERATOR’S MANUAL AND
SUPPLIED WITH THE BLADES.
1. THE ECHO SAW TOOTH BLADE IS
DESIGNED TO CUT BRUSH AND SMALL
TREES.
2. THE ECHO 8 TOOTH ROTARY KNIFE
BLADE IS DESIGNED TO CUT HEAVY
WEEDS AND GRASS. TO AVOID INJURY
DUE TO KICK BACK OR BLADE
FRACTURE, DO NOT USE THIS BLADE TO
CUT BRUSH OR TREES.
3. ECHO INC. WILL NOT BE RESPONSIBLE
FOR THE FAILURE OF CUTTING DEVICES
WHICH HAVE NOT BEEN TESTED AND
APPROVED BY ECHO FOR USE WITH
THIS UNIT.

4
SRM-400U
Dimension L × W × H cm 186 × 70 × 43 (73.2 in × 27.6 in × 16.9 in)
Mass kg 9.9 (21.8 lb): without shoulder harness and cutter head
Engine Type Air cooled two stroke single cylinder
Displacement mL (cm³) 42.7 (2.6 cu in)
Maximum
revolution r/min 10,000
Carburetor Walbro diaphragm type WYK
Ignition Flywheel magneto : CDI (Capacitor Discharge Ignition)
system
Spark plug CHAMPION CJ-6Y
Starter Recoil starter
Clutch Automatic centrifugal clutch
Fuel Mixing ratio Mixture of gasoline (Unleaded, 89 octane minimum) and
specially blended 50 : 1 ECHO two cycle engine oil.
Tank capacity L 1.0 (33.8 US fl oz)
Drive shaft Cutter (Option) Nylon line cutter head
assembly Cutter Circular saw, 25 cm (10 in)
Cutter (Option) 8 cutter blade, 20 cm (8 in)
Gear housing 60 degree bevel gears, ratio 1 : 1.33 (Counterclockwise)
Lubrication Good quality lithium grease
Drive shaft High tensile solid steel, 5 bearings
Shield Metal shield mounted on the gear housing for nylon line
and metal blade applications.
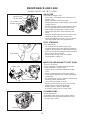
NOMENCLATURE HAVE PARTS
TECHNICAL DATA
Spark plug
Decompression device
Muffler
Choke lever
Air cleaner cover
Starter handle
Fuel tank
Gear housing
Ignition switch
Drive shaft assembly
Shield
Shoulder harness
Technical data subject to change without notice.
Throttle trigger
Grip
Part number 890177-51330
Part number 890228-09560
Part number 890160-54130

5
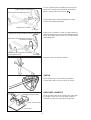
ASSEMBLING
DRIVE SHAFT
•Stand engine upright on a level floor.
•Loosen bolts at drive shaft end of the engine.
•Fit drive shaft assembly ensuring that the drive
shaft is correctly engaged.
•Tighten bolts to fasten drive shaft assembly.
WARNING DANGER
NEVER START ENGINE WITHOUT
DRIVESHAFT ASSEMBLY INSTALLED.
THIS COULD RESULT IN SERIOUS INJURY.
Remove bolt retainer tube from end of handle
assembling bolt (8 mm).
Handle assembling bolt (8 mm)
Install handle assembling bracket (upper) in handle
assembling bracket (lower) and fix handle by
tightening handle assembling bolt (8 mm) lightly.
Handle assembling bracket (upper)
Insert right hand grip assembly into right hand U-
handle and fit it to the slot for rotation prevention of
right hand U-handle.
Fit grip assembling bolt and secure the grip firmly.
Right hand grip assembly
Grip assembling bolt
HANDLE
Bolts
Slot
Right hand U-handle
Bolt retainer tube
Handle assembling bolt (8 mm)
Left handle
Handle assembling bracket (lower)
To engine

6
SHIELD
Fit the shield on the gear housing and tighten
screws with washers (Seven points) as shown.
SHOULDER HARNESS
Fit the shoulder strap to the swivel hook, and adjust
the length of strap and or the location clamps to
maintain the cutter head parallel to the ground.
Shoulder strap assembly
Quick release latch
Waist pad
2
4
5
6
7
3
1
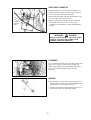
Adjustment of right handle inclination (left/right)
Loosen 4 right handle assembling bolts and insert
right hand U-handle into right handle assembling
bracket. (toward direction of arrow )
Fix the right hand U-handle by tightening 4 right
handle assembling bolts lightly.
Right handle assembling bolt
Right handle assembling bracket
Right hand U-handle
To engine
Adjustment of right handle inclination
(forward/ backward)
Adjustment of left handle inclination
(forward/ backward)
To engine
Determine “Easy to operate” position.
Adjust each inclination of right and left handles to
adequate position (easy to operate) and tighten handle
firmly assembling bolt (8 mm) and 4 right handle
assembling bolts.

7
Oil 1
50
Gasoline
GENERAL CHECK
Ensure that all nuts, screws and bolts installed are
properly tightened.
FUEL STATEMENT
GASOLINE: Use 89 octane [(R+M)/2] gasoline or
gasohol known to be good quality. Gasohol may
contain maximum 10 % ethyl (grain) alcohol or 15
% MTBE (methyl tertiary-butyl ether). Gasohol
containing methyl (wood) alcohol is not approved.
OIL: ECHO brand premium two-stroke 50 : 1 oil is
requirred.
Mix oil and gasoline/gasohol according to
instructions on the oil container label.
MIXING: Follow directions on the oil container.
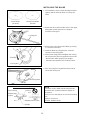
OPERATION
US METRIC
GAS OIL GAS OIL
GAL FL OZ L mL
1 2.6 4 80
2 5.1 8 160
5 12.8 20 400
Fuel mix chart (50 : 1)
IMPORTANT
Stored fuel ages.
Do not mix more fuel than you expect to use in
thirty (30) days, ninety (90) days when a fuel
stabilizer is added.
Stored two-stroke fuel may separate.
ALWAYS shake fuel container thoroughly before
each use.
•It is not permitted to fill fuel above the shoulder
level of fuel tank.
•Slide switch to START/RUN position as shown.
•Push purge bulb 3 or 4 times (or until constant
flow of fuel is visible in fuel return line).
•Move choke lever to COLD START (Close)
position.
•Press the decompression device.
•Pull starter handle until the engine fires. Now,
move choke lever to RUN (open) position, and if
necessary, restart the engine again and allow to
warm up for a few minutes before using.
•After idling, gradually open throttle and cutter
blade will start to operate as the engine attains
clutch engagement speed of 3,500 r/min
approximately.
Throttle trigger
Ignition switch
START/RUN
Throttle control lockout
NOTE
Starter handle : Use short pulls - only 1/2 - 2/3 of
starter rope for starting. Do not let starter rope
snap back in.
Always hold the unit firmly.
Purge bulb
Fuel return line
Choke lever
COLD START (Close)
RUN (Open)
STARTING COLD ENGINE
WARNING DANGER
••
••
•WHEN ENGINE IS STARTED, CONFIRM IF
THERE IS NOT ANY ABNORMAL
VIBRATION OR SOUND. IF THERE IS
ABNORMAL VIBRATION OR SOUND, ASK
YOUR DEALER TO REPAIR.
••
••
•AFTER REFUELING TIGHTEN FUEL CAP
FIRMLY AND CHECK FOR LEAKAGE. IN
CASE OF FUEL LEAKAGE REPAIR BEFORE
STARTING OPERATION SINCE THERE IS A
DANGER OF FIRE.
Starter handle
Sholder level
Fuel tank

8
OPERATING THE TRIMMER
•Adjust handle to a convenient position for cutting
as instructed on page 6.
•Allow the engine to warm up at a fast idle for a
few minutes.
•Increase engine speed as necessary.
•When mowing shrubs, weeds, or grass, swing the
cutter head from right to left as you move forward.
- Avoid striking any obstruction such as rocks,
stones or tree stumps which can damage the
cutter head.
Do not cut into the ground.
- To avoid damage to the engine, do not run the
engine unloaded at full throttle.
•In the event that the cutter strikes an obstruction
or is otherwise prevented from rotating in normal
operation, the clutch will slip to prevent possible
engine damage. In this case, stop the engine, free
the cutter and then start the operation again.
STARTING WARM ENGINE
•Press the decompression device.
•When engine is warm, start it by pulling starter
handle with switch positioned at START/RUN.
(Keep choke lever in RUN (open) position)
•If engine does not start in a few tries, follow same
procedures as starting a cold.
STOPPING ENGINE
•Release throttle trigger and allow to run at an idle
speed.
•Slide ignition switch to “STOP” position.
Decompression device
HOLD THE UNIT FIRMLY.
Starter handle

9
WARNING DANGER
DO NOT ALLOW EITHER PEOPLE OR
ANIMALS INTO THE WORK AREA.
ALWAYS WEAR SAFETY GOGGLES WHEN
CUTTING.
DRESS PROPERLY - AVOID LOOSE
CLOTHING.
WHEN GRASS OR WEEDS HAVE CLOGGED
THE CUTTER HEAD AFFECTING NORMAL
OPERATION, FIRST, STOP THE ENGINE AND
THEN REMOVE THE DEBRIS.
OPERATING INSTRUCTIONS (METAL
BLADES and OPTIONAL NYLON LINE)
Your brushcutter/trimmer, has been designed and
constructed to give you years of trouble-free
service and relieve you of the many back-aching
tasks normally associated with grass trimming,
weed control and brushcutting. Nevertheless, in
common with all other power operated tools, the
Owner and/or Operator has a definite responsibility
to maintain the safe working condition of the unit as
provided by the manufacturer, and to ensure also
the safe operating procedures as prescribed by
common sense and this manual. Please, therefore,
read and understand the instructions as listed
hereunder, and on Page 3, in order to prevent
accidents and possible injury.
WARNING DANGER
••
••
•BEFORE STARTING UP THE ENGINE,
MAKE SURE THAT THE CUTTER BLADE IS
NOT CONTACTING ANYTHING.
••
••
•WHEN TWO OR MORE OPERATORS ARE
WORKING TOGETHER, ENSURE THAT A
SAFE DISTANCE IS KEPT BETWEEN THEM.
WARNING DANGER
GRASS/WEED TRIMMERS CAN THROW
GRAVEL, STONE, WOOD CHIPS, GLASS,
AND PLASTIC OR METAL OBJECTS. THE
DEBRIS SHIELD BEHIND THE TRIMMER
HEAD STOPS MUCH OF THE DEBRIS, BUT
CANNOT PREVENT THE OPERATOR FROM
BEING STRUCK BY SOME DEBRIS. READ
THE RULES FOR SAFE OPERATION IN THE
OPERATOR’S MANUAL THAT YOU
RECEIVED WITH YOUR ECHO TRIMMER.
ALSO, FOLLOW AII INSTRUCTIONS IN THIS
INSTRUCTION SHEET.
ECHO 2-LINE MANUAL TRIMMER
HEAD (OPTION)
1. Read the Operator’s Manual carefully.
Be throughly familiar with the controls and proper
use of the trimmer.
Know how to stop the unit and disengage the
controls.
2. Never allow children to operate the trimmer.
3. Never allow adults to use the trimmer unless
they have received proper instructions.
Be sure the operator is properly attired and
wears the type of foot, leg, head, eye and ear
protection recommended both in your ECHO
Operator’s Manual and by your ECHO Servicing
Dealer.
4. Always wear eye protection that conforms to
ANSI Z 87. 1-2000.

10
INSTALLATION OF NYLON LINE HEAD
(OPTION)
Set the nylon line head to the drive shaft and
tighten by turning as shown.
CUTTING PROCEDURES
Locking tool
OPERATING INSTRUCTIONS NYLON
LINE
1. Always use the end of the line for cutting.
Forcing the cutter head too close to the work will
result in reduced efficiency and broken line.
2. Maintain the line at the recommended length of
12.5 to 15 cm (5 to 6 in).
A longer line will reduce engine speed, a shorter
line may result in engine damage.
3. The trimmer head rotates counterclockwise.
Always cut with the head tilted to the right to
deflect debris away from the operator.
4. Always observe the SAFETY RULES on Page 3
when using the unit.
Upper fixing plate
TIGHTEN
Cutting head
1. REPLACING LINE
A.Remove spool by turning knob clockwise, “right”,
and separating parts.
B.Thread a 6 m (20 feet) length of 2.4 mm (0.095 in)
or 2.7 mm (0.105 in) ECHO line through hole in
spool so that ends are the same length.
C.Wind both ends of line tightly and evenly clock-
wise (see arrows on spool), and wind from side
to side without twisting the lines.
D.Secure ends of line temporarily with about 15 cm
(6 in) extending out.
NOTE
Keep line tight on spool.
A.Snap spool into housing while pulling line
through eyelets with about 15 cm (6 in)
extending out.
CAUTION
Knob tightens counterclockwise, “left”.
B.Fasten spool to housing with shaft bolt, spring,
and knob.
2.REPLACING SPOOL
1C
1D
HOUSING
BOLT
SPRING
KNOB
1B
2A
15 cm (6 in)
SPOOL
2B

11
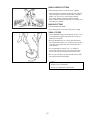
SHOULDER HARNESS
•Install the harness over the both shoulders and
adjust shoulder straps so that the quick release
latch rests low on the right hand side.
•Attach the trimmer/brushcutter to the harness by
means of the quick release latch.
•Make some practice sweeps as with a trimmer
and readjust the harness as necessary for
comfort and to maintain the cutter parallel to the
ground.
WARNING DANGER
IN CASE OF EMERGENCY, PULL THE QUICK
RELEASE LATCH TO DISCONNECT THE
TRIMMER FROM THE HARNESS.
PULL
Quick
release
latch
TRIMMING
The nylon line will allow you to trim along walls and
fence lines. Always try to trim from right to left,
walking behind the unit and parallel to the wall or
fence, thus deflecting debris away from the
operator.
EDGING
1. The nylon line is intended only to cut grass and
should not be used to cut a normal edging trench
along stone or concrete driveway etc.
2. Tilt the unit vertically as illustrated and use only
the line tip to remove unwanted growth.

12
WARNING DANGER
1. SERIOUS INJURY MAY RESULT FROM
THE IMPROPER USE OF STEEL BLADES.
READ AND COMPLY WITH SAFETY
INSTRUCTIONS LISTED IN THIS MANUAL.
2. THE EIGHT TOOTH BLADE IS DESIGNED
SPECIALLY TO CUT WEED AND GRASS.
TO AVOID INJURY DUE TO KICKBACK OR
BLADE FRACTURE, DO NOT USE THIS
BLADE TO CUT BRUSH OR TREES.
3. ECHO INC. WILL NOT BE RESPONSIBLE
FOR THE FAILURE OF CUTTING DEVICES
WHICH HAVE NOT BEEN TESTED AND
APPROVED BY ECHO FOR USE WITH
THIS UNIT.
STEEL BLADE OPERATIONS
Your ECHO Trimmer/Brushcutter is designed for
fast, efficient weed and brush control in areas
which are otherwise inaccessible to power
equipment. Standard configuration includes a
handle bar and nylon line head for light trimming
and weed clearing. Two special steel blades are
available as options and recommended for use in
extended heavy weed and brush clearing
operations :
1. Blade: weed and grass 8 tooth 20 cm (8 in)
diameter
2. Blade: brush 80 tooth 25 cm (10 in) diameter
MOWING
•The nylon line will effectively mow large areas of
heavy grass and/or weeds. Use the standard 12.5
to 15 cm (5 to 6 in) of line and operate at full
throttle.
•When mowing cultivated areas such as lawns
hold the cutter head parallel to the ground to avoid
scalping.
SCALPING
1. The cleaning of weeds and grass right down to
the earth can be accomplished very easily with
the nylon line.
2. Scalping around trees and brushes is particularly
effective, but care should be exercised not to
bruise the bark of young and sensitive growth.
3. In flower beds, always remember that the nylon
line will cut in a complete circle to avoid cutting
flowers instead of weeds.
TREE
SWEEPING
Sweeping grass and other debris from a hard
surface can be done very quickly.

13
6. SHOULD THE BRUSHCUTTER BE
OPERATED FOR AN EXTENDED PERIOD
OF HIGH TEMPERATURES, THE GEAR
BOX MAY BECOME VERY HOT.
IF TOO HOT TO TOUCH, ALLOW THE UNIT
TO COOL DOWN, CHECK THE
LUBRICATION AS PER ‘MAINTENANCE’
AND CONTINUE TO OPERATE IF IN
ORDER.
7. TO AVOID ENGINE DAMAGE, DO NOT
RUN ON FULL THROTTLE WITHOUT
LOAD.
8. DO NOT OPERATE THE BRUSHCUTTER
WITHOUT THE HARNESS AND DEBRIS
SHIELD CORRECTLY FITTED.
9. ALWAYS INSPECT THE WORK AREA AND
REMOVE ANY FOREIGN OBJECTS.
SAFETY PRECAUTIONS
1. ALWAYS USE THE CORRECT BLADE FOR
THE JOB AS RECOMMENDED.
2. BE CAREFUL NOT TO HIT ROCKS,
STONES, TREE STUMPS OR ANY
FOREIGN OBJECT WHICH MAY DAMAGE
THE BLADE.
3. DO NOT CUT INTO THE GROUND TO
AVOID DULLING THE BLADE.
4. ALWAYS STOP THE ENGINE AND
EXAMINE THE BLADE AFTER STRIKING
AN OBSTRUCTION.
DO NOT OPERATE WITH A BLADE WHICH
IS BLUNT, BENT, FRACTURED, OR
DISCOLORED DUE TO OVERHEAT.
5. IN THE EVENT, THAT THE BLADE
STRIKES AN OBSTRUCTION, OR IS
OTHERWISE PREVENTED FROM
ROTATING IN NORMAL OPERATION, THE
CENTRIFUGAL CLUTCH WILL SLIP TO
PREVENT ENGINE DAMAGE.
IN THIS CASE, STOP THE ENGINE, FREE
AND EXAMINE THE BLADE AND IF IN
GOOD ORDER, RESUME OPERATION.
WARNING DANGER
SHOULDER HARNESS
•Install the harness over the both shoulders and
adjust shoulder straps so that the quick release
latch rests low on the right hand side.
•Attach the trimmer/brushcutter to the harness by
means of the quick release latch.
•Make some practice sweeps as with a scythe and
readjust the harness as necessary for comfort
and to maintain the cutter parallel to the ground.
WARNING DANGER
IN CASE OF EMERGENCY, PULL THE QUICK
RELEASE LATCH TO DISCONNECT THE
TRIMMER FROM THE HARNESS.
SHIELD
When using a metal blade.
Use same as Nylon line.
PULL
Quick
release
latch

14
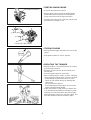
INSTALLING THE BLADE
1. The installation of the 8 tooth weed/grass blade
(option) and the 80 tooth brush is exactly the
same.
Locking tool
Box wrench
TIGHTEN
3. Remove the nylon line head, if fitted, by turning
in a clockwise direction.
4. Install the blade ensuring that it is centered
correctly on the fixing plate.
5. Fit the lower fixing plate and tighten the locking
nut using the box wrench supplied in the tool kit.
- Never fasten while applying your weight.
Otherwise the thread of nut could be broken.
Gear housing
Adapter plate
(Upper)
Locking
tool
Nut
Split pin
Adapter plate (Lower)
Assemble cutter blade properly
NOTE
•The drive shaft is fitted with left hand threads,
therefore turn counterclockwise to tighten as
illustrated.
•Always use a new split pin to secure the locking
nut.
Split pin 2 × 22 mm
Part No. 898502-01130.
Upper fixing plate
Locking tool
2. Rotate the drive shaft until the holes in the upper
fixing plate and the gear box are aligned.
Insert the locking tool.
Lower fixing plate
Split pin
6. Fit a new split pin as supplied in the tool kit to
secure the locking nut.
Weed/Grass Blade
(8 tooth)
Brush Blade
(80 tooth)

15
HEAVY WEED CUTTING
•Install the 8 tooth 20 cm (8 in) blade. (option)
•Observing all precautions as listed in this manual,
start the engine and using full throttle, swing the
blade in an arc as you move forward slowly.
The cutter rotates counterclockwise and the
debris will be pushed backwards so the work area
will always be visible.
SMALL TREES
•The unit will effectively cut small trees up to 7.5 cm
(3 in) diameter using the 80 tooth 25 cm (10 in)
diameter new blade.
•Before attempting to cut, ensure that the falling
tree will fall away from you, and if necessary, tie a
rope to the tree and have an assistant pull it in a
safe direction.
•Do not attempt to “plunge cut”, i.e. using the
brushcutter like an axe. It is not necessary and
may cause serious damage to the brushcutter.
•Brace your feet firmly on the ground and cut with
the left hand side of the blade.
NOTE
1. Always cut on full throttle.
2. Never try cutting with a blunt blade.
BRUSHCUTTING
•Install the 80 tooth blade.
•Proceed exactly as for weed and grass cutting.

16
MAINTENANCE AND CARE
- ALWAYS KEEP THE UNIT CLEAN -
AIR FILTER
Clean before using the unit.
- Close choke. Disengage latch and remove air
cleaner cover.
- Remove air filters (felt and sponge).
- Air filter (flet): Brush off dust lightly or clean with
compressed air.
- Air filter (sponge): Brush off dust lightly or wash
it in a non-inflammable solvent if necessary.
- Soak air filter (sponge) into 2 stroke oil and
squeeze it firmly not to allow remaining oil to
trickle.
- Install the air filter (sponge) into air cleaner cover.
- Install the air filter (felt) into cleaner case.
- Install assembled air clearner cover on cleaner
case with air filter (felt) and engaged latch.
FUEL STRAINER
Check periodically.
- Do not allow dust to enter into fuel tank.
- Clogged strainer will cause difficulty in starting
engine or abnormalities in engine performances.
- Pick up fuel strainer through fuel inlet port with a
piece of steel wire or the like.
- When strainer is dirty, wash it in suitable
cleaning fluid or replace it.
CYLINDER FINS
•Check periodically.
•Clogged fins will result in poor engine cooling.
•Remove dirt and dust from between fins to let
cooling air pass easily.
Cylinder fins
MUFFLER AND EXHAUST PORT (SAM)
•Clean as necessary.
•Carbon deposits in cylinder exhaust port and
muffler will reduce engine output.
- Muffler can be removed by taking off muffler
cover.
- Remove spark arrestor screen from muffler.
- Clean carbon deposits from screen and muffler
components.
- Be careful not to scratch cylinder or piston when
cleaning cylinder exhaust port.
Use non-ferrous plastic or wood.
- Replace spark arrestor screen if it is cracked,
plugged or has holes burned through.
- Inspect gaskets, replace if damaged.
- Assemble components in reverse order.
Latch
Cleaner case
Air filter (felt)
Air cleaner cover
Air filter (sponge)
Fuel strainer
Muffler cover
Lid
Spark arrestor screen
Air intake

17
CAUTION
When starting, idling adjustment speed
should be adjusted not to rotate the cutting
attachment. Correct idle speed is adjusted
2,900 to 3,100 r/min. Or 1/4 turn CCW from
the point the cutting attachment stops
moving. When there is some trouble with the
carburetor, refer to your dealer.
Idle speed adjustment screw (T)
WARNING DANGER
CUTTING ATTACHMENT MUST NOT TURN
OR MOVE WHEN UNIT IS IDLING.
CARBURETOR ADJUSTMENT
Every unit is run at the factory and the carburetor is
set in compliance with Emission Regulations, in
addition.
1. Before adjusting carburetor clean or replace air
filter and muffler, “Spark Arrestor Screen”.
2. Make sure the cutting attachment such as hedge
clipper blades or circular saw are properly
adjusted. Trimmer line should be extended to
cut-off knife.
3. Start engine and run several minutes to bring to
operating temperature. Flash choke twice during
warm-up to clear any air from the fuel system.
4. Idle Speed Adjustment
•Start engine, turn “idle” speed adjustment
screw clockwise (CW) until the cutting
attachment begins to turn, then turn screw out
counterclockwise (CCW) until attachment stops
turning. Turn screw out, CCW, an additional 1/4
turn.
SPARK PLUG
•Check periodically.
•Standard spark plug gap is 0.6 to 0.7 mm
(0.024 to 0.028 in).
•Replace if either electrode is worn or if the
insulator is fouled by oil or other deposits.
•TORQUE = 15 to 17 N•m (130 to 145 in•lb)
NOTE
Do not over torque.
0.6 - 0.7 mm (.024 - .028 in)
Gear housing
Bolt
GEAR HOUSING
•Remove the bolt every 50 hours and check.
•Replenish as necessary, but do not overfill.
- Good quality lithium multi grease is
recommendable.
CHECK FUEL SYSTEM
• Check before every use.
• After refuelling make sure fuel does not leak or
exude from around fuel pipe, fuel grommet or fuel
tank cap.
• In case of fuel leakage or exudation there is a
danger of fire. Stop using the machine
immediately and request your dealer to inspect or
replace.

18
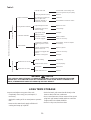
TROUBLE SHOOTING
Poor performance of the engine and/or trimming mechanism can normally be prevented by carefully
following instructions.
Poor performances can easily be corrected even by a beginner.
When the engine does not function properly check the following three (3) points first.
•Is engine compression adequate?
•Is fuel system in good condition and is enough fuel being supplied?
•Is electrical system in good condition and is spark plug operating normally?
When there is serious trouble with the unit, do not try to repair it yourself but have your distributor or dealer
do it for you. For detailed TROUBLE SHOOTING refer to tables 1 and 2. Locate the problem on the
following charts and repair as necessary.
EIGHT CUTTER BLADE
•Use only the blade designated by the
manufacturer for this model.
•When crack is noticed on the blade, never use it,
but replace with a new one.
•Round the tooth bottom for 1- 2 mm radius in
order to avoid the crack using a round file.
- Rounded part is not to be sharpened.
- Sharpen each cutter equally so as to retain the
balance of the blade.
- In sharpening the edge by use of a grinder, do
not cool the cutter abruptly by immersing it in
water.
30°
Cutter edge
Not sharpened
2R
2mm
Tooth bottom
MAGNETO
The unit is incorporated with a CDI (Capacitor
Discharge Ignition) system, which does not require
adjustment of ignition timing and the contact
breaker point gap. Ensure wire connections and
couplers assembling.

19
Fuel strainer clogged Clean or replace.
Fuel pipe clogged Clean.
Suction insufficient Make sufficient.
Fuel strainer clogged Clean or replace.
Carburetor out of order Disassemble and check.
C.D.I. module defective Remove and replace.
Ignition coil defective Remove and replace.
Wire connection defective Reconnect.
High-tension cord connection Repair as necessary.
defective
Switch is grounded Switch on.
Insulator cracked Replace plug.
Spark gap incorrect Adjust.
Covered with carbon Clean or replace.
Fouled with fuel Clean or replace.
Starting procedures incorrect Start correctly.
Low and high speed needle Readjust.
setting too lean
Metering lever spring too strong Readjust.
Fuel pump diaphragm defective Replace.
Fuel passage clogged with dust Disassemble and clean.
Fuel leaking from fixing Retighten all screws.
surfaces of carburetor
Air valve, fuel tank cap Replace or clean.
does not work normally
Fuel pump does not operate Check impulse drilling.
Fuel inlet needle valve Clean.
clogged with dust
Metering lever spring not placed Correct.
in dent of lever
This is because fuel
mixture is too rich.
Muffler sticky Start the engine several
with fuel times with choke shutter
fully open and run at fast
idle until engine does not
smoke.
Bearing damaged Disassemble and replace.
Piston and/or cylinder seized Disassemble and replace.
Crankshaft worn Disassemble and replace.
Crankshaft contacting Disassemble and replace.
crankcase
Fuel is not
reaching
carburetor
Starting procedures
correct
Accelera-
tion and
low speed
function
defective
No spark at high
tension cord end
No spark at plug
Fuel is not
reaching
cylinder
Fuel is reaching cylinder
There is spark at plug
There is spark at high
tension cord end
Fuel does
not keep
running
Carburetor
overflow
Engine does
not crank
Table 1
Engine cranks
Engine does not start (or, is difficult to start)
There is fuel in the tank
Fuel is reaching carburetor

20
Improper fuel used Use fuel with correct mixing ratio.
Never use gasoline of poor quality.
Spark plug defective (burnt) Replace.
As cooling fins clogged, air Clean fins.
does not pass well
Excessive deposits in Disassemble and remove carbon.
combustion chamber
Plug damaged or fouled Replace or clean.
Combustion poor due to Check wiring.
defective wiring
High-speed needle Readjust.
setting incorrect
Carburetor overflow Refer to Table 1.
Air cleaner clogged Clean as necessary.
Compression insufficient Disassemble, check and replace
(piston ring stuck or worn if necessary.
out)
Cylinder chromium plating Replace cylinder.
peeled or worn out
Exhaust port clogged with Clean as necessary.
carbon
Throttle is not fully open Readjust.
Improper setting Set properly.
Height of cutter uneven Correct properly.
Overloaded Adjust load.
Clutch shoe worn out Replace.
Table 2
•Inspect and adjust every part of the unit.
- Completely clean every part, and repair, if
necessary.
- Apply thin coating of oil on metal parts to prevent
rust.
- Remove the cutter head, apply sufficient oil
coating and wrap up in plastic.
LONG TERM STORAGE
•Drain fuel tank, pull starter handle slowly a few
times to drain fuel from carburetor.
•Pour a small amount of clean motor oil into spark
plug hole, pull starter handle and then crank the
engine until TOP DEAD CENTER.
•Store in a dry area, free from dust.
Engine overheated
Carburetor defective
Other troubles
Firing function defective
Blade does not cut well
Blade does not rotate
Machine does not trim properly
Engine speed insufficient
Engine runs normally
WARNING DANGER
FUEL VAPORS ARE EXTREMELY FLAMMABLE AND MAY CAUSE FIRE AND/OR EXPLOSION.
NEVER TEST FOR IGNITION SPARK BY GROUNDING SPARK PLUG NEAR CYLINDER PLUG
HOLE, OTHERWISE SERIOUS PERSONAL INJURY MAY RESULT.
-
 1
1
-
 2
2
-
 3
3
-
 4
4
-
 5
5
-
 6
6
-
 7
7
-
 8
8
-
 9
9
-
 10
10
-
 11
11
-
 12
12
-
 13
13
-
 14
14
-
 15
15
-
 16
16
-
 17
17
-
 18
18
-
 19
19
-
 20
20


Ask a question and I''ll find the answer in the document
Finding information in a document is now easier with AI
Related papers
Other documents
-
 Universal AC04128 User guide
-
Hyundai HYWT5080 User manual
-
Truper DES-63 User manual
-
Husqvarna 967680401 Operating instructions
-
Craftsman BRUSHWACKER 636.795454 Owner's manual
-
Morrison BC 430E Owner's manual
-
Toro TC 4000 Gas Trimmer User manual
-
Powerbase RG415 Owner's manual
-
Dolmar EDGING TRIMMER PE-251 User manual
-
Shindaiwa C230_T230X User manual
