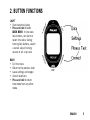
Polar RCX3 is a versatile GPS training computer designed to optimize your horse's performance and help you achieve your equestrian goals. With its ability to track speed, distance, and heart rate, it provides valuable insights into your horse's fitness and exertion levels. The RCX3's user-friendly interface allows for easy customization of training views and settings, making it suitable for a variety of disciplines and training styles. Additionally, the device's wireless connectivity enables seamless data transfer to Polar's online platform, polarpersonaltrainer.
Polar RCX3 is a versatile GPS training computer designed to optimize your horse's performance and help you achieve your equestrian goals. With its ability to track speed, distance, and heart rate, it provides valuable insights into your horse's fitness and exertion levels. The RCX3's user-friendly interface allows for easy customization of training views and settings, making it suitable for a variety of disciplines and training styles. Additionally, the device's wireless connectivity enables seamless data transfer to Polar's online platform, polarpersonaltrainer.


-
 1
1
-
 2
2
-
 3
3
-
 4
4
-
 5
5
-
 6
6
-
 7
7
-
 8
8
-
 9
9
-
 10
10
-
 11
11
-
 12
12
-
 13
13
-
 14
14
-
 15
15
-
 16
16
-
 17
17
-
 18
18
-
 19
19
-
 20
20
-
 21
21
-
 22
22
-
 23
23
-
 24
24
-
 25
25


Polar RCX3 is a versatile GPS training computer designed to optimize your horse's performance and help you achieve your equestrian goals. With its ability to track speed, distance, and heart rate, it provides valuable insights into your horse's fitness and exertion levels. The RCX3's user-friendly interface allows for easy customization of training views and settings, making it suitable for a variety of disciplines and training styles. Additionally, the device's wireless connectivity enables seamless data transfer to Polar's online platform, polarpersonaltrainer.
Ask a question and I''ll find the answer in the document
Finding information in a document is now easier with AI
Related papers
Other documents
-
 Active Secure CLiK64-T series User Instructions
-
 T'nB IPHSP5 Datasheet
-
Polar Electro RCX3 Getting Started Manual
-
 T'nB SPARMLED Datasheet
-
 SKG G7 PRO-E User guide
-
Shenzhen Fitcare Electronics HW401 User manual
-
 AlarmForce Industries SJLFS315 User manual
-
Classic Accessories 32-014-014001-00 Owner's manual
-
-
Yamaha BODiBEAT BF-1 User manual


