Page is loading ...

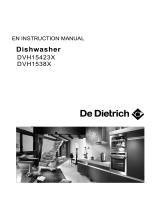
Dishwasher
BCJ322DQB

If you cannot solve the problems by yourself,
please ask for help from a professional technician.
To review

1

2

3

4

5
Press the program button for more than 3 seconds to cancel the running program.
Refer to the section entitled "Preparing and loading dishes".
Close the door, press the program button until the selected program lights up.
(see the section entitled "Operation instruction")
When the working cycle has finished, then stop. Turn off the appliance using On/Off button.
Scrap off any large amount of leftover food.
Soften remnants of burned food in pans, then load the baskets.
Refer to the dishwasher loading instruction.
(Follow the user instructions!)
Open the flap(marked with A), fill in the main wash detergent , and then close the flap;
Pre wash detergent drop into the tank directly;
Refill the rinse aid through the hole below the cap(marked with B)
If you need .
A
B

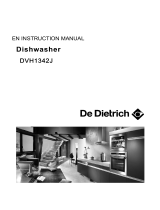
3.Operation Instruction3.Operation Instruction
Control PanelControl Panel
before using it for the first time.
To get the best performance from your dishwasher, read all operating instructions
IMPORTANTIMPORTANT
2.On/Off Button: To turn on/off the power supply.
8. Delay Button :
3. Program Button : Press the button to select a
wash Program.
7. Extra drying Button: Press this button to select
extra drying.
1. Power Indicator: To show when the power is on. 5. Salt and rinse aid warning lights: To show when salt
6. Extra drying indicator:
4. Program Indicators:
To show which program you
have chosen.
Auto wash program indicator
Intensive wash program indicator
Glass wash program indicator
ECO wash program indicator
90 minutes wash program indicator
Rapid wash program
indicator
6
P
auto
auto
1
2
3467
8
To delay the start of a washing program.
90min
90min
5
9
9.Display screen:
To show the delay time and error codes.
and rinse aid dispenser need to be refilled.
To show that extra-drying
fonction has been selected.
This function can not be selected with
Auto and Glass programs.
Eco
Eco
• Manual pre-rinsing of tableware items leads to increased water and energy consumption and is not recommended
• Washing tableware in a household dishwasher usually consumes less energy and water in the use phase than hand
dishwashing when the household dishwasher is used according to the manufacturer’s instructions.

The water softener must be set manually, using the water hardness dial.
The water softener is designed to remove minerals and salts from the water, which would have
a detrimental or adverse effect on the operation of the appliance.
The higher the content of these minerals and salts, the harder your water is.
The softener should be adjusted according to the hardness of the water in your area. Your local Water Authority
can advise you on the hardness of the water in your area.
Adjusting Salt Consumption
The dishwasher is designed to allow for adjustment in the amount of salt consumed based on the hardness of
the water used. This is intended to optimise and customise the level o f salt consumption.
1. Open the door ,Switch on the appliance;
2. Press the Program button for more than 5 seconds to start the water softener
set model within 60seconds after the appliance was switched on;
3. Press the Program button to select the proper set according to your local environment,
the sets will change in the following sequence: H1->H2->H3->H4->H5->H6->H1;
4. Press the Power button to end the set up model.
WATER SOFTENER
The hardness of the water varies from place to place. If hard water is used in the dishwasher, deposits will
form on the dishes and utensils.
The appliance is equipped with a special softener that uses a salt container specifically designed to eliminate
lime and minerals from the water.
4.Prior using for the first time4.Prior using for the first time
Contact your local water board for information on the hardness of your water supply.
H1
H2
H3
H4
Please follow the steps below for adjustment in salt consumption.
A. Water SoftenerA. Water Softener
NOTE:NOTE:
If your model does not have any water softener, you may skip this section.
H5
H6
Note:2Note:2
The manufactory setting: H3 (EN 50242)
Before using your dishwasher for the first time:
A. Set the water softener
B. Add 1.5Kg dishwasher salt and then full fill the salt container with water
C. Fill the rinse aid dispenser
D. Fill in detergent
¡ã
Clark: British degree
¡ã
fH: French degree
¡ã
dH: German degree
Note:1Note:1 dH=1.25 Clarke=1.78 fH=0.178mmol/l
¡ã ¡ã
¡ã
1
dH
mmol/l
0~90~5 0~0.94 0
10-20
6-11
1.0-2.0 9
21-30
12-17 2.1-3.0 12
20
fH
0~6
7-14
15-21
Clarke
WATER HARDNESS
Selector Position Salt c onsumption
(gram/cycle)
18-22 31-40 22-28 3.1-4.0
41-60
23-34 4.1-6.0 30
60
29-42
35-55 61-98 43-69 6.1-9.8
7

1. The salt container must only be refilled when the salt warning light in the control panel comes on.
Depending on how well the salt dissolves, the salt warning light may still be on even though the
salt container is filled.
If there is no salt warning light in the control panel (for some Models),you can estimate when to fill
the salt into the softener by the cycles that the dishwasher has run.
2. If there are spills of the salt, a soak or a rapid program should be run to remove the excessive salt.
Always use the salt intended for use with dishwasher.
The salt container is located beneath the lower basket and should be filled as explained
in the following:
Attention!
Only use salt specifically designed for the use in dishwashers! Every other type of
salt not specifically designed for the use in a dishwasher, especially table salt, will
damage the water softener. In case of damages caused by the use of unsuitable
salt the manufacturer does not give any warranty nor is liable for any damages caused.
Only fill with salt just before starting one of the complete washing programs.
This will prevent any grains of salt or salty water, which may have been spilled,
remaining on the bottom of the machine for any period of time, which may cause
corrosion.
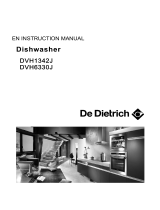
B. Loading the Salt Into the SoftenerB. Loading the Salt Into the Softener
NOTE:NOTE:
Full fill the salt container with water,It is normal for a small amount of water to come out of the
salt container.
11
22
A After the lower basket has been removed, unscrew and remove the cap from the salt container.
B Place the end of the funnel (supplied) into the hole and introduce about 1.5kg of dishwasher salt.
C
D After filling the container , screw the cap tightly back clockwise.
E The salt warning light will stop being after the salt container has been filled with salt.
F Immediately after filling the salt into the salt container, a washing program should be started (We suggest to use a short
program). Otherwise the filter system, pump or other important parts of the machine may be damaged
by salty water. This is out of warranty.
1122
OpenOpen
8

Adjust ing t he rinse aid r eservoir
To achieve a better drying performance with limited rinse aid, the dishwasher is
designed to adjust the consumption by user. Follow the below steps.
Open the door and switch on the appliance.
Within 60 seconds after step 1, press the Program button more than 5 seconds,
and then press the Delay button to enter the set model, the rinse aid indication
Press the Program button to select the proper set according to your using habits,
the sets will change in the following sequence: D1->D2->D3->D4->D5->D1.
The higher the number, the more rinse aid the dishwasher uses.
Without operation in 5 seconds or press the Power button to complete the setup
and exit the setup mode.
Close the cap after all.
Remove the rinse reservoir cap by
lifting up the handle .
Pour the rinse aid into the dispenser,
being careful not to overfill.
blinks as 1Hz frequency.
9

Filling The Detergent Dispenser
Please choose an open way according
to the actual situationC
1 Open the cap by sliding the release
catch.
1 Open the cap by pressing down the
release catch.
Add detergent into the larger cavity
(A) for the main wash cycle .
For better cleaning result, especially if
you have very dirt items, pour a small
amount of detergent onto the door.
The additional detergent will activate
during the pre-wash phase.
Close the flap by sliding it to the
front and then pressing it down.
"
3
Be aware that depending on the soiling of water, setting may be different.
Please observe the manufacturer's recommendations on the detergent packaging.
10

Based on their chemical composition, detergents can be split in two basic types:
Detergent tablets of different brands dissolve at different speeds. For this reason some
detergent tablets cannot dissolve and develop their full cleaning power during short
programs. Therefore please use long programs when using detergent tablets, to
ensure the complete removal of detergent residuals.
The dispenser must be refilled before the start of each wash cycle following the instructions
provided in the wash cycle table . Your dishwasher uses less detergent and rinse aid than
Conventional dishwasher. Generally, only one tablespoon of detergent is needed for
a normal wash load. More heavily soiled items need more detergent. Always add the
detergent just before starting the dishwasher, otherwise it could get damp and will not
dissolve properly.
Concentrated Detergent
Detergent Tablets
Detergent Dispenser
conventional, alkaline detergents with caustic components
low alkaline concentrated detergents with natural enzymes
Normally new pulverised detergent is without phosphate. Thus the water softener function of
phosphate is not given. In this case we recommend to fill salt in the salt container even when
the hardness of water is only 6 °dH. If detergents without phosphate are used in the case of hard water
often white spots appear on dishes and glasses. In this case please add more detergent to reach
better results. Detergents without chlorine do only bleach a little. Strong and coloured spots will not
be removed completely. In this case please choose a program with a higher temperature.
Detergents
There are 3 sorts of detergents
1.With phosphate and with chlorine
2.With phosphate and without chlorine
3.Without phosphate and without chlorine
Detergents with its chemical ingredients are necessary to remove dirt, crush dirt and transport it out of the dishwasher.
Most of the commercial quality detergents are suitable for this purpose.
D. Function of Detergent
Proper Use of Detergent
Use only detergent specifically made for the use in dishwashers. Keep your detergent fresh and dry.
Don't put powdered detergent into the dispenser until you're ready to wash dishes.
Attention!
11

5.Loading the Dishwasher Baskets5.Loading the Dishwasher Baskets
For washing in the dishwasher the following cutlery/dishesFor washing in the dishwasher the following cutlery/dishes
Cutlery with wooden, horn china or
mother-of-pearl handles
Plastic items that are not heat resistant
Older cutlery with glued parts that are not
temperature resistant
Bonded cutlery items or dishes
Pewter or cooper items
Crystal glass
Steel items subject to rusting
Wooden platters
Items made from synthetic fibres
Some types of glasses can become
dull after a large number of washes
Silver and aluminum parts have a
tendency to discolour during washing
Glazed patterns may fade if machine
washed frequently
Are not suitable Are of limited suitability
Dishes and items of cutlery must not lie inside one another, or cover each other.
To avoid damage to glasses, they must not touch.
Load large items which are most difficult to clean into the lower basket.
The upper basket is designed to hold more delicate and lighter dishware such as glasses, coffee
and tea cups
Long bladed knives stored in an upright position are a potential hazard!
Long and/or sharp items of cutlery such as carving knives must be positioned
horizontally in the upper basket.
Please do not overload your dishwasher. This is important for good results and for
reasonable consumption of energy.
Load hollow items such as cups, glasses, pans etc. With the opening facing downwards so that
water cannot collect in the container or a deep base.
RecommendationRecommendation
Consider buying utensils which are identified as dishwasher-proof.
Use a mild detergent that is described as 'kind to dishes'. If necessary, seek further
information from the detergent manufacturers.
For particular items, select a program with as low a temperature as possible.
To prevent damage, do not take glass and cutlery out of the dishwasher immediately
after the programme has ended.
(For best performance of the dishwasher, follow these loading guidelines.
Features and appearance of baskets and cutlery baskets may vary from your model.)
Scrape off any large amounts of leftover food. Soften remnants of burnt food in pans.
It is not necessary to rinse the dishes under running water.
Place objects in the dishwasher in following way:
1.Items such as cups, glasses, pots/pans, etc. are faced downwards.
2.Curved items, or ones with recesses, should be loaded aslant so that water can run off.
3.All utensils are stacked securely and can not tip over.
4.All utensils are placed in the way that the spray arms can rotate freely during washing.
NOTE:NOTE:
Very small items should not be washed in the dishwasher as they could easily fall out of the basket.
Attention before or after loading the Dishwasher BasketsAttention before or after loading the Dishwasher Baskets
To prevent water dripping from the upper basket into the lower basket, we recommend that you
empty the lower basket first and then the upper basket.
Removing the DishesRemoving the Dishes
12

Lift the basket for higher position Lift the handle to lower the basket
For better stacking of pots and pans,the spikes can be folded
down as shown on the picture below.
13
To make room for taller items in the upper basket, raise the
You can then lean the tall glasses against
required for use.
cup rack upwards.
it. You can also remove it when it is not

NOTE:NOTE:
*EN 5 0242 : This programme is the test cycle. The information for comparability test
in accordance with EN 50242, as follows:
Capacity: 13 settings
Position Upper basket: upper wheels on rails
Rinse aid setting: 5
Pl:0.49w; Po:0.45w.
6.Starting a washing program6.Starting a washing program
Wash Cycle TableWash Cycle Table
NOTE:NOTE:
Means: need to fill rinse into the Rinse-Aid Dispenser.
( )
Detergent
pre/main
Detergent
pre/main
Cycle Selection
Information
Cycle Selection
Information
ProgramProgram
Intensive
(*EN 5 0242)
Running
time(min)
Running
time(min) Water
(L)
Water
(L)
Energy
(Kwh)
Energy
(Kwh)
Rinse
Aid
Rinse
Aid
Rapid
Description
of Cycle
Description
of Cycle
90 Min
Glass
For lightly soiled crockery
and glass
For heaviest soiled crockery,
and normally soiled pots
pans dishes etc with dried
on soiling.
For lightly soiled loads that
do not need excellent drying
efficiency.
A shorter wash for lightly
soiled loads that do not
need drying.
Auto
Auto sensing wash, lightly,
normally or heavily soiled
crockery, with or with out
dried-on food
This is Standard programme, it is suitable
to clean normally soiled tableware and
it is the most efficient programme in
terms of its combined energy and water
consumption for that type of tableware.
Pre-wash(50 )
Wash (65 )
Rinse
Rinse
Rinse(60 )
Drying
Pre-wash
Wash (50 )
Rinse(50 )
Drying
Wash (45 )
Rinse(45 )
30
0.755
1.5
0.82
16.6
11.2
(60 )
Rinse
Rinse (50 )
Drying
90 12.5
1.18
32.5g
1 piece
20g
120 0.95 13.5
Pre-wash
Wash (50 )
Rinse(50 )
Drying
0.85~1.55
1or2 pieces
Pre-wash (45 )
Autowash(55-65 )
Rinse
Rinse(50-55 )
Drying
14-1
auto
90min
Eco
Values other than the ECO program are purely indicative.
Rinse
Rinse(50 )
Wash
85-150
205
198
8.5~18
9.8
5/27.5g
1or2 pieces
5/27.5g
1or2 pieces
5/27.5g
1or2 pieces
5/27.5g

NOTE:NOTE:
*EN : This programme is the test cycle. The information for comparability test
in accordance with EN , as follows:
Capacity: 13 settings
Position Upper basket: upper wheels on rails
Rinse aid setting: 5
Pl:0.49w; Po:0.45w.
Turning On the ApplianceTurning On the Appliance
Starting a cycle wash
1 Draw out the lower and upper basket, load the dishes and push them back.
It is commended to load the lower basket first, then the upper one (see the section entitled
).
2 Pour in the detergent (see the section entitled ).
3 Insert the plug into the socket. The power supply is 220-240 VAC /50 HZ, the specification
of the socket is 10A 250VAC. Make sure that the water supply is turned on to full pressure.
4 Open the door, press the ON/OFF Button.
5 Press the program Button , the wash program will be changed as follows direction:
If a program is selected, the response light will light. Then close the door, the dishwasher
Wash Cycle TableWash Cycle Table
NOTE:NOTE:
Means: need to fill rinse into the Rinse-Aid Dispenser.
( )
Detergent
pre/main
Detergent
pre/main
Cycle Selection
Information
Cycle Selection
Information
ProgramProgram
Intensive
(*EN 60436)
Running
time(min)
Running
time(min) Water
(L)
Water
(L)
Energy
(Kwh)
Energy
(Kwh)
Rinse
Aid
Rinse
Aid
Rapid
Description
of Cycle
Description
of Cycle
90 Min
Glass
For lightly soiled crockery
and glass
For heaviest soiled crockery,
and normally soiled pots
pans dishes etc with dried
on soiling.
For lightly soiled loads that
do not need excellent drying
efficiency.
A shorter wash for lightly
soiled loads that do not
need drying.
Auto
Auto sensing wash, lightly,
normally or heavily soiled
crockery, with or with out
dried-on food
This is Standard programme, it is suitable
to clean normally soiled tableware and
it is the most efficient programme in
terms of its combined energy and water
consumption for that type of tableware.
Pre-wash(50 )
Wash (65 )
Rinse
Rinse
Rinse(60 )
Drying
Pre-wash
Wash (50 )
Rinse(50 )
Drying
Wash (45 )
Rinse(45 )
30
0.736
1.5
0.82
16.6
11.2
(60 )
Rinse
Rinse (50 )
Drying
90 12.5
1.18
21g
1 piece
120 0.95 13.5
Pre-wash
Wash (50 )
Rinse(50 )
Drying
0.85~1.55
1or2 pieces
Pre-wash (45 )
Autowash(55-65 )
Rinse
Rinse(50-55 )
Drying
14-2
auto
Eco->90min-> Rapid->Auto->Intensive->Glass->ECO
"Preparing and loading dishes" “Prior to first time use”
will start the selected washing cycle soon.
90min
Eco
Values other than the ECO program are purely indicative.
Rinse
Rinse(50 )
Wash
85-150
205
198
8.5~18
9.8
1or2 pieces
1or2 pieces
1or2 pieces
4/17g
4/17g
4/17g
4/17g
12g
60436
60436

"Preparing and loading dishes" ).
washing program").
The dishwasher door opens automatically at the end of the program, which improves
the drying results. (If the dishwasher is built-in the surrounding furnishings must be
resistant to any condensation.)
The dishwasher door must not be blocked when set to open automatically.
This can disrupt door lock functionality.
NOTE:
Auto Open Door

OpenOpen
to be drained

The control panel can be cleaned by using a lightly dampened cloth.
After cleaning, make sure to dry it thoroughly.
For the exterior, use a good appliance polish wax.
Never use sharp objects, scouring pads or harsh cleaners on any part of the dishwasher.
Protect Against Freezing
1.Cut off the electrical power to the dishwasher.
2.Turn off the water supply and disconnect the water inlet pipe from the water valve.
3.Drain the water from the inlet pipe and water valve. (Use a pan to gather the water)
4.Reconnect the water inlet pipe to the water valve.
5.Remove the filter at the bottom of the tub and use a sponge to soak up water in the sump.
please take frost protection measures on the dishwasher in winter. Every time after washing cycles,
please operate as follows
Caring for the DishwasherCaring for the Dishwasher
Cleaning the Filter
Cleaning The Door
To clean the coarse filter and the fine filter, use a cleaning brush. Reassemble the filter parts as shown in the figures
on the last page and reinsert the entire assembly in the dishwasher, positioning it in its seat and pressing downwards.
When cleaning the filters, don't knock on them. Otherwise, the filters could be
contorted and the performance of the dishwasher could be decreased.
WARNING! WARNING!
To clean the edge around the door, you should use only a soft warm, damp cloth.
To avoid penetration of water into the door lock and electrical components, do not
use a spray cleaner of any kind.
WARNING! WARNING!
Never use a spray cleaner to clean the door panel as it may damage the door lock
and electrical components.
Abrasive agents or some paper towels should not be used because of the risk of
scratching or leaving spots on the stainless steel surface.
nn
nn
Cleaning the Spray Arms
NOTE:NOTE:
If your dishwasher cannot work because of the ice,
please contact professional service persons.
It is necessary to clean the spray arms regularly for hard
water chemicals will clog the spray arm jets and bearings.
- Inspect the filters for blocking after every time the dishwasher has been used.
- By unscrewing the coarse filter, you can remove the filter system. Remove any food remnants and
clean the filters under running water.
Remarks:
The entire filter assembly should be cleaned once a week.
NOTE:NOTE:
To remove the lower spray arm, pull out the spray arm upward.
To remove the upper spray arm, hold the nut, rotate the arm
clockwise to remove it.
Wash the arms in soapy and warm water and use a soft brush to
clean the jets. Replace them after rinsing them thoroughly.
OpenOpen
17
/