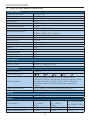
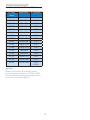
Philips 221S9A-75: Enhance your productivity with this sleek and functional monitor. Experience crisp visuals with Full HD resolution, while Adaptive Sync technology eliminates screen tearing and stuttering for smooth gaming and video playback. Optimize your viewing experience with SmartImage presets for various scenarios like gaming, movies, and office work.
Philips 221S9A-75: Enhance your productivity with this sleek and functional monitor. Experience crisp visuals with Full HD resolution, while Adaptive Sync technology eliminates screen tearing and stuttering for smooth gaming and video playback. Optimize your viewing experience with SmartImage presets for various scenarios like gaming, movies, and office work.


-
 1
1
-
 2
2
-
 3
3
-
 4
4
-
 5
5
-
 6
6
-
 7
7
-
 8
8
-
 9
9
-
 10
10
-
 11
11
-
 12
12
-
 13
13
-
 14
14
-
 15
15
-
 16
16
-
 17
17
-
 18
18
-
 19
19
-
 20
20
-
 21
21
-
 22
22
-
 23
23
-
 24
24
-
 25
25
-
 26
26
-
 27
27
-
 28
28


Philips 221S9A-75: Enhance your productivity with this sleek and functional monitor. Experience crisp visuals with Full HD resolution, while Adaptive Sync technology eliminates screen tearing and stuttering for smooth gaming and video playback. Optimize your viewing experience with SmartImage presets for various scenarios like gaming, movies, and office work.
Ask a question and I''ll find the answer in the document
Finding information in a document is now easier with AI