Page is loading ...

C H E M D O S E
™
Owners Manual
C D - 1 2 0

Chemdose Manual 3
Warranty ........................................................................................................4
Warning ........................................................................................................5
How Does My Chemdose Work? ......................................................................6
Pre Operation Checklist ..................................................................................7
Application ....................................................................................................7
Chemical Mixing ............................................................................................8
Operation ......................................................................................................9
Charging ......................................................................................................10
MS-20E Sprayer Cart Bottom Draw Instructions ..........................................11
MS-20E Sprayer Cart & Tank Assembly Diagram & Parts List ......................12
Chemdose Assembly Diagram & Parts List....................................................13
Chemdose Pump Assembly Diagram & Parts List ..........................................14
Troubleshooting ..........................................................................................15
Notes ............................................................................................................16
Printed in the U.S.A. Modified: 1/2012 CD120_MAN1
Table of Contents

The Dramm CD100 Chemdose applies toxic chemicals. Extreme caution must be
used! Read all warnings. Serious injury or death can occur from misuse.
WARNING
Chemdose Manual 5
• Do not operate machine without read-
ing all warnings and instructions.
• Owners or Managers: It is your
responsibility to inform and instruct any
employee who uses this machine in
regards to safety and operational proce-
dures.
W
HEN
S
PRAYING
:
• Caution: Use this machine only for
chemical application.
• When applying hazardous chemicals
care and logic must be adhered to.
• NEVER use this machine to pump
Flammable liquids.
• NEVER operate this machine in an
explosive environment. Switch or motor
brush arcing may cause an explosion.
• Do not use this machine without proper
ventilation.
• Mix only the amount of chemical solu-
tion which will be used. NEVER - Keep,
store or hold over unused chemical solu-
tion.
• Follow all E.P.A. guidelines and chemi-
cal label information when applying
chemicals.
• Use the re q u i r ed personal pro t e c t i o n
gear when applying chemicals. Consult
chemical label or chemical manufacturer
when in doubt.
• Be sure to connect correct voltage to
receptacle.
• Do not charge the unit if it is warm to
the touch after use. Allow unit to cool
before charging.
• Never use any charger but the one pro-
vided to charge the battery, damage to
the unit or personal injury may result.
• Exercise normally accepted safety pro-
cedures when using electricity.
• After use - Double rinse pesticide /
chemical tank. Clean nozzle and suction
line thoroughly. Store unit in a safe loca-
tion away from children and unautho-
rized personnel.
• Follow all E.P.A. guidelines for re-entry.

6 Chemdose Manual
The Dramm Chemdose is a
machine designed for precision applica-
tion of chemical solutions directly to a
pot or root zone. This results in less
wasteful application of expensive chemi-
cals with little or no overdosing. The
Chemdose applies user defined amounts
of solution between 10 ml and 90 ml per
shot. Complete variability within this
range is possible. These shots may be
applied individually or may be released at
timed intervals. This is useful for dosing
to many plants in a small area and pre-
vents undue strain on the user's thumb.
For complete portability the
Chemdose is battery operated. The bat-
tery is a 12 volt 7 amp hour battery.
This battery may be recharged with the
included battery maintainer in approxi-
mately 6 hours. On a full charge, this
battery will allow for approximately
16,000 cycles or shots to be applied
before recharging is necessary. IMPOR-
TANT: Keep track of how many shots are
used on a charge as there will be no
warning when the machine needs charg-
ing. The Chemdose will continue to run
after 16,000 cycles but the volume of the
output will decrease, changing the preci-
sion of each dose. A cycle counter is
located on the control face of the
Chemdose to help with counting.
The Chemdose cart and tank are
designed to fit down standard green-
house aisles easily. The Chemdose
comes standard with 25 feet of co-
extruded polyurethane hose. This hose
is chemical resistant but not puncture
resistant. Be careful of all sharp edges
and corners when using the Chemdose.
The Chemdose gun has two buttons,
green and red. The green button will fire
one shot each time it is depressed. The
red button will activate the interval dos-
ing mechanism. Once depressed, the
Chemdose will continue to dose the pre-
chosen amount at the specified interval
until the button is depressed again. The
Chemdose includes an assortment of
three stainless steel dosing wands
designed for different uses: a 16", a 30"
and a 36" hanging basket wand. The 16"
wand is bent slightly at the end and is
designed for treatment of plants on
benches. The 30" wand is straight and
designed for treatment of plants grown
on the floor or ground. The 36" wand
has a 90˚ bend. This wand is perfect for
treating hanging baskets. The Chemdose
features a wand rack designed to carry
the two unused wands while the
Chemdose is in operation and all three
wands while the Chemdose is not in use.
How Does My Chemdose Work?

Chemdose Manual 7
Pre Operation Checklist
T
REATMENT
A
REA
:
A. Make sure that the treatment area is vacant. No humans or pets should be present.
B. Post all hazard signs before application.
C. Follow all E.P.A. and W.P.S. guidelines. Follow all chemical label directions.
C
HEMDOSE
:
A. Fit the Chemdose with the proper wand for your application situation. Make sure that
the wand does not leak from any of the fittings.
B. Dial the dosing knob to the correct output setting. Dial the interval to the desired length
of time between shots. Make this time long enough to prevent rushing and inaccurate appli-
cation.
C. Reset the cycle counter. Make sure to keep track of the number of shots used on a full
charge to ensure proper dosing.
D. Test the Chemdose with clear water. Use each button separately to ensure proper opera-
tion of both. Make sure that nothing is blocking the output. Proper flow should be an even,
aerated flow.
E. Uncoil the hose and make sure that there are no kinks in the hose.
F. Mix chemical solution according to label guidelines. (see "Application and Chemical
Mixing" section below)
Application
1. WARNING: Follow all EPA Guidelines on the handling, application, and re-entry periods
for chemicals. Only crops listed on the label should be treated.
2. Pre Water plants to be treated. Most applications of drench products work best when the
plant has been pre-watered. Ensure that the media is thoroughly saturated. Some chemi-
cals can be applied to dry soil. Always defer to the chemical manufacturer recommendations
for application.
3. Determine how you will treat the area and whether or not you will be spot treating individ-
ual plants or treating all the plants in an area. Choose the correct button for the method
you prefer.

Chemical Mixing
8 Chemdose Manual
The Chemdose is designed to apply precise doses of chemical solution to the pot
or root zone of plants. Because this is a precision application it is important to know
how much chemical solution is needed per pot. This will help determine the amount
of chemical needed in the Chemdose.
1. D e t e r mine the amount of chemical solution needed per pot. This may be
obtained from the chemical label or from the chemical manufacturer.
2. Determine the number of pots to be treated.
3. Mix the chemical solution according to the label. Most chemical labels will state
the rate in amount to be diluted into 100 gallons of water. Mix at the proper
ratio for 20 gallons of water.
amount of product
per 100 gallons
1
2
3
4
5
6
7
8
9
10
11
12
amount to mix
in 20 gallons
0.2
0.4
0.6
0.8
1.0
1.2
1.4
1.6
1.8
2.0
2.2
2.4
amount of product
per 100 gallons
13
14
15
16
17
18
19
20
21
22
23
24
amount to mix
in 12 gallons
2.6
2.8
3.0
3.2
3.4
3.6
3.8
4.0
4.2
4.4
4.6
4.8
The Chemdose comes standard with a 20 gallon tank. This volume equals 2,560
fluid ounces. This is important in determining the amount of total solution available
in the Chemdose and the total number of pots that one tank will treat.
WA R N I N G : The Chemdose does not provide agitation for chemical solutions.
O n l y chemicals that will fre e l y dissolve in wa ter should be used. Do not use
chemicals that will separate from solution readily, as they will clog the Chemdose
and provide uneven application of chemicals.
0.5 5120
1 2560
1.5 1707
2 1280
2.5 1023
3 853
Ounces Needed/Pot Number of Pots Treated
with 20 Gallon Tank

Chemdose Manual 9
Operation
OPERATION:
1. Switch the three position switch from "off" to "on".
2. Determine the amount of solution desired per shot and set the inner timer dial to
the corresponding time setting. Use the chart below (figure 1) or on the machine to
determine this setting.
3. Set the outer dial to the desired interval time. The scale on this timer may be
changed for longer or shorter times by using a paper clip as shown below (figure 2).
This timer is factory preset to seconds.
4. Press the green button for one shot. Press the red button to begin interval dosing.
Press the red button a second time to stop interval dosing.
5. Keep track of the number of shots per full charge. After 16,000 shots, the volume
will decrease from the pump even though the machine will appear to dose correctly.
6. After application, thoroughly clean machine by triple rinsing the tank and flush-
ing the hose with clean, hot water. Make sure that clean water flows through the
entire length of the hose.
0.7 0.8
67 76
2.27 2.57
Time in
Seconds
Volume
in OZ
Volume
in ML
0.20.1 0.3 0.4 0.5 0.6 0.9 1.0
2314 32 42 50 59 82 91
0.780.47 1.08 1.42 1.69 2.00 2.77 3.08
•Using a paper clip or another similar object you
can change the scale for the Chemdose spray
cycle and delay. Each square around the dial
corresponds to the nearest display.
•You can change the Seconds (SEC) to Minutes
(MIN) or Hours (HRS).
•You can also change the multiplier of x0.1 to x1.
F
IGURE
1
F
IGURE
2

10 Chemdose Manual
Charging
C
HARGING
:
1. Plug the charger into a 120 volt 60 Hz (standard voltage, other voltage chargers
are available from Dramm).
2. Plug the charger into the charger receptacle on the Chemdose.
3. Switch the three position switch to charge. The "Fast Charge" light should come
on, indicating charge. If the "Fault" light comes on, see trouble shooting on page 16.
4. Allow to charge at least 6 hours. There is no need to monitor the charg e r ,
because it is a battery maintainer, it will not overcharge the battery.
5. Battery is fully charged when the "Float" light is on.

Chemdose Manual 11
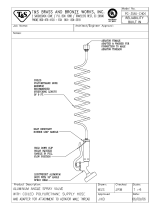
Ms-120E Sprayer Cart Bottom Draw Instructions
1
4
3
2
Included in your MS-20E
Dramm Electric Sprayer Cart
there are several parts which
enable you to set up the cart
for siphon from the bottom
low point of the tank. These
parts are for use in conjunc-
tion with the Dramm
Chemdose.
1. Remove the plug from the
tapped hole on the bottom of
the tank.
2. Place some of the Teflon
®
pipe sealant onto both male
ends of the filter and the
male end of the street elbow.
3. S c r ew the filter, stre e t
elbow and hose barb fitting
t o g e t h e r . Then screw the
assembly into the tank.
4. With the tank in the cart
with the outlet to the re a r
and the Chemdose in place,
m e a s u r e the red suction
hose from the sprayer to the
hose barb fitting.
5. Cut the suction strainer
end of the hose off to the
length in step #4
6. Push the suction hose on
the barb fitting and secure
with the hose clamp.
7. Remove the vent assem-
bly from the tank cap with a
s c r ewdriver and place the
cap back onto the tank.
8. Place the re t u r n line
through the hole in the cap.
P
ARTS
L
IST
Item Description Part #
1. Street Elbow M412-005
2. In-Line Filter 14297
3. Hose Barb Fitting 75190
4. Hose Clamp 6204
Teflon
®
Pipe Sealant 59214

MS-20E Sprayer Cart & Tank Assembly Diagram
1 DII093A MSO 20 Cart 1
2 DII096 Handle Assembly 1
3 DIII20A MSO Pump Bracket 1
4 DIII21 Side Leg 2
5 DIII59 Chemdose Bracket 1
6 DI0563 Chemdose Box 1
7 1899041 6” Caster 2
8 SNI0275-OP 5/8 10 X 2 Wheel 2
9 SP0020-LC 20 Gallon Tank 1
Item # Document # Description Quantity
12 Chemdose Manual

Chemdose Parts Exploded View
109QC1-12V Pilot Light
1435-005 1/2 NPT X 1/2" Barb
1806T44 Counter Panel Mount DC
2088-343-135 Pump
3175 60 14 fitting 1/4 mntp to 3/8 o.d.
4710A-2-A-1 One Shot Timer
90-0003 Switch
A3M Plug 3 pin male
C3F Receptacle 3 pin female
C4F Receptacle 4 pin female
D10563 Steel Box
D10624 Bench Wand
D10625 Floor Wand
D10626 Hanging Basket Wand
D10633A Grip and Hose
HPX-10 Battery Charger
MDR2U120 Timer
12170 Battery 12 volt 17AH
42045 1/2 x 1/4 fpt pipe coupling
8300875 "U" Handle
Item # Description Item # Description
Chemdose Manual 13

2088 Series Pump Exploded View
P
UMP
P
ARTS
L
IST
1
2
3
4
5
6
7
8
94-236-11
94-231-05
94-230-05
94-237-05
94-231-30
94-232-05
94-238-03
11-111-00
Complete Pump Head
Upper Housing / Switch assembly
Switch kit
Check Valve Kit
Upper Housing Kit
Valve Kit
Diaphragm / Drive Kit
Motor
R
EFERENCE
# P
ART
N
UMBER
D
ESCRIPTION
14 Chemdose Manual

Chemdose Troubleshooting
P
ROBLEM
C
AUSE
R
EMEDY
Switch or timer settings
incorrect
In line strainer clogged
Remove strainer bowl
and clean filter
Review manual operat-
ing procedures
Pump will not prime
Leak in suction side of
pump
Inlet tubing restricted or
kinked
Incorrect volume
Check battery charge
level
Recharge battery
Debris in pump valves
Disassemble pump and
clean out debris
Check all connections
and repair any leaks
Damaged pump valves
Disassemble pump and
replace valves
Clogged nozzle
Disassemble, clean and
re-install
Charger "Fault" signal
Confirm the correct
timer setting
Improper voltage
Damaged Battery
Charger
Check chart on unit
and step time
Get a replacement
charger from Dramm
Blown fuse
Check for cause and
repair, then replace fuse
Unit will not run Battery not charged Fully charge battery
Use voltage adapter
Chemdose Manual 15
/