Tongfang Multimedia E4SFC5017 User manual
- Category
- LCD TVs
- Type
- User manual

1
En
CONTENTS
Important Safety Instructions
Safety Information
Preparation
What's Included
Front View
Rear View
Installing the Stand
Removing the Stand for Wall-Mounting
Remote Control
Connecting External Devices
Customizing TV Settings
Initial Setup
Navigating the Setup Settings
Apps
Media
Viewing Photos
Playing Movie
Listening to Music
Source
Setup
System
Channel
Support
Lock
Picture
Network
Auto Upgrade
Audio
Parental Control
Troubleshooting
Maintaining
6SHFL¿FDWLRQ
OTT APP Service
2
3
4
4
5
6
7
7
8
9
10
10
11
12
13
13
13
14
15
16
16
18
18
19
20
21
22
25
25
27
27
28
29

2
En
IMPORTANT SAFETY INSTRUCTIONS
• Read these instructions
– All the safety and
operating instructions should be read before this
product is operated.
• Keep these instructions
– The safety and
operating instructions should be retained for future
reference.
• Heed all warnings
– All warnings on the appliance
and in the operating instructions should be adhered
to.
• Follow all instructions
– All operating and use
instructions should be followed.
• Do not use this apparatus near water
– The
appliance should not be used near water or
moisture – for example, in a wet basement or near
a swimming pool, and the like.
• Clean only with dry cloth.
• Do not
block any ventilation openings. Install in
accordance with the manufacturer’s instructions.
• Do not
install near any heat sources such as
radiators, heat registers, stoves, or other apparatus
LQFOXGLQJDPSOL¿HUVWKDWSURGXFHKHDW
• Do not
defeat the safety purpose of the polarized
or grounding-type plug. A polarized plug has two
blades with one wider than the other. A grounding-
type plug has two blades and a third grounding
prong. The wide blade or the third prong are
provided for your safety. If the provided plug does
not fit into your outlet, consult an electrician for
replacement of the obsolete outlet.
• Protect the power cord from being walked on
or pinched particularly at plugs, convenience
receptacles, and the point where they exit from the
apparatus.
• 2QO\XVHDWWDFKPHQWVDFFHVVRULHVVSHFL¿HGE\WKH
manufacturer.
• Use only with the cart, stand, tripod, bracket, or
WDEOHVSHFL¿HGE\WKHPDQXIDFWXUHURUVROGZLWKWKH
apparatus. When a cart is used, use caution when
moving the cart/apparatus combination to avoid
injury from tip-over.
WARNING:
7RUHGXFHWKHULVNRI¿UHRUHOHFWULFVKRFN
do not expose this apparatus to rain or moisture.
The apparatus should not be exposed to dripping or
splashing. Objects filled with liquids, such as vases
should not be placed on apparatus.
WARNING:
The batteries shall not be exposed to
H[FHVVLYHKHDWVXFKDVVXQVKLQH¿UHRUWKHOLNH
WARNING:
The mains plug is used as disconnect
device, the disconnect device shall remain readily
operable.
WARNING:
To reduce the risk of electric shock, do not
UHPRYHFRYHURUEDFNDVWKHUHDUHQRXVHUVHUYLFHDEOH
SDUWVLQVLGH5HIHUVHUYLFLQJWRTXDOL¿HGSHUVRQQHO
• Unplug this apparatus during lightning storms or
when unused for long periods of time.
• Refer all servicing to qualified service personnel.
Servicing is required when the apparatus has
been damaged in any way, such as the power
supply cord or plug is damaged, liquid has been
spilled or objects have fallen into the apparatus, the
apparatus has been exposed to rain or moisture,
does not operate normally, or has been dropped.
• Please keep the unit in a well-ventilated
environment.
This lightning flash with arrowhead symbol
within an equilateral triangle is intended to
alert the user to the presence of non-insulated
“dangerous voltage” within the product’s
HQFORVXUHWKDWPD\EHRIVXI¿FLHQWPDJQLWXGHWR
constitute a risk of electric shock.
The exclamation point within an equilateral
triangle is intended to alert the user to
the presence of important operating and
maintenance instructions in the literature
accompanying the appliance.
This equipment is a Class II or double insulated
electrical appliance. It has been designed in
such a way that it does not require a safety
connection to electrical earth.
This product contains electrical or electronic
materials. The presence of these materials
may,if not disposed of properly, have potential
adverse effects on the environment and human
health. Presence of this label on the product
means it should not be disposed of as unsorted
waste and must be collectedseparately. As a
consumer, you are responsible for ensuring that
this product is disposed of properly.

3
En
SAFETY INFORMATION
To ensure reliable and safe operation of this equipment, please carefully read all the instructions in
this user guide, especially the safety information below.
Electrical Safety
• The TV set should only be connected to a main power supply with voltage that matches the
label at the rear of the product.
• To prevent overload, do not share the same power supply socket with too many other
electronic components.
• Do not place any connecting wires where they may be stepped on or tripped over.
• Do not place heavy items on any connecting wire, which may damage the wire.
• Hold the main plug, not the wires, when removing from a socket.
• During a thunderstorm or when not in using the television for long periods, turn off the power
switch on the back of the television.
• Do not allow water or moisture to enter the TV or power adapter. Do not use in wet, moist
areas, such as bathrooms, steamy kitchens or near swimming pools.
• Pull the plug out immediately, and seek professional help if the main plug or cable is damaged,
liquid is spilled onto the set, if the TV set accidentally exposed to water or moisture, if anything
accidentally penetrates the ventilation slots or if the TV set does not work normally.
• Do not remove the safety covers. There are no user serviceable parts inside. Trying to service
WKHXQLW\RXUVHOILVGDQJHURXVDQGPD\LQYDOLGDWHWKHSURGXFW¶VZDUUDQW\4XDOL¿HGSHUVRQQHO
must only service this apparatus.
• To avoid a battery leakage, remove batteries from the remote control, when the remote is not
use for long period, or when the batteries are exhausted.
• 'RQRWEUHDNRSHQRUWKURZH[KDXVWHGEDWWHULHVLQWRD¿UH
Physical Safety
• Do not block ventilation slots in the back cover. You may place the TV in a cabinet, but ensure
DWOHDVWFP¶¶FOHDUDQFHDOODURXQG
• Do not tap or shake the TV screen, or you may damage the internal circuits. Take good care
of the remote control.
• 7RFOHDQWKH79XVHDVRIWGU\FORWK'RQRWXVHVROYHQWVRUSHWUROHXPEDVHGÀXLGV
• Do not install near any heat sources such as radiators, heat registers, stoves or other
DSSDUDWXVLQFOXGLQJDPSOL¿HUVWKDWSURGXFHKHDW
• Do not defeat the safety purpose of the polarized or grounding-type plug. A polarized plug
has two blades with one wider than the other. A grounding plug has two blades and a third
grounding prong, the wide blade,or the third prong is provided for your safety. If the provided
SOXJGRHVQRW¿WLQWR\RXURXWOHWFRQVXOWDQHOHFWULFLDQIRUUHSODFHPHQWRIWKHREVROHWHRXWOHW
• Protect the power cord from being walked on or pinched particularly at plugs.
• Unplug the apparatus during lightning storms or when unused for long periods.
• 5HIHUDOOVHUYLFLQJWRDTXDOL¿HGVHUYLFHSHUVRQQHO6HUYLFLQJLVUHTXLUHGLIWKHDSSDUDWXVGRHV
not operate normally or if the apparatus, including the power supply cord or pulg, has been
damaged in any way.
• Servicing is also required if liquid has been spilled, or objects have fallen into the apparatus;
when the apparatus has been exposed to rain or moisture; or if the apparatus has been
dropped.
• Always connect your television to a power outlet with protective ground connection.

4
En
PREPARATION
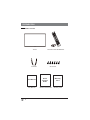
What's Included
Quick Connect Guide
Quick
Connect
Guide
User Manual
User Manual
Remote Control with Batteries
Warranty Card
Warranty
Card
TV Set
TV Stand
Six Screws

5
En
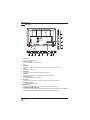
1. POWER
Switch the TV between On / Standby mode.
2. SOURCE
Press to select among different input signal sources.
3. MENU
Display the main menu.
4. CH /
Press to select a channel.
5. VOL +/
-
Press to adjust the volume.
6. POWER Indicator
Illuminate blue when the TV is turned on. Illuminate red when the TV is in standby mode.
7. IR
,QIUDUHG5HFHLYHU
Receive IR signals from the remote control.
PREPARATION
Front View

6
En
PREPARATION
Rear View
1. Power Cord
Connect to AC power outlet.
2. OPTICAL Output
Connect a digital sound system to this
jack.
3. USB Port
&RQQHFWWRD86%VWRUDJHGHYLFHWRSOD\FRPSDWLEOHPRYLHDQGSKRWR¿OHV
4. LAN
Network connection port.
5. HDMI Input
&RQQHFWWRD+LJK'H¿QLWLRQ+'VLJQDOLQSXWGHYLFH
6. VGA Input
Connect to a computer or other devices with a VGA interface.
7. PC AUDIO Input
Connect to a computer audio output.
8. RF Input
&RQQHFWWRWKHDQWHQQDȍ9+)8+)VRFNHWZLWKWKH5)FRD[LDOFDEOH
9. Headphone Socket
Connect to the Headphones.
10. AUDIO Input
&RQQHFWWRWKH$8',2/5RXWSXWVRFNHWVRQH[WHUQDODXGLRGHYLFHV
11. COMPOSITE/COMPONENT IN
&RQQHFWWR$9GHYLFHVZLWKFRPSRVLWHFRPSRQHQW<3E3UYLGHRDQGDXGLRRXWSXWVRFNHWV
&20326,7(9,'(2DQG&20321(17<3%35VKDUHZLWK$8',2,1/5
LA N
OPTICAL
PC AUDI O
VG A
10
COMPONENT
AUDI
O
900
HDMI1(ARC)

7
En
Installing the Stand
Removing the Stand for Wall-Mounting
PREPARATION
•1.
Lay the TV face down on a flat,
cushioned surface to avoid
damaging
or scratching
.
•2.
Fix the Left Base Stand to the main
unit using 3 pcs provided screws.
•3.
Fix the Right Base Stand to the
main unit using 3 pcs provided screws.
•1.
Lay the TV face down on a flat,
cushioned surface to avoid
damaging
or scratching.
•2.
Untighten the 6 pcs screws holding
the stand assembly and remove them.
•3.
Attach the wall-mount bracket to
the TV using the mounting holes on
the back of the TV. Mount this TV
according to the instructions included
in the wall-mount bracket.
Wall-Mounting Screws
0RXQWWKH9(6$EUDFNHWXVLQJ0LVRPHWULFWKUHDGHGVFUHZVQRWLQFOXGHG
WARNING:
with the installation instruction.
WARNING
Never place a television set in an unstable location. A television set may fall, causing serious personal injury
or death. Many injuries, particularly to children, can be acoided by taking simple precautions such as:
-Using cabinets or stands recommended by the manufacturer of the television set.
-Only using furniture that can safely support the television set.
-Ensuring the television set is not overhanging the edge of the supporting furniture.
-Not placing the television set on tall furniture(for example, cupboards or bookcases) without anchoring
both the furniture and the television set to a suitable support.
-Not placing the television set on cloth or other materials that may be located between the television
set and supporting furniture.
-Educating children about the dangers of climbing on furniture to reach the television set or its controls.
If your existing television set is being retained and relocated, the same considerations as above should be
applied.

8
En
PREPARATION
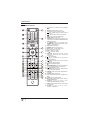
Remote Control
1. :
Switch the TV between On and Standby
mode.
2. MUTE:
Mute and restore TV sound.
3. 0~9:
6HOHFWDSURJUDP$79'79PRGH
4.
:
Enter multiple program channel number
such as 2-1.
5.
:
Return to the previous viewing channel.
6. APP:
Press to select the desired APP.
7. MENU:
Display the main menu.
8. SOURCE:
Select among the different input
signal sources:TV/HDMI1/HDMI2/HDMI3/USB/
VGA/AV/Component.
9.
:
Allows you to navigate the on
screen display menus and adjust the system
settings to your preference.
10. OK:
&RQ¿UPWKHVHOHFWLRQ
11. RETURN:
Return to previous menu.
12. EXIT:
Exit the on screen display menu.
13. TV:
Press to turn to TV mode.
14. VOL+/-:
Adjust the volume.
15. CH / :
Select the channel.
16. DISPLAY:
Display the present screen
information such as the current channel and
input source.
17.
:
Stop the playback.
18.
:
Skip to the beginning of the previous
chapter/track/photo.
19. :
Skip to the beginning of the next chapter/
track/photo.
20. :
Reverse playback rapidly.
21.
:
Advance playback rapidly.
22. COLOR BUTTONS:
Press to access directly to
the corresponding function in APP service.
23. :
Start playback or pause.
24. P.MODE:
Select picture mode: dynamic/movie/
energy saving/user/standard.
25. S.MODE:
Select sound mode: standard/music/
movie/user.
26. CH.LIST:
Display program list.
27. CC:
Closed Caption selection: ON/OFF/CC On
Mute.
28. V-CHIP:
Set up parental control.
29. MTS:
Switch among different audio channels:
STEREO/MONO/SAP.
30. ASPECT:
Select the aspect ratio
settings:standard/wide/wide zoom/zoom.
31. AUTO:
Press to adjust the picture automatically
in VGA source.
32. SLEEP:
Set the TV sleep timer:
OFF/5/10…/180/240 min.

9
En
CONNECTING EXTERNAL DEVICES
HDMI1(ARC)

10
En
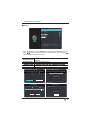
CUSTOMIZING TV SETTINGS
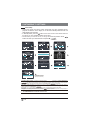
Initial Setup
• Connect the power cord to the power socket after you have completed all the
physical connections. At this stage, the TV will enter Standby Mode and the red
LED indicator will illuminate.
• In Standby Mode, press the
button on the main unit or on the remote control to
turn the TV on. The red LED indicator will turn blue.
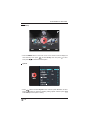
• The first time you turn the TV on, it will go into the Setup Wizard. Press
buttons to select your desired mode and press OK
• If channels can not be
found, this frame will be
displayed automatically.
5
7
8
9
Follow this guide to help setup your UHDTV
for scanning channels or accessing your
external devices for Antenna, Set-top Box,
Blu-ray, DVD, Games and other players.
Welcome to the WESTINGHOUSE UHDTV Setup Wizard.
OK :
Next
Follow this guide to help setup your UHDTV
for scanning channels or accessing your
external devices for Antenna, Set-top Box,
Blu-ray, DVD, Games and other players.
Welcome to the WESTINGHOUSE UHDTV Setup Wizard.
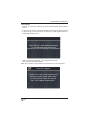
Are you sure you want Home Mode(Energy Saving)?
Click here to set Wired or Wireless network.
Click here to scan channels from the antenna or coaxial cable input.
Click here to connect a Game, Blu-ray, DVD or other players.
Select Your Connection Devices
OK :
Next
OK :
Next
OK :
Next
OK :
Next
Hawaii
Alaska
OK :
Next
OK :
Next
OK :
Next
Click here to connect a Game, Blu-ray, DVD or other players.
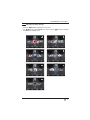
Scanning Channel Program
RF CH : 51
Found : 0
MENU:
Skip
EXIT :
Quit
DTV
Auto scanning program stops manually.
Click here to return to scan channel program
Click here to connect a Game, Blu-ray, DVD or other players.
Click here to return to scan channel program
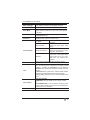
Home Mode optimizes the standard video settings
OK :
Next
Are you sure you want Home Mode(Energy Saving)?
OK :
Next
Home M ode (Energy Saving) is t he default as-shipped t elevision and s ettings. And Home M ode (Energy
Saving ) i s the setting in w hich t he p roduct qualifies f or Energy S tar
®
. Any changes to default as-shipped t elevisio n
and settings would change the energy consumption. And enabling certain optional features and functionalities
may increase energy consumption beyond the limits required for Energy Star
®
as applicable.
Retail Mode : Select Retail Mode if you would like your picture to be brighter. At times this mode may use more energy to
operate the Volume/Sound Mode a nd t he Picture M ode. In this setting, t he power consumption may possibly e xceed the
limited requirement of the Energy Star
®
Energy Star
®
is a set of power-saving guidelines issued by the U.S. Environmental Protection Agency(EPA).
Energy Star
®
is a joint program of the U.S. Environmental Protection Agency and the U.S. Department of Energy helping us
all save money and protect the environment through energy products and pratices.
• The ON-MODE Power under Home Mode should be less than 74W
• The SLEEP-MODE Power should be less than 0.5 W.
Apps Media Setup
Source
HDMI1
HDMI2
Component
TV
HDMI3

11
En
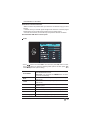
CUSTOMIZING TV SETTINGS
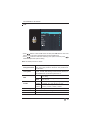
Navigating the Setup Settings
• Press the
MENU
button to display the main menu.
• Use
buttons to select
Setup
menu and then press buttons to navigate
and select the available menu.
Channel
Support
Audio
Network
Channel
SupportSystem
LockAudio
Support
LockChannel
PictureSystem
Lock
PictureSupport
NetworkChannel
Picture
NetworkLock
AudioSupport
Network
AudioPicture
SystemLock
Audio
SystemNetwork
ChannelPicture

12
En
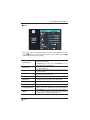
Apps
• Press the
MENU
button on the main unit or on the remote control to display the
Apps
. Then press
to enter the streaming and use to select the desired
APP and press
OK
button to view. Or press the hotkey on the remote control to
enter the APP directly.
1HWÀL[
Enjoys TV shows & movies streamed instantly over the
Internet.
Pandora
Free personalized radio that offers effortless and
endless music enjoyment and discovery. Just start with
the name of one of your favorite artists, songs, genres
or composers and Pandora will do the rest. It’s easy to
create personalized stations that play only music you’ll
love.
Toon Goggles
A subscription video on-demand platform that offers
animated, fun and educational cartoons, engaging
games and songs from all over the world and in many
different languages to children.
AccuWeather
Displays the current weather conditions and the
temperature anywhere in the world in centigrade or
Fahrenheit.
YouTube
YouTube your way on the best screen in your house.
VUDU
Discover, watch and collect the latest movies and
TV shows in high quality 1080p. Free to sign up. No
subscriptions, late fees or commitments.
CUSTOMIZING TV SETTINGS
VUDU
Toon Goggles

13
En
CUSTOMIZING TV SETTINGS
Media
• Press the
MENU
button on the main unit or on the remote control, then press
to select
Media
, and use to enter the media and use to select the
desired option.
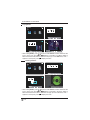
Viewing Photos
• After entering
Media
, press
buttons to select
Photos
and then select the
disk type to enter. Then use
/ buttons to navigate in the picture folder
to select the desired photo, then a subscreen will pop up. Press
OK
button, when
¥DSSHDUVRQWKHWRSOHIWSUHVV to display the photo.

14
En
CUSTOMIZING TV SETTINGS
Playing Movie
• After entering
Media
, press
buttons to select
Movie
and then select the disk
type to enter. Then use / buttons to navigate in the Movie folder to
select the desired video, then a subscreen will pop up. Press
OK
EXWWRQZKHQ¥
appears on the top left, press to display the video.
Listening to Music
22
2
5
1.avi 2.avi
Aspect: 16:9
Seq
00:00:11/--:--:--
Music
Photos
Movie
Photos
Movi
22
2
5
Travelling
Movie
Photos
Music
mp3
Play
• After entering
Media
, press buttons to select
Music
and then select the disk
type to enter. Then use / buttons to navigate in the music folder to
VHOHFWWKHGHVLUHGPXVLFWKHQDVXEVFUHHQZLOOSRSXS3UHVV2.EXWWRQZKHQ¥
appears on the top left, press to display the music.

15
En
CUSTOMIZING TV SETTINGS
Source
• Press the
MENU
button on the main unit or on the remote control and press
buttons to select the
Source
menu. Then press to enter source,and use
buttons to select different input sources among:
TV/ HDMI1/ HDMI2/ HDMI3/
USB/ VGA/ AV/ Component
and press
OK
EXWWRQWRFRQ¿UP

16
En
Setup
• Press the
MENU
button on the main unit or on the remote control to display the
main interface. Then press
to select
Setup
menu and press to enter.
Then press to select the desired option.
System
• Press buttons to select
System
menu and then press
OK
button to enter.
Press buttons to select the following setting options and then press
buttons to adjust each option’s setting.
CUSTOMIZING TV SETTINGS
Wide

17
En
CUSTOMIZING TV SETTINGS
Advanced
Adjust advanced option’s setting: H-POS, V-POS, Clock,
Phase or Auto.
(VGA source mode only)
Closed Caption
CC Mode
Select CC mode : On, Off or CC
on Mute.
Basic Selection
Basic Selection: CC1, CC2,
CC3, CC4, Text1, Text2, Text3,
Text4.
Advanced Selection
Advanced Selection: Service1,
Service2, Service3, Service4,
Service5, and Service6.
OPTION
Options: Mode, Font Style ,
Font Size, Font Edge Style,
Font Edge Color, FG_Color,
BG_Color, FG_ Opacity, BG_
Opacity..
DLC
Select to turn On/Off the dynamic luminance control.
Time
Sleep Timer:
Select a period of time after which
the TV automatically switches to standby mode:
Off/5/10/…/180/240 min.
Alternative:
You may press the
SLEEP
button repeatedly to select the number of minutes
directly.
Time Zone:
6HOHFWD7LPH=RQH+DZDLL$ODVND3DFL¿F
Mountain/ Central/ Eastern/ Atlantic/ Newfoundland.
Daylight Saving Time:
Select to turn On/Off daylight saving
time.
Other Setting
Set other settings:
HDMI EDID:
select the HDMI version: Mode 1 / Mode
2.
INlink(HDMI-CEC):
set the following settings: INlink
Control, Device Power Off, TV Power On, Audio Receiver,
INlink Device List, Root Menu.
Restore Default
Restore the TV to factory default settings.
Menu Language
Select menu language : English, Français or Español.
The default on-screen menu language is English.
Transparency
Select to turn On/Off transparency function.
Zoom Mode
Select zoom mode : Standard/Wide/Wide Zoom/Zoom.
Note: Different input source, the zoom mode options
may differ.
Noise Reduction
Reduce the noise level of the connected device: Off/
Weak/Middle/Strong.

18
En
COSTOMIZING TV SETTINGS
Channel
• Press
buttons to select
Channel
menu and then press
OK
button to enter.
Press buttons to select the following channel options and then press
buttons to adjust each option’s setting.
Air/Cable
Select antenna between Air and Cable.
Auto Scan
Select Auto Scan to search the available Air or Cable
channels.
Show/Hide
Show/Hide the selected channel.
Channel Number
Display the current channel number.
Channel Label
Display the current channel label.
Signal Information
Display the information of current signal.
• Press
buttons to select
Support
menu and then press
OK
button to view
the built-in user manual.
Support
2
En
1
En
CONTENTS
Important Safety Instructions
Safety Information
Preparation
What's Included
Front View
Rear View
Installing the Stand
Removing the Stand for Wall-Mounting
Wall-Mounting Screws
Remote Control
Connecting External Devices
Customizing TV Settings
Initial Setup
Navigating the Setup Settings
Apps
Media
Viewing Photos
Playing Movie
Listening to Music
Setup
System
Channel
Support
Lock
Picture
Network
Auto Upgrade
Audio
Parental Control
Troubleshooting
Maintaining
OTT APP Service
2
3
4
4
5
6
7
7
7
8
9
10
10
11
12
13
13
14
14
16
16
18
18
19
20
21
22
23
24
26
27
28
29
IMPORTANT SAFETY INSTRUCTIONS
• Read these instructions – All the safety and
operating instructions should be read before this
product is operated.
• Keep these instructions – The safety and
operating instructions should be retained for future
reference.
• Heed all warnings – All warnings on the appliance
and in the operating instructions should be adhered
to.
• Follow all instructions – All operating and use
instructions should be followed.
• Do not use this apparatus near water – The
appliance should not be used near water or
moisture – for example, in a wet basement or near
a swimming pool, and the like.
• Clean only with dry cloth.
• Do not block any ventilation openings. Install in
accordance with the manufacturer’s instructions.
•Donot install near any heat sources such as
radiators, heat regis
ters, stoves, or other apparatus
• Do not defeat the safety purpose of the polarized
or grounding-type plug. A polarized plug has two
blades with one wider than the other. A grounding-
type plug has two blades and a third grounding
prong. The wide blade or the third prong are
provided for your safety. If the provided plug does
not fit into your outlet, consult an electrician for
replacement of the obsolete outlet.
• Protect the power cord from being walked on
or pinched particularly at plugs, convenience
receptacles, and the point where they exit from the
apparatus.
•
manufacturer.
• Use only with the cart, stand, tripod, bracket, or
apparatus. When a cart is used, use caution when
moving the cart/apparatus combination to avoid
injury from tip-over.
WARNING:
do not expose this apparatus to rain or moisture.
The apparatus should not be exposed to dripping or
splashing. Objects filled with liquids, such as vases
should not be placed on apparatus.
WARNING: The batteries shall not be exposed to
WARNING: The mains plug is used as disconnect
device, the disconnect device shall remain readily
operable.
WARNING: Toreduce the risk of electric shock, do not
UHPRYHFRYHURUEDFNDVWKHUHDUHQRXVHUVHUYLFHDEOH
• Unplug this apparatus during lightning storms or
when unused for long periods of time.
• Refer all servicing to qualified service personnel.
Servicing is required when the apparatus has
been damaged in any way, such as the power
supply cord or plug is damaged, liquid has been
spilled or objects have fallen into the apparatus, the
apparatus has been exposed to rain or moisture,
does not operate normally, or has been dropped.
• Please keep the unit in a well-ventilated
environment.
This lightning flash with arrowhead symbol
within an equilateral triangle is intended to
alert the user to the presence of non-insulated
“dangerous voltage” within the product’s
constitute a risk of electric shock.
The exclamation point within an equilateral
triangle is intended to alert the user to
the presence of important operating and
maintenance instructions in the literature
accompanying the appliance.
This equipment is a Class II or double insulated
electrical appliance. It has been designed in
such a way that it does not require a safety
connection to electrical earth.
This product contains electrical or electronic
materials. The presence of these materials
may,if not disposed of properly, have potential
adverse effects on the environment and human
health. Presence of this label on the product
means it should not be disposed of as unsorted
waste and must be collectedseparately. As a
consumer, you are responsible for ensuring that
this product is disposed of properly.

19
En
CUSTOMIZING TV SETTINGS
Lock
• Press
buttons to select
Lock
menu and then press
OK
button to enter. Use
the 0-9 buttons to input 4-digit password to enter the
Lock
menu.
• Press buttons to select the following lock options and then press
buttons to adjust each option’s setting.
Note:
the default password is “0000”.
Change Password
Use
0-9
buttons to input the old password and then input
the new 4-digit password. Re-enter new password for
FRQ¿UPDWLRQ
Lock System
Select to turn On/Off system lock. The following options
86$&DQDGD5576HWWLQJDQG5575HVHWZLOORQO\EH
accessible when you turn the system lock on.
USA
TV
TV RATING: Press
OK
button to lock or unlock
TV rating.
MPAA
Select MPAA rating : N/A,G, PG, PG-13, R,
NC-17,or X.
Canada
Canada
English
Select MPAA rating for English-speaking
Canada : E, C, C8+, G, PG, 14+, 18+.
Canada
French
Select MPAA rating for Quebec Canada : E, G,
8 ans+, 13 ans+, 16 ans+, 18 ans+.
RRT Setting
Set Rating Region Table.
RRT Reset
Select to reset the RRT setting.
Clear Lock
Clear all lock settings.

20
En
• Press buttons to select
Picture
menu and then press
OK
button to enter.
Press buttons to select the following picture options and then press
buttons to adjust each option’s setting.
Picture
Picture Mode
Cycle among picture mode: Dynamic/Movie/Energy
Saving/User/Standard.
Alternative:
you may press the
P.MODE
button to
select the picture mode directly.
Blue Screen
Allow the blue background to turn On/Off during weak or
no signal conditions.
Brightness
Increase or decrease the amount of white in the picture.
(For User mode)
Contrast
Adjust the difference between light and dark levels in
the pictures.
(For User mode)
Color
Control the color intensity.
(For User mode)
Sharpness
Adjust the level of crispness in the edges between light
and dark areas of the picture.
(For User mode)
Tint
Adjust the balance between red and green levels.
Color Temp
Cycle among color temperatures: Cool/Normal/Warm.
Advanced Setting
Color Space:
To adjust the following settings: Color
Mode, Color, Hue, Saturation, Brightness and Reset.
White Balance:
To adjust the settings of white balance.
MEMC
Cycle among Motion Estimate and Motion
Compensation modes:Middle/High/Off/Low.
COSTOMIZING TV SETTINGS
Page is loading ...
Page is loading ...
Page is loading ...
Page is loading ...
Page is loading ...
Page is loading ...
Page is loading ...
Page is loading ...
Page is loading ...
-
 1
1
-
 2
2
-
 3
3
-
 4
4
-
 5
5
-
 6
6
-
 7
7
-
 8
8
-
 9
9
-
 10
10
-
 11
11
-
 12
12
-
 13
13
-
 14
14
-
 15
15
-
 16
16
-
 17
17
-
 18
18
-
 19
19
-
 20
20
-
 21
21
-
 22
22
-
 23
23
-
 24
24
-
 25
25
-
 26
26
-
 27
27
-
 28
28
-
 29
29


Tongfang Multimedia E4SFC5017 User manual
- Category
- LCD TVs
- Type
- User manual
Ask a question and I''ll find the answer in the document
Finding information in a document is now easier with AI