Page is loading ...

Page 1 of 2
INSTALLATION INSTRUCTIONS
Product
7160-0879
Quick Release Wall Mount, Getac F110
Revision
REV. B
Form
INST-770
Printing Spec: PS-001
This Gamber-Johnson Quick Release Wall Mount is designed to hold a Getac F110
Docking Station and AC power supply and is intended to be installed on a flat surface.
Product Mounting Disclaimer
Gamber-Johnson is not liable under any theory of contract or tort law for any loss, damage, personal injury, special, incidental or consequential
damages for personal injury or other damage of any nature arising directly or indirectly as a result of the improper installation or use of its
products in vehicle or any other application. In order to safely install and use Gamber-Johnson products full consideration of vehicle occupants,
vehicle systems (i.e., the location of fuel lines, brakes lines, electrical, drive train or other systems), air-bags and other safety equipment is
and recommendations, Gamber-Johnson product instruction sheets, or workmanship standards as endorsed through the Gamber-Johnson Certified
Installer Program.
© copyright 2017 Gamber-Johnson, LLC
If you need assistance or have questions, call Gamber-Johnson at 1-800-456-6868

Page 2 of 2
SURFACE PREPARATION
• Find a flat surface area at least 9” x 13” to install the quick release
mount keeping in mind you will need additional space above the mount
for the docking station to slide on and off the wall mount. Ensure that
you have adequate structural material within the wall so that the
mounting screws will hold firmly.
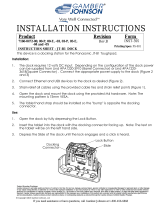
TO INSTALL THE WALL MOUNT
• There are seven ¼” mounting holes on the wall portion of the mount, (4)
holes are in the VESA 75mm pattern and (3) holes are in a straight line
and can be used for installing the mount to a stud within a wall. Place
the wall portion of the mount in the desired location (ensure it is level)
and mark the mounting hole locations on the wall with a pencil. If you
are using ¼” x 1” lag screws (included), drill a 3/16” pilot holes then
fasten the mount to the wall. (See figure 1). DO NOT OVERTIGHTEN
THE SCREWS.
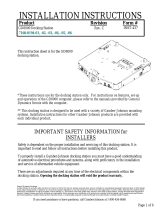
TO INSTALL THE DOCKING STATION ADAPTER PLATE
• Install the adapter plate onto the back of the docking station by aligning
the 4 holes in the adapter plate with the four holes in the docking station
and use the ¼” machine screws provided. The adapter plate should sit
flat against the back of the dock. (See figure 2).
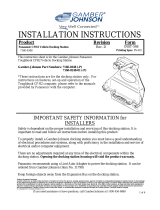
INSTALL THE POWER SUPPLY (If needed)
• Place the power supply flat into the bottom of the wall mount as shown
in (Figure 3). The end of the power supply that connects to the AC
outlet should match up with the end of the holder that has two tabs; the
end of the power supply that connects to the computer should match up
with the end of the holder that has one tab. Insert the cable connector
into the computer and the AC plug into an available outlet. Tie off
excess cable using the available cable-tie holes found in the tabs of the
power supply holder and wall mount. NOTE: Be sure cables will not
interfere when attempting to install the dock onto the wall mount.
USING THE QUICK RELEASE MOUNT
To install the docking station on the quick release wall mount
• Align the tabs on the docking station adapter plate with the alignment
slots in the wall mount and slide the dock down into the slots until the
release latch snaps into place.
To remove the docking station from the quick release wall mount
• Pull Release Latch (See Figure 2) toward you and at the same time
slide dock upward to release the docking station from the wall mount.
IMPORTANT: Keep in mind data and power cables may need to be
disconnected from the docking station first.
Figure 3
Figure 2
Alignment tabs
Release latch
Figure 1
Alignment
slot
/