Page is loading ...

www.trafomaticaudio.com Rev. 1
www.trafomaticaudio.com Rev. 1
LARA
Line Level Preamplier


Table of Contents
Section Page No.
Safety Precautions 02
Getting Started 05
AboutYourLinePreamplier 05
Packaging / Preparation for use 06
Controls and Their Functions 08
Front Panel 08
Rear Panel 10
Servicing 11
Technical Specications 12
Table of Contents
Section Page No.
Safety Precautions 02
Getting Started 05
AboutYourLinePreamplier 05
Packaging / Preparation for use 06
Controls and Their Functions 08
Front Panel 08
Rear Panel 10
Servicing 11
Technical Specications 12

SAFETY PRECAUTIONS
IMPORTANT SAFEGUARDS
PLEASE READ CAREFULLY ALL THE
FOLLOWING IMPORTANT SAFE-
GUARDS THAT ARE APPLICABLE TO
YOUR EQUIPMENT
CAUTION!
TO REDUCE THE RISK OF ELECTRIC SHOCK, DO NOT REMOVE SCREWS. NO USER SER-
VICEABLE PARTS INSIDE. REFER SERVICING TO QUALIFIED SERVICE PERSONNEL.
SAFETY
1) Read the User’s Manual and refer to it frequently during use of this product - All the
safety and operating instructions should be read before the product is operated.
2) Retain the User’s Manual - The safety and operating instructions should be retained for
future reference.
3) Follow Instructions - All operating and instructions for use should be closely followed.
4) Power Sources - This product should be operated using only the type of power source indi-
cated on the marking label. If you are not sure of the type of power supply in your home, con
sult your product dealer or local power company.
5) Grounding - This product is equipped with a three prong IEC connector. Always use power
cord with adequate wire cross section and an electrical outlet that is grounded. If you do not
know whether the outlet is grounded, consult your electrician or local power company.
6) Power Cord Protection – Power supply cords should be routed so that they are not likely
to be walked on or pinched. Pay particular attention to cords at plugs, convenience recep-
tacles and where they exit from the product. Always use power cords with adequate current
ratingsandsafetycertications(UL,CE,TÜV,CSA,etc.)
7) Fuses-Forcontinuedprotectionagainstrehazard,replacefuseswiththesametypeand
ratingofthefusesspecied.Whenchangingfuses,completelyunplugtheACcordfromthe
wall outlet.
8) Turn-off when not using-Turnofftheunitassoonasyoustopactivelyusingit.Unplugthe
power supply from the wall during a lightning storm or when the product is to be left unattend-
ed and unused for longer periods of time.
02
LARA -LINELEVELPreamplier-User Manual


ENVIRONMENT
1) Water and Moisture. Do not use this product near water - i.e. near a bathtub, ash bowl, kitch
en sink or laundry tub; in a wet basement; or near a swimming pool or the like. Damp base-
ments should be avoided.
2) Heat. The product should be situated away from heat sources such as radiators, heat regis-
ters, stoves or other appliances that produce heat. Also avoid putting the unit in the direct rays
of the sun.
3) For indoor use only.
PLACEMENT
1) Accessibility. It is normal for an audio device to run warm if used for prolonged periods.
Always place your device away from children and pets to prevent burns.
2) Ventilation. Proper ventilation is critical for safe and reliable operation of all vacuum tube
based equipment. This product should not be placed in a built-in installation or rack unless
proper ventilation is provided or the manufacturer’s instructions have been followed. Never
placeanythingontopofyourpreamplierthatcouldobstructairowandcausevacuum
tubestooverheatanddamagetheunit.Donotplaceyourpreamplierinaclosedbookcase;
overheatingcouldoccur.Ensurethatthereisatleast6”(150mm)ofopenspaceabovethe
preamplier.
3) Surface.Placetheunitonaatlevelsurface.Careshouldbetakentopreventobjectsfrom
fallingandliquidsfromspillingintotheunit.Donotsubjecttheunittoexcessivesmoke,dust,
vibration or shock.
MAINTENANCE
1) Cleaning.Unplugthisproductfromthewalloutletbeforecleaning.Donotuseliquidcleaners
oraerosolcleaners.Useadryclothforcleaning.Donotuseanytypeofabrasivepad,scour-
ingpowderorsolventsuchasalcoholorbenzene.
2) Tube replacement.Vacuumtubeshavelifeinthe5000hourrange.Werecommendreplac-
ing the tubes after 24-36 months, depending on your listening habits. That will ensure that the
preamplieralwaysperformsatitsbestandtubefailurewillnotoverstressotherpartsoftheunit.
3) Biasing the amplier.BiasingoftheLARApreamplierisnotrequired.
SERVICE
1) Replacement Parts.Whenreplacementpartsarerequired,besurethattheservicetechni-
cianusesreplacementpartsspeciedbythemanufacturerorpartswiththesamecharacter-
isticsastheoriginalpart.Unauthorizedsubstitutionsmayresultinre,electricshockorother
hazards.
2)Tubereplacement.Shoulditbecomenecessarytoreplacethevacuumtubes,removethe
ACpowerplugfromthewallandallowthirtyminutes(30min)forthehighvoltagecapacitors
to discharge. Follow instructions outlined below in the section “Handling vacuum tubes”.
3) Modications.Modicationstotheamplierarestronglydiscouraged.Theunitwasde-
signedbyexperiencedengineersandtestedforsafeandreliableoperation.Anymodication
may poses safety risk and result in reduced lifetime of the product. Any removal of the cover
will void warranty.
04
LARA -LINELEVELPreamplier-User Manual

05 LARA -LINELEVELPreamplier-User Manual
GETTING STARTED - ABOUT
YOUR LINE PREAMPLIFIER
Your LARA Line Level Preamplier was designed to provide high value based on its high
performance,whichisaresultofacarefullydesignedcircuitandoptimizedcomponentselec-
tion.Thedesignutilizesminimumnumberofactivepartsandtopqualitypassiveelements.The
LARAwasconceivedasapreamplierwithrecognizedTrafomaticAudiosoundqualitywhile
occupying more affordable price level.
The design is based on a very linear 6N30P vacuum tube and features maximum gain
of 20dB. The preamplier operates in Class A with custom designed output transformers. A
dedicated power supply is housed in a separate chassis, for maximum separation. LARA pre-
ampliercomeswithastandard,beautifullycraftedremotecontrol.
TheLARAhasthree(3)single-ended(RCA)andtwo(2)balanced(XLR)inputs,single-ended
(RCA)andbalanced(XLR)stereooutputs.Subwooferoutputisprovidedinstereoconguration.
As a valuable feature, phase reversal and ground lift switches are also available on the rear
panel.
HANDLING AND REPLACING VACUUM TUBES
Many people have never had experience handling vacuum tubes. Process is very similar to
handling in candescent light bulbs. As with the light bulbs, you should not touch a vacuum tube
when it is operating since you can burn yourself.
Similarly,ifatubeisdroppedonahardsurfaceitmaybreakorchangecriticaloperatingpa-
rameters.Whenreplacingthetubesandremovingthepreamplier’scover,allowsufcienttime,
minimum 30 minutes, for tubes to cool down andinternal capacitors to discharge.
Before you insert a tube you should make certain the unit is disconnected from the AC outlet.
Inspect the tube for cracks and physical damage.
Make sure that the pins are straight. If you need to straighten the pins,be very careful as it may
cause the glass envelope to break, causing the tube to lose the vacuum and fail as soon as the
preamplifer is powered on. Carefully align the pins with the socket and gently insert the tube.
Never force a tube into a socket.
The LARA preamplier is designed around the 6N30P vacuum tube as a gain stage.
Whenthetubesaredueforreplacement,pleasecontactTrafomaticAudioorauthorizeddealer
for recommendations about substitutes.
ShouldyoudecidetobuyreplacementtubesfromTrafomaticAudio,restassuredthattheyare
fully tested before the shipment.

LARA -LINELEVELPreamplier-User Manual 06
LARA -LINELEVELPreamplier-User Manual
PACKAGING
Savetheoriginalpackaginginadryplace.Thepackaginghasbeendesignedtoprotectyour
devicefromstressesincurredduringshipping.Usingpackagingdifferentfromtheoriginalin-
creases risks of shipping damages
PREPARATION FOR USE
Placeyourpreamplieronaat,stablesurface.
Powerswitch,locatedontheleftsideofthepowersupplyunitshouldbeintheOFF(0)po-
sition.
Makesurethatthevoltageselectorswitch(locatedontherearpanel,nexttotheACinlet)
isproperlyset:thisswitchneedstobesetsothatthenumberdisplayed(115or230)corre-
sponds with the line voltage in your country.
Connectthepowersupplyunitwiththepreamplierunitbyusingprovidedpowercable.
Plug in the power cord.
ConnectLINEOUToftheLARAtolineinputsofyouramplier.Ifapplicable,connectsub-
woofertotheSUBOUTconnectors.
Connectyouraudiosourcestothepreamplier’sinputs(L1throughL3andXLR1,XLR2).
Ifsomeofyoursourcesrequiresignalgrounding(turntabletonearm,forexample),connect
thewiretothegroundinglug(GND)ontherearpanelofthepreamplier.
Byusingthefrontpanelinputselectorswitch,selecttheappropriateaudiosource(L1through
L3andXLR1,XLR2).
Make sure that volume control is set to minimum position.
Turn on the LARA by using power switch located on the left side of the power supply unit.
Turnonyourpoweramplier.
Slowlyincreasevolume,tomakesuretherearenounusualnoisescomingoutofthespeak-
ers.
CONGRATULATIONS!YouareallsetandreadytoenjoyhighsoundqualityoftheLARA
LineLevelpreamplier.


CONTROLS AND THEIR FUNCTIONS
FRONT PANEL
Input Selector:Thevepositions“Inputs”switchisusedtoselectoneoftheveavailableinputs,marked(rca1
through rca3 and xlr1, xlr2).
Volume control:regulatesmaximumoutputsontheLINEOUTandSUBOUToutputs.
The front panel has window for the remote control receiver.
LEFT SIDE OF THE UNIT
Power ON/OFF switch:TheswitchturnsthepreamplierONandOFF
Whenturningonthepreamplier,makesurethatthevolumecontrolisatitsminimum.Thepreamplierwillbe
fullyfunctionalafteronly30seconds.However,asitwarmsupovertherst15minutesofoperation,youmay
notice subtle improvements in the sound quality.
Attheendofyourlisteningsession,makesuretoturntheamplieroff.Leavingitturnedondoesnotimprove
sound quality and it reduces life of the vacuum tubes.
Thepreampliershouldalwaysbeturnedonandoffviaitsownpowerswitch.
The left side also has the power on light
08
LARA -LINELEVELPreamplier-User Manual
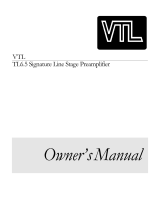
Volume control Input selector knob
Power supply box
Front view


CONTROLS AND THEIR FUNCTIONS
REAR PANEL - POWER SUPPLY UNIT
The only control on the rear panel is the line voltage selector switch located next to the AC power
inlet(ACINPUT).Thisswitchneedstobesetsothatthenumberdisplayed(115or230)corre-
sponds with the line voltage in your country.
REAR PANEL – PREAMPLIFIER UNIT
Groundinglug(GND)
Threesingle-ended RCA inputs (L1, L2 and L3)
Two pairs of balanced XLR inputs (XLR1, XLR2)
One pair of balanced XLR outputs (LINE OUTS)
Two switches for reversing phase of the output sig-
nal (PHASE)
Single-endedRCA outputs (LINE)
StereosubwooferRCA outputs (SUB)
Output grounding lift switch (OUT GND LIFT):
in some congurations, grounding of the system
can congure so-called “ground loops”. In certain
situation, this causes increased hum in the system.
Groundliftswitchisusedtobreakthe“groundloop”
while maintaining safety afforded by proper system
grounding. NOTE: never use the so called “cheater
plugs” to remove ground from the system, as it cre-
atespotentiallyhazardousconditions.
Power supply connector
The rear panel also hosts:
10
LARA -LINELEVELPreamplier-User Manual
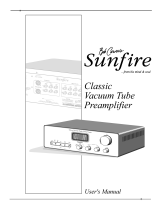
115/230V switch
AC Input socket
8 pin connector
Line outputs connectors
Line inputs connectors Reverse phase switch
Output ground lift switch
Main ground terminal
Back view

SERVICING
High quality parts and careful design of the LARA ensure long and reliable operation
without need for any maintenance other than that listed in the MAINTENANCE section. In
an unlikely case that the unit does not operate as intended, please contact factory or your
local distributor for assistance.
CAUTION
Lethalvoltagesarepresentinsidetheamplier.Donotremovethepreamplier’scovers.Ser-
vicingoftheunitshouldbeperformedonlybyauthorizedservicepersonnel.
11 LARA -LINELEVELPreamplier-User Manual

LARA -LINELEVELPreamplier-User Manual
TECHNICAL SPECIFICATIONS:
LARA - LINE LEVEL PREAMPLIFIER
Class of operation: Fully balanced Class A with line output transformers
S/N: – 88dB
Inputs:3xRCA,2xXLR
Outputs:1xRCA,1xXLR,1xSubOutindependent
Output Impedance:1KOhms,XLRandRCA
Frequency Response: 10Hz-67KHz(-1dB)
Vacuum Tube Complement: 2x 6N30P
Power supply: Low Induction toroid transformer by Trafomatic Audio, High Inductivity
custom made chokes, Mundorf MLytic HV type
Requirements:230V/50Hz-115V/60Hzswitchable
Power consuption:80VA
Weight: 10 kg
Dimensions: 400 x 310 x 100 mm
REMOTE CONTROL
LARA comes with its own dedicated remote control circuit. For the sake of simplic-
ity, reliability and long battery life, basic functionality is provided via two buttons:
volume up and down.
12
LARA -LINELEVELPreamplier-User Manual

www.trafomaticaudio.com
/