Main Specications
Roland KD-10: Kick Pad
Pad size 5 inches
Dimensions 210 (W) x 209 (D) x 443 (H) mm
8-5/16 (W) x 8-1/4 (D) x 17-1/2 (H) inches
Weight 3.3 kg 7 lbs 5 oz
Accessories Owner’s Manual, Connection cable
Options
(sold separately) Noise Eater (NE-10)
* This document explains the specications of the product at the time that the
document was issued. For the latest information, refer to the Roland website.
Check the Included Items
After opening the package, check that all of the included items
are present. If anything is missing, contact your dealer.
¹KD-10
¹Owner’s Manual
¹Connection cable
* This package does not include a kick pedal or beater. A variety of
commercially available beaters can be used, including felt, plastic, or
wood types.
Main Features
The Strike Feel of an Acoustic Kick Drum in a Compact Size
A strike surface combining dedicated mesh material with
cushion material provides the same strike feel as an acoustic
drum, while allowing a compact design.
Twin Pedal Support
In spite of its compact size, the strike surface is large enough to
accommodate twin pedal setups.
High Compatibility with Commercially-Available Kick Pedals
The pedal mounting plate has an adjustable angle to
accommodate dierences in the attachment mechanism and
position of various kick pedals. You can use the commercially-
available pedal of your choice.
Quiet Impact
A rubber cover with a proprietary structure is combined
with a dedicated cushion, providing a high degree of sound
absorption that is remarkable for a kick drum pad.
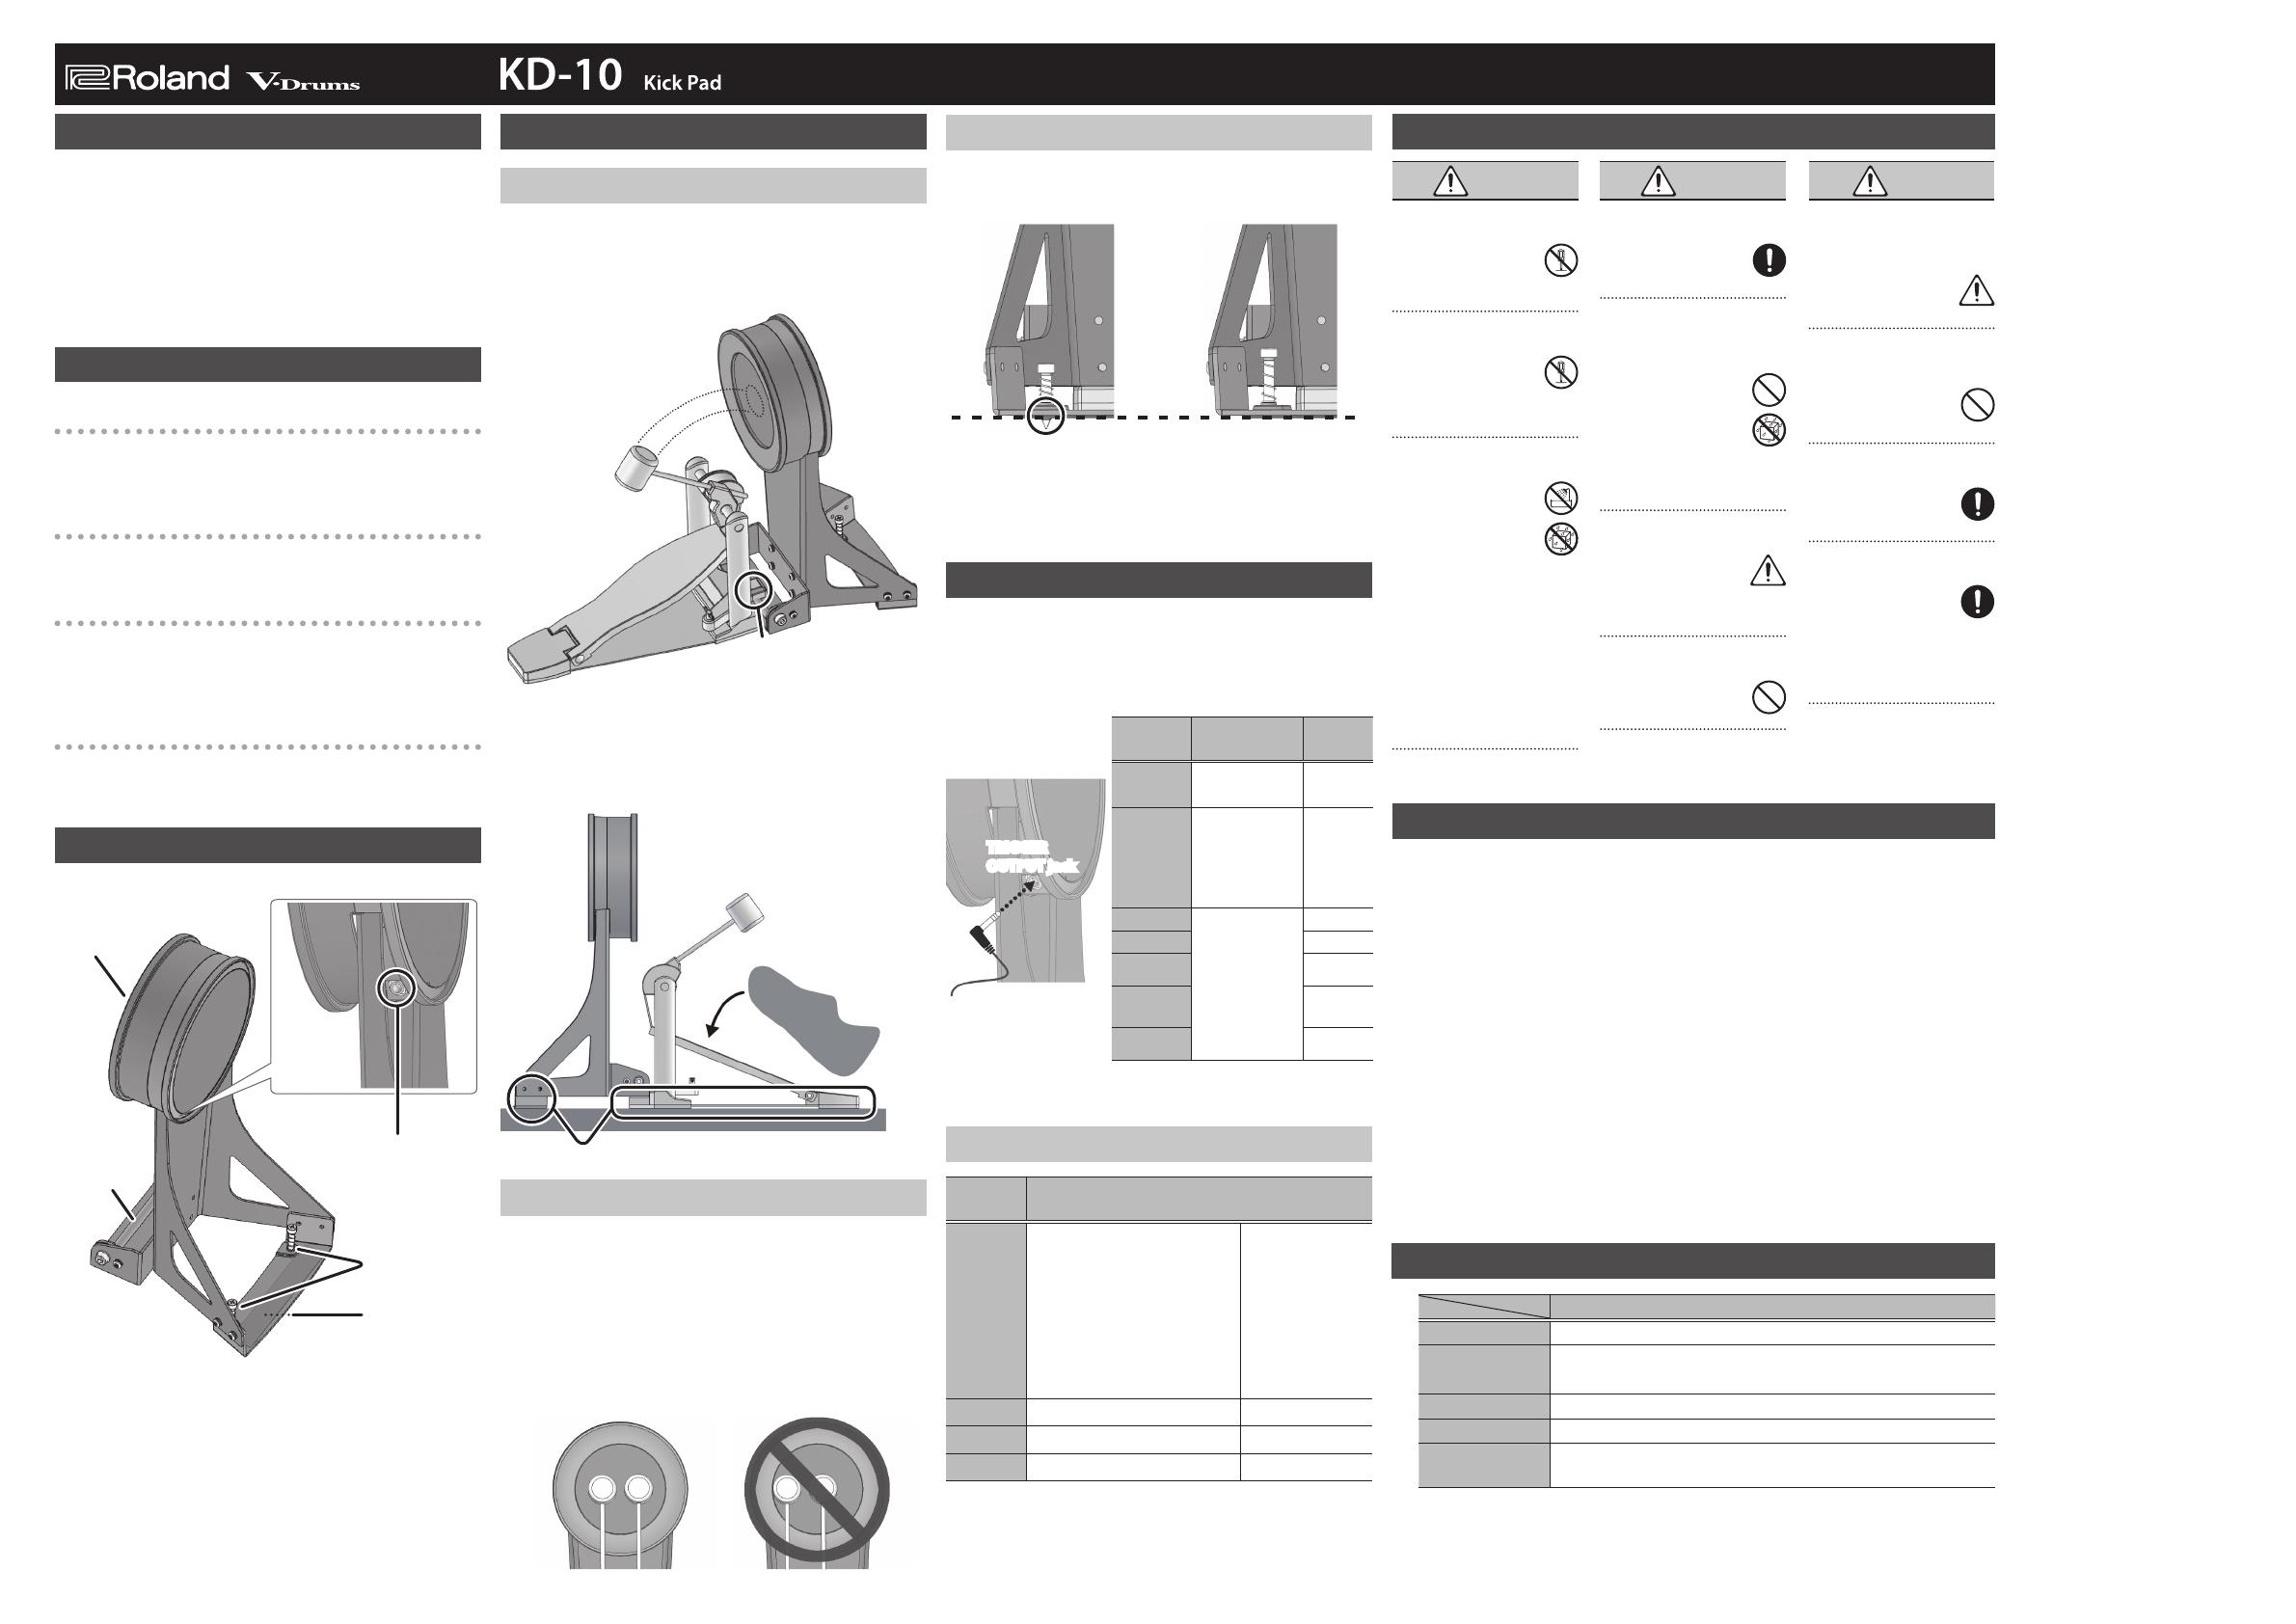
Descriptions
TRIGGER OUTPUT jack
Anchor bolts
Head
Slip-prevention
tape
Mounting
plate for the
kick pedal
* Do not subject the strike surface to any force other than performance,
and do not allow foreign objects to get inside it. Doing so will cause
malfunction or damage.
IMPORTANT NOTES
USING THE UNIT SAFELY
© 2018 Roland Corporation
EnglishOwner’s Manual
Adjusting the Anchor Bolts
If you’re using this unit on a V-Drums mat, on a Noise Eater (NE-
10), or on carpet, extending the anchor bolts will secure the
unit in place, making it easier for you to perform.
When using on
the V-Drums mat,
Noise Eater, or carpet
When using
on the oor
* When used on ooring, the anchor bolts may damage the oor.
* The tips of the anchor bolts are sharp. Handle with care.
Connections
Connect this unit’s TRIGGER OUTPUT jack to your sound
module, using the connection cable of your sound module or
the included connection cable.
* Connect the L-shaped plug of the cable to the KD-10’s TRIGGER
OUTPUT jack.
TRIGGER
OUTPUT jack
* To prevent malfunction and equipment failure, always turn down the
volume, and turn o all the units before making any connections.
* Make sure KD-10 does not touch the drum stand or other pads.
Sound Module Settings
Sound
module Value
TD-50/
TD-30/
TD-25/
TD-15/
TD-11/
HPD-20/
SPD-30/
SPD-SX/
TM-2
“Trig Type,”
“Pad Type,”
“Type”
KD-9
TD-1 “Pad Type” Kick Pedal: 2
TD-17 “Pad Type” KD-10
TM-6 PRO “Trig Type” KD-10
* Use the Sensitivity setting (Sens) to adjust the sensitivity of the pad to
your taste.
* If double triggering occurs, adjust the sensitivity by increasing the
value of the sound module’s trigger parameter “Threshold.”
Sound
module
Connection
cable Jack
TD-50/
TD-30
Connection cable
included with this
unit
KICK
TD-25/
TD-17/
TD-15/
TD-11/
TD-1
Connection cable of
sound module (KIK) –
HPD-20
Connection cable
included with this
unit
TRIG IN
SPD-30 1/KICK
SPD-SX TRIG IN 1/2,
TRIG IN 3/4
TM-6 PRO TRIGGER IN
1–6
TM-2 TRIG IN 1,
TRIG IN 2
Setup
Attaching the Kick Pedal
1. Attach the kick pedal.
Position the beater so that it strikes the center of the head,
then secure the kick pedal and KD-10 rmly in place.
* Take care not to pinch your ngers.
Beater
Install the kick pedal
securely.
2. Step on the kick pedal and make sure that it’s
properly attached and in a stable position.
Check to make sure that the base of the KD-10 and the
kick pedal both make contact with the oor.
Check to be sure they’re making contact with the oor
When Using a Twin Pedal
Position the two beaters equally apart from the center of the
pad as shown in the gure.
If one of the beater is further away from the center than the
other, the sound from the further beater will be lower in
volume, or will not sound as desired.
Using a twin pedal will result in lower sensitivity as compared
to when a single pedal is used. Raise the sensitivity on the
sound module.
Correct positioning Incorrect positioning
WARNING
Do not disassemble or
modify by yourself
Do not carry out anything
unless you are instructed to
do so in the owner’s manual.
Otherwise, you risk causing
malfunction.
Do not repair or replace parts
by yourself
Refer all servicing to
your retailer, the nearest
Roland Service Center,
or an authorized Roland
distributor, as listed on the
“Information.”
Do not use or store in the
following types of locations
• Subject to temperature
extremes (e.g., direct
sunlight in an enclosed
vehicle, near a heating
duct, on top of heat-
generating equipment);
or are
• Damp (e.g., baths, washrooms,
on wet oors); or are
• Exposed to steam or smoke;
or are
• Subject to salt exposure; or are
• Exposed to rain; or are
• Dusty or sandy; or are
• Subject to high levels of
vibration and shakiness; or are
• Placed in a poorly ventilated
location.
WARNING
Do not place in an unstable
location
Otherwise, you risk injury
as the result of the unit
toppling over or dropping
down.
Do not allow foreign objects
or liquids to enter unit; never
place containers with liquid
on unit
Do not place containers
containing liquid (e.g., ower
vases) on this product.
Never allow foreign objects
(e.g., ammable objects,
coins, wires) or liquids (e.g.,
water or juice) to enter this
product. Doing so may cause short
circuits, faulty operation, or other
malfunctions.
Be cautious to protect
children from injury
Always make sure that an
adult is on hand to provide
supervision and guidance
when using the unit in
places where children are present, or
when a child will be using the unit.
Do not drop or subject to
strong impact
Otherwise, you risk causing
damage or malfunction.
CAUTION
Route all power cords and
cables in such a way as to
prevent them from getting
entangled
Injury could result if
someone were to trip on a
cable and cause the unit to
fall or topple.
Avoid climbing on top of the
unit, or placing heavy objects
on it
Otherwise, you risk injury
as the result of the unit
toppling over or dropping
down.
Disconnect all cords/cables
before moving the unit
Damage or malfunction
may result if you fail to
disconnect all cables before
moving the unit.
Keep small items out of the
reach of children
To prevent accidental
ingestion of the parts listed
below, always keep them
out of the reach of small
children.
Removable Parts:
• Anchor Bolts
• Springs
Placement
• When moved from one
location to another where the
temperature and/or humidity
is very dierent, water droplets
(condensation) may form inside
the unit. Damage or malfunction
may result if you attempt to
use the unit in this condition.
Therefore, before using the
unit, you must allow it to stand
for several hours, until the
condensation has completely
evaporated.
• Do not paste stickers, decals, or
the like to this instrument. Peeling
such matter o the instrument
may damage the exterior nish.
• Do not place containers or
anything else containing liquid
on top of this unit. Also, whenever
any liquid has been spilled on
the surface of this unit, be sure
to promptly wipe it away using a
soft, dry cloth.
Maintenance
• Never use benzine, thinners,
alcohol or solvents of any
kind, to avoid the possibility of
discoloration and/or deformation.
Additional Precautions
• Use a reasonable amount of
care when using the unit’s
buttons, sliders, or other controls;
and when using its jacks and
connectors. Rough handling can
lead to malfunctions.
• When disconnecting all cables,
grasp the connector itself—never
pull on the cable. This way you
will avoid causing shorts, or
damage to the cable’s internal
elements.
• When you perform, the sound
and vibration of the impact can
travel unexpectedly well through
a wall or oor. Take care that you
are not inconveniencing other
people nearby.
Trademarks
• Roland, V-Drums, and Noise Eater
are either registered trademarks
or trademarks of Roland
Corporation in the United States
and/or other countries.
• Company names and product
names appearing in this
document are registered
trademarks or trademarks of their
respective owners.
Before using this unit, carefully read “USING THE UNIT SAFELY” and “IMPORTANT NOTES.” After reading,
keep the document(s) including those sections where it will be available for immediate reference.
