Page is loading ...

RefRigeRation
SyStemS
inStallation
manual
3/20 Rev. M 040086

2
3/20 Rev. M 040086
table of ContentS
Tools Required 3
General Information 4-5
Unpacking & Inspection for Ceiling Mount 4
Unpacking & Inspection for Remote 5
General Installation Instructions 6-17
Ceiling Mount Refrigeration Systems 6-15
Remote Refrigeration Systems 16-18
Instructions for Pre-Charged Lines 16-17
Instructions for Wire Harness 18
Outdoor Systems 19-20
Membrane Roong Material 19
Operation 21-23
Standard Temperature (Cooler) Systems 21
Low Temperature (Freezer) Systems 22-23
Maintenance 24
Maintenance Analysis 25

3/20 Rev. M 040086
3
toolS RequiRed
toolS RequiRed foR unCRating and inStallation of the RefRigeRation SyStem
• Safety glaSSeS
• PRy baR
• hammeR
• adjuStable oPen end WRenCh (2)
• dRill dRiveR
• PenCil

4
3/20 Rev. M 040086
CEILING MOUNTED REFRIGERATION SYSTEM
GENERAL INFORMATION
This Refrigeration System was produced utilizing the latest in manufacturing technology, the highest quality
materials available, along with innovations that make it a distinctive product in its field. Despite rigid controls in
the production of the product, there is no substitute for thoroughly reading and UNDERSTANDING the instructions
that follow. The result will be an orderly and efficient installation. Please take the time to follow the steps explicitly!
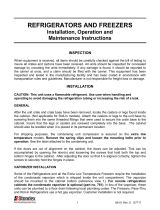
UNPACKING & INSPECTION--CEILING MOUNT SYSTEM
Check the Delivery Receipt for the number of pieces that made up the shipment and make sure that the number
of pallets, boxes or crates agrees with that number. Each piece should be clearly marked with the same five-digit
order number that appears on the Delivery Receipt as the shipper's number.
Examine the general condition of the shipment and, as soon as unpacking is completed, carefully inspect all parts
for possible shipping damage. If damaged parts are discovered, contact the supplier immediately.
It is recommended the condensing unit be elevated from the deck a minimum of 12"-18" to ensure the condenser
fan is not drawing or pulling heat reflected off the building roof or pavement in a grade level installation in which
the summer heat may exceed +120°F. Ambient temperature around the system should be less than +90°F and
50% RH.
RefRigeRation SyStemS-geneRal infoRmation
Delivery Receipt

3/20 Rev. M 040086
5
UNPACKING & INSPECTION FOR REMOTE REFRIGERATION SYSTEMS
Check the Delivery Receipt for the number of pieces that made up the shipment and make sure that the number
of pallets, boxes or crates agrees with that number. Each piece should be clearly marked with the same five-digit
order number that appears on the Delivery Receipt as the shipper's number.
Examine the general condition of the shipment and, as soon as unpacking is completed, carefully inspect all parts
for possible shipping damage. If damaged parts are discovered, contact the supplier immediately.
For outdoor systems it is recommended the condensing unit be elevated from the deck a minimum of 12"-18" to
ensure the condenser fan is not drawing or pulling heat reflected off the building roof or pavement in a grade level
installation in which the summer heat may exceed +120°F.
For indoor systems the ambient temperature around the system should be less than +90°F and 50% RH.
RefRigeRation SyStemS-geneRal infoRmation

6
3/20 Rev. M 040086
geneRal inStallation inStRuCtionS
GENERAL INSTALLATION INSTRUCTIONS
This section has the general instructions for installing the ceiling mounted Refrigeration System. Before proceeding,
also see the following section on mounting "Remote Systems with Electric Vaporizer", if applicable.
Note: Proper "temporary" support of the ceiling panel with the cut out must be added during the installation of the
refrigeration.
Note: Due to the weight of these systems (approximately 150 lbs.), it is highly recommended that proper lifting
equipment, such as a fork lift or material lift, be utilized during installation. Be sure to allow for sufficient airflow
around the condenser. A 4" minimum clearance is required above the condensing unit. If multiple units are located
in the same area, be sure they do not exhaust hot air into one another. Refer to section titled "Locating and
Mounting Condensing Units" for details. In addition to allowing for proper airflow, consideration should be given to
the final mounting location of the refrigeration system relative to the customer location to avoid any possible risk
of noise impacting the customer experience.
Position the insulated evaporator section of the Refrigeration System over the hole in the walk-in ceiling section.
Special care should be used when positioning the evaporator section over the ceiling cut-out. Be sure not to
damage the gasket underneath the evaporator section.
Seal perimeter as described in the Diffuser Installation Instructions found on pages 8 and 9. When reinstalling the
diffuser panel, make sure the ceiling section divider on the panel seals against the black gasket. Some adjustment
may be required by simply bending the ceiling section divider slightly forward or backward. This will prevent any
short cycling of discharge and return air.
Note: On smaller refrigeration systems, you may elect to install the system on the ceiling section while the section
is still on the floor. CAUTION! Make sure to fasten down the system to the ceiling panel. The ceiling section and
the refrigeration system may then be erected together in the normal sequence of assembly as shown in the Kold
Locker™ Walk-in Installation Instructions. This method is not practical and should not be used with larger systems
of 100 series or above.

3/20 Rev. M 040086
7
GENERAL INSTALLATION INSTRUCTIONS
Some systems require a permanent connection to an electrical service and a connection at the junction box
located within the condensing unit housing. Refer to the serial tag for all pertinent electrical data. These systems
must be connected to a power supply disconnect switch and wired according to local and national electric codes.
With some models, no plumbing drain is required. For models requiring an optional condensate vaporizer (see
page 12 for installation details).
Wiring Instruction for The Two-Piece Refrigeration System
Note: Do not mount power disconnect to the condensing unit housing
After the equipment is properly located on the walk-in: Each piece of equipment is pre wired to a designated
termination in the J-box. Electrical power connections are provided and labeled appropriately. For a close-
coupled system use the wiring harness provided to compete the final electrical connection between the
condensing unit sections directly to the evaporator section. Note the diagrams for electrical details.
geneRal inStallation inStRuCtionS
This will require a single point power connection at the electrical J-box on the condensing unit base. Refer to
serial tag for electrical circuit requirements.
Remote Applications (Power Drop Situations)
Each piece of equipment is pre-wired to a designated termination in the J-box. Electrical power connections are
provided and labeled appropriately. Complete power connections in J-box electrical provided. See serial tag for
each component for electrical specications.

8
3/20 Rev. M 040086
PRS-2 SERIES DIFFUSER INSTALLATION INSTRUCTIONS
1. Remove diffuser from ceiling panel before installing ceiling panel (Figures 1 and 2)
2. Lift PRS-2 series into position on top of walk-in. Note: Do not slide PRS-2 series into position as cowl gasket
damage will occur. If the PRS-2 series must be slid into position, place PRS-2 series on a piece of cardboard
prior to moving to prevent gasket damage.
3. Inspect cowl gasket to ensure proper placement (Figure 3)
geneRal inStallation inStRuCtionS
Figure 3
Figure 2
Figure 1

3/20 Rev. M 040086
9
4. Seal cowl to ceiling at gasket seam above diffuser panel using provided silicone (Figure 4)
5. Replace diffuser panel removed in step 1.
geneRal inStallation inStRuCtionS
Figure 4

10
3/20 Rev. M 040086
CONNECTING REFRIGERATION BASE TO THE EVAPORATOR
(INDOOR CLOSE-COUPLED MODELS)
Carefully align the condensing unit and evaporator section at the refrigeration connections using the alignment
bolts provided on the evaporator section. Position the condensing unit’s slots over the positioning bolts on the
evaporator section. Fasten the bolts securely to the evaporator section.
geneRal inStallation inStRuCtionS

3/20 Rev. M 040086
11
MAKING REFRIGERATION CONNECTION (CLOSE-COUPLED SYSTEMS)
By employing self-sealing refrigeration couplings, the condensing unit section, evaporator section, and the
connecting tubing are separately pre-charged with refrigerant and leak tested at the factory before shipment.
Carefully align the Condensing unit and evaporator section at the refrigeration connections using the alignment
bolts provided.
1. Remove the dust caps and plugs from the couplings and inspect them to see if the synthetic seals are intact.
2. Using a clean cloth, wipe the coupling seals and threaded surfaces to prevent the inclusion of any dirt or foreign
material in the system.
3. Lubricate the synthetic seal in the male half of the couplings with refrigeration oil and thread the two coupling
halves together BY HAND to ensure proper mating of the threads. Note: Make certain that the insulated suction
line is connected to the coupling half marked "Suction Line" and that the bare tube liquid line is connected to the
coupling half marked "Liquid Line".
geneRal inStallation inStRuCtionS

12
3/20 Rev. M 040086
OPTIONAL FEATURE - ELECTRIC CONDENSATE VAPORIZER
Indoor PRS-2 series Applications (do not use condensate vaporizer for an outdoor application)
The vaporizer is intended to be mounted in the orientation shown below. Note the location of the condensate drain
coming from the evaporator and locate the vaporizer so the condensate water will drain into it. Use the supplied
plastic tubing and copper elbow and extend the drain into the vaporizer. Cut the plastic tubing to the desired length.
Provide power to the electric vaporizer per local national electrical codes. Avoid locating vaporizer below any
electrical enclosures.
geneRal inStallation inStRuCtionS

3/20 Rev. M 040086
13
OPTIONAL FEATURE - ELECTRIC CONDENSATE VAPORIZER
PRS-2 series Applications using kit number 133141 (208/230 Volt Models Only)
Conrm the unit is disconnected from the power supply then remove housing from condensing unit. Route the
drain line from the evaporator section plastic tubing, copper elbow and clamps from kit as shown in Figure 1.
Remove hole plug from vaporizer and position so that copper tube extends into pan as shown in Figure 2. Make
sure the end of the copper elbow is pointing down and not up inside the vaporizing pan so it does not create a
trap. Remove hole plug and feed power supply cord through hole in control panel and connect leads at terminal
block posts and ground wire to ground stud per local and national electric codes as shown in Figure 3. Secure
cord with strain relief and use wire clamp as needed to locate cord. Replace condensing unit housing and
energize unit.
WARNING: THE VAPORIZER IS HOT AND THE COVER MUST BE USED!
Figure 1
Figure 2
Figure 3
Vaporizer electrical specication for 132962 and vaporizer electrical for 133141 vaporizer kit noted below.
geneRal inStallation inStRuCtionS

14
3/20 Rev. M 040086
Set the Refrigeration System evaporator section over the
hole in the ceiling section. Align the evaporator with the clips
provided and lock in place. Refer to the Diffuser Installation
Instructions found on pages 8 and 9. Seal the seam using
silicone provided. When reinstalling the Diffuser Panel, make
sure that the ceiling section divider located on the panel
seals against the black gasket. Some adjustment may be
required by simply bending the ceiling section divider slightly
forward or backward. This will prevent any short cycling of
discharge and return air.
Fasten the evaporator section down to the ceiling using the
provided drive screws, which can be found taped to the side
of the insulated evaporator section.
CAUTION! This must be done to prevent the entire
refrigeration system from moving during operation.
FOR REMOTE SYSTEMS WITH ELECTRIC VAPORIZER
geneRal inStallation inStRuCtionS

3/20 Rev. M 040086
15
LOCATING AND MOUNTING CONDENSING UNITS
Condensing units (CU’s) must be located where there is an unrestricted supply of clean, fresh air. Do not locate
units where air discharge from one will enter into the air intake of others nor where the air ow is toward a wall or
obstruction. Avoid locating units in restricted spaces where heat will build up and can enter the condenser. There
must be room around the unit for regular inspection and service. Master-Bilt recommends 200CFM in any area
where condensing units may be located. Air ow should be sufcient to maintain an ambient temperature of no
more than 85°
Walls or Obstructions
The units should be located so that air may
circulate freely. For proper air ow, all sides of
the unit should be a minimum of the width of the
condensing unit away from any wall or obstruc-
tion. It is preferred that this distance be increased
whenever possible.
Multiple units
For units placed side by side, the minimum
distance between units should be the width of
the largest unit. If units are placed end to end,
the minimum distance between units should be 4
feet.
Roof mounted condensing units must have adequate support for their operating weight. Corrosive atmospheres
require custom design condensers.
It is recommended the condensing unit be elevated from the deck a minimum of 12"-18" to ensure the condenser
fan is not drawing or pulling heat reected off the building roof or pavement in a grade level installation in which
the summer heat may exceed +120°F
Condensing Unit
Walk-in Ceiling
Building Wall
Walk-in Ceiling
Condensing Unit Condensing Unit
geneRal inStallation inStRuCtionS

16
3/20 Rev. M 040086
INSTRUCTIONS FOR PRE-CHARGED LINES - REMOTE SYSTEMS
By employing self-sealing refrigeration couplings, the condensing unit section, evaporator section, and the
connecting tubing are separately pre-charged with refrigerant and leak tested at the factory before shipment.
Follow steps 1-8 below to install the connecting tubing at both the condensing unit and the evaporator section.
1. Carefully uncoil the suction line. This is the line covered with a continuous
length of sponge rubber insulation.
2. Carefully uncoil the liquid line. The liquid line is the smaller diameter, bare
copper tube.
3. Before making any connections, determine the routing of both lines and
carefully hand bend them to suit the situation. Keep any bend radius rather
large to prevent kinking the tubing. It is a general practice to route the suction
and liquid line parallel and close together in the installation.
4. Remove the dust caps and plugs from the couplings and inspect them to
see if the synthetic seals are intact.
5. Using a clean cloth, wipe the coupling seals and threaded surfaces to
prevent the inclusion of any dirt or foreign material in the system.
6. LUBRICATE the synthetic seal in the male half of the couplings with
refrigeration oil and thread the two coupling halves together BY HAND to
ensure proper mating of the threads. Note: Make certain that the insulated
suction line is connected to the coupling half marked "Suction Line" and that
the bare tube liquid line is connected to the coupling half marked "Liquid Line".
Note: Always use two wrenches on the coupling body hex nut and on the union
to prevent twisting of the tube while tightening the connections as described in
the next step.
7. Using the proper size wrench on the union nut, tighten until the coupling
bodies bottom, or until a definite resistance is felt. Tighten an additional 1/6 to
1/4 turn. This final turn is needed to compress the spring loaded fitting allowing
the free flow of refrigerant and to seal the coupling. We advise leak checking
the couplings to ensure there are no leaks.
Note: legs shown in photos are not standard but instead, an optional item.
Connecting to the Condensing Unit Side
Remote RefRigeRation SyStemS

3/20 Rev. M 040086
17
8. Once the suction line is connected, the sponge insulation must be pulled up to cover the quick connects. Tie
or tape off the insulation to prevent air infiltration and reduce water/ice formation on the suction line.
All valves are open and the system is ready for operation. Remember, the refrigeration couplings on this system
are self sealing and, if the need ever arises, the couplings may be disconnected without any loss of refrigerant.
IMPORTANT: Since this system is equipped with pre-charged refrigerant lines, it is the installing contractor’s
responsibility to ensure that the quick connect refrigerant couplings are properly mated and are leak free. It is also
their responsibility upon start-up to check the system for proper operation and make any necessary temperature
control or thermal expansion valve adjustments.
Note: A drain line is required to be run by the contractor for this type of installation.
CAUTION: Line set must not exceed 3 feet longer than required length to complete connection or improper oil
return may result in compressor failure. Contact the Service Department with model and serial number for further
assistance.This information is also included on a tag attached to the line set.
Some systems require a permanent connection to an electrical service and a connection at the junction
box located within the condensing unit housing. Refer to the serial tag for all pertinent electrical data.
These systems must be connected to a power supply disconnect switch and wired according to local and
national electric codes. Do not attach power disconnect to the condensing unit housing.
Remote RefRigeRation SyStemS

18
3/20 Rev. M 040086
1. All systems with a wire harness will have a “K” at or near the end of the model number.
Example: RCPB100DC-A-50K.
2. These systems will come with the wire harness already wired to the condensing unit section of the refrigeration
system.
3. These wire harnesses will have approved seal tight conduit and connectors.
4. Before power is connected to the condensing unit section it should first be wired to the evaporator section with
the wire harness provided.
5. Remove the control box cover on the evaporator section.
6. Make the proper connections inside the control box on the evaporator section as shown in the wiring diagram
provided with the system.
7. Replace the cover on the control box when wiring is completed.
8. Now power can be brought to the condensing unit section of the refrigeration system.
If you do not have the wiring diagram, contact the factory for the correct one. Have your model and serial
number available when you call.
Remote RefRigeRation SyStemS With WiRe haRneSS

3/20 Rev. M 040086
19
OUTDOOR SYSTEMS UTILIZING A MEMBRANE ROOFING MATERIAL
1. After the walk-in is completely assembled,
place the curb face down on top of
the ceiling sections (curb is fastened
to crate base during shipping and
must be removed and installed prior to
membrance roof installation). To ensure
proper opening alignment, mark the
outside portion of the curb on the ceiling
sections with a marking pencil.
2. Remove the paper from the gasket and
position the curb, gasket side down, on
the pencil line. Press down firmly. Note:
Movement of the curb is very difficult
after the gasket adheres to the ceiling
section. Refer to Figure 1.
3. Lay the membrane roofing material
over the walk-in ceiling sections and
curb leaving a six inch overhang
on all four sides of the walk-in.
Using an utility knife, cut a hole in
the membrane roof approximately
1-1/2” in from the edge of the
opening. (The resulting hole in the
membrane will be smaller than the
ceiling opening). Fold the 1-1/2”
membrane flaps into the opening,
notching the membrane around
the locators and divider. Use either
sheet metal screws, caulk, glue,
etc. to fasten the membrane roofing
material to the inside edge of the
curb frame. Refer to Figure 2. Do
not make any penetrations in the top
of the membrane roof. Any needed
penetrations should be through the
side wall to maintain the integrity of
the roof.
Curb
Alignment Marks
Ceiling Sections
Walk-In
Figure 1
outdooR SyStemS
Membrane
Roofing
Opening
Fasten to Edge
of Curb Frame
Cutout Line
Walk-In
Figure 2

20
3/20 Rev. M 040086
4. Set the Refrigeration System over
the opening in the curb. Refer to the
Diffuser Installation Instructions found
on pages 8-9. Seal the seam as
described in the instructions. When
reinstalling the Diffuser Panel, make
sure that the ceiling section divider
located on the panel seals against the
black gasket. Some adjustment may
be required by simply bending the
ceiling section divider slightly forward
or backward. This will prevent any
short cycling of discharge and return
air.
Before proceeding to step 5, pull
membrane straight and smooth before
installing the trim.
Note: Seal gasket at top of curb with
silicone.
5. Fold all four corners of the membrane
roofing material over the walk-in corners as shown in Figure 4.
6. Attach the trim and door hood (if your walk-in is equipped with them)
by using the provided pan head sheet metal screws. Ensure the trim
and membrane roof material cover the joint between the ceiling and
wall panels. Refer to figure 5. Note: The trim may have to be cut to fit.
7. Trim off all excess membrane roofing material
from under the trim with a utility knife. Do not allow the knife to cut the
metal panel, as this will damage the coating and cause rust.
NOTE: In outdoor installations, the condensate
line should be plumbed to the nearest drain
and a P-trap installed near the end. Check local
building codes. Outside drain lines must also
be wrapped with a suitable heater wire and
insulated if they are ever subjected to below
freezing temperatures.
Fold Membrane
Figure 4
outdooR SyStemS
Capsule Pak™
Membrane
Roofing
Opening
Walk-In
Figure 3
Ceiling Panel
Membrane Roof
Material
Trim by Nor-Lake
3"
Figure 5
1/26