IMPORTANT SAFETY
INSTRUCTIONS
READ AND SAVE THESE SAFETY
INSTRUCTIONS BEFORE USING THIS
HUMIDIFIER
When using electrical appliances, basic precautions
should always be followed to reduce the risk of re,
electric shock, and injury to persons, including the
following:
1. Always place this humidier on a rm, at and level
surface. This humidier may not work properly on an
uneven surface.
2. Place this humidier in an area where it is not accessible
to children.
3. Do not place the humidier near any heat sources such as
stoves, radiators, and heaters.
4. Do not use the humidier outdoors.
5. Before using the humidier, check the power cord for any
signs of damage. If the cord is found to be damaged, DO
NOT USE and return the humidier to the manufacturer
under the warranty agreement for repair.
6. This appliance has a polarized plug (one blade is wider
than the other). To reduce the risk of shock, this plug is
intended to t only one way in a polarized outlet. If the
plug does not t securely in the outlet, reverse the plug. If
it still does not t, contact a qualied electrician. DO NOT
attempt to defeat this safety feature.
7. To disconnect the humidier, rst turn controls to the
OFF position, then grip the plug and pull it from the wall
outlet. Never pull by the cord.
8. A loose t between the AC outlet (receptacle) and plug
may cause overheating and a distortion of the plug.
Contact a qualied electrician to replace loose or worn
outlet.
9. The humidier should always be unplugged and emptied
when not in operation or while being serviced or cleaned.
10. Never tilt or attempt to move the humidier while it is
operating or lled with water. UNPLUG the humidier
before moving.
11. This humidier requires regular cleaning. Refer to
the CLEANING instructions provided. Never clean the
humidier in any manner other than as instructed in this
manual.
12. Do not direct moisture ow directly at individuals, walls
or furniture.
13. When a humidier is used in a closed room or small
rooms, check periodically for proper ventilation, as
excessive humidity can cause condensation stains on
walls.
14. Turn the humidier OFF if you notice moisture on the
inside of your windows. For proper humidity reading
use a hygrometer, which is available in many hardware
and department stores, or by ordering one from the
manufacturer.
Cool Moisture HuMidifier witH
w
asHable filter
HCM-800 Series
The Honeywell trademark is used by Kaz, Inc. under license from Honeywell Intellectual Properties, Inc.
HCM-800_OM.indd 1 4/5/07 12:06:37 PM

2
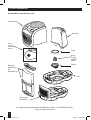
SETTING UP YOUR HUMIDIFIER
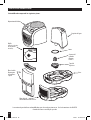
Your humidier is made up of these parts:
It is recommended that you disinfect your humidier prior to rst use. See CLEANING Instructions.
*Protec
TM
cartridge sold separately.
Motor Housing
Permanent
Washable Filter
and
Filter Holder-1 pc
Water Tank
Base
Tank Cap
Gasket
Screen
(Located
under Motor
Housing)
Filter properly
located on base
Protec
TM
Cleaning
Cartridge
Holder*
HCM-800_OM.indd 2 4/5/07 12:06:38 PM

3
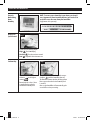
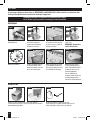
SETTING UP YOUR HUMIDIFIER (CONT’D)
Select a rm, level location at least 6” (15cm) from any walls
for proper airow. Place the humidier on a water-resistant
surface, as water can damage furniture and some ooring.
Kaz will not accept responsibility for property damage caused
by water spillage.
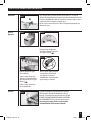
Placement
Fill Tank
Power
Step 1
Step 1
Remove the water tank Turn tank upside-down.
Remove tank cap by turning
counter- clockwise
.
Step 2
Step 3
Step 4
Fill tank with cool tap water.
Replace tank cap. Tighten by
turning clockwise
.
Place tank back on humidier.
Once the lled water tank has
been placed on the unit do not
move humidier. Doing so could
cause leakage and spills.
With the power switch in the OFF position, plug the
lled humidier into a polarized 120V outlet. DO NOT
FORCE THE POLARIZED PLUG INTO THE OUTLET; it will
only t one way.
DO NOT plug in humidier with wet hands to
avoid electric shock.
Step 1
Water Tank
HCM-800_OM.indd 3 4/5/07 12:06:41 PM

4
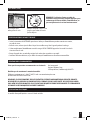
OPERATING YOUR HUMIDIFIER
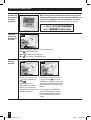
Output/Fan
Speed Control
Set Humidity
Step 1
Set fan speed to desired output:
High ( ) Fast Humidifying
Medium ( ) Everyday moisture control
Low ( ) Nighttime or maintenance use
Step 1
Turn the humidistat knob
clockwise
to the highest
setting (
).
Run on high for at least 1 hour
or until room has reached a
comfortable humidity level.
Step 2
Then, slowly turn the humidistat knob counter-
clockwise
until the humidier shuts o.
The illuminated water window will change from
blue to green when the desired humidity level
is reached.
Once set, the humidier will automatically cycle
on and o based on your setting.
NOTE: To ensure proper humidity in your home, you should
use a hygrometer (room humidity indictor) such as the E-10
and place across the room from your humidier.
(Hygrometer sold separately)
Properly
Maintaining
Room
Humidity
HCM-800_OM.indd 4 4/5/07 12:06:43 PM

5
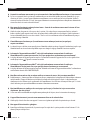
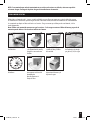
NOTE: It is recommended that all maintenance be done in the kitchen or bathroom on a water resistant surface.
Remove water tank from unit before moving.
The lter should be cleaned every 1-3 months depending on your water quality. Keep in mind, depending on your water quality,
mineral deposits can still clog or discolor the lter, aecting the performance of your humidier.
It is recommended you clean your lter in the bathroom or kitchen. Keep in mind your lter may be damp depending on your
last usage.
Note: Filter is contained in a lter holding frame. Please do not remove lter from frame or it may be damaged.
Do not discard your lter or frame.
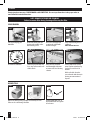
Step 1 Step 2 Step 3 Step 4
Step 5 Step 6 Step 7
Turn o and unplug your
humidier.
Remove the water tank and
motor housing and carefully
set aside.
Remove lter holding frame
and lter from the unit.
Soak lter in 2 tsp vinegar
per gallon of water.
Let stand for 20 minutes. Insert lter frame back into
the base of the humidier.
Note: Do Not Wring or
Squeeze Filter.
Replace motor housing and
water tank.
CLEANING YOUR FILTER
HCM-800_OM.indd 5 4/5/07 12:06:44 PM

6
Step 1 Step 2
1
g
a
l
Step 3
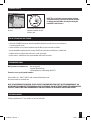
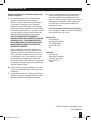
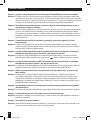
DISINFECTING
Remove the motor housing and lter and carefully set aside.
Failure to do so will damage the lter.
Fill water tank with 1 tsp. of
household bleach and 1 gallon
of cool water.
Let stand for 20 minutes With vinegar in the tank and
base, wipe surface with a soft
cloth or brush.
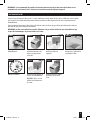
Step 6 Step 7Step 5 Step 8
Rinse the base and water
tank thoroughly with water
to remove scale and cleaning
solution.
Fill base with clean, cool tap
water. Replace motor housing
back on base and let sit 20
minutes.
With a soft cloth, clean the
screen located under the main
housing to remove mineral
deposits.
NOTE: REMOVE FILTER BEFORE CLEANING.
Failure to remove lter during cleaning will destroy the lter.
Step 1 Step 2 Step 3 Step 4
Turn o and unplug your
humidier.
Remove the water tank and
housing and carefully set the
motor housing aside.
Place base and water tank
in sink or tub and ll with
undiluted vinegar.
Place motor housing on base
and let sit.
NOTE: Do not turn on.
SCALE REMOVAL
Cleaning involves two steps, SCALE REMOVAL and DISINFECTING. Be sure to perform these in the proper order to
avoid harmful chemical interactions.
CLEANING
HCM-800_OM.indd 6 4/5/07 12:06:46 PM

7
Pour some solution into
the base.
Step 4
NOTE: The use of other water treatment products
and chemicals may cause deterioration of the lter
or damage the humidier, thereby hindering the
humidier’s eectiveness.
END-OF-SEASON CARE AND STORAGE
• Follow the CLEANING instructions when the humidier will not be used for at least one week or more,
or at the end of the season.
• At the end of the season, remove and throw away the lter; do not store with a used lter.
• Dry the humidier completely before storing. DO NOT store with water inside the Base or Water Tank.
• Pack the unit in its original carton and store in a cool, dry location.
• Before next use, remember to clean your humidier and install a new lter.
CONSUMER RELATIONS
Mail questions or comments to: Kaz, Incorporated
Consumer Relations Dept.
250 Turnpike Road, Southborough, MA 01772
Please be sure to specify model number.
Call us toll-free at: 1-800-477-0457; E-mail: consumerr[email protected]
Or visit our website at: www.kaz.com
NOTE: IF YOU EXPERIENCE A PROBLEM, PLEASE CONTACT CONSUMER RELATIONS FIRST OR SEE YOUR WARRANTY. DO
NOT RETURN THE HUMIDIFIER TO THE ORIGINAL PLACE OF PURCHASE. DO NOT ATTEMPT TO OPEN THE MOTOR HOUSING
YOURSELF, DOING SO MAY VOID YOUR WARRANTY AND CAUSE DAMAGE TO THE PRODUCT OR PERSONAL INJURY.
ELECTRICAL RATINGS
The Honeywell QuietCare™ Series models are rated at 120V, 60 Hz.
Step 5
Let stand for 20 minutes. Rinse
with water until the smell of
bleach is gone.
CLEANING (CONT’D)
HCM-800_OM.indd 7 4/5/07 12:06:46 PM

8
TROUBLESHOOTING
Q: I hear the fan turning, but I don’t see any mist. Is my humidier operating properly?
A: Dry air is pulled through the system and a fan disperses invisible, moisture balanced air. There is no “mist” emitted. When
operating normally you will feel only cool air coming from the unit. Monitor the water level in your Tank/ Base. If you notice
a decrease in the Water Tank over 24 hours then the unit is operating normally.
Q: My unit has been running for several hours. I hear the fan spinning, but I do not notice the water level in the
tank decreasing.
A: Check the water window to see if water is owing through the system. If the water window does not show any water owing,
then remove the housing and check the silver screen located on the bottom of the pump to ensure the screen is not blocked.
Also please note, if the humidity level in your home is above 60%, you air is fully saturated and the humidier will be unable
to put out additional moisture.
Q: The humidier is not running (the fan is not even spinning), but all (or some) of the lights are on.
A: The water window will change from blue to green when your desired humidity is reached. The unit will then shut o until the
room humidity drops below the preset level or you change the control to a higher humidity setting.
Q: The Advanced Mist™ Humidistat knob was set according to the manual, but the humidier never seems to turn
back on. Is something wrong?
A: The Humidistat knob may be set too low. Moving the Humidistat knob to the end clockwise should restart the unit.
Q: The Advanced Mist™ Humidistat knob was set according to the manual, but the humidier never seems to turn
o. Is something wrong?
A: The Humidistat knob may be set too high. Reset the Advanced Mist™ Humidistat knob following the instructions under
FEATURES.
Q: My lter has turned light brown and rust colored or has a lot of scaling. Do I need to clean my lter?
A: Probably not. Since your lter has been made with Protec™ antimicrobial the change in color indicates only a mineral
deposit. Soak lter in a sink full of cool water to help break up deposits. The discoloration may remain but will not aect
the humidier’s performance. Your lter should however be cleaned every 1-3 months depending on usage to keep your
humidier operating properly
Q: My humidier doesn’t appear to be as clean as when I rst purchased and/or I’m smelling an unpleasant odor.
What should I do?
A: If you have been using your humidier regularly for over 30 days, follow the cleaning instructions.
Q: Unit is running but I do not see any visible water movement in my water window.
A: Check to be sure your unit is not out of water. Also check to make sure the pump inlet screen is not clogged.
Q: My unit makes a gurgling sound.
A: When the unit rst starts up, there may be air that is sucked into the system which can produce this sound. Please allow 15 to
30 minutes for this to go away.
HCM-800_OM.indd 8 4/5/07 12:06:46 PM

9
You should rst read all instructions before attempting
to use this product.
A. This 3 year limited warranty applies to repair or
replacement of product found to be defective in material
or workmanship. This warranty does not apply to damage
resulting from commercial, abusive, unreasonable use
or supplemental damage. It also does not apply to the
lter or Protec™ Cleaning Cartridge. Defects that are the
result of normal wear and tear will not be considered
manufacturing defects under this warranty.
KAZ IS NOT LIABLE FOR INCIDENTAL OR
CONSEQUENTIAL DAMAGES OF ANY NATURE. ANY
IMPLIED WARRANTY OF MERCHANTABILITY OR
FITNESS FOR A PARTICULAR PURPOSE ON THIS
PRODUCT IS LIMITED IN DURATION TO THE DURATION
OF THIS WARRANTY.
Some jurisdictions do not allow the exclusion or limitation
of incidental or consequential damages or limitations
on how long an implied warranty lasts, so the above
limitations or exclusions may not apply to you. This
warranty gives you specic legal rights, and you also
may have other rights which vary from jurisdiction to
jurisdiction. This warranty applies only to the original
purchaser of this product from the original date of
purchase.
B. At its option, Kaz will repair or replace this product if it is
found to be defective in material or workmanship.
C. This warranty does not cover damage resulting from any
unauthorized attempts to repair or from any use not in
accordance with the instruction manual.
D. Return defective product to Kaz, Incorporated with a brief
description of the problem. Include proof of purchase and
a $10 US/$15.50 CAN check or money order for handling,
return packing and shipping charges. Please include your
name, address and a daytime phone number.
You must prepay shipping charges. We suggest
having tracking or delivery conrmation. Send to:
In U.S.A.:
Kaz, Incorporated
Attn: Returns Department
4755 Southpoint Drive
Memphis, TN 38118
USA
In Canada:
Kaz Canada, Inc.
Attn: Returns Department
510 Bronte Street South
Milton, ON L9T 2X6
Canada
3 YEAR LIMITED WARRANTY
©2007 Kaz, Incorporated. All Rights Reserved.
P/N: 31IMM800190
HCM-800_OM.indd 9 4/5/07 12:06:46 PM

HCM-800_OM.indd 10 4/5/07 12:06:46 PM
Page is loading ...
Page is loading ...
Page is loading ...
Page is loading ...
Page is loading ...
Page is loading ...
Page is loading ...
Page is loading ...
Page is loading ...

20
HCM-800_OM.indd 20 4/5/07 12:06:51 PM
Page is loading ...
Page is loading ...
Page is loading ...
Page is loading ...
Page is loading ...
Page is loading ...
Page is loading ...
Page is loading ...
Page is loading ...
Page is loading ...
-
 1
1
-
 2
2
-
 3
3
-
 4
4
-
 5
5
-
 6
6
-
 7
7
-
 8
8
-
 9
9
-
 10
10
-
 11
11
-
 12
12
-
 13
13
-
 14
14
-
 15
15
-
 16
16
-
 17
17
-
 18
18
-
 19
19
-
 20
20
-
 21
21
-
 22
22
-
 23
23
-
 24
24
-
 25
25
-
 26
26
-
 27
27
-
 28
28
-
 29
29
-
 30
30


Ask a question and I''ll find the answer in the document
Finding information in a document is now easier with AI
in other languages
- français: Honeywell HCM800 Manuel utilisateur
- español: Honeywell HCM800 Manual de usuario
Related papers
-
Honeywell HCM-310T User manual
-
Honeywell HCM-650 User manual
-
-
-
Honeywell HCM350 User manual
-
-
 Enviracaire ECM250I Owner's manual
-
-
-