
Microwave Oven
49-40764 04-16 GE
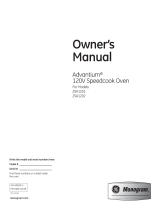
JVM6172
Owner’s Manual
Write the model and serial
numbers here:
Model # __________________
Serial # ___________________
You can find them on a label inside the
oven.
Safety Instructions ........2–7
Operating Instructions
Oven Features ...............8-11
Time Features ...............12-16
Convenience Features .......17-19
Auto Features ..................19
Other Features ..............20-21
Microwave Terms ..............22
Care and Cleaning ......23-25
Troubleshooting Tips ......26
Things That Are Normal ........26
Consumer Support
Accessories .....................9
Warranty ......................27
Consumer Support ......Back Cover

IMPORTANT SAFETY INSTRUCTIONS.
READ ALL INSTRUCTIONS BEFORE USING.
2
To reduce risk of burns, electric shock, fire, personal injury or exposure to excessive microwave
energy.
This is the safety alert symbol. This symbol alerts you to potential hazards that can kill or hurt you and others. All safety
messages will follow the safety alert symbol and the word “DANGER”, “WARNING”, or “CAUTION”. These words are defined as:
Indicates a hazardous situation which, if not avoided, will result in death or serious injury.
Indicates a hazardous situation which, if not avoided, could result in death or serious injury.
Indicates a hazardous situation which, if not avoided, could result in minor or moderate injury.
SAFETY INFORMATION
WARNING
DANGER
CAUTION
WARNING
SAVE THESE INSTRUCTIONS
When using electrical applainces basic safety precautions should be followed, including the following:
³5HDGDQGIROORZWKHVSHFLILFSUHFDXWLRQVLQWKH
PRECAUTIONS TO AVOID POSSIBLE EXPOSURE TO
EXCESSIVE MICROWAVE ENERGY section on page 4.
³8VHWKLVDSSOLDQFHRQO\IRULWVLQWHQGHGXVHDVGHVFULEHG
in this manual. Do not use corrosive chemicals or vapors
in this appliance. This microwave oven is specifically
designed to heat, dry or cook food, and is not intended
for laboratory or industrial use.
³7KLVPLFURZDYHVKRXOGEHVHUYLFHGRQO\E\TXDOLILHG
service personnel. Contact nearest authorized service
facility for examination, repair, or adjustment.
INSTALLATION
³,QVWDOORUORFDWHWKLVDSSOLDQFHRQO\LQDFFRUGDQFHZLWK
the provided installation instructions.
³7KLVDSSOLDQFHPXVWEHJURXQGHG&RQQHFWRQO\WR
a properly grounded outlet. See the GROUNDING
INSTRUCTIONS section on page 3.
³7KLVPLFURZDYHRYHQLV8/OLVWHGIRULQVWDOODWLRQRYHUERWK
gas (less than 60,000 BTU) and electric ranges.
³7KLVXQLWLVVXLWDEOHIRUXVHDERYHJDVRUHOHFWULFFRRNLQJ
HTXLSPHQWµRUOHVVZLGH
³'RQRWRSHUDWHWKLVDSSOLDQFHLILWKDVDGDPDJHGSRZHU
cord or plug, if it is not working properly, or if it has been
damaged or dropped.
³.HHSSRZHUFRUGDZD\IURPKHDWHGVXUIDFHV
³'RQRWOHWSRZHUFRUGKDQJRYHUHGJHRIWDEOHRU
counter.
³'RQRWLPPHUVHSRZHUFRUGRUSOXJLQZDWHU
³'RQRWEORFNRUFRYHUDQ\RSHQLQJVRQWKHDSSOLDQFH
³'RQRWVWRUHWKLVDSSOLDQFHRXWGRRUV'RQRWXVHWKLV
SURGXFWQHDUZDWHU³IRUH[DPSOHLQDZHWEDVHPHQW
near a swimming pool, near a sink or in similar location.
³'RQRWPRXQWWKLVDSSOLDQFHRYHUDVLQN
TO REDUCE THE RISK OF FIRE IN THE OVEN CAVITY
³'RQRWRYHUFRRNIRRG&DUHIXOO\DWWHQGDSSOLDQFHZKHQ
paper, plastic or other combustible materials are placed
inside the oven while cooking.
³5HPRYHZLUHWZLVWWLHVDQGPHWDOKDQGOHVIURPSDSHURU
plastic containers before placing them in the oven.
³'RQRWVWRUHDQ\PDWHULDOVRWKHUWKDQRXUUHFRPPHQGHG
accessories, in this oven when not in use. Do not leave
paper products, cooking utensils or food in the cavity
when not in use. Microwave rack should be removed
from oven when not in use.
³,IPDWHULDOVLQVLGHWKHRYHQLJQLWHNHHSWKHRYHQGRRU
closed, turn the oven off and disconnect the power cord,
or shut off power at the fuse or circuit breaker panel.
³'RQRWRSHUDWHWKHPLFURZDYHZLWKRXWIRRGLQWKHRYHQ
TO REDUCE THE RISK OF BURNS
³%HFDUHIXOZKHQRSHQLQJFRQWDLQHUVRIKRWIRRG8VHSRW
holders and direct steam away from face and hands.
³9HQWSLHUFHRUVOLWFRQWDLQHUVSRXFKHVRUSODVWLFEDJVWR
prevent build-up of pressure.
³%HFDUHIXOZKHQWRXFKLQJWKHWXUQWDEOHGRRURUZDOOVRI
the oven which may become hot during use.
³/LTXLGVDQGFHUWDLQIRRGVKHDWHGLQWKHPLFURZDYHRYHQ
can present a risk of burn when removing them from the
microwave. The potential for a burn is greater in young
children, who should not be allowed to remove hot items
from the microwave.
OPERATING AND CLEANING
³$VZLWKDQ\DSSOLDQFHFORVHVXSHUYLVLRQLVQHFHVVDU\
when used by children.
³'RQRWVWRUHDQ\WKLQJGLUHFWO\RQWRSRIWKHPLFURZDYH
surface when the microwave oven is in operation.
³2YHUVL]HGIRRGRURYHUVL]HGPHWDOFRRNZDUHVKRXOGQRW
be used in a microwave/convection oven because they
increase the risk of electric shock and could cause a fire.
³'RQRWFOHDQZLWKPHWDOVFRXULQJSDGV3LHFHVFDQEXUQ
off the pad and touch electrical parts involving risk of
electric shock.
³'RQRWXVHSDSHUSURGXFWVLQRYHQZKHQDSSOLDQFHLV
operated in any cooking mode except microwave only.

3
IMPORTANT SAFETY INSTRUCTIONS.
READ ALL INSTRUCTIONS BEFORE USING.
SAVE THESE INSTRUCTIONS
OPERATING AND CLEANING (Continued)
³6RPHSURGXFWVVXFKDVZKROHHJJVDQGVHDOHG
FRQWDLQHUV³IRUH[DPSOHFORVHGMDUV³DUHDEOHWRH[SORGH
and should not be heated in this microwave oven.
³'RQRWFRYHUDQ\SDUWRIWKHPLFURZDYHZLWKPHWDOIRLO
This will cause overheating of the microwave.
³&RRNPHDWDQGSRXOWU\WKRURXJKO\³PHDWWRDWOHDVWDQ
INTERNAL temperature of 160°F and poultry to at least
an INTERNAL temperature of 180°F. Cooking to these
temperatures usually protects against foodborne illness.
³0DNHVXUHDOOFRRNZDUHXVHGLQ\RXUPLFURZDYHRYHQLV
suitable for microwaving. Most glass casseroles, cooking
dishes, measuring cups, custard cups, pottery or china
dinnerware which does not have metallic trim or glaze
with a metallic sheen can be used.in compliance with
cookware manufacturers’ recommendations.
³,WLVLPSRUWDQWWRNHHSWKHDUHDFOHDQZKHUHWKHGRRU
seals against the microwave. Use only mild, nonabrasive
detergents applied with a clean sponge or soft cloth.
Rinse well.
SUPERHEATED WATER
³/LTXLGVVXFKDVZDWHUFRIIHHRUWHDDUHDEOHWREH
overheated beyond the boiling point without appearing
to be boiling. Visible bubbling or boiling when the
container is removed from the microwave oven is
not always present. THIS COULD RESULT IN VERY
HOT LIQUIDS SUDDENLY BOILING OVER WHEN THE
CONTAINER IS DISTURBED OR A SPOON OR OTHER
UTENSIL IS INSERTED INTO THE LIQUID.
To reduce the risk of injury to persons:
³'RQRWRYHUKHDWWKHOLTXLG
³6WLUWKHOLTXLGERWKEHIRUHDQGKDOIZD\WKURXJKKHDWLQJLW
³'RQRWXVHVWUDLJKWVLGHGFRQWDLQHUVZLWKQDUURZQHFNV
³$IWHUKHDWLQJDOORZWKHFRQWDLQHUWRVWDQGLQWKH
microwave oven for a short time before removing the
container.
³8VHH[WUHPHFDUHZKHQLQVHUWLQJDVSRRQRURWKHUXWHQVLO
into the container.
The fan will operate automatically under certain conditions.
Take care to prevent the starting and spreading of
accidental cooking fires while the vent fan is in use.
³Clean the underside of the microwave often. Do not allow
grease to build up on the microwave or the fan filters.
³In the event of a grease fire on the surface units below
the microwave oven, smother a flaming pan on the
surface unit by covering the pan completely with a lid, a
cookie sheet or a flat tray.
³Use care when cleaning the vent fan filters. Corrosive
cleaning agents, such as lye-based oven cleaners, may
damage the filters.
³When preparing flaming foods under the microwave,
turn the fan on.
³Never leave surface units beneath your microwave
oven unattended at high heat settings. Boilovers
cause smoking and greasy spillovers that may ignite
and spread if the microwave vent fan is operating. To
PLQLPL]HDXWRPDWLFIDQRSHUDWLRQXVHDGHTXDWHVL]HG
cookware and use high heat on surface units only when
necessary.
VENT FAN
PACEMAKERS
Most pacemakers are shielded from interference from electronic products, including microwaves. However,
patients with pacemakers may wish to consult their physicians if they have concerns.
³3OXJPLFURZDYHLQWRDJURXQGHGSURQJRXWOHW
³'RQRWUHPRYHWKHJURXQGSURQJRUXVHDQDGDSWHU
³'RQRWXVHDQH[WHQVLRQFRUG
Improper use of the grounding plug can result in a
risk of electric shock.
This appliance must be grounded. In the event of an
electrical short circuit, grounding reduces the risk of electric
shock by providing an escape wire for the electric current.
7KLVDSSOLDQFHLVHTXLSSHGZLWKDSRZHUFRUGKDYLQJD
grounding wire with a grounding plug. The plug must
be plugged into an outlet that is properly installed and
grounded.
&RQVXOWDTXDOLILHGHOHFWULFLDQRUVHUYLFHWHFKQLFLDQLIWKH
grounding instructions are not completely understood,
or if doubt exists as to whether the appliance is properly
grounded.
A short power-supply is provided to reduce the risks
resulting from becoming entangled or tripping over a longer
cord. Do not use an extension cord with this appliance. If
WKHSRZHUFRUGLVWRRVKRUWKDYHDTXDOLILHGHOHFWULFLDQRU
service technician install an outlet near the appliance.
GROUNDING INSTRUCTIONS
To prevent risk of electric shock, follow these instructions:
WARNING

4
IMPORTANT SAFETY INSTRUCTIONS.
READ ALL INSTRUCTIONS BEFORE USING.
PRECAUTIONS TO AVOID POSSIBLE EXPOSURE
TO EXCESSIVE MICROWAVE ENERGY
• Do Not Attempt to operate this oven with the door
open since open-door operation can result in harmful
exposure to microwave energy. It is important not to
defeat or tamper with the safety interlocks.
• Do Not Place any object between the oven front
face and the door or allow soil or cleaner residue to
accumulate on sealing surfaces.
• Do Not Operate the oven if it is damaged. It is
particularly important that the oven door close
properly and that there is no damage to the:
(1) door (bent)
(2) hinges and latches (broken or loosened)
(3) door seals and sealing surfaces
• The Oven Should Not be adjusted or repaired by
DQ\RQHH[FHSWSURSHUO\TXDOLILHGVHUYLFHSHUVRQQHO
Contact nearest autorized service facility for
examination, repair or adjustment.
SAVE THESE INSTRUCTIONS
READ AND FOLLOW THIS SAFETY INFORMATION CAREFULLY.
FEDERAL COMMUNICATIONS COMMISSION (U.S.A.)
RADIO FREQUENCY INTERFERENCE STATEMENT
7KLVHTXLSPHQWJHQHUDWHVDQGXVHV,60IUHTXHQF\HQHUJ\
and if not installed and used properly, that is in strict
accordance with the manufacturer’s instructions, may
cause interference to radio and television reception. It has
been type tested and found to comply with limits for an
,60(TXLSPHQWSXUVXDQWWRSDUWRI)&&5XOHVZKLFKDUH
designed to provide reasonable protection against such
interference in a residential installation. However, there is
no guarantee that interference will not occur in a particular
LQVWDOODWLRQ,IWKLVHTXLSPHQWGRHVFDXVHLQWHUIHUHQFHWR
radio or television reception, which can be determined by
WXQLQJWKHHTXLSPHQWRIIDQGRQWKHXVHULVHQFRXUDJHGWR
try to correct the interference by one or more of the following:
Reorient the receiving antenna of radio or television.
Relocate the Microwave oven with respect to the receiver.
Move the microwave oven away from the receiver.
Plug the microwave oven into a different outlet so that
microwave oven and receiver are on different branch
circuits.
The manufacturer is not responsible for any radio or TV
interference cause by unauthorized modification to this
microwave oven. It is the responsibility of the user to correct
such interference.
Page is loading ...
Page is loading ...
Page is loading ...

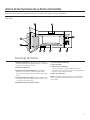
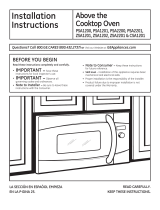
Throughout this manual, features and appearance may vary from your model.
1000 Watts
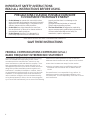
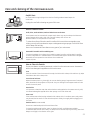
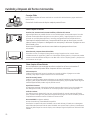
Features of the Oven
1. Door Handle. Pull to open the door. The door must
be securely latched for the microwave to operate.
2. Door Latches.
3. Window with Metal Shield. Screen allows cooking
to be viewed while keeping microwaves confined
in the oven.
4. Charcoal Filter Door. Push down two button to
open the door. You can change charcoal filter
easily.
5. Touch Control Panel.
6. Cooktop Light.
7. Grease Filter .
8. Removable Turntable.
Turntable and support must be in place
when using the oven. The turntable may be
removed for cleaning.
9. Rating Plate.
NOTE: Oven vent(s) and oven light are located on the
inside walls of the microwave oven.
8
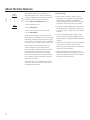
About the features of your microwave oven.

9
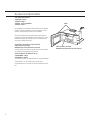
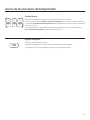
Optional Accessories
Filler Panel Kits
JX36CWW - White
JX36CBB - Black
JX36CSS - Stainless
JX36CES - Slate
When replacing a 36” range hood, filler panel kits fill in the
additional width to provide a custom built-in appearance.
For installation between cabinets only; not for end-of
cabinet installation. Each kit contains two 3” wide filler
panels. Two kits are needed for a 36” opening.
Recirculating Charcoal Filter Kit
JX81J (sales number)
WB02X1124 (service number)
Filter kits are used when the microwave oven cannot be
vented to the outside.
15” Cabinet Installation Kit
JX15BUMPBB - Black
JX15BAMPW - White
For use when installing with 15” depth cabinets.
Available at extra cost from your GE supplier, or see the
GE Service numbers.
JX36
JX81J (sales number)
WB02X1124 (service number)

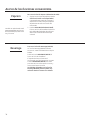
You can microwave by time or with the convenience features. Not all features on all models.
Cooking Controls
Check the Convenience Guide before you begin.
10
About the features of your microwave oven.
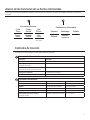
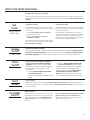
Time Features
Press Enter
Cook Time Amount of cooking time
Defrost Weight/Time
Press twice
Amount of defrosting time
Express Cook
Press number pads (1-5)
Starts Immediately!
Add 30 Sec Starts Immediately!
Power Level Power level 1 to 10
Convenience Features
Press Enter Options
Popcorn Starts immediately! 2.0/2.5/3.0/3.5 oz
Beverage Starts immediately! 4/8/12/16 oz
Reheat Food 1-6 1-3 servings
Potato Starts Immediately! 1-4
Defrost Weight/Time
Press once
Enter food weight 0.1-6.0 lbs
Cook
Time
Timer
On/Off
Add
30 Sec
Lock Control
Hold 3 Sec
Microwave Features
Power
Level
Display
On/Off
Set
Clock
Hold 3 Sec
Convenience Microwave
Defrost
Reheat
PotatoBeverage
Popcorn
Weight/Time

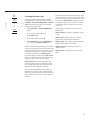
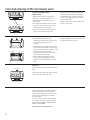
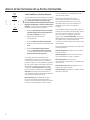
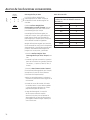
Changing the Power Level
The power level may be entered or changed
immediately after entering the feature time for
Cook Time, Time Defrost, Add 30 Sec or Express
Cook. The power level may also be changed
during the time countdown.
1. Press Cook Time. or Defrost Weight/Time
twice.
2. Enter cooking or defrosting time
3. Press Power Level.
4. Select desired power level 1-10.
5. Press Start/Pause. Pressing Start/Pause is
not necessary for Express Cook buttons.
Variable power levels add flexibility to microwave
cooking. The power levels on the microwave oven
can be compared to the surface units on a range.
Each power level gives you microwave energy
a certain percent of the time. Power level 7 is
microwave energy 70% of the time. Power level
3 is energy 30% of the time. Most cooking will be
done on HI which gives you 100% power.
Power Level 10 will cook faster but food may
QHHGPRUHIUHTXHQWVWLUULQJURWDWLQJRUWXUQLQJ
over. A lower setting will cook more evenly and
need less stirring or rotating of the food.
Some foods may have better flavor, texture or
appearance if one of the lower settings is used.
Use a lower power level when cooking foods that
have a tendency to boil over, such as scalloped
potatoes.
Rest periods (when the microwave energy cycles
RIIJLYHWLPHIRUWKHIRRGWR´HTXDOL]HµRUWUDQVIHU
heat to the inside of the food. An example of this
is shown with power level 3³WKHGHIURVWF\FOH,I
microwave energy did not cycle off, the outside
of the food would cook before the inside was
defrosted.
Here are some examples of uses for various
power levels:
Power Level 10: Fish, bacon, vegetables, boiling
OLTXLGV
Power Level 7: Gentle cooking of meat and
poultry; baking casseroles and reheating.
Power Level 5: Slow cooking and tenderizing for
stews and less tender cuts of meat.
Power Level 2 or 3: Defrosting; simmering;
delicate sauces.
Power Level 1: .HHSLQJIRRGZDUPVRIWHQLQJ
butter.
11
Cook
Time
Power
Level
123
4
5
6
7
890
Start
Pause

12
About the time features.
Cook Time I
Allows you to microwave for any time up to 99
minutes and 99 seconds.
Power level 10 (high) is automatically set, but
you may change it for more flexibility.
1. Press Cook Time.
2. Enter cooking time.
3. Change power level if you don’t want full
power. (Press Power Level. Select a desired
power level 1–10.)
4. Press Start/Pause.
You may open the door during Cook Time
to check the food. Close the door and press
Start/Pause to resume cooking.
Cook Time II
Lets you change power levels automatically
during cooking. Here’s how to do it:
1. Press Cook Time.
2. Enter the first cook time.
3. Change the power level if you don’t want full
power. (Press Power Level. Select a desired
power level 1–10.)
4. Press Cook Time again.
5. Enter the second cook time.
6. Change the power level if you don’t want full
power. (Press Power Level. Select a desired
power level 1–10.)
7. Press Start/Pause.
At the end of Cook Time I, Cook Time II counts
down.
Cook
Time
123
4
5
6
7
890
Start
Pause

13
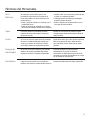
Cooking Guide for Cook Time
NOTE: Use power level 10 unless otherwise noted.
Vegetable Amount Time Comments
Asparagus
(fresh spears) 1 lb. 6 to 9 min., In 1
1
/2TWREORQJJODVVEDNLQJGLVKSODFHFXSZDWHU
Rotate dish after half of time.
IUR]HQVSHDUV R]SDFNDJH WRPLQ ,QTWFDVVHUROH
Beans
(fresh green) 1 lb. cut in half 9 to 11 min. In 1
1
/2TWFDVVHUROHSODFHFXSZDWHU
(frozen green) 10-oz. package 6 to 8 min.
,QTWFDVVHUROHSODFHWDEOHVSRRQVZDWHU
IUR]HQOLPD R]SDFNDJH WRPLQ ,QTWFDVVHUROHSODFHFXSZDWHU
Beets
IUHVKZKROH EXQFK WRPLQ ,QTWFDVVHUROHSODFHFXSZDWHU
Broccoli
(fresh cut) 1 bunch (1
1
/4 to 1
1
/2OEV WRPLQ ,QTWFDVVHUROHSODFHFXSZDWHU
(fresh spears) 1 bunch (1
1
/4 to 1
1
/2OEV WRPLQ ,QTWREORQJJODVVEDNLQJGLVKSODFHFXSZDWHU
Rotate dish after half of time.
IUR]HQFKRSSHG R]SDFNDJH WRPLQ ,QTWFDVVHUROH
(frozen spears) 10-oz. package 5 to 7 min.
,QTWFDVVHUROHSODFHWDEOHVSRRQVZDWHU
Cabbage
(fresh) 1 medium head (about 2 lbs.) 8 to 11 min. In 1
1
/2RUTWFDVVHUROHSODFHFXSZDWHU
ZHGJHV WRPLQ ,QRUTWFDVVHUROHSODFHFXSZDWHU
Carrots
(fresh, sliced) 1 lb. 7 to 9 min. In 1
1
/2TWFDVVHUROHSODFHFXSZDWHU
(frozen) 10-oz. package 5 to 7 min.
,QTWFDVVHUROHSODFHWDEOHVSRRQVZDWHU
Cauliflower
IORZHUHWV PHGLXPKHDG WRPLQ ,QTWFDVVHUROHSODFHFXSZDWHU
IUHVKZKROH PHGLXPKHDG WRPLQ ,QTWFDVVHUROHSODFHFXSZDWHU
(frozen) 10-oz. package 5 to 7 min.
,QTWFDVVHUROHSODFHWDEOHVSRRQVZDWHU
Corn
(frozen kernel) 10-oz. package 5 to 7 min.
,QTWFDVVHUROHSODFHWDEOHVSRRQVZDWHU
Corn on the cob
IUHVK WRHDUV WRPLQ ,QTWREORQJJODVVEDNLQJGLVKSODFHFRUQ,IFRUQ
per ear is in husk, use no water; if corn has been husked,
add 1/4 cup water. Rearrange after half of time.
IUR]HQ HDU WRPLQ 3ODFHLQTWREORQJJODVVEDNLQJGLVK
2 to 6 ears 3 to 4 min. Cover with vented plastic wrap. Rearrange after
per ear half of time.
Mixed vegetables
(frozen) 10-oz. package 5 to 7 min.
,QTWFDVVHUROHSODFHWDEOHVSRRQVZDWHU
Peas
IUHVKVKHOOHG OEVXQVKHOOHG WRPLQ ,QTWFDVVHUROHSODFHFXSZDWHU
(frozen) 10-oz. package 5 to 7 min.
,QTWFDVVHUROHSODFHWDEOHVSRRQVZDWHU
Potatoes
(fresh, cubed,
SRWDWRHV WRPLQ 3HHODQGFXWLQWRLQFKFXEHV3ODFHLQTW
white) (6 to 8 oz. each) casserole with 1/2 cup water. Stir after half of time.
(fresh, whole, 1 (6 to 8 oz.) 3 to 4 min. Pierce with cooking fork. Place in the oven, 1 inch
sweet or white) apart, in circular arrangement. Let stand 5 minutes.
Spinach
IUHVK WRR] WRPLQ ,QTWFDVVHUROHSODFHZDVKHGVSLQDFK
(frozen, chopped 10-oz. package 5 to 7 min.
,QTWFDVVHUROHSODFHWDEOHVSRRQVZDWHU
and leaf)
Squash
(fresh, summer 1 lb. sliced 5 to 7 min. In 1
1
/2TWFDVVHUROHSODFHFXSZDWHU
and yellow)
ZLQWHUDFRUQ WRVTXDVK WRPLQ &XWLQKDOIDQGUHPRYHILEURXVPHPEUDQHV,QTW
RUEXWWHUQXW DERXWOEHDFK REORQJJODVVEDNLQJGLVKSODFHVTXDVKFXWVLGHGRZQ
Turn cut-side-up after 4 minutes.

About the time features.
14
Time Defrost allows you to defrost for a
selected length of time. See the Defrosting
Guide for suggested times. (Weight Defrost is
explained in the Auto Feature section.)
1. Press Defrost Weight/Time twice.
2. Enter defrosting time.
3. Press Start/Pause.
4. Turn food over when the oven signal.
5. Press Start/Pause.
When the oven signals, turn food over and
break apart or rearrange pieces for more even
defrosting. Shield any warm areas with small
pieces of foil. The oven will continue to defrost
if you don’t open the door and turn the food.
Power level is automatically set at 3, but
can be changed. You can defrost small
LWHPVTXLFNO\E\UDLVLQJWKHSRZHUOHYHODIWHU
entering the time. Power level 7 cuts the
total defrosting time in about half; power
level 10 cuts the total time to approximately
+RZHYHUIRRGZLOOQHHGPRUHIUHTXHQW
attention than usual.
A dull thumping noise may be heard during
defrosting. This is normal when oven is not
operating at High power.
Defrosting Tips
• Foods frozen in paper or plastic can be
defrosted in the package. Closed packages
should be slit, pierced or vented AFTER
food has partially defrosted. Plastic storage
containers should be partially uncovered.
• Family-size, prepackaged frozen dinners can
be defrosted and microwaved. If the food is
in a foil container, transfer it to a microwave-
safe dish.
• For more even defrosting of larger foods,
such as roasts, use Defrost Weight. Be sure
large meats are completely defrosted before
cooking.
• Foods that spoil easily should not be allowed
to sit out for more than one hour after
defrosting. Room temperature promotes the
growth of harmful bacteria.
• When defrosted, food should be cool but
softened in all areas. If still slightly icy, return
to the microwave very briefly, or let it stand
a few minutes counts down.
123
4
5
6
7
890
Start
Pause
Defrost
Weight/Time

15
Defrosting Guide
Food Time Comments
Breads, Cakes
Bread, buns or rolls (1 piece) 1 min.
Sweet rolls (approx. 12 oz.) 3 to 5 min. Rearrange after half of time.
Fish and Seafood
Fillets, frozen (1 lb.) 6 to 8 min.
Shellfish, small pieces (1 lb.) 5 to 7 min. Place block in casserole.
Turn over and break up after first half of time.
Fruit
3ODVWLFSRXFK³RU WRPLQ
(10-oz. package)
Meat
Bacon (1 lb.) 2 to 5 min.
Place unopened package in oven. Let stand 5 minutes after defrosting.
Franks (1 lb.) 2 to 5 min. Place unopened package in oven. Microwave just until franks can be
separated. Let stand 5 minutes, if necessary, to complete defrosting.
Ground meat (1 lb.) 5 to 7 min. Turn meat over after first half of time.
Roast: beef, lamb, veal, pork 12 to 16 min. per lb. Use power level Warm (1).
Steaks, chops and cutlets 5 to 7 min. per lb. Place unwrapped meat in cooking dish. Turn over after first half
of time and shield warm areas with foil. After second half of time,
separate pieces with table knife. Let stand to complete defrosting.
Poultry
Chicken, broiler-fryer, cut up 15 to 19 min. Place wrapped chicken in dish. Unwrap and turn over after first
(2
1
/2 to 3 lbs.) half of time. After second half of time, separate pieces and place in
cooking dish. Microwave 2 to 4 minutes more, if necessary. Let stand
a few minutes to finish defrosting.
Chicken, whole (2
1
/2 to 3 lbs.) 17 to 21 min. Place wrapped chicken in dish. After first half of time, unwrap
and turn chicken over. Shield warm areas with foil. To complete
defrosting, run cool water in cavity until giblets can be removed.
Cornish hen 7 to 13 min. per lb. Place unwrapped hen in oven breast-side-up. Turn over after first half
of time. Run cool water in cavity until giblets can be removed.
Turkey breast (4 to 6 lbs.) 5 to 9 min. per lb. Place unwrapped breast in microwave-safe dish breast-side-down.
After first half of time, turn breast-side-up and shield warm areas
with foil. Defrost for second half of time. Let stand 1 to 2 hours in
refrigerator to complete defrosting.

About the time features.
16
Add 30 Sec
You can use this feature two ways:
It will add 30 seconds to the time counting down each time the pad is pressed.
,WFDQEHXVHGDVDTXLFNZD\WRVHWVHFRQGVRIFRRNLQJWLPH
Express Cook
This is a quick way to set cooking time for 1 –5 minutes.
Press one of the Express Cook pads (from 1 to 5) for 1 to 5 minutes of cooking at power level 10. For
example, press the 2 pad for 2 minutes of cooking time.
The power level can be changed as time is counting down. Press POWER LEVEL and enter 1–10.
123
4
5
Add
30 Sec

17
About the convenience features.
To use the Popcorn feature:
To use the Popcorn feature:
1. Follow package instructions, using Cook
Time if the package is less than 2.0 ounces
or larger than 3.5 ounces. Place the
package of popcorn in the center of the
microwave.
2. Press POPCORN. The oven starts
immediately. Tap POPCORN to select the
bag size you are cooking.
Use only with prepackaged
microwave popcorn
weighing 2.0 to 3.5 ounces
To use the Beverage feature:
The Beverage feature heats 4-16 oz of any
beverage.
Press BEVERAGE. The oven starts
immediately.
The serving size is automatically set for 4
oz. Press BEVERAGE twice for 8 oz, three
times for 12 oz, and four times for 16 oz.
Drinks heated with the Beverage feature
may be very hot. Remove the container
with care.
Popcorn
Beverage

About the convenience features.
18
Reheat
The Reheat feature reheats 1-3 servings of
many previously cooked foods..
1. Press REHEAT.
2. Select food type 1-6 for one serving (see
Reheat Guide below).
3. Press 2 or 3 to reheat 2 or 3 servings.
4. Press START.
Potato
The Potato feature cooks up to four 8-10
ounce potatoes.
Press POTATO once for one potato, twice
for two potatoes, three times for three
potatoes, and four times for four potatoes.
The oven will start immediately after
POTATO is pressed.
Food Type Comments
1 Plate Cover with vented plastic wrap.
2 Soup Cover with lid or vented plastic wrap.
3. Vegetables Cover with lid or vented plastic wrap.
4. Pasta Cover with lid or vented plastic wrap.
5. Meats Cover with lid or vented plastic wrap.
6. Sauces Cover with lid or vented plastic wrap.
Reheat Guide:
Reheat
Potato

19
Weight Defrost
The Defrost Weight/Time feature gives you
two ways to defrost food.
Press Defrost Weight/Time once for
weight defrost or twice for Time Defrost.
Use Weight Defrost for meat, poultry and
fish up to 6 pounds. Use Time Defrost for
most other frozen foods.
Weight Defrost automatically sets the
defrosting times and power levels to give
even defrosting results for meats, poultry
and fish.
1. Press Defrost Weight/Time once.
2. Using the conversion guide, enter food
weight. For example, press pads 1 and 2
for 1.2 pounds (1 pound, 3 ounces).
3. Press Start/Pause.
(Time Defrost is explained in the Time
Features section.)
• Remove meat from package and place on
microwave-safe dish.
• When the oven signals, turn the food
over. Remove defrosted meat or shield
warm areas with small pieces of foil.
• After defrosting, most meats need to
stand 5 minutes to complete defrosting.
Large roasts should stand for about 30
minutes.
If the weight of food is stated in pounds and
ounces, the ounces must be converted to
tenths (.1) of a pound.
Ounces Pounds
1–2 .1
3 .2
4–5 .3
6–7 .4
8 .5
9–10 .6
11 .7
12–13 .8
14–15 .9
Conversion Guide
123
4
5
6
7
890
Start
Pause
Defrost
Weight/Time

Set Clock
Press to enter the time of day or to check the
time of day while microwaving.
1. Press Set Clock.
2. Enter time of day.
3. Press Start or Set Clock.
To check the time of day while microwaving,
press Set Clock.
Child Lock-Out
You may lock the control panel to prevent the
microwave from being accidentally started or
used by children.
To lock or unlock the controls, press and hold
Set Clock for about three seconds. When the
FRQWUROSDQHOLVORFNHG/2&.('ZLOODSSHDULQ
the display.
Timer On/Off
Timer On/Off operates as a minute timer and
can be used at any time, even when the oven is
operating.
1. Press TIMER ON/OFF.
2. Enter time you want to count down.
3. Press TIMER ON/OFF to start.
When time is up, the oven will signal. To turn off
the timer signal, press TIMER ON/OFF.
NOTE: The timer indicator will be lit while the
timer is operating.
20
About other features.
Display On/Off
To turn the clock display on or off, press and hold 0 for about 3 seconds. The Display On/Off
feature cannot be used while a cooking feature is in use.
Cooking Complete Reminder
To remind you that you have food in the oven, the oven will display “Food is Ready” and beep
once a minute until you either open the oven door or press Cancel/Off.
Start/Pause
In addition to starting many functions, Start/Pause allows you to stop cooking without opening
the door or clearing the display. Press Start/Pause again to restart the oven.
Turntable
For best cooking results, leave the turntable on. It can
be turned off for large dishes. Press TURNTABLE On/
Off to turn the turntable on or off.
Sometimes the turntable can become too hot to
touch. Be careful touching the turntable during and
after cooking.
Lock Control
Hold 3 Sec
Set
Clock
Display
On/Off
Hold 3 Sec
Timer
On/Off
Start
Pause
Turntable
On/Off

21
Surface Light
Press to turn the surface light on or off.
On some models, there is a night light option.
Press Surface Light once for bright light, twice for the
night light or three times to turn the light off.
Mute
The beeper sound level can be mute. Press Mute On/
Off.
Automatic Fan
An automatic fan feature protects the microwave from too much heat rising from the cooktop
below it. It automatically turns on at low speed if it senses too much heat.
If you have turned the fan on you may find that you cannot turn it off. The fan will
automatically turn off when the internal parts are cool. It may stay on for 30 minutes or more
after the cooktop and microwave controls are turned off.
Vent Fan
The vent fan removes steam and other vapors from surface cooking.
Press Vent Fan once for high fan speed, twice for low fan speed or a third time to turn the fan
off.
Vent Fan
Surface
Light
Mute
On/Off
Settings
Settings
Settings
Clock Mode
You can change cloak 12/24hrs display
mode.
1. Press Settings.
2. Press Express Cook pad 1.
3. Select 12hrs/24hrs.
1 - 12 hrs
2- 24 hrs
Display Speed
You can change display speed.
1. Press Settings.
2. Press Express Cook pad 2.
3. Select new display speed.
1 - slow
2 - normal
3 - fast
Sound Level
You can change sound level.
1. Press Settings.
2. Press Express Cook pad 3.
3. Select sound level.
0 - mute
1 - low
2 - normal
3 - loud
Filter Replace Reminder
The charcoal/grease filter should be replaced
when it is noticeably dirty / discolored(usually
after 6-12 months, depending on hood usage) or
filter replacement LED is on.
When the Filter Replace LED turned on, replace
filter and press Reset Filter and hold for 3
seconds to reset.

22
Microwave terms.
Arcing
Arcing is the microwave term for sparks in the
oven. Arcing is caused by:
• Metal or foil touching the side of the oven.
• Foil that is not molded to food (upturned
edges act like antennas).
• Metal such as twist-ties, poultry pins, gold-
rimmed dishes.
• Recycled paper towels containing small
metal pieces.
• Plates or dishes with a metallic trim or glaze
with a metallic sheen.
Covering
Covers hold in moisture, allow for more even
heating and reduce cooking time.
Venting plastic wrap or covering with wax
paper allows excess steam to escape.
Shielding
In a regular oven, you shield chicken breasts
or baked foods to prevent over-browning.
When microwaving, you use small strips of foil
to shield thin parts, such as the tips of wings
and legs on poultry, which would cook before
larger parts.
Standing
Time
When you cook with regular ovens, foods such
as roasts or cakes are allowed to stand to
finish cooking or to set.
Standing time is especially important in
microwave cooking. Note that a microwaved
cake is not placed on a cooling rack.
Venting
After covering a dish with plastic wrap, you
vent the plastic wrap by turning back one
corner so excess steam can escape.

Care and cleaning of the microwave oven.
Helpful Hints
An occasional thorough wiping with a solution of baking soda and water keeps the
inside fresh.
Unplug the cord before cleaning any part of this oven.
How to Clean the Inside
Walls, Floor, Inside Window, Metal and Plastic Parts on the Door
6RPHVSDWWHUVFDQEHUHPRYHGZLWKDSDSHUWRZHORWKHUVPD\UHTXLUHDGDPSFORWK5HPRYH
greasy spatters with a sudsy cloth, then rinse with a damp cloth. Do not use
abrasive cleaners or sharp utensils on oven walls.
To clean the surface of the door and the surface of the oven that come together upon
closing, use only mild, nonabrasive soaps or detergents using a sponge or soft cloth. Rinse
with a damp cloth and dry.
Never use a commercial oven cleaner on any part of your microwave.
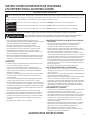
Removable Turntable and Turntable Support
To prevent breakage, do not place the turntable into water just after cooking. Wash it carefully
in warm, sudsy water or in the dishwasher. The turntable and support can be broken if dropped.
Remember, do not operate the oven without the turntable and
support in place.
1 2 3
4 5 6
7 8 9
Power
0
Level
Set
Clock
Turntable
Cook
Time
Timer
On/Off
Add
30 Sec
Clock Display
Express Cook
Sensor Cooking
Defrost
Reheat
Vegetable
PotatoBeverage
Popcorn
Weight/Time
Cancel
Off
Start
Pause
How to Clean the Outside
Do not use cleaners containing ammonia or alcohol on the microwave oven. Ammonia or
alcohol can damage the appearance of the microwave.
Case
Clean the outside of the microwave with a sudsy cloth. Rinse with a damp cloth and then dry. Wipe
the window clean with a damp cloth.
Control Panel and Door
Wipe with a damp cloth. Dry thoroughly. Do not use cleaning sprays, large amounts of soap and
ZDWHUDEUDVLYHVRUVKDUSREMHFWVRQWKHSDQHO³WKH\FDQGDPDJHLW6RPHSDSHUWRZHOVFDQDOVR
scratch the control panel.
Door Surface
It is important to keep the area clean where the door seals against the microwave. Use only mild,
non-abrasive detergents applied with a clean sponge or soft cloth. Rinse well.
Power Cord
If the cord becomes soiled, unplug and wash with a damp cloth. For stubborn spots, sudsy water
may be used, but be certain to rinse with a damp cloth and dry thoroughly before plugging cord
into outlet.
Stainless Steel (on some models)
Do not use a steel-wood pad; it will scratch the surface.
To clean the stainless steel surface, use a hot, damp cloth with a mild detergent suitable
for stainless steel surfaces. Use a clean, hot, damp cloth to remove soap. Dry with a dry, clean cloth.
Always scrub lightly in the direction of the grain.
1 2 3
4 5 6
7 8 9
Power
0
Level
Set
Clock
Turntable
Cook
Time
Timer
On/Off
Add
30 Sec
Clock Display
Express Cook
Sensor Cooking
Defrost
Reheat
Vegetable
PotatoBeverage
Popcorn
Weight/Time
Cancel
Off
Start
Pause
23
Page is loading ...
Page is loading ...
Page is loading ...
Page is loading ...
Page is loading ...
Page is loading ...
Page is loading ...
Page is loading ...
Page is loading ...
Page is loading ...
Page is loading ...
Page is loading ...
Page is loading ...
Page is loading ...
Page is loading ...
Page is loading ...
Page is loading ...
Page is loading ...
Page is loading ...
Page is loading ...
Page is loading ...
Page is loading ...
Page is loading ...
Page is loading ...
Page is loading ...
Page is loading ...
Page is loading ...
Page is loading ...
Page is loading ...
Page is loading ...
Page is loading ...
-
 1
1
-
 2
2
-
 3
3
-
 4
4
-
 5
5
-
 6
6
-
 7
7
-
 8
8
-
 9
9
-
 10
10
-
 11
11
-
 12
12
-
 13
13
-
 14
14
-
 15
15
-
 16
16
-
 17
17
-
 18
18
-
 19
19
-
 20
20
-
 21
21
-
 22
22
-
 23
23
-
 24
24
-
 25
25
-
 26
26
-
 27
27
-
 28
28
-
 29
29
-
 30
30
-
 31
31
-
 32
32
-
 33
33
-
 34
34
-
 35
35
-
 36
36
-
 37
37
-
 38
38
-
 39
39
-
 40
40
-
 41
41
-
 42
42
-
 43
43
-
 44
44
-
 45
45
-
 46
46
-
 47
47
-
 48
48
-
 49
49
-
 50
50
-
 51
51
-
 52
52
-
 53
53
-
 54
54


Ask a question and I''ll find the answer in the document
Finding information in a document is now easier with AI
in other languages
Related papers
-
GE JNM7196FLDS Owner's manual
-
GE Appliances JVM7195EK1ES Owner's manual
-
GE JVM7195 Owner's manual
-
GE DVM7195SKSS Owner's manual
-
GE PVM9215DKBB User manual
-
Samsung PVM9005 Owner's manual
-
GE Profile PVM9005FMDS Owner's manual
-
GE PVM9005FMDS Owner's manual
-
GE JVM3160DFWW Owner's manual
-
GE Appliances JVM3160DFWW Owner's manual
Other documents
-
Hotpoint RVM5160DHBB Owner's manual
-
GE Appliances JVM3160DFWW Owner's manual
-
-
Yes CVM521P2MS1 User manual
-
GE Profile PVM9179DKBB Owner's manual
-
 GE Monogram ZSA1201JSS Owner's manual
-
Yes 1065217 Owner's manual
-
 GE Monogram ZSA1201JSS Installation guide
-
Hotpoint RGA824DEDWW Owner's manual
-

