
Use and care
GUIDE
THERMADOR.COM
Masterpiece
®
Series
Built-in Speed Oven
MC30WS


Table of
CONTENTS
Table of Contents
Use and care manual
Safety Definitions ....................................................... 4
IMPORTANT SAFETY INSTRUCTIONS ........................ 5
9 PRECAUTIONS TO AVOID POSSIBLE EXPOSURE
TO EXCESSIVE MICROWAVE ENERGY .......................... 5
GROUNDING INSTRUCTIONS ....................................... 6
TV / Radio Interference ................................................... 6
Intended Use ................................................................... 6
Child Safety ..................................................................... 6
Cleaning Safety ............................................................... 6
Cooking Safety ................................................................ 7
In Case of Fire ................................................................. 7
Liquids ............................................................................. 7
Cooking Items ................................................................. 8
Cooking Utensils ............................................................. 8
Metal Tray Turntable ...................................................... 8
Thermometers ................................................................. 9
Pacemakers ..................................................................... 9
State of California Proposition 65 Warnings ................... 9
Fan Motor Operation ...................................................... 9
Causes of Damage .................................................... 10
Protecting the environment ..................................... 10
Tips for saving energy ................................................... 10
Getting to Know the Appliance ................................ 11
Parts .............................................................................. 11
Control Panel ................................................................ 12
Accessories ................................................................... 13
Before First Use ........................................................ 14
Before using the appliance for the first time ................ 14
Initial operation ............................................................. 14
Cleaning accessories .................................................... 15
Operating the appliance .......................................... 15
Switching the Appliance On and Off ............................ 15
Setting the appliance .................................................... 15
Operating features ........................................................ 16
Microwave ................................................................ 17
Microwave utensil guide ............................................... 17
Microwave power levels ................................................ 17
Setting the microwave .................................................. 18
Suggestions for best results .......................................... 19
Microwave programs ............................................... 19
Information on the settings ........................................... 19
Setting a Microwave Program ....................................... 19
Pizza .............................................................................. 20
Beverage ....................................................................... 21
Popcorn ......................................................................... 21
Sensor Cook .................................................................. 21
Sensor Reheat ............................................................... 22
Auto Defrost ................................................................. 23
Melt Butter .................................................................... 23
Melt Chocolate ............................................................. 23
Soften Ice Cream .......................................................... 24
Soften Cream Cheese ................................................... 24
CookSmart
™
............................................................. 24
Information on the settings ........................................... 24
Selecting food ............................................................... 24
Selecting and setting food ............................................ 27
Heating Modes ........................................................ 28
Cookware tips for conventional cooking modes .......... 28
True Convection ‚ ....................................................... 28
Keep Warm « .............................................................. 29
Speed Convection n ................................................... 29
Broil ‰ .......................................................................... 29
Convection Broil ‡ ....................................................... 30
Combi Mode ............................................................ 31
Setting ........................................................................... 31
Timer Options .......................................................... 32
Oven Timer ................................................................... 32
Kitchen Timer ................................................................ 32
Checking, changing or deleting settings ...................... 33
Panel Lock ............................................................... 33
Activating and Deactivating .......................................... 33
Adjust Basic Settings ............................................... 33
Changing the Settings .................................................. 33
Available Settings .......................................................... 33
Cleaning and Maintenance ...................................... 34
Cleaning Guide ............................................................. 34
Before Calling for Service ........................................ 35

4
THERMADOR® Support .......................................... 36
Before Calling Service ................................................... 36
Data Plate ...................................................................... 36
Service ........................................................................... 36
Parts and Accessories .................................................... 36
STATEMENT OF LIMITED PRODUCT WARRANTY ... 37
What this Warranty Covers & Who it Applies to ........... 37
How Long the Warranty Lasts ....................................... 37
Repair/Replace as Your Exclusive Remedy .................... 37
Out of Warranty Product ............................................... 37
Warranty Exclusions ...................................................... 37
.
Safety Definitions
Safety Defi nitions
9 WARNING
This indicates that death or serious injuries may
occur as a result of non-observance of this warning.
9 CAUTION
This indicates that minor or moderate injuries may
occur as a result of non-observance of this warning.
NOTICE: This indicates that damage to the appliance or
property may occur as a result of non-compliance with
this advisory.
Note: This alerts you to important information and/or
tips.

SAVE THESE INSTRUCTIONS. 5
9 IMPORTANT SAFETY INSTRUCTIONS
READ ALL INSTRUCTIONS BEFORE USING THE APPLIANCE
IMPORTANT SAFET Y I NST RUCT I ONSRE AD AL L INSTRUCTIONS BEF ORE US I NG THE APP L I ANCE
9 PRECAUTIONS TO AVOID
POSSIBLE EXPOSURE TO
EXCESSIVE MICROWAVE
ENERGY
PRECAUTIONS TO AVOID POSSIBLE EXPOSURE TO
EXCESSIVE MICROWAVE ENERGY
(1) Do not attempt to operate this oven with the door
open, since open-door operation can result in harmful
exposure to microwave energy. It is important not to
defeat or tamper with the safety interlocks.
(2) Do not place any object between the oven front face
and the door or allow soil or cleaner residue to
accumulate on sealing surfaces.
(3) Do not operate the oven if it is damaged. It is
particularly important that the oven door close properly
and that there is no damage to the:
▯ door (bent)
▯ hinges and latches (broken or loosened)
▯ door seals and sealing surfaces.
(4) The oven should not be adjusted or repaired by
anyone except authorized service personnel. Improper
installation, service or maintenance can cause injury or
property damage. Refer to this manual for guidance.
Refer all servicing to a factory authorized servicer.
WARNING
To reduce the risk of burns, electric shock, fire, injury to
persons, or exposure to excessive microwave energy,
read all instructions before using the appliance.
WARNING
If the information in this manual is not followed exactly,
fire or shock may result causing property damage or
personal injury.
When using electrical appliances basic safety
precautions should be followed, including the
following:
Read and follow the specific “PRECAUTIONS TO AVOID
POSSIBLE EXPOSURE TO EXCESSIVE MICROWAVE
ENERGY” found in the Safety Instructions chapter.
This appliance must be grounded. Connect only to
properly grounded outlet (see section on Electrical
Installation - GROUNDING INSTRUCTIONS in the
Installation Manual of this appliance).
Install or locate this appliance only in accordance with
the provided installation instructions.
Some products such as whole eggs and sealed
containers – for example, closed glass jars – can
explode and should not be heated in this oven.
Use this appliance only for its intended use as described
in the manual. Do not use corrosive chemicals or vapors
in this appliance. This type of oven is specifically
designed to heat, cook, or dry food. It is not designed for
industrial or laboratory use.
As with any appliance, close supervision is necessary
when used by children (see CHILD SAFETY).
This appliance should be serviced only by authorized
service personnel. Contact nearest authorized service
facility for examination, repair, or adjustment.
Do not cover or block any vents or openings on the
appliance.
Do not store this appliance outdoors. Do not use this
product near water – for example, near a kitchen sink, in
a wet basement, near a swimming pool, or similar
locations.
Suitable for plug-connected only:
(1) Do not immerse cord or plug in water.
(2) Keep cord away from heated surfaces.
(3) Do not let cord hang over edge of table or counter.
(4) Do not operate this appliance if it has a damaged
cord or plug, if it is not working properly, or if it has
been damaged or dropped.
When cleaning surfaces of door and oven that come
together on closing the door, use only mild, nonabrasive
soaps, or detergents applied with a sponge or soft cloth.
See door surface cleaning instructions in chapter
“Cleaning and Maintenance”.
To reduce the risk of fire in the oven cavity:
▯ Do not overcook food. Carefully attend appliance
when paper, plastic, or other combustible materials
are placed inside the oven to facilitate cooking.
▯ Remove wire twist-ties from paper or plastic bags
before placing bag in oven.
▯ If materials inside the oven ignite, keep oven door
closed, turn oven off, and disconnect the power cord,
or shut off power at the fuse or circuit breaker panel.
▯ Do not use the cavity for storage purposes. Do not
leave paper products, cooking utensils, or food in the
cavity when not in use.

9 IMPORTANT SAFETY INSTRUCTIONS
READ ALL INSTRUCTIONS BEFORE USING THE APPLIANCE
6 SAVE THESE INSTRUCTIONS.
GROUNDING INSTRUCTIONS
This appliance must be grounded. Grounding reduces
the risk of electric shock by providing a safe pathway for
electric current in the event of a short circuit.
The appliance must be connected to a grounded,
metallic, permanent wiring system, or an equipment
grounding conductor should be run with the circuit
conductors and connected to the equipment grounding
terminal or lead on the appliance.
WARNING
Improper grounding can result in a risk of electric shock.
Consult a qualified electrician if the grounding
instructions are not completely understood, or if doubt
exists as to whether the appliance is properly grounded.
Do not use an extension cord. If the power supply cord is
too short, have a qualified electrician install an outlet
near the appliance.
The model stated on the front cover is dual-rated,
designed to be connected to either 208 or 240V AC,
60 Hz, four-wire or three-wire electrical system.
TV / Radio Interference
This appliance generates and uses ISM frequency
energy. If not installed and used properly, in strict
accordance with the manufacturer’s instructions, it may
cause interference to radio and television reception. It
has been type tested and found to comply with limits for
ISM equipment pursuant to part 18 of FCC rules, which
are designed to provide reasonable protection against
such interference in a residential installation. However,
there is no guarantee that interference will not occur in a
particular installation. Turn the appliance on and off to
determine if it causes interference. Try the following to
correct the interference:
▯ Clean door and sealing surface of the oven.
▯ Reorient the receiving antenna of the radio or
television.
▯ Relocate the microwave oven with respect to the
receiver.
▯ Move the microwave oven away from the receiver.
▯ Plug the microwave into a different outlet so that the
oven and the receiver are on different branch circuits.
The manufacturer is not responsible for any radio or TV
interference caused by unauthorized modification to this
microwave oven. It is the responsibility of the user to
correct such interference.
Intended Use
This appliance is intended for normal family household
use only. It is not approved for outdoor use. See the
Statement of Limited Product Warranty. If you have any
questions, contact the manufacturer.
Do not use the cavity for storage purposes. Do not leave
paper products, cooking utensils, or food in the cavity
when not in use.
Do not operate oven when room humidity is excessive.
This oven is suitable for use above both conventional
built-in gas and electric ovens 36” (914 mm) or less
wide.
Child Safety
Do not allow children to use this appliance. Failure to do
so can result in burns or serious injury to children.
Children and pets should not be left alone or unattended
in the area where the appliance is in use. They should
never be allowed to play in its vicinity, whether or not the
appliance is in use.
When children become old enough to use the appliance,
it is the responsibility of the parents or legal guardians to
ensure that they are instructed in safe practices by
qualified persons.
Do not allow anyone to climb, stand, lean, sit, or hang on
any part of an appliance, especially a door, warming
drawer, or storage drawer. This can damage the
appliance, and the unit may tip over, potentially causing
severe injury.
Cleaning Safety
When cleaning surfaces of door and oven that come
together on closing the door, use only mild, nonabrasive
soaps, or detergents applied with a sponge or soft cloth.
See door surface cleaning instructions in chapter
“Cleaning and Maintenance”.
Clean turntable roller rest and oven bottom frequently to
prevent excessive noise.
Allow the ceramic tray to cool before cleaning or placing
in water.
WARNING
Be sure the entire appliance (including the light bulb) has
cooled and grease has solidified before attempting to
clean any part of the appliance.

SAVE THESE INSTRUCTIONS. 7
9 IMPORTANT SAFETY INSTRUCTIONS
READ ALL INSTRUCTIONS BEFORE USING THE APPLIANCE
Cooking Safety
CAUTION
To avoid personal injury or property damage, observe
the following:
▯ Do not leave oven unattended while in use.
▯ Do not store flammable material next to or in the
oven.
▯ When flaming foods under the microwave, always
turn the fan on.
▯ Do not operate the oven while empty. This could
damage the oven and result in a risk of fire.
▯ Do not store or use corrosive chemicals, vapors,
flammables or nonfood products in or near this
appliance. It is specifically designed for use when
heating or cooking food. The use of corrosive
chemicals in heating or cleaning will damage the
appliance and could result in injury.
▯ Do not dry clothes, newspapers or other
materials in the oven. Do not use newspapers or
paper bags for cooking. Fire could result.
▯ Do not use recycled paper products unless
labeled safe for microwave use. They may
contain impurities which may cause sparks and
result in fires when used.
▯ Always use potholders when removing items from
the oven. The cooking container and the glass
tray can be hot even if the oven is cool.
▯ Whenever possible, do not operate the ventilation
system during a cooktop fire. However, do not
reach through fire to turn it off.
▯ Do not mount over sink.
▯ Do not store anything directly on top of the
appliance surface when the appliance is in
operation.
▯ Oversized food or oversized metal utensils
should not be inserted in a microwave oven as
they may create a fire or risk of electric shock.
▯ Do not clean with metal scouring pads. Pieces
can break off the pad and touch electrical parts
involving a risk of electric shock.
▯ Do not store any materials, other than
manufacturer’s recommended accessories, in
this oven when not in use.
▯ Do not cover racks or any other part of the oven
with metal foil. This will cause overheating of the
oven.
▯ Do not use paper products when appliance is
operated in the toaster mode.
In Case of Fire
If materials inside an oven should ignite:
1.
Keep door closed
2.
Turn appliance off
3.
Unplug the appliance or shut off at fuse or circuit
breaker
Liquids
Liquids, such as water, coffee, or tea could be
overheated. They can be heated beyond the boiling point
without appearing to boil. For example, visible bubbling
or boiling when the container is removed from the
microwave oven is not always present. THIS COULD
RESULT IN VERY HOT LIQUIDS SUDDENLY BOILING
OVER WHEN THE CONTAINER IS DISTURBED OR A
UTENSIL IS INSERTED INTO THE LIQUID.
When heating liquids, always place a glass rod/spoon in
the container. This will prevent delayed boiling.
CAUTION
Metal e.g. a spoon in a glass must be kept at least 1 inch
(25 mm) from the oven walls and the inside of the door.
Sparks could irreparably damage the glass on the inside
of the door.
▯ Take ready meals out of the packaging. They will heat
up more quickly and evenly in microwaveable
ovenware. The different components of the meal may
not require the same amount of time to heat up.
▯ Always cover the food. If you do not have a suitable
cover for your container, use a plate or special
microwave foil.
▯ Stir or turn the food several times during cooking.
Check the temperature.
▯ After heating, allow the food to stand for a further 2 to
5 minutes so that it can achieve an even temperature.
▯ Always use an oven cloth or oven gloves when
removing plates from the oven.

9 IMPORTANT SAFETY INSTRUCTIONS
READ ALL INSTRUCTIONS BEFORE USING THE APPLIANCE
8 SAVE THESE INSTRUCTIONS.
Cooking Items
Eggs: Do not cook or reheat whole eggs, with or without
shell. Steam buildup in whole eggs may cause them to
explode, and possibly damage the oven or cause injury.
Reheating sliced hard-boiled eggs and cooking
scrambled eggs is safe.
Popcorn: Use only popcorn in packages designed and
labeled for microwave use, or pop it in a microwave oven
corn popper. Follow popcorn manufacturers’ directions
and use a brand suitable for the wattage of your oven.
Do not continue to heat after popping has stopped.
Popcorn will scorch or burn. Do not leave oven
unattended.
CAUTION
When using pre-packaged microwave popcorn, check
package weight before using the popcorn function. Set
the oven for the weight of the popcorn package. If these
instructions are not followed, popcorn may not pop
adequately or may ignite and cause fire.
Foods with nonporous skins: Potatoes, tomatoes, sweet
potatoes, apples, whole squash and sausages are
examples of foods with nonporous skins. These types of
foods must be pierced before cooking to prevent them
from exploding.
Baby food / Baby formula: Do not heat baby bottles or
food in microwave oven. The glass jar or the surface of
food may appear warm while the interior can burn the
infant’s mouth and esophagus.
Deep fat frying: Do not deep fat fry in oven. Oil can be
heated beyond ideal temperatures very quickly in a
microwave oven. Temperatures can climb high enough
for the cooking oils to reach their respective flash points
and burst into flames. The heated oil may bubble and
spatter causing possible damage to the oven and
perhaps result in burns. Additionally, microwave–safe
utensils may not be able to withstand the temperature of
the hot oil, and could result in the utensil shattering, if it
contains a slight imperfection, scratch or chip.
Home Canning / Drying foods / Small quantities of
foods: Do not use microwave oven for home canning or
heating of any closed jar. Pressure will build up and the
jar may explode. In addition, the oven cannot maintain
the food at the proper canning temperature. Improperly
canned food may spoil and be dangerous to consume.
Small quantities of food or foods with low moisture
content can dry out, burn or catch on fire.
Do not dry meats, herbs, fruits or vegetables in your
oven.
Proper cooking depends on time set and weight of food.
If you use a smaller portion than recommended and
cook at the time for the recommended portion, fire could
result.
Browning dishes: Microwave browning dishes or grills
are designed for microwave cooking only. Preheating
times vary depending on the size of the browning dish
and food being cooked. Always follow instructions
provided by the browning dish or grill manufacturer. Do
not preheat browning dishes more than 6 minutes.
Oven roasting bags: If an oven bag is used for
microwave cooking, prepare according to package
directions. Do not use wire twist–ties to close bags,
instead use nylon ties, cotton string or a strip cut from
the open end of the bag. Make six ½" (12.7 mm) slits by
closure. Place oven cooking bag in a dish slightly larger
than the food being cooked.
Cooking Utensils
See also Microwave Utensil Guide.
Cooking utensils, the ceramic tray and racks get hot
during microwaving. Always use potholders when
removing items from the oven. Allow the ceramic tray
and the metal racks (if used) to cool before handling.
Do not use metal utensils, or dishes with metallic trim in
the oven.
When using aluminum foil in the oven, allow at least
1 inch (25 mm) of space between foil and interior oven
walls or door.
The ceramic tray and the metal racks (if used) will get hot
during cooking. The cooking container and the ceramic
tray can be hot even if the oven is cool.
Never use paper, plastic, or other combustible materials
that are not intended for cooking.
When cooking with paper, plastic, or other combustible
materials, follow manufacturer’s recommendations on
product use. Do not use paper towels which contain
nylon or synthetic fibers. Heated synthetics could melt
and cause paper to ignite.
Do not heat sealed containers or plastic bags in oven.
Food or liquid could expand quickly and cause container
or bag to break. Pierce or open container or bag before
cooking.
Metal Tray Turntable
Do not operate the oven without the metal tray turntable
in place.
Verify that the metal tray turntable is properly positioned
and turning when the oven is in use. Improper cooking or
damage to the oven could result.
Only use the metal tray turntable designed for this oven.
Do not substitute any other tray.
Always replace the metal tray in its proper position.

SAVE THESE INSTRUCTIONS. 9
9 IMPORTANT SAFETY INSTRUCTIONS
READ ALL INSTRUCTIONS BEFORE USING THE APPLIANCE
Thermometers
Do not use regular cooking thermometers in oven. Most
cooking thermometers contain mercury and may cause
electrical arc, malfunction, or damage to the oven.
Pacemakers
CAUTION
To avoid pacemaker malfunction, consult physician or
pacemaker manufacturer about effects of microwave
energy on pacemaker.
State of California Proposition 65
Warnings:
WARNING
This product can expose you to chemicals including vinyl
chloride, which is known to the State of California to
cause cancer and birth defects or other reproductive
harm. For more information go to
www.P65Warnings.ca.gov.
Fan Motor Operation
After using the oven the fan motor can continue to run to
cool the electric components. This is perfectly normal,
and you can take out the food from the oven while the
fan operates.

10
Causes of Damage
NOTICES:
▯ Metal e.g. a spoon in a glass must be kept at least
1 inch (25 mm) from the oven walls and the inside of
the door. Sparks could irreparably damage the glass
on the inside of the door.
▯ Water in the hot oven interior: Never pour water into
the hot oven interior. Steam is produced. Damage to
the enamel can arise due to the temperature change.
▯ Do not leave moist groceries in a closed oven for an
extended period of time. It can lead to corrosion inside
the oven.
▯ Fruit juice can leave stains in the oven. Always remove
fruit juice immediately when safe to touch, and wipe up
first with a damp and then a dry cloth.
▯ Cooling with the appliance door open: only allow the
oven cavity to cool when it is closed. Even if the
appliance door is only open a little, front panels of
adjacent units could be damaged over time.
▯ Highly soiled door seal: the appliance door will no
longer close properly during operation if the door seal
is highly soiled. Adjoining furniture fronts may be
damaged. Always keep the door seal clean.
▯ Appliance door as a seat or storage surface: do not
stand, sit or hang on the appliance door. Do not place
any cookware or accessories on the appliance door.
▯ Inserting accessories: depending on the appliance
type, accessories can scratch the door pane when
closing the appliance door. Always slide accessories
fully into the oven interior.
▯ Do not hold or carry the appliance by the door handle.
The door handle cannot carry the weight of the device
and could break off, or the hinges can be damaged.
▯ Operating the microwave without food in the oven
cavity may lead to overloading. Never run the
microwave unless there is food in the oven cavity. An
exception to this rule is a short ovenware test, see
section ~ "Microwave utensil guide" on page 17, or
a Cook Smart
®
mode that needs pre-heating.
▯ Always set the microwave power as recommended for
the food. High power settings can overheat foods very
quickly.
▯ The turntable may jump if overloaded.
Protecting the environment
Unpack the appliance and dispose of the packaging in
an environmentally friendly manner.
Tips for saving energy
▯ Open the appliance door as little as possible while
cooking, baking or roasting.
▯ Use dark, black-painted or enameled baking forms.
These absorb the heat particularly well.
▯ It is best to bake several cakes in succession. The
oven is still warm. This shortens the baking time for the
second cake. You can also slide in two loaf tins next to
each other.

11
Getting to Know the Appliance
This section outlines and describes the features,
indicators and controls of the appliance. You will also
find information on the various functions of your
appliance.
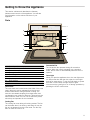
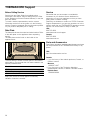
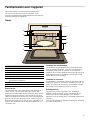
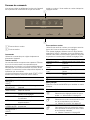
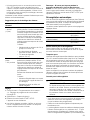
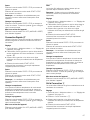
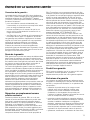
Parts
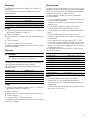
Oven Vents
The oven vents are located around the sides of the oven
cavity. Warm air may be released from the top and
bottom vents before, during and after cooking. It is
normal to see steam escaping from these vents, and
condensation may collect in this area. This area may be
warm when the oven is in use. Do not block any vents,
since they are important for air circulation.
Cooling Fan
The cooling fan runs during all cooking modes. The fan
can be heard when it is running, and warm air may be
felt as it is released from the oven vents. The fan may
also run after the oven is off.
Convection Fan
The convection fan operates during all convection
modes. When the oven is operating in a convection
mode, the fan turns off automatically when the door is
opened.
Oven Light
When you open the appliance door, the oven light turns
on. After some time with the door open, the oven light
turns off to save energy. To turn the light back on, press
the LIGHT touch button, the light turns on again.
You can turn the oven light on or off during operation by
pressing the LIGHT touch button.
0LFURZDYH
PLQV
&22.60$5721O2)) /,*+7 7,0(56 0(18 ,1)2 /2&. 67$57O6723
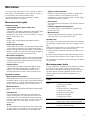
1 Control panel and display
2 Convection fan and element
3 Rack holders (4)
4 Door gasket
5 Door hinges
6 Ceramic microwave tray
7 Metal tray turntable with bake element below
8 Broil element
9 Oven vents

12
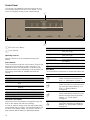
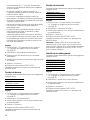
Control Panel
You can set your appliance's various functions on the
control panel using the full touch color display. The full
touch color display shows you the current settings.
Operating Controls
Use the controls to set your appliance simply and
directly.
Touch buttons
There are sensors under the touch buttons. Press on the
words of the touch buttons to select a function. The
available functions are indicated by a light above the
respective touch button. Depending on the operation you
are running, the number of available functions can
change.
--------
Full touch color display
Use the full touch color display to navigate through the
lines on the display and select the settings.
In order to adjust a setting, touch the appropriate place
on the display with your finger. The area gets brighter. On
this area of the display, swipe your finger to the left or
right until the desired setting is displayed enlarged.
Main Menu
Touch the MENU touch button to access the main menu.
0LFURZDYH
&RQWLQXH
6HWWLQJV
&RRN6PDUW
0:3URJUDPV
&22.60$5721O2)) /,*+7 7,0(56 0(18 ,1)2 /2&. 67$57O6723
+HDWLQJ0RGHV
&RPEL0RGHV
(
Full touch color display
0
Touch buttons
Touch button Use
ON I OFF Switches the appliance on or off
LIGHT Switches the appliance light on or off
TIMERS Sets the kitchen timer, or cooking
time
MENU Selects operating modes and
settings
COOK SMART Selects CookSmart™ programs
INFO Displays additional information
LOCK Activates/Deactivates panel lock
START I STOP Starts or pauses the operation
Direction Use
Navigate to the left Swipe to the right on the display
with your finger
Navigate to the right Swipe to the left on the display
with your finger
Navigate up Touch the top line of the display
Navigate down Touch the bottom line of
the display
;
Go to previous screen
8
Confirm setting
Menu Use
•
Microwave
Select the desired microwave set-
tings ~ "Microwave" on page 17
¢
Heating Modes
Select the desired conventional heat-
ing mode and temperature for your
food ~ "Heating Modes"
on page 28
¡
Combi Modes
Offers three heating modes for com-
bined microwave and conventional
heating ~ "Combi Mode"
on page 31
4
Settings
Individually adjusting the appliance
settings ~ "Adjust Basic Settings"
on page 33

13
--------
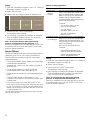
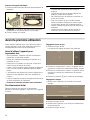
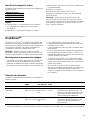
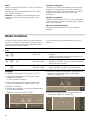
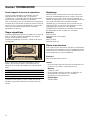
Accessories
--------
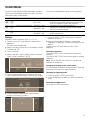
How to install the turntable
Place the turntable with the rollers "A" as shown in the
picture, on the carrier "B" in the middle of the oven cavity
bottom.
The turntable must sit straight on the carrier.
Note: Do not use the appliance if the turntable is not in
place. Confirm that all parts are properly seated and that
the turntable rotates freely when the microwave is
operated.
£
Cook Smart
®
Automatic settings for many dishes
in combination mode
~ "CookSmart
™
" on page 24
±
Microwave Programs
Automatic microwave settings for
many dishes ~ "Microwave pro-
grams" on page 19
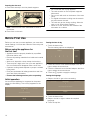
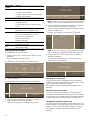
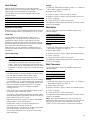
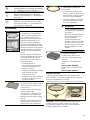
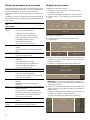
Metal tray turntable
Food which particularly requires
a lot of heat from underneath,
such as pizza and chicken nug-
gets, can be prepared directly on
the metal tray turntable.
The turntable is dishwasher safe
and cut resistant. You can cut
pizza into slices on the turntable
itself.
Place the metal tray turntable on
the drive in the center of the oven
cavity bottom. Ensure that it is
properly fitted.
▯ Never use the microwave with-
out the metal tray turntable.
▯ The metal tray turntable can
support max. 12 lbs.
▯ The metal tray turntable must
turn when using all types of
heating.
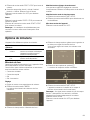
Wire rack
The wire rack can be used with
the recess facing up ½ or
down ¾.
Use it facing down for
CookSmart
TM
, Convection, Keep
Warm and to fit larger dishes into
the oven cavity.
Use it facing up (as shown) for
Broil and Convection Broil.
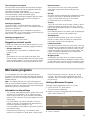
Ceramic tray
Use for microwave cooking.
▯ You can place food, like a pop-
corn bag or potatoes, directly
on the ceramic tray.
▯ The ceramic tray can also be
used for conventional cooking.
9 CAUTION
The ceramic tray will get hot
during convection cooking.
Place the ceramic tray on top
of the metal tray turntable.
The ceramic tray can remain
in the oven for all cooking
modes, unless “Bake on
Metal Tray” is required.
Broil pan and grid
(optional accessory)
Use for broiling and roasting.
Available from www.therma-
dor.com
Pan - PAN, BROILER, MINI
Part number 00666709
Grid - GRILL, BROILER, PAN,
MINI
Part number 00666710
$
$
$
%
%%

14
Inserting the wire rack
1.
Place rack securely in the four plastic supports.
Note: Rack must not touch metal walls or back of
microwave.
2.
Place food on the rack.
9 CAUTION
▯ Do not use the rack to pop popcorn.
▯ The rack must be on the four plastic supports
when used.
▯ Do not cook with rack on the bottom of the oven
cavity.
▯ For regular microwave cooking use the ceramic
tray and remove the rack.
▯ The rack can get hot during cooking. Allow the
rack to cool down before handling.
▯ When not in use, store the rack outside of the
microwave in a cabinet.
Before First Use
Before you can use your new appliance, you must enter
certain settings. You must also clean the oven cavity and
accessories.
Before using the appliance for
the first time
▯ Appliance must be properly installed by a qualified
technician before use.
▯ Remove all packing materials from inside and outside
the oven.
▯ While cool, wipe with a clean, damp cloth and dry.
▯ There may be a slight odor from your new appliance;
this is normal and will disappear after a short time.
▯ Optimum cooking results depend on proper cookware
being used.
▯ Read and understand all safety precautions and Use
and Care Guide information.
▯ Execute the following sections prior to operating.
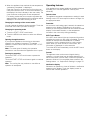
Initial operation
As soon as the appliance is connected to the power
supply, the first setting "Time of Day" appears on the
display.
Setting the time of day
1.
Touch the bottom line.
The time setting options are displayed.
2.
Touch the “Hours” touch field and swipe to the left or
right to select the current hour.
3.
Touch the "Minutes" touch field and swipe to the left or
right to select the current minute.
4.
Touch the 8 symbol to apply the settings.
Setting the language
1.
Swipe to the left to get to the next setting.
2.
Touch the bottom line.
3.
Swipe to the left or right to select the required
language.
4.
Touch the top line.
7LPHRI'D\
/DQJXDJH
6HWFXUUHQWWLPHRIGD\
0LQXWHV
+RXUV
/DQJXDJH
7LPH'LVSOD\
(QJOLVK
6HWWKHODQJXDJH\RXUHTXLUH
7LPHRI'D\

15
Setting the time display
1.
Swipe to the left to get to the next setting.
2.
Touch the bottom line.
3.
Swipe to the left or right to select how the clock should
be displayed when the appliance is in stand-by mode.
4.
Press the MENU touch button to complete initial use.
5.
Touch the Save touch field.
“First start up finished” is displayed. The appliance
goes to stand-by mode.
Notes
▯ You can change these settings at any time in the basic
settings menu. ~ "Adjust Basic Settings" on page 33
▯ After connecting the appliance to the power or
following a power failure, the settings for initial use
may be shown in the display.
Cleaning accessories
Before using accessories for the first time, thoroughly
clean them with hot soapy water and a soft dish cloth.
Operating the appliance
You have already learned about the controls and how
they work. Now we will explain how to apply settings on
your appliance. You will learn about what happens when
you switch the appliance on and off, and how to select
the operating mode.
Switching the Appliance On and Off
Touch the ON l OFF touch button to switch the appliance
on or off.
The appliance will automatically go to the main menu.
Setting the appliance
Use the touch buttons and the touch fields on the touch
screen to enter the different operating menus.
Example: True Convection with 325° F (160 °C)
1.
Touch the ON l OFF touch button to switch on the
appliance.
You go directly to the main menu.
2.
Swipe to the left in the top line of the display to select
“Heating Mode” ¢.
3.
Touch “Continue”.
4.
“True Convection” ‚ is shown as the default mode.
Swipe in the top line of the display to set a different
mode if desired.
5.
Touch the bottom line of the display and swipe to the
left or right to select the temperature.
6.
Touch the START l STOP touch button to start the
appliance operation.
For heating modes that require a preheat the status
bar appears in the display to indicate the preheating
progress.
7LPH'LVSOD\
$QDORJ
6HOHFWZKLFKFORFNGLVSOD\LVVKRZQ
/DQJXDJH
'LJLWDO 2II
ZKHQWKHDSSOLDQFHLVVZLWFKHGRII
+HDWLQJ0RGH
&RQWLQXH
6HWWLQJV
&RRN6PDUW
0Z3URJUDPV
0LFURZDYH
&RPEL0RGHV
7UXH&RQYHFWLRQ
³
.HHS:DUP
³
ª
6SHHG&RQY
7UXH&RQYHFWLRQ
³
7UXH&RQYHFWLRQ
³

16
7.
When the appliance has reached the set temperature,
“preheating completed” is displayed.
Open the oven door to place the food into the oven
cavity and close the door, or touch the notification on
the display if the food is already in the oven cavity. The
oven continues cooking with the set temperature.
For heating modes that do not require a preheat the
status bar fills in immediately and no notification will be
displayed. The oven starts cooking at once.
Changing the settings of the current mode
You can change the settings during operation. Touch the
touch field of the value you want to change.
Changing the operating mode
1.
Touch the START l STOP touch button.
2.
Touch the MENU touch button to select a a different
mode.
Opening the appliance door
If you open the appliance door during a microwave
operation, the operation is paused. To continue
operation, close the door and touch the START l STOP
touch button.
Note: For some types of heating, the operation
continues to run even when the appliance door is open.
Pausing the operation
Touch the START l STOP touch button to pause the
operation.
Touch the START l STOP touch button again to continue
operation.
Note: The cooling fan may continue to run while an
operation is interrupted.
Operating features
Your appliance has several additional operating features
that help you to use the appliance correctly and
effectively.
Default values
The appliance suggests a temperature or setting for each
heating mode. You can accept this value or change it in
the appropriate area.
Status bar
As soon as a new heating type is started, the status bar
appears on the display. Depending on the cooking
feature you are using the status bar can indicate a visual
display of microwave duration, or the temperature
increase in the oven cavity during preheating.
INFO Touch Button
If the INFO touch button lights up, important information
regarding the mode you are using is available. This may
include for example recommendations on suitable
cookware or how to prepare food for a safe cooking
result. When you touch the INFO touch button, the
information is displayed for a few seconds.
To exit the INFO text immediately, touch the INFO touch
button or the display.
Sounds
The appliance uses various sound signals during
operation. A sound signal can be heard whenever you
use a touch button or touch field, or when an operation is
started or finished. You can adjust these sounds in the
Settings menu. ~ "Adjust Basic Settings" on page 33
Notification display
Whenever an operation or timer is finished, a notification
appears on the display. Touch the display screen to
confirm and continue operation.

17
Microwave
You can use the microwave to cook, heat up or defrost
food quickly. The microwave can be used on its own, or
in combination with another heating mode.
To ensure optimum use of the microwave, please
observe the notes on cookware.
Microwave utensil guide
Suitable ovenware
▯ Heat-resistant glass, glass ceramic and
earthenware:
Utility dishes, loaf dishes, pie plates, cake plates, liquid
measuring cups, casseroles and bowls without
metallic trim (e.g. Pyrex
®
, Anchor Hocking™, Corning
Ware
®
, Emile Henry, etc.).
▯ China:
Bowls, cups, serving plates and platters without
metallic trim.
▯ Plastic films and wraps:
Plastic wrap (as a cover) - lay the plastic wrap loosely
over the dish and press it to the sides. Vent plastic
wrap by turning back one edge slightly to allow excess
steam to escape. The dish should be deep enough so
that the plastic wrap will not touch the food.
▯ Microwave-safe plastics:
Microwave-safe plastic dishes, cups, semi-rigid freezer
containers and plastic bags for short cooking times.
Use these with care because the plastic may soften
from the heat of the food.
▯ Paper products:
Paper towels, wax paper, parchment paper, paper
napkins and paper plates with no metallic trim or
design. Look for the manufacturers label for any
special instructions for use in the microwave oven.
Unsuitable ovenware
▯ Metal utensils and cookware:
Metal shields the food from microwave energy and
produces uneven cooking. Also, avoid metal skewers,
thermometers or foil trays. Metal utensils can cause
arcing, which can damage your microwave oven.
▯ Metal decoration:
Bowls, cups, serving plates and platters with metallic
trim.
▯ Aluminum foil:
Avoid large sheets of aluminum foil because they
hinder cooking and may cause harmful arcing. Use
small pieces of foil to shield poultry legs and wings.
Keep ALL aluminum foil at least 1 inch (25 mm) from
the side walls of the oven cavity and door of the
microwave.
▯ Wood:
Wooden bowls and boards will dry out and may split
or crack when you use them in the microwave oven.
Baskets made of wood will react in the same way.
▯ Tightly covered cookware:
Be sure to leave openings for steam to escape from
covered cookware. Pierce plastic pouches of
vegetables or other food items before cooking. Tightly
closed pouches may explode.
▯ Brown paper:
Avoid using brown paper bags. They absorb heat and
can burn.
▯ Flawed or chipped cooking utensils:
Any utensil that is cracked, flawed or chipped may
break in the oven.
▯ Metal twist ties:
Remove metal twist ties from plastic or paper bags.
They become hot and could cause a fire.
Ovenware test
Do not turn on the microwave unless there is food inside.
The following ovenware test is the only exception to this
rule.
Perform the following test if you are unsure whether your
ovenware is suitable for use in the microwave:
1.
Heat the empty ovenware at maximum power for ½ to
1 minute.
2.
Check the temperature occasionally during that time.
The ovenware should still be cold or warm to the touch.
The ovenware is unsuitable if it becomes hot or if sparks
are generated.
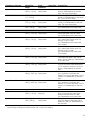
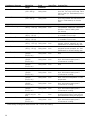
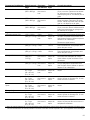
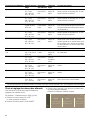
Microwave power levels
You can select from 10 different microwave power levels.
If you do not set a power level, the microwave will
automatically operate at the highest power level 100%.
The table below provides suggested power levels for
various types of food that can be prepared in the
microwave.
Microwave
output
Use for
100%
high
Boiling water
Cooking ground meat
Making candy
Cooking fresh fruit & vegetables
Cooking fish & poultry
Preheating browning dish
Reheating beverages
Cooking bacon slices
90% Reheating meat slices quickly
Saute onions, celery & green peppers
80% All reheating
Cooking scrambled eggs

18
Setting the microwave
The appliance must be turned off.
1.
Touch the ON l OFF touch button to switch on the
appliance.
You go directly to the main menu.
2.
“Microwave” • is shown as the default mode.
3.
Touch “Continue”.
4.
A microwave power level in percent is suggested.
5.
Touch the power level field and swipe to the left or
right to select a different power level.
Confirm your setting by touching the 8 symbol.
Note: If you do not touch the 8 symbol the changes
will be taken over automatically after a few seconds.
6.
Touch the field that displays the default cooking time.
You can set hours, minutes and seconds.
Touch the required field and swipe to the left or right to
set the cooking time.
Confirm your setting by touching the 8 symbol.
Note: If you do not touch the 8 symbol the changes
will be taken over automatically after a few seconds.
7.
Touch the START l STOP touch button to start the
appliance operation.
The status bar begins to fill up. The cooking time
counts down on the display.
Changing the cooking time
You can change the cooking time at any time during
operation, by touching the time as it counts down. Touch
the 8 touch field to apply the settings.
The operation continues automatically with the new
settings.
Add 30 seconds cooking time
Touch the “Add 30 sec” field on the touch screen to
increase the cooking time in increments of 30 seconds.
You can also touch this field during microwave operation
to add 30 seconds to the remaining microwave time.
Changing the microwave power level
You can change the microwave power level at any time
during operation, by touching the power level field on the
display. Touch the 8 touch field to apply the settings.
The operation continues automatically with the new
settings.
70% Cooking breads & cereal products
Cooking cheese dishes
Cooking muffins, brownies & cupcakes
Cooking whole poultry
60% Cooking pasta
50% Cooking meat
Cooking custard
Cooking spare ribs, rib roast & sirloin
roast
40% Cooking less tender cuts of meat
Reheating frozen packaged foods
30% Thawing meat, poultry & seafood
Cooking small quantities of food
Finish cooking casseroles,
stew & some sauces
Melting chocolate
20% Softening butter & cream cheese
10%
low
Softening ice cream
Raise yeast dough
Microwave
output
Use for
&RQWLQXH
0LFURZDYH
&RRN6PDUW
0:3URJUDPV +HDWLQJ0RGHV
&RPEL0RGHV
0LFURZDYH
PLQV
$GGVHF
0LFURZDYH
PLQV
0LQXWHV
+RXUV 6HFRQGV
0LFURZDYH
PLQV
$GGVHF

19
The cooking time has elapsed
As soon as the set microwave time has been reached,
an audible signal sounds and the appliance ends the
microwave operation automatically.
“Microwave completed x” appears on the display.
Touch the display to stop the audible signal.
You can restart the microwave operation with the same
power level by setting a new time and touching the
START l STOP touch button.
Pausing the operation
Touch the START l STOP touch button to pause the
operation. Press the START l STOP touch button again to
continue the operation.
Opening the appliance door interrupts the operation.
Touch the START l STOP touch button once the door has
been closed. The operation continues.
Switching the appliance off
Touch the ON l OFF touch button.
Suggestions for best results
To help you achieve the best possible results from your
microwave oven, read the following suggestions below:
▯ Storage temperature
Foods taken from the freezer or refrigerator take
longer to cook.
▯ Size
Small pieces of food cook faster than large ones.
Pieces similar in size and shape will cook more evenly
when cooked together. For more even results, reduce
the power levels when cooking large pieces of food.
▯ Natural moisture
Very moist foods cook more evenly because
microwave energy heats water molecules very
efficiently.
▯ Stirring
Stir foods such as casseroles and vegetables from the
outside to the center to distribute the heat more
evenly. This will allow the food to cook faster.
(Constant stirring is not necessary.)
▯ Turning
Turn over foods such as pork chops, roasts or whole
cauliflower halfway through the cook time. This will
help to expose all sides equally to microwave energy.
▯ Placing food
Place delicate areas of food items, such as asparagus
tips, toward the center of the turntable tray.
▯ Arranging food
Arrange unevenly shaped foods, such as chicken
pieces or salmon, with the thicker or meatier parts
toward the outside of the turntable tray.
▯ Letting food stand
After removing the food from the microwave, cover the
food with foil or a casserole lid and let it stand to finish
cooking. This will help the food finish cooking in the
center and avoids overcooking the outer edges. The
length of stand time depends on the density and
surface area of the food items.
▯ Wrapping foods
Sandwiches and many other food types containing
pre-baked bread should be wrapped in paper towels
or wax paper prior to placing in the microwave to help
prevent the food items from drying out while heating.
Microwave programs
You can prepare food very easily using the various
programs. You select a program and enter the weight or
amount of your food. The program then applies the most
suitable settings.
Note: The display will give you useful instructions for
each of the microwave programs. Press the INFO button
whenever it lights up, and read and follow the displayed
instructions for best cooking results.
Information on the settings
▯ The cooking result depends on the quality of the food
and the type of cookware. For an optimal cooking
result, use food that is in good condition and chilled
meat only. For frozen food, use food straight out of the
freezer only.
▯ For some dishes, you will be required to enter the
weight or amount. The appliance will then apply the
time and temperature settings for you.
It is not possible to set weights or amounts outside of
the intended range.
▯ Information is provided, e.g. on cookware, shelf
position or the addition of liquid when cooking meat.
Some food requires turning or stirring, etc. during
cooking. This is shown in the display shortly after
operation starts. An audible signal will remind you at
the right time.
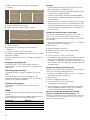
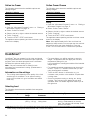
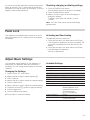
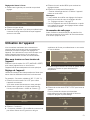
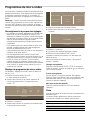
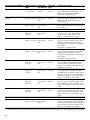
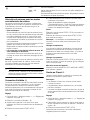
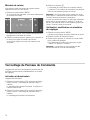
Setting a Microwave Program
Example: Setting Melt Butter mode for 1/4 cup.
1.
Touch the ON l OFF touch button.
The main menu is displayed.
2.
Swipe to the right in the upper field of the display to
select “Mw Programs” ±.
3.
Touch “Continue”.
&RQWLQXH
+HDWLQJ0RGHV
&RRN6PDUW
0LFURZDYH
&R
P
0LFURZDYH3URJUDPV

20
4.
Swipe to the right or left to select a Microwave
Program.
5.
Touch the Melt Butter program.
6.
Swipe to the left or right to select 1/4 cup.
7.
Touch “Continue”.
8.
A summary of the settings you have made is
displayed.
9.
Touch the START l STOP touch button.
The appliance starts operating and the cook time counts
down on the display.
Once the cook time has run out, “Program completed” is
displayed.
Changing the operating mode
Touch the START l STOP touch button, then set a
different mode. Touch the ; symbol to navigate to the
main menu.
When the program is finished
The display shows “Program completed. Enjoy your
meal!”
Touch the display to turn off the notification. The
previously set program is displayed. You can continue
cooking or turn off the appliance.
Switching off the appliance
Touch the ON l OFF touch button to switch off the
appliance.
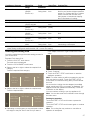
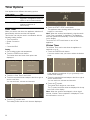
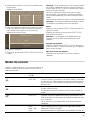
Pizza
You can use the Pizza mode to bake three different types
of pizza.
The following chart shows the available options and the
proper accessory to use for each Pizza type.
Pizza tips
▯ Check pizza before minimum time, pizza may cook
faster compared to a traditional oven.
▯ For fresh pizza use a pizza paddle for sliding the pizza
on and from the metal turntable.
▯ If using a pizza paddle, sprinkle the paddle liberally
with cornmeal for ease in transferring the dough to the
metal turntable.
▯ Maximum size is 12 inches for fresh and frozen pizzas.
▯ Avoid using a pizza stone as it can damage the oven.
▯ The metal turntable can be used for cutting pizza into
slices. Remove the turntable from the oven after the
pizza is baked.
Setting Pizza mode for fresh or frozen pizza
You can set a temperature range from 375 to 450° F
(190 to 235°C) for fresh and frozen pizza modes.
You can bake fresh or frozen pizza directly on the metal
tray turntable.
1.
Open the “Microwave Programs” menu. ~ "Setting a
Microwave Program" on page 19
2.
Select “Pizza”.
3.
Select the desired pizza type.
4.
Swipe to the left or right to set a temperature.
5.
Touch “Continue”.
6.
Touch the START l STOP touch button.
7.
The appliance starts preheating. The status bar fills up.
When the set temperature is reached “preheating
completed” is displayed. Place the food into the oven
and close the door. The appliance continues with the
set temperature.
Setting Pizza mode for microwave pizza
Place the microwave pizza on the ceramic tray and put it
in the oven following package directions.
1.
Open the “Microwave Programs” menu. ~ "Setting a
Microwave Program" on page 19
2.
Select “Pizza”.
3.
Select the desired pizza type.
4.
Touch the START l STOP touch button.
The appliance starts sensing.
5.
Once sensing is complete a notification is displayed.
Then the appliance starts cooking. The calculated
cook time counts down on the display.
Note: Do not open the door during the sensing
process, or the process will be cancelled. Once
sensing is completed, you can open the door to stir, turn
or rearrange the food. Touch the START l STOP touch
button to resume operation.
Pizza type Bake on
Frozen Pizza Metal tray
Fresh Pizza Metal tray
Microwave Pizza Ceramic tray
$XWR'HIURVW 0HOW%XWWHU 0HOW&KRFRODWH
*URXQG0HDW WEVS
FXS
FXS
FXSV0HDW3LHFHV
0HOW%XWWHU
FXS
&RQWLQXH
FXSWEVS
Page is loading ...
Page is loading ...
Page is loading ...
Page is loading ...
Page is loading ...
Page is loading ...
Page is loading ...
Page is loading ...
Page is loading ...
Page is loading ...
Page is loading ...
Page is loading ...
Page is loading ...
Page is loading ...
Page is loading ...
Page is loading ...
Page is loading ...
Page is loading ...
Page is loading ...
Page is loading ...
Page is loading ...
Page is loading ...
Page is loading ...
Page is loading ...
Page is loading ...
Page is loading ...
Page is loading ...
Page is loading ...
Page is loading ...
Page is loading ...
Page is loading ...
Page is loading ...
Page is loading ...
Page is loading ...
Page is loading ...
Page is loading ...
Page is loading ...
Page is loading ...
Page is loading ...
Page is loading ...
Page is loading ...
Page is loading ...
Page is loading ...
Page is loading ...
Page is loading ...
Page is loading ...
Page is loading ...
Page is loading ...
Page is loading ...
Page is loading ...
Page is loading ...
Page is loading ...
Page is loading ...
Page is loading ...
Page is loading ...
Page is loading ...
Page is loading ...
Page is loading ...
Page is loading ...
Page is loading ...
-
 1
1
-
 2
2
-
 3
3
-
 4
4
-
 5
5
-
 6
6
-
 7
7
-
 8
8
-
 9
9
-
 10
10
-
 11
11
-
 12
12
-
 13
13
-
 14
14
-
 15
15
-
 16
16
-
 17
17
-
 18
18
-
 19
19
-
 20
20
-
 21
21
-
 22
22
-
 23
23
-
 24
24
-
 25
25
-
 26
26
-
 27
27
-
 28
28
-
 29
29
-
 30
30
-
 31
31
-
 32
32
-
 33
33
-
 34
34
-
 35
35
-
 36
36
-
 37
37
-
 38
38
-
 39
39
-
 40
40
-
 41
41
-
 42
42
-
 43
43
-
 44
44
-
 45
45
-
 46
46
-
 47
47
-
 48
48
-
 49
49
-
 50
50
-
 51
51
-
 52
52
-
 53
53
-
 54
54
-
 55
55
-
 56
56
-
 57
57
-
 58
58
-
 59
59
-
 60
60
-
 61
61
-
 62
62
-
 63
63
-
 64
64
-
 65
65
-
 66
66
-
 67
67
-
 68
68
-
 69
69
-
 70
70
-
 71
71
-
 72
72
-
 73
73
-
 74
74
-
 75
75
-
 76
76
-
 77
77
-
 78
78
-
 79
79
-
 80
80


Ask a question and I''ll find the answer in the document
Finding information in a document is now easier with AI
in other languages
- français: Thermador MC30WS Manuel utilisateur
Related papers
Other documents
-
Bosch HMC80152UC Owner's manual
-
Bosch HMC80252UC/01 Owner's manual
-
Bosch HMV5052U User manual
-
-
-
Bosch HMC80242UC User manual
-
-
Bosch HMV5053U User manual
-
Bosch HMV3053U User manual
-