De Dietrich DME729X Owner's manual
- Category
- Cookers
- Type
- Owner's manual

F
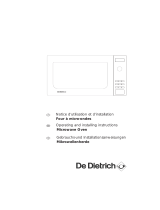
Notice d’utilisation et d’installation
Micro-ondes
Operating and installing instructions
Microwave Oven
D Gebrauchs-und Installationsanweisungen
Mikrowellenherde
P Manual de Instruções e de Instalação
do Microondas
E Instrucciones de uso e instalación
Microondas
Gebruiks- en installatiehandleiding
Magnetronoven
Betjenings- og installationsvejledning for
Mikrobølgeovn
Page is loading ...

F
3
Instruction de sécurité importantes.
Lire avec attention et garder pour les futures utilisations.
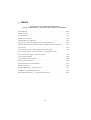
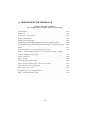
Installation . . . . . . . . . . . . . . . . . . . . . . . . . . . . . . . . .4
Mises en garde . . . . . . . . . . . . . . . . . . . . . . . . . . . . . .10
Présentation . . . . . . . . . . . . . . . . . . . . . . . . . . . . . . . .11
Bandeau de commande . . . . . . . . . . . . . . . . . . . . . . . .12
L'afficheur et le sélecteur . . . . . . . . . . . . . . . . . . . . . . . . .13
Mise a l'heure / Equivalence des puissances . . . . . . . . . .14
Programmation micro-ondes /programmation express . . . .15
La clayette . . . . . . . . . . . . . . . . . . . . . . . . . . . . . . . . .16
La fonction gril / Programmation du gril . . . . . . . . . . . . .17
La fonction gril + micro-ondes / Programmation
de la fonction gril + micro-ondes . . . . . . . . . . . . . . . . . .18
La fonction Pizza . . . . . . . . . . . . . . . . . . . . . . . . . . . . .19
Le plat Pizza . . . . . . . . . . . . . . . . . . . . . . . . . . . . . . . .21
Touche mémoire . . . . . . . . . . . . . . . . . . . . . . . . . . . . .22
Programmation enchaînée . . . . . . . . . . . . . . . . . . . . . .23
Départ différé . . . . . . . . . . . . . . . . . . . . . . . . . . . . . . .24
Un petit problème ! Que faire ? . . . . . . . . . . . . . . . . . . .25
Entretien & nettoyage . . . . . . . . . . . . . . . . . . . . . . . . .26
Recommandations / Service après-vente . . . . . . . . . . . . .27
Service Consommateurs . . . . . . . . . . . . . . . . . . . . . . . .28
F
SOMMAIRE
Page is loading ...
Page is loading ...
Page is loading ...

F
7
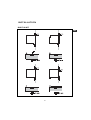
76
5
4
1
2
3
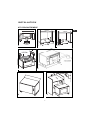
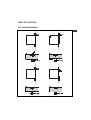
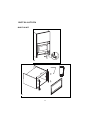
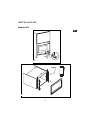
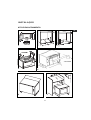
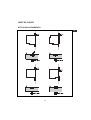
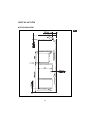
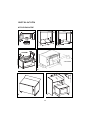
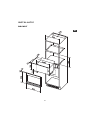
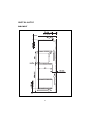
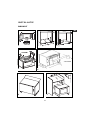
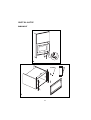
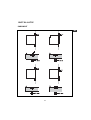
INSTALLATION
KIT D’ENCASTREMENT

8
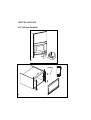
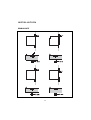
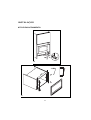
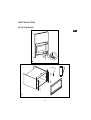
INSTALLATION
KIT D’ENCASTREMENT
8
9
Page is loading ...
Page is loading ...
Page is loading ...

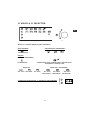
12
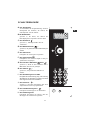
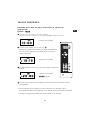
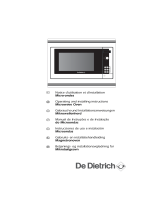
BANDEAU DE COMMANDE
A L'afficheur :
vous facilite la programmation en affichant :
la fonction, le temps, la température de cuisson
ou l’heure.
B Le sélecteur :
permet de programmer la durée, l’heure de la fin
d’un programme ou l'horloge.
C La touche décongélation :
permet de décongeler tout produit surgelé.
D La touche micro-ondes :
permet de choisir la puissance micro-ondes désirée.
E La touche START :
permet de débuter tout programme.
F La touche Mémoire M:
permet d'accéder rapidement aux 3 opérations
préprogrammées.
G La touche Gril + micro-ondes /pizza :
permet d'accéder directement aux fonctions gril
+ micro-ondes ou pizza.
H La touche Gril :
permet de choisir le niveau de gril désiré.
I La touche Annulation C/STOP:
permet d’interrompre (Stop) ou d’effacer (Annulation)
un programme en cours. Un appui pour Stop,
deux appuis pour Annulation.
J La touche horloge :
permet de mettre l’horloge à l’heure ou pro-
grammer un départ différé.
K
La touche Arrêt plateau :
permet l’arrêt du plateau tournant.
L La touche ouverture de porte :
permet d'ouvrir l'appareil ou arrêter un pro-
gramme en cours.
G
F
D
E
H
B
C
A
K
J
I
L

F
13
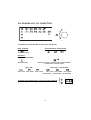
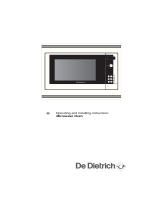
L’AFFICHEUR & LE SELECTEUR
L’afficheur et le sélecteur vous guident pour sélectionner :
plateau tournant : programmations mémorisées :
ARRET PLATEAU
fonctions :
Puissances micro-ondes
DECONGÉLATION CUISSON TRÈS DOUCE / CUISSON DOUCE / MIJOTAGE /
RÉCHAUFFAGE / CUISSON FORTE
Niveaux Gril Niveaux Gril + micro-ondes
GRIL DOUX GRIL MOYEN GRIL FORT GRIL DOUX GRIL MOYEN GRIL FORT
+MICRO-ONDES +MICRO-ONDES +MICRO-ONDES
le temps de programmation, l’horloge ou départ différé
11 22 :: 00 00
W

14
PUISSANCE - WATT UTILISATION
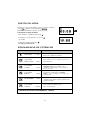
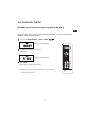
MISE A L'HEURE
EQUIVALENCE DES PUISSANCES
Après le branchement de votre appareil ou une coupure de
courant, l’horloge apparaît dans l'afficheur et
00 00 :: 00 00
clignote, vous invitant à régler l'heure.
Pour mettre l’horloge à l’heure :
- Appuyez pendant 5 secondes sur la touche horloge .
- Programmez l’horloge en tournant le sélecteur
(ex. 12:00).
- Validez d’une simple pression sur la touche horloge
.
Votre horloge est à l’heure.
11 22 :: 00 00
00 00 :: 00 00
DECONGEL. 150
Pour terminer des cuissons délicates ou pour
cuire très lentement.
MIJOTAGE 500
Pour tous les poissons et volailles. Pour terminer
les préparations commencées en “CUISSON
FORTE”, telles que haricots, lentilles, laitages.
RECHAUFFAGE 7 0 0
Pour réchauffer tous vos plats cuisinés frais ou
congelés. Pour mettre à température les plats
préparés et les légumes surgelés.
CUISSON
DOUCE 350
Pour terminer la cuisson de plats commencée
en “CUISSON FORTE” qui risquent de trop cuire
en surface, tels que rôti de veau, de porc...
Pour décongeler de la viande, du poisson,
des fruits, du pain ou les aliments délicats.
Pour cuire tous les légumes et potages.
Pour chauffer tous les liquides.
PUISSANCE MICRO-ONDES RESTITUEE
: 1000 W
CUISSON TRÈS
DOUCE 250
CUISSON
DOUCE 1000
Page is loading ...
Page is loading ...
Page is loading ...
Page is loading ...
Page is loading ...
Page is loading ...
Page is loading ...
Page is loading ...
Page is loading ...
Page is loading ...
Page is loading ...
Page is loading ...
Page is loading ...
Page is loading ...

GB
29
Important safety instructions.
Read carefully and keep for future reference.
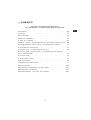
Installation . . . . . . . . . . . . . . . . . . . . . . . . . . . . . . .30
Warning . . . . . . . . . . . . . . . . . . . . . . . . . . . . . . . . .36
General description . . . . . . . . . . . . . . . . . . . . . . . . .37
Control panel . . . . . . . . . . . . . . . . . . . . . . . . . . . . .38
The display & the selector knob . . . . . . . . . . . . . . . . . . .39
Setting the clock / Microwave power settings . . . . . . . . . . .40
Setting a microwave programme/ Express programme . .41
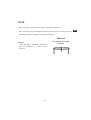
The grilling rack . . . . . . . . . . . . . . . . . . . . . . . . . . . .42
The grill function / Programming the grill function . . . .43
The microwave + grill function / Programming
the microwave + grill function . . . . . . . . . . . . . . . . . .44
The Pizza function . . . . . . . . . . . . . . . . . . . . . . . . . .45
The Pizza dish . . . . . . . . . . . . . . . . . . . . . . . . . . . . .47
Memory key . . . . . . . . . . . . . . . . . . . . . . . . . . . . . . .48
Linked programmes . . . . . . . . . . . . . . . . . . . . . . . . . .49
Preprogramming START . . . . . . . . . . . . . . . . . . . . . . .50
Troubleshooting guide . . . . . . . . . . . . . . . . . . . . . . .51
Care & cleaning . . . . . . . . . . . . . . . . . . . . . . . . . . . .52
Pointers / After-sales service . . . . . . . . . . . . . . . . . . .53
CONTENTS

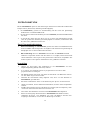
30
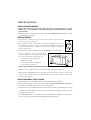
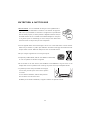
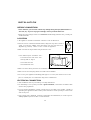
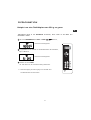
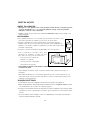
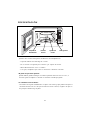
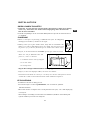
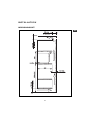
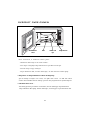
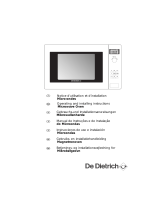
INSTALLATION
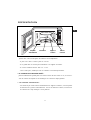
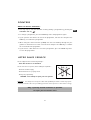
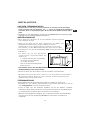
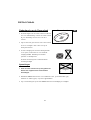
Leave sufficient space around the oven :
- 5 cm between the sides of the oven
and any walls or objects
- 14 cm above the oven
- 10 cm behind the oven.
LOCATION
BEFORE CONNECTION
•
Check whether your oven has suffered any damage during transport (deformed door or
door seal, etc.). If you see any signs of damage, contact your dealer before use.
•
Verify the power voltage. If there is a PERMANENT undervoltage (200-210 volts), consult your
electrical installer.
ELECTRICAL CONNECTION
5 cm
14 cm
10 cm
5 cm
•
The appliance should be installed at a distance of 85 cm above floor.
•
Place the oven on a flat and horizontal surface, away from any source of heat or
steam. To ensure the stability of the microwave oven, the front left foot is
adjustable (5 positions). Turn it to raise or lower the appliance.
•
Make sure that air may circulate freely around the oven.
•
Make sure that nothing obstructs the ventilation louvers at the back of the appliance.
•
Make sure the electrical plug will be accessible after installation.
•
Do not use your appliance immediatly (wait approx. 1-2 hours) after transfer from a cold
place to a warm place as condensation may cause a malfunction.
•
Your installation must be protected by a 16 Amp thermal fuse.
•
It is mandatory to use a power point with a ground terminal, connected in accordance with
current safety regulations.
•
In your electrical installation, provide a device that is accessible to the installer, capable of
separating the appliance from the mains power and whose contact opening is at least 3 mm
at all of the poles.
•
If the supply cord is damaged, it must be replaced by the manufacturer, its service agent or
similarly qualified persons in order to avoid a hazard.

GB
31
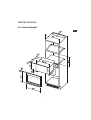
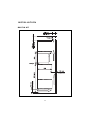
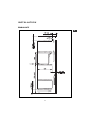
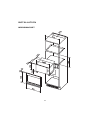
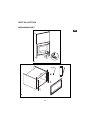
INSTALLATION
BUILT IN KIT

32
INSTALLATION
BUILT IN KIT

GB
33
INSTALLATION
BUILT IN KIT
76
5
4
1
2
3

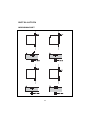
34
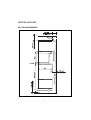
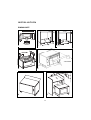
INSTALLATION
BUILT IN KIT
8
9

GB
35
INSTALLATION
BUILT IN KIT

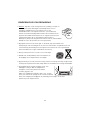
36
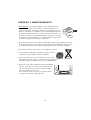
WARNING
• Your appliance is designed exclusively for the domestic purposes of defrosting, heating or
cooking foods. The manufacturer bears no responsibility in the case of improper usage.
• Only use ustensils that are suitable for use in microwave ovens.
• To avoid deterioration of your microwave oven, never operate it empty or without the
turntable.
• Never tamper with the lock mechanism of your microwave oven; you could cause damage
requiring repair by an authorised technician.
• When heating food in plastic or paper containers, keep an eye on the oven due to the
possibility of ignition.
• It is not advisable to use metal recipients, forks, spoons, knives, metal ties or staples for
deep-freeze bags.
• The contents of feeding bottles are baby food jars shall be stirred or shaken and the
temperature checked before consumption in order to avoid burns.
• Only allow children to use the oven without supervision when adequate instructions
have been given so that the child is able to use the oven in a safe way and understands
the hazards of improper use.
• Liquids and other foods must not be heated in sealed containers they are liable to explode.
• Eggs in their shell and whole hard-boiled eggs should not be heated in microwave ovens
since they may explode, even after microwave heating has ended.
• Microwave heating of beverages can result in delayed eruptive boiling, therefore care
must be taken when handling the container.
• For small amounts (one sausage, a single croissant, etc.), place a glass of water along-
side the food item.
• Time settings that are too long may dry out and burn the food. To avoid such incidents,
never use the same cooking times as those recommended for traditional ovens.
• If smoke is observed, switch off or unplug the appliance and keep the door closed in
order to stifle any flames.
• In order to evacuate moisture, your appliance is fitted with a delayed ventilation func-
tion. Depending on the applied cooking mode (solo/grill/combination), the oven venti-
lation will continue to operate after the cooking end.

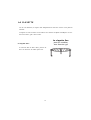
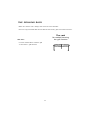
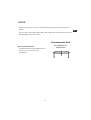
37
GB
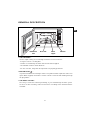
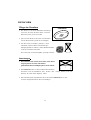
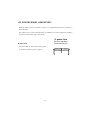
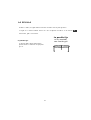
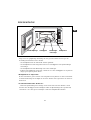
• THE TURNTABLE :
ensures equal cooking of food throughout with no need to intervene.
- It may be used as a cooking dish.
- Rotation is controlled by the drive shaft and the wheel support.
- The turntable rotates in both directions.
- If it does not turn, verify that all components are properly positioned.
•
TURNTABLE OFF :
stops the turntable from revolving in order to use platters which require the entire oven
space. When stopped, remember to stir the contents or turn the dish midway through
the programme.
• THE WHEEL SUPPORT :
Do not try to rotate the roller ring manually, as you could damage the drive system.
If it does not turn smoothly, make sure that there is nothing in the well beneath the
turntable.
GENERAL DESCRIPTION
TurntableDrive shaft Wheel
support
Identification
label

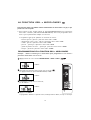
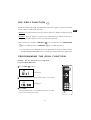
38
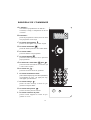
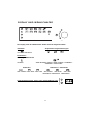
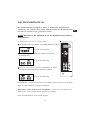
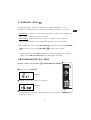
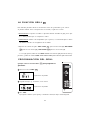
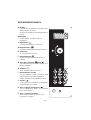
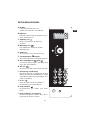
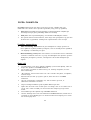
CONTROL PANEL
A Display window :
to simplify programming, the display indi-
cates : the time of day, the programme
length, the functions or cooking tem-
perature programmed.
B Selector knob :
to set the clock, the programme length
or the end-time of a programme .
C
Defrost key :
to defrost all frozen food.
D Microwave key
:
to set the microwave power level.
E START key :
to start all programmes.
F Memory key M :
for rapid access to 3 preprogrammed
operations.
G Grill + Microwave / pizza key
to program the microwave + grill and
pizza functions.
H
Grill key :
to select the desired level of grill.
I CLEAR/STOP key C/STOP:
to interrupt (press once) or cancel a pro-
gramme (press twice).
J Clock key :
to set the clock or preprogramme START.
K Stop-Turntable key :
to stop the turntable from revolving.
L
Door open button :
to open the door or stop the oven.
G
F
D
E
H
B
C
A
K
J
I
L

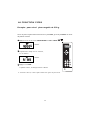
39
GB
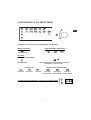
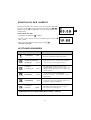
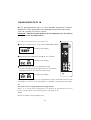
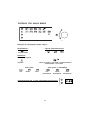
THE DISPLAY & THE SELECTOR KNOB
The display and the selector knobs guide you in your choice of :
turntable option : memorized programme settings :
STOP TURNTABLE
functions :
Microwave power levels
DEFROST VERY LOW COOK
/ LOW COOK
/ SIMMER /
REHEAT / HIGH COOK
Grill levels Microwave + grill levels
LOW GRILL MEDIUM GRILL HIGH GRILL LOW GRILL MEDIUM GRILL HIGH GRILL
+MICROWAVE +MICROWAVE +MICROWAVE
the programme length, clock or preprogrammed start time
11 22 :: 00 00
M3
M2
M1
W
W

40
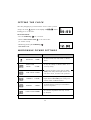
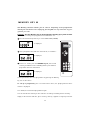
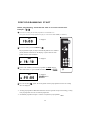
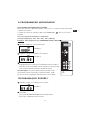
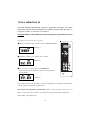
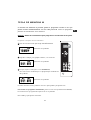
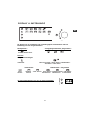
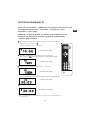
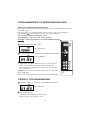
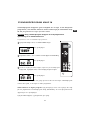
SETTING THE CLOCK
MICROWAVE POWER SETTINGS
After first plugging in your microwave oven or after a power
outage, the clock appears in the display and
00 00 :: 00 00
flashes,
inviting you to set the time.
To set the clock :
- Press the CLOCK key for 5 seconds.
- Turn the time selector knob to the correct time
(ex. twelve o'clock).
- Validate by pressing the CLOCK key .
Your clock is set.
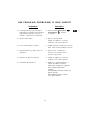
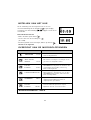
To cook fish and poultry. To finish programmes
begun with the HIGH COOK power setting such
as beans, lentils or milk-based dishes.
00 00 :: 00 00
11 22 :: 00 00
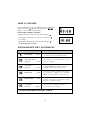
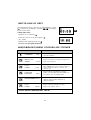
POWER SETTING APPLICATION
DEFROST 150W
VERY LOW
COOK 250W
To top off cooking of delicate dishes or to
cook very slowly.
SIMMER 500W
REHEAT 700W
To reheat all fresh or frozen pre-cooked dishes
and frozen vegetables.
LOW COOK 350W
To finish programmes begun with the HIGH
COOK power setting
which might otherwise over
cook on the outside, for instance veal or pork roast.
To defrost meat, fish, fruit, bread or delicate
dishes.
HIGH COOK 1000W
To cook fresh vegetables and soup
.
To heat
up all liquids.
MICROWAVE OUTPUT POWER : 1000W

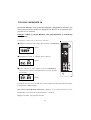
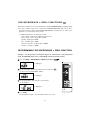
41
GB
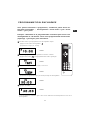
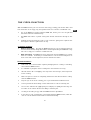
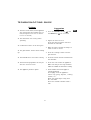
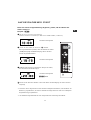
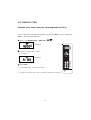
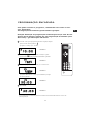
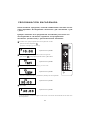
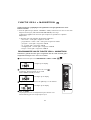
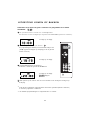
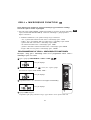
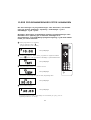
SETTING A MICROWAVE PROGRAMME
Your microwave oven is now plugged in and the clock is set.
Open the door, set the dish inside, close the door. If the door is nor properly shut,
the appliance will not operate.
If the dish is too large to turn freely inside the oven, press the STOP TURNTABLE key before
or during the programme.
6 microwave power levels are available :
(150 [defrost] - 250 - 350 - 500 - 700 - 1000 W).
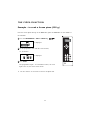
Example : Set a microwave programme at the HIGH COOK
power level (1000 W).
①①
Press the MICROWAVE POWER KEY to select
1000W :
is displayed.
②②
Set the programme time with the selector knob, ex. five minutes :
is displayed.
③③
Press START.
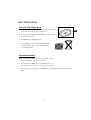
The programme begins : the turntable revolves, the oven light comes on.
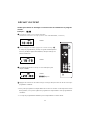
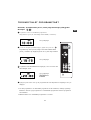
3 beeps announce the end of a programme. The beeps are repeated
every minute for 10 minutes until you open the door.
To defrost, proceed similarly, using the defrost key to select the 150W power level.
If there is an error in the programming, press the CLEAR/STOP key twice.
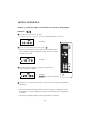
EXPRESS PROGRAMME
①①
Set the programme time with the selector knob, ex. three minutes :
is displayed.
②②
Press START.
The HIGH COOK programme begins automatically : the turntable revolves, the oven light comes on.
00 33 :: 00 00
11 00 00 00
WW
00 55 :: 00 00
2
1
3
Page is loading ...
Page is loading ...
Page is loading ...
Page is loading ...
Page is loading ...
Page is loading ...
Page is loading ...
Page is loading ...
Page is loading ...
Page is loading ...
Page is loading ...
Page is loading ...
Page is loading ...
Page is loading ...
Page is loading ...
Page is loading ...
Page is loading ...
Page is loading ...
Page is loading ...
Page is loading ...
Page is loading ...
Page is loading ...
Page is loading ...
Page is loading ...
Page is loading ...
Page is loading ...
Page is loading ...
Page is loading ...
Page is loading ...
Page is loading ...
Page is loading ...
Page is loading ...
Page is loading ...
Page is loading ...
Page is loading ...
Page is loading ...
Page is loading ...
Page is loading ...
Page is loading ...
Page is loading ...
Page is loading ...
Page is loading ...
Page is loading ...
Page is loading ...
Page is loading ...
Page is loading ...
Page is loading ...
Page is loading ...
Page is loading ...
Page is loading ...
Page is loading ...
Page is loading ...
Page is loading ...
Page is loading ...
Page is loading ...
Page is loading ...
Page is loading ...
Page is loading ...
Page is loading ...
Page is loading ...
Page is loading ...
Page is loading ...
Page is loading ...
Page is loading ...
Page is loading ...
Page is loading ...
Page is loading ...
Page is loading ...
Page is loading ...
Page is loading ...
Page is loading ...
Page is loading ...
Page is loading ...
Page is loading ...
Page is loading ...
Page is loading ...
Page is loading ...
Page is loading ...
Page is loading ...
Page is loading ...
Page is loading ...
Page is loading ...
Page is loading ...
Page is loading ...
Page is loading ...
Page is loading ...
Page is loading ...
Page is loading ...
Page is loading ...
Page is loading ...
Page is loading ...
Page is loading ...
Page is loading ...
Page is loading ...
Page is loading ...
Page is loading ...
Page is loading ...
Page is loading ...
Page is loading ...
Page is loading ...
Page is loading ...
Page is loading ...
Page is loading ...
Page is loading ...
Page is loading ...
Page is loading ...
Page is loading ...
Page is loading ...
Page is loading ...
Page is loading ...
Page is loading ...
Page is loading ...
Page is loading ...
Page is loading ...
Page is loading ...
Page is loading ...
Page is loading ...
Page is loading ...
Page is loading ...
Page is loading ...
Page is loading ...
Page is loading ...
Page is loading ...
Page is loading ...
Page is loading ...
Page is loading ...
Page is loading ...
Page is loading ...
Page is loading ...
Page is loading ...
Page is loading ...
Page is loading ...
Page is loading ...
Page is loading ...
Page is loading ...
Page is loading ...
Page is loading ...
Page is loading ...
Page is loading ...
-
 1
1
-
 2
2
-
 3
3
-
 4
4
-
 5
5
-
 6
6
-
 7
7
-
 8
8
-
 9
9
-
 10
10
-
 11
11
-
 12
12
-
 13
13
-
 14
14
-
 15
15
-
 16
16
-
 17
17
-
 18
18
-
 19
19
-
 20
20
-
 21
21
-
 22
22
-
 23
23
-
 24
24
-
 25
25
-
 26
26
-
 27
27
-
 28
28
-
 29
29
-
 30
30
-
 31
31
-
 32
32
-
 33
33
-
 34
34
-
 35
35
-
 36
36
-
 37
37
-
 38
38
-
 39
39
-
 40
40
-
 41
41
-
 42
42
-
 43
43
-
 44
44
-
 45
45
-
 46
46
-
 47
47
-
 48
48
-
 49
49
-
 50
50
-
 51
51
-
 52
52
-
 53
53
-
 54
54
-
 55
55
-
 56
56
-
 57
57
-
 58
58
-
 59
59
-
 60
60
-
 61
61
-
 62
62
-
 63
63
-
 64
64
-
 65
65
-
 66
66
-
 67
67
-
 68
68
-
 69
69
-
 70
70
-
 71
71
-
 72
72
-
 73
73
-
 74
74
-
 75
75
-
 76
76
-
 77
77
-
 78
78
-
 79
79
-
 80
80
-
 81
81
-
 82
82
-
 83
83
-
 84
84
-
 85
85
-
 86
86
-
 87
87
-
 88
88
-
 89
89
-
 90
90
-
 91
91
-
 92
92
-
 93
93
-
 94
94
-
 95
95
-
 96
96
-
 97
97
-
 98
98
-
 99
99
-
 100
100
-
 101
101
-
 102
102
-
 103
103
-
 104
104
-
 105
105
-
 106
106
-
 107
107
-
 108
108
-
 109
109
-
 110
110
-
 111
111
-
 112
112
-
 113
113
-
 114
114
-
 115
115
-
 116
116
-
 117
117
-
 118
118
-
 119
119
-
 120
120
-
 121
121
-
 122
122
-
 123
123
-
 124
124
-
 125
125
-
 126
126
-
 127
127
-
 128
128
-
 129
129
-
 130
130
-
 131
131
-
 132
132
-
 133
133
-
 134
134
-
 135
135
-
 136
136
-
 137
137
-
 138
138
-
 139
139
-
 140
140
-
 141
141
-
 142
142
-
 143
143
-
 144
144
-
 145
145
-
 146
146
-
 147
147
-
 148
148
-
 149
149
-
 150
150
-
 151
151
-
 152
152
-
 153
153
-
 154
154
-
 155
155
-
 156
156
-
 157
157
-
 158
158
-
 159
159
-
 160
160
-
 161
161
-
 162
162
-
 163
163
-
 164
164
-
 165
165
-
 166
166
-
 167
167
-
 168
168
-
 169
169
-
 170
170
-
 171
171
-
 172
172
-
 173
173
-
 174
174
-
 175
175
-
 176
176
-
 177
177
-
 178
178
-
 179
179
-
 180
180


De Dietrich DME729X Owner's manual
- Category
- Cookers
- Type
- Owner's manual
Ask a question and I''ll find the answer in the document
Finding information in a document is now easier with AI
in other languages
- français: De Dietrich DME729X Le manuel du propriétaire
- español: De Dietrich DME729X El manual del propietario
- Deutsch: De Dietrich DME729X Bedienungsanleitung
- Nederlands: De Dietrich DME729X de handleiding
- português: De Dietrich DME729X Manual do proprietário
- dansk: De Dietrich DME729X Brugervejledning
Related papers
-
 De Dietrich DME321XE1 Owner's manual
-
 De Dietrich DME320ZE1 Owner's manual
-
 De Dietrich DME321BE1 Owner's manual
-
De Dietrich DME328XE1 Owner's manual
-
 De Dietrich DME329XU1 Owner's manual
-
De Dietrich DME329BE1 Owner's manual
-
 De Dietrich DME330WE1 Owner's manual
-
 De Dietrich DME329XA1 Owner's manual
-
 De Dietrich MW6723E1 Owner's manual
-
De Dietrich MW6516E2 Owner's manual


Other documents
-
Groupe Brandt CE3331E Owner's manual
-
Panasonic NNE251 Owner's manual
-
Brandt BKC6575X Owner's manual
-
Groupe Brandt MW24EGX Owner's manual
-
-
Groupe Brandt MW3245GELX Owner's manual
-
-
-
Brandt CE3610W User manual
-
Brandt CE3610B User manual