Page is loading ...

PB
1
POWER
BLENDER
LICUADORA POTENTE
use and care manual
manual de uso y c uidado
BL2110BGG
BL2110BGG_IB_26094.indd 1 5/3/19 12:20 PM

2
3
Should you have any questions or concerns with your new product,
please call our Customer Service Line at 1-800-465-6070 (US and
Canada). Please do not return to the store.
Si usted tiene alguna inquietud o pregunta con su producto, por
favor llame a nuestra línea de servicio al cliente una atención
inmediata 1-800-465-6070 (EE.UU/Canadá) 01-800-714-2503
(México). No devuela a la tienda.
Thank you for your purchase!
Gracias por su compra!
www.prodprotect.com/blackanddecker
www.BlackAndDeckerAppliances.com
BL2110BGG_IB_26094.indd 2 5/3/19 12:20 PM

2
3
Please Read and Save this Use and Care Book.
IMPORTANT SAFEGUARDS.
When using electrical appliances, basic safety precautions should always be
followed including the following:
• Read all instructions.
• To protect against risk of electrical shock do
not immerse cord, plugs or appliance in water
or other liquid.
• Close supervision is necessary when any
appliance is used by or near children.
• Unplug from outlet when not in use, before
putting on or taking off parts, and before
cleaning.
• Avoid contacting moving parts.
• Do not operate appliance with a damaged cord
or plug, or after the appliance malfunctions or
has been dropped or damaged in any manner.
Contact Consumer Support at the toll-free
number listed in the warranty section. This
appliance has important markings on the plug
blade. The attachment plug or entire cordset
(if plug is molded onto cord) is not suitable for
replacement. If damaged, the appliance must
be replaced.
• The use of attachments, including canning jars,
not recommended by the manufacturer may
cause fire, electric shock or injury.
• Do not use outdoors.
• Do not let cord hang over edge of table or
counter.
• Keep hands and utensils out of container while
blending to reduce the risk of severe injury to
persons or damage to the blender. A scraper
may be used, but must be used only when the
blender is not running.
• Blades are sharp. Handle carefully.
• To reduce the risk of injury, never place cutter-
assembly blades on base without jar properly
attached.
• Always operate blender with cover in place.
• Do not blend hot foods/liquids.
• This appliance is not intended for use by
persons (including children) with reduced
physical, sensory or mental capabilities, or
lack of experience and knowledge, unless they
have been given supervision or instruction
concerning use of the appliance by a person
responsible for their safety.
• Children should be supervised to ensure that
they do not play with the appliance.
POLARIZED PLUG (120V models only)
This appliance has a polarized plug (one blade is wider than the other). To reduce the
risk of electric shock, this plug is intended to fit into a polarized outlet only one way. If
the plug does not fit fully into the outlet, reverse the plug. If it still does not fit, contact
a qualified electrician. Do not attempt to modify the plug in any way.
TAMPER-RESISTANT SCREW
Warning: This appliance is equipped with a tamper-resistant screw to prevent
removal of the outer cover. To reduce the risk of fire or electric shock, do not attempt
to remove the outer cover. There are no user-serviceable parts inside. Repair should
be done only by authorized service personnel.
ELECTRICAL CORD
a) A short power-supply cord is provided to reduce the risks resulting from becoming
entangled in or tripping over a longer cord.
b) Extension cords are available and may be used if care is exercised in their use.
c) If an extension cord is used:
1) The marked electrical rating of the extension cord should be at least as great as
the electrical rating of the appliance;
2) If the appliance is of the grounded type, the extension cord should be a
grounding-type 3-wire cord; and
3) The cord should be arranged so that it will not drape over the counter top or
tabletop where it can be pulled on by children or tripped over.
Note: If the power cord is damaged, please contact the warranty department listed
in these instructions.
SAVE THESE INSTRUCTIONS.
This product is for household use only.
BL2110BGG_IB_26094.indd 3 5/3/19 12:20 PM

4
5
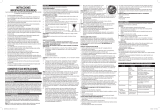
GETTING TO KNOW
YOUR BLENDER
Product may vary slightly from what is illustrated.
2
3
1
4
14
5
6
7 8
9
10
11
12
13
1. Dual-opening lid
(Part# BL2110-01)
2. Pour spout
3. Ingredient slot
4. Blending jar (Part# BL2110-02)
5. Handle
6. Blade assembly
(Part# BL2110-03)
7. Gasket
8. Jar base
(Part# BL2110-04)
9. Blender Base
10. Pulse/OFF button
11. LO button
12. HI button
13. Speed buttons
14. Grinding attachment cup
(Part # BL2110-05)
15. Grinding blade assembly
(Part # BL2110-06)
BL2110BGG_IB_26094.indd 4 5/3/19 12:20 PM

4
5
This product is for household use only.
GETTING STARTED
• Remove all packing material, any stickers from the product, and the
plastic band around the plug.
• Remove and save literature.
• Please visit www.prodprotect.com/blackanddecker to register your
warranty.
• Wash all removable parts as instructed in CARE AND CLEANING
section of this manual.
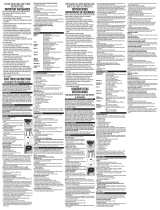
BLENDER JAR ASSEMBLY
1. Turn blending jar upside down and place flat on
counter top or work surface.
2. Place the gasket against the glass jar.
Important: Gasket MUST be between the jar and blade
assembly or the blender will not function properly.
3. Place the blade assembly, blade first, into the jar. (A).
4. Place jar base onto jar and rotate clockwise until it is
tight (B).
5. Turn assembled jar right side up.
6. Place lid onto blending jar.
Note: Do not plug in the cord.
7. Place on base, making sure it is pressed firmly
into place. (Jar base should not extend more than 1⁄8-inch above the rim
at the top of the base.)
USING YOUR BLENDER
Important: Appliance should always have lid in place when in use.
Caution: Do not place blender jar onto base when motor is running.
1. Make sure appliance is OFF.
2. Place foods to be blended into jar. For best results place ingredients in jar
in the following order: liquids, powders, soft foods, hard foods, ice.
3. Place lid on jar. Make sure the pour spout and ingredient slot are closed.
4. Plug power cord into outlet.
Note: When in use, do not leave blender unattended. When using hard foods,
such as ice or cheese, keep one hand on the lid to keep blender in place.
5. Select the speed that best suits your desired task.
(See SPEED CHART)
Note: Use PULSE for no more than five seconds at a time, allowing the blend-
er to rest briefly between each pulse, no more than two minutes total. This
helps break up the ice and distribute the ingredients.
HOW TO USE
B
A
BL2110BGG_IB_26094.indd 5 5/3/19 12:20 PM

6
7
6. Open the
ingredient slot
to add ingredients while the
blender is running. Drop ingredients through the
opening. (C).
Important: Do not remove the lid while the blender
is running.
7. When finished, press the OFF button. Make
sure blades have completely stopped before
attempting to remove the blending jar from the
base.
8. To remove the jar, grasp the handle and lift up.
9. Open pour spout to serve.
Note: Always unplug the appliance when not in use.
BLENDING TIPS AND TRICKS
• Cut food into pieces no larger than ¾" for use in the blender.
• When preparing foods that have several different kinds of ingredients,
always add liquid ingredients first.
• When ingredients splatter onto the sides of the jar or the mixture is
very thick, press the OFF button to turn appliance off. Remove the lid
and use a rubber spatula to scrape down the sides of the jar and to
redistribute the food, pushing food toward the blades. Replace the lid
and continue blending.
• When making bread crumbs make sure blender jar is completely dry.
• When using PULSE function; use short bursts. Allow the blades to stop
rotating between pulses. Do not use PULSE for more than 5 seconds at
a time, or more than 2 minutes total.
• Use the PULSE button when preparing beverages that include ice cubes
or anything frozen; this helps to produce a smoother texture.
• It is helpful to begin the blending process on the lowest speed and then
increase to a higher speed, if necessary.
• To stop blending at any time, press the OFF button.
• Do not store foods in the blending jar.
• Do not overfill the blender (the blender is more efficient with less rather
than more).
• Do not run blender for longer than 1 ½ minutes at a time. Scrape down
sides of blending jar, if necessary, and continue blending.
• Do not use if blending jar is chipped or cracked.
• It is not recommended to use your blender to beat egg whites, mix
dough, mash potatoes, or grind meats.
DO NOT PLACE ANY OF THE FOLLOWING IN THE BLENDER:
• Large pieces of frozen foods
• Tough foods such as raw turnips,
sweet potatoes and potatoes
• Bones
• Hard salami, pepperoni
• Hot liquids
C
BL2110BGG_IB_26094.indd 6 5/3/19 12:20 PM

6
7
USING THE GRINDING ATTACHMENT
Use the grinding attachment for spices, nuts, coffee
beans and other dry foods.
IMPORTANT:
The grinding attachment is NOT suit-
able for processing liquids because they may leak
during use.
1. Check that the speed control is off.
2. Unscrew the grinding blade assembly from the
bottom of the grinding cup.
3. Add the ingredients to be ground. For best
results don’t fill the cup past the MAX mark. (D)
4. Refit the grinding blade assembly. Tighten firmly.
5. Lower the assembled grinding attachment onto
the motor unit.
6. Place the palm of your hand over the top of
the grinding attachment and press firmly
downwards. (E) Maintain this pressure during
processing to steady the grinding attachment.
7. Press Pulse for a second or two, then release it. (E) Check the results and
repeat as required.
8. To process continuously, press the button for your desired speed. Use the
lower speeds for more coarse grinding and the higher speeds for more
fine grinding
9. Don’t operate the grinding attachment for longer than 30 seconds.
10. Once processing has finished, remove the grinding attachment, carefully
unscrew the blade assembly and empty out the contents.
Note:
Make sure grinding cup is completely dry when making bread crumbs,
chopping nuts, or grinding coffee beans.
D
E
BL2110BGG_IB_26094.indd 7 5/3/19 12:20 PM

8
9
CARE AND CLEANING
This product contains no user serviceable parts. Refer service to qualified
service personnel.
CLEANING
1. Before cleaning, turn off and unplug appliance.
2. Lift blending jar by handle off power base.
3. Remove jar base by turning counterclockwise until loose.
4. Remove gasket and blade assembly.
Caution: Blades are sharp, handle carefully.
5. Remove lid and lid cap.
6. Wash removable parts by hand or in your dishwasher. Place jar on bottom
rack and rest of parts on top rack only.
Important:
• Do not place jar parts in boiling liquids.
• Do not immerse base in liquid. Wipe base with damp cloth and dry
thoroughly.
• Remove stubborn spots by rubbing with damp cloth and nonabrasive
cleaner.
Note: If liquids spill onto base, wipe with damp cloth and dry thoroughly. Do
not use rough scouring pads or cleansers on parts or finish.
QUICK CLEANING
For quick cleanup, combine 1 cup warm water and a drop of liquid dish
soap in the blending jar. Cover and blend on Speed 4 for about 30 seconds.
Discard liquid and rinse jar thoroughly.
STORAGE
For convenient storage, wrap the cord around the feet on the bottom of the
blender base.
BL2110BGG_IB_26094.indd 8 5/3/19 12:20 PM

8
9
SPEED CHART
Pulse/Off
• Use for thick mixtures
LOW
1) Stir
• Prepare sauces
• Remove lumps from gravies
• Reconstitute frozen juices, drink mixes and condensed
soups
• Prepare salad dressings
• Puree hot liquids
2) Blend
• Mix puddings
• Combine pancake and waffle batter or mixes
3) Crumb
• Make cookie, cereal and bread crumbs
4) Clean
• Combine drop of dishwashing liquid and hot water to clean
blender
5) Grate
• Grate hard cheeses and coconut
• Make superfine sugar
• Make cookie, cereal and bread crumbs
• Grind coffee beans, spices and chocolate
HIGH
6) Beat
• Beat eggs for omelets and custards
7) Puree
• Puree baby foods – fruits and vegetables
• Blend protein drinks
8) Liquefy
• Liquefy frozen drinks
9) Smoothie
• Prepare smoothies and milkshakes
10) Ice Crush
• Crush ice
PROBLEM POSSIBLE CAUSE SOLUTION
Jar bottom does not come
off of jar.
A vacuum has been
formed.
Place the jar on the blender and
turn counter clockwise until jar is
released from the bottom.
Liquid is leaking from
bottom of jar.
Gasket is either missing or
not in place correctly.
Check that jar is assembled
correctly.
Appliance does not turn
on.
Appliance is not plugged
in.
Check that appliance is plugged
into a working outlet.
Mixture in blender does
not seem to be blending.
Not enough liquid in
mixture being blended or
too much ice.
Turn the blender off and use a
rubber spatula to redistribute the
food; add some liquid and pulse
the mixture to aid in the blending
process.
Herbs or bread are
sticking to sides of
blender and not getting
chopped.
Blender jar, food to be
chopped and blade are not
dry.
Always make sure that the jar, the
blade and the food to be
chopped are dry.
Food chopped is too fine
or watery.
Food is over processed. Use Pulse in short bursts or blend
for a shorter time.
TROUBLESHOOTING
If additional assistance is needed, please contact our consumer service team at
1-800-465-6070.
BL2110BGG_IB_26094.indd 9 5/3/19 12:20 PM

10
11
RECIPES
WILD BERRY YOGURT COOLER
2 cups pineapple juice
1 cup wild berry frozen yogurt
1 cup frozen cubed mango
1 cup frozen hulled strawberries
Combine all ingredients in order listed into blending jar and close with lid.
Pulse for several seconds (three to four times). Select Smoothie and let cycle
run until mixture is smooth and well blended; about 30 seconds.
Makes about 4
1/2
cups.
MANGO AND CORN SALSA
1/2
cup orange pepper, cut into
3/4
-inch chunks
1/2
cup purple onion, cut in
1/2
-inch pieces
2 to 3 medium jalapeños, seeded and quartered
2 large cloves garlic
Juice of 1 lime
1
1/2
cups tomato, cubed
1 large mango, cubed
1/2
cup fresh cilantro leaves
1 cup canned whole kernel corn
In blending jar, combine pepper, onion, jalapeños and garlic. Place lid on jar.
Pulse several times, for about 5 seconds each, to chop ingredients. Add lime
juice, tomato, mango and cilantro and Pulse several times until vegetables
are chopped and mixture is blended. Spoon mixture into bowl; stir in corn.
Cover and refrigerate until ready to serve.
Serve with tortilla chips.
Makes about 4
1/2
cups.
BL2110BGG_IB_26094.indd 10 5/3/19 12:20 PM

10
11
WARRANTY AND CUSTOMER SERVICE
INFORMATION
For service, repair or any questions regarding your appliance, call the
appropriate 800 number listed within this section. Please DO NOT return the
product to the place of purchase. Also, please DO NOT mail product back to
manufacturer, nor bring it to a service center. You may also want to consult
the website listed in this manual.
Two-Year Limited Warranty
(Applies only in the United States and Canada)
What does it cover?
• Any defect in material or workmanship provided; however, Spectrum Brands,
Inc.’s liability will not exceed the purchase price of product.
For how long?
• Two years from the date of original purchase with proof of purchase.
What will we do to help you?
• Provide you with a reasonably similar replacement product that is either new or
factory refurbished.
How do you get service?
• Save your receipt as proof of date of sale.
• Visit the online service website at www.prodprotect.com/blackanddecker, or call
toll-free 1-800-465-6070, for general warranty service.
• If you need parts or accessories, please call 1-800-738-0245.
What does your warranty not cover?
• Damage from commercial use
• Damage from misuse, abuse or neglect
• Products that have been modified in any way
• Products used or serviced outside the country of purchase
• Glass parts and other accessory items that are packed with the unit
• Shipping and handling costs associated with the replacement of the unit
• Consequential or incidental damages (Please note, however, that some states do
not allow the exclusion or limitation of consequential or incidental damages, so
this limitation may not apply to you.)
How does state law relate to this warranty?
• This warranty gives you specific legal rights. You may also have other rights that
vary from state to state or province to province.
BL2110BGG_IB_26094.indd 11 5/3/19 12:20 PM

12
13
Por favor lea este instructivo antes de usar el producto.
INSTRUCCIONES IMPORTANTES
DE SEGURIDAD
Cuando se usan aparatos eléctricos, siempre se deben respetar las siguientes
medidas básicas de seguridad:
• Por favor lea todas las
instrucciones.
• A fin de protegerse contra el
riesgo de un choque eléctrico,
no sumerja el cable, los
enchufes ni el aparato en agua
ni en ningún otro líquido.
• Todo aparato eléctrico usado
en la presencia de los niños o
por ellos mismos requiere la
supervisión de un adulto.
• Desconecte el aparato del
tomacorriente cuando no esté
en uso, antes de instalarle
o retirarle piezas y antes de
limpiarlo.
• Evite el contacto con las piezas
móviles.
• No opere el aparato con un
cable o enchufe dañado,
o después de presentar
problemas de funcionamiento
o si se ha dejado caer o
se ha dañado de manera
alguna. Comuníquese con el
departamento de Servicio
al Cliente, al número gratis
que aparece en la sección
de garantía. Este aparato
contiene marcas importantes
en el contacto del enchufe. Ni
el enchufe de accesorio ni el
enchufe conector (si el enchufe
está moldeado en el cable) es
apto para ser reemplazado. Si
se daña, el aparato debe ser
reemplazado.
• El uso de accesorios,
incluyendo los tarros de
envasar, no recomendados por
el fabricante pueden ocasionar
incendio, choque eléctrico o
lesiones.
• No use este aparato a la
intemperie.
• No permita que el cable
cuelgue del borde de la mesa o
del mostrador.
• Para reducir el riesgo de
lesiones severas a las personas
o daño al procesador de
alimentos, mantenga las
manos y utensilios alejados
de las cuchillas o discos
mientras la licuadora esté en
funcionamiento.
• Las cuchillas tienen filo.
Manéjelas con cuidado.
• Para reducir el riesgo de
lesiones, nunca coloque el
montaje de las cuchillas en la
base sin haber enganchado la
jarra debidamente en su lugar.
• Siempre opere la licuadora con
la tapa en su lugar.
• No mezcle alimentos/líquidos
calientes.
• Este aparato no está diseñado
para ser usado por personas
(incluído niños) con capacidad
limitada física, mental o
sensoriales disminuidas y falta
de experiencia o conocimiento
que les impida utilizar el
aparato con toda seguridad sin
supervisión o instrucción.
• Se debe asegurar la supervisión
de los niños para evitar que
usen el aparato como juguete.
BL2110BGG_IB_26094.indd 12 5/3/19 12:20 PM

12
13
CONSERVE ESTAS INSTRUCCIONES.
Este aparato eléctrico es para uso doméstico únicamente.
ENCHUFE POLARIZADO (SOLAMENTE PARA LOS MODELOS DE 120V)
Este aparato cuenta con un enchufe polarizado (un contacto es más ancho que el
otro). A fin de reducir el riesgo de un choque eléctrico, este enchufe encaja en un
tomacorriente polarizado en un solo sentido. Si el enchufe no entra en el
tomacorriente,inviértalo y si aun así no encaja, consulte con un electricista. Por favor
no trate de alterar esta medida de seguridad.
TORNILLO DE SEGURIDAD
Advertencia: Este aparato cuenta con un tornillo de seguridad para evitar la remoción
de la cubierta exterior del mismo. A fin de reducir el riesgo de incendio o de choque
eléctrico, por favor no trate de remover la cubierta exterior. Este producto no
contiene piezas reparables por el consumidor. Toda reparación se debe llevar a cabo
únicamente por personal de servicio autorizado
CABLE ELÉCTRICO
a) Un cable de alimentación corto es provisto para reducir los riesgos de enredarse o
tropezar con un cable más largo.
b) Existen cables de extensión disponibles y estos pueden ser utilizados si se toma el
cuidado debido en su uso.
c) Si se utiliza un cable de extensión:
1) La clasificación eléctrica marcada del cable de extensión debe ser, como
mínimo, igual a la clasificación eléctrica del aparato;
2) Si el aparato es del tipo de conexión a tierra, el cable de extensión debe ser un
cable de tres alambres de conexión a tierra; y
3) El cable debe ser acomodado de manera que no cuelgue del mostrador o de la mesa
para evitar que un niño tire del mismo o que alguien se tropiece sin darse cuenta.
Nota: Si el cordón de alimentación es dañado, por favor, póngase en contacto con el
departamento de garantía enumerado en estas instrucciones.
BL2110BGG_IB_26094.indd 13 5/3/19 12:20 PM

14
15
FAMILIARÍCESE SU LICUADORA
El producto puede variar ligeramente del que aparece ilustrado aquí.
1. Tapa de doble apertura
(pieza no. BL2110-01)
2. Boquilla vertedora
3. Ranura para ingredientes
4. Jarra (pieza no. BL2110-02)
5. Asa
6. Montaje de cuchillas
(pieza no. BL2110-03)
7. Junta
8. Base de la jarra
(pieza no. BL2110-04)
9. Base de la licuadora
10. Pulso / botón de apagado (OFF)
11. Botón bajo (LO)
12. Botón alto (HI)
13. Botones de velocidad
14. Accesorio de recipiente moledor
(pieza no. BL2110-05)
15. Montaje de cuchillas moledoras
(pieza no. BL2110-06)
2
3
1
4
14
5
6
7 8
9
10
11
12
13
BL2110BGG_IB_26094.indd 14 5/3/19 12:20 PM

14
15
COMO USAR
Este producto es para uso doméstico solamente.
PASOS PRELIMINARES
• Retire todo el material de embalaje, calcomanía adherida al producto, y
labanda de plástico alrededor de la clavija.
• Por favor, visite www.prodprotect.com/blackanddecker para registrar su
garantía.
• Lave todas las piezas desmontables siguiendo las instrucciones
indicadas en la sección de CUIDADO Y LIMPIEZA de este manual.
ENSAMBLAJE DE LA JARRA
1. Ponga la jarra boca abajo y colóquela plana sobre la encimera o la superficie
de trabajo.
2. Coloque la junta en contra de la jarra de vidrio.
Importante: La junta debe estar entre la jarra y las cuchillas o
la licuadora no funcionará correctamente.
3. Coloque las cuchillas, cuchilla en primer lugar, en el frasco. (A).
4. Ponga la jarra en la base de la licuadora y gire en sentido
horario hasta que quede herméticamente colocada (B).
5. Una vez ensamblada la jarra, póngala boca arriba.
6. Coloque la tapa en la jarra de la licuadora.
Nota: No enchufe el cable.
7. Coloque la jarra en la base de la licuadora y verifique
que esté encajada firmemente en su lugar. (La jarra no
debe extenderse más de 1/8 de pulgada por encima del
borde en la parte superior de la base.)
USO DE SU LICUADORA
Importante: El aparato siempre debe tener la tapa colocada en su lugar
cuando esté uso.
Precaución: No coloque la jarra de la licuadora en la base cuando el motor
esté funcionando.
1. Asegúrese de que el aparato esté apagado (OFF).
2. Coloque los alimentos a licuar en la jarra. Para obtener mejores
resultados, coloque los ingredientes en el orden siguiente: líquidos,
polvos, alimentos suaves, alimentos duros, hielo.
3. Coloque la tapa sobre la jarra. Asegúrese de que la boquilla vertedora y la
ranura para ingredientes estén cerradas.
4. Enchufe el cable de alimentación a un tomacorriente.
Nota: No deje la licuadora desentendida cuando esté en uso. Cuando utilice
alimentos duros, tales como hielo o queso, mantenga una mano sobre la tapa
para mantener la licuadora en su lugar.
5. Seleccione la velocidad adecuada para la tarea a realizar. (Consulte la
TABLA DE VELOCIDADES).
B
A
BL2110BGG_IB_26094.indd 15 5/3/19 12:20 PM

16
17
Nota: Use la función de pulso (Pulse) por no más de
5 segundos a la vez, permitiendo que la licuadora
descanse un poco entre cada pulso, no más de 2
minutos en total. Esto ayuda a partir el hielo y dis-
tribuir los ingredientes.
6. Abra la ranura para ingredientes para añadir
los ingredientes mientras la licuadora está
funcionando. Deje caer los ingredientes a través
de la apertura. (C)
Importante: No retire la tapa mientras la licuadora esté funcionando.
7. Cuando termine, presione el botón de apagado (OFF). Verifique que las
cuchillas se hayan detenido completamente antes de retirar la jarra de la
base.
8. Para retirar la jarra, sujete firmemente el asa y álcela.
9. Abra la boquilla vertedora para servir.
Nota: Siempre desenchufe el aparato cuando no esté en uso.
CONSEJOS Y TRUCOS PARA LICUAR
• Corte los alimentos en trozos de no más de ¾ pulgada antes de
introducirlos en la licuadora.
• A la hora de preparar alimentos con diferentes tipos de ingredientes,
vierta siempre los ingredientes líquidos en primer lugar.
• Cuando los ingredientes salpiquen sobre los lados de la jarra o la mezcla
esté muy espesa, presione el botón de apagado (OFF) para apagar
el aparato. Retire la tapa y use una espátula de goma para raspar los
lados de la jarra y para redistribuir los alimentos, empujándolos hacia las
cuchillas. Coloque la tapa de nuevo en su lugar y continúe licuando.
• Cuando vaya a moler pan asegúrese de que la jarra esté completamente seca.
• Cuando utilice la función de pulso (PULSE), realice presiones breves.
Espere a que las cuchillas dejen de girar entre cada pulsación. No use
la función de pulso por más de 5 segundos a la vez o por más de 2
minutos en total.
• Use el botón de pulso (PULSE) cuando vaya a preparar bebidas que
incluyen cubos de hielo o ingredientes congelados; esto ayuda a
producir una textura más suave.
• Se recomienda empezar el proceso de batido en la velocidad más baja
y, si fuera necesario, ir aumentado la velocidad de manera progresiva.
• Para detener la licuadora en cualquier momento, presione el botón de
apagado (OFF).
• No coloque el aparato sobre ni cerca de las hornillas de gas o eléctricas
ni adentro de un horno caliente
• No conserve alimentos en la jarra de la licuadora.
• No llene en exceso la licuadora (la licuadora es más eficaz mientras
menos alimentos contiene).
• No haga funcionar la licuadora durante más de 1 ½ minutos y medio de
C
BL2110BGG_IB_26094.indd 16 5/3/19 12:20 PM

16
17
manera ininterrumpida; si fuera necesario, rebañe las paredes de la jarra
y siga batiendo.
• No utilice la licuadora si la jarra está rota o deteriorada.
• No es recomendado utilizar su licuadora para batir claras de huevo,
mezclar masa, hacer puré de papas ni para moler carnes.
NO INTRODUZCA NINGUNO DE ESTOS PRODUCTOS EN LA LICUADORA:
• Grandes trozos de alimentos
congelados
• Alimentos excesivamente duros
como nabos, boniatos o patatas
en crudo
• Huesos
• Salami o chorizo curado
• Líquidos calientes
USO DEL ACCESORIO MOLEDOR
Utilice el accesorio moledor para especias, nueces, granos de café y otros
alimentos secos.
IMPORTANTE:
El accesorio moledor NO es apto para procesar líquidos ya
que estos pueden derramarse durante el uso.
1. Verifique que el control de velocidad esté apagado.
2. Desenrosque el montaje de cuchillas moledoras de la parte inferior del
recipiente moledor.
3. Añada los ingredientes para moler. Para mejores
resultados, no llene el recipiente pasando la
marca “MAX”. (D)
4. Coloque de nuevo el montaje de cuchillas
moledoras. Ajuste firmemente.
5. Baje el accesorio moledor ensamblado hasta
quedar sobre el motor de la unidad..
6. Coloque la palma de su mano encima del
accesorio moledor y presione hacia abajo.
(E) Mantenga esta presión durante el
procesamiento para mantener estable el
accesorio moledor.
7. Presione el botón de la función de pulso por
uno o dos segundos y suéltelo. (E) Verifique los
resultados y repita según sea requerido.
8. Para procesar continuamente, presione el botón
de la velocidad deseada. Use velocidades más bajas para molido más
grueso y velocidades más altas para molido más fino.
9. No opere el accesorio moledor por más de 30 segundos.
10. Una vez que el ciclo de procesamiento haya terminado, cuidadosamente
retire el accesorio moledor, y con cuidado desenrosque le montaje de
cuchillas y vacíe el contenido.
Nota:
Asegúrese de que el recipiente moledor esté completamente seco
cuando vaya a preparar migas de pan, picar nueces o moler granos de café.
D
E
BL2110BGG_IB_26094.indd 17 5/3/19 12:20 PM

18
19
GUÍA DE VELOCIDADES
Pulse/Off
(Pulso/Apagado)
• Usar para mezclas espesas
BAJO (LOW)
1. Stir (Revolver)
• Preparar salsas
• Sacar los grumos de las salsas
• Use para reconstituir jugos congelados, bebidas
instantáneas y sopas condensadas
• Preparar aderezos para ensaladas
• Hacer puré de líquidos calientes
2. Blend (Combinar)
• Use para mezclar pudines o postres
• Combinar las mezclas o masas para hacer panqueques o
wafles
3. Crumb (Desmigar)
• Picar galletas, cereales y hacer pan rallado
4. Clean (Limpieza)
• Combine una gota de líquido de lavar platos y agua caliente
para limpiar la licuadora
5. Grate (Rayar)
• Rayar quesos duros y vegetales
• Hacer azúcar superfina
• Picar nueces, desde gruesas hasta más finas
• Moler granos de café, especias y chocolate
HIGH (ALTA)
6. Beat (Batir)
• Batir huevos para tortillas y flanes
7. Puree (Hacer puré)
• Hacer puré para bebes - de frutas y vegetales
• Mezclar bebidas de proteína
8. Liquefy (Licuar)
• Licuar bebidas congeladas
9. Smoothie
(Bebida de frutas)
• Para preparar bebidas de frutas y batidos
10. Ice Crush
(Triturar hielo)
• Para triturar hielo
BL2110BGG_IB_26094.indd 18 5/3/19 12:20 PM

18
19
CUIDADO Y LIMPIEZA
Este producto no contiene piezas reparables por el consumidor. Para
servicio, por favor consulte con personal calificado.
LIMPIEZA
1. Antes de limpiar, apague y desenchufe el aparato.
2. Agarre la jarra por el asa para extraerla de la base eléctrica.
3. Retire la jarra haciéndola girar en sentido antihorario hasta que se suelte.
4. Retire la junta y las cuchillas.
Precaución: Las cuchillas están afiladas y deben manejarse con sumo
cuidado.
5. Retire la tapa y el tapón.
6. Lave las piezas desmontables a mano o en una máquina lavaplatos.
Coloque jarra en la cesta inferior de la máquina y el resto de las piezas
sólo en la cesta superior.
Importante:
• No introduzca las piezas de la jarra en líquidos hirviendo.
• No sumerja la base de la licuadora en líquido; límpiela con un paño
humedecido y seque bien.
PROBLEMA POSIBLE CAUSA SOLUCIÓN
La jarra no se separa de la
parte de abajo.
Se ha formado un vacío. Coloque la jarra sobre la
licuadora y gire contrario a las
manecillas del reloj hasta que la
jarra se separe de la parte de
abajo.
Gotea líquido por la parte
de abajo de la jarra.
Falta la junta o no está
colocada correctamente.
Revise que la jarra está
ensamblada de forma correcta.
El aparato no enciende. El aparato está
desenchufado.
Revise que el aparato esté
enchufado a un tomacorriente
que trabaje.
La mezcla no parece
licuarse bien.
La mezcla no tiene
suficiente líquido o tiene
mucho hielo.
Apague la licuadora y use una
espátula de goma para
redistribuir los alimentos; añada
algún líquido y presione la
función de pulso (Pulse)para
ayudar el proceso de licuado.
Se pegan las hierbas o el
pan a los lados de la
licuadora y no se pican
bien.
La jarra, los alimentos que
está licuando y la cuchilla
no están secas.
Siempre asegúrese de que la
jarra, la cuchilla, y los alimentos
estén secos.
Al picar los alimentos
salen muy pequeñitos o
aguados.
Los alimentos se están
procesando de más.
Use el ciclo de pulso (Pulse) en
incrementos de tiempo más
cortos.
RESOLUCIÓN DE FALLAS
Si necesita asistencia adicional, favor the ponerse en contacto con nuestro
equipo de servicio al consumidor llamando al número 1-800-465-6070.
BL2110BGG_IB_26094.indd 19 5/3/19 12:20 PM

20
21
• Retire las manchas rebeldes frotando con un paño humedecido y un
producto no abrasivo.
Nota: Si se salpica con líquidos la base eléctrica, limpie con un paño
humedecido y seque bien. No utilice detergentes ni estropajos abrasivos
para limpiar las piezas o los acabados.
LIMPIEZA RÁPIDA
Para una limpieza rápida, combine 1 taza de agua cálida y una gota de líquido
para lavar platos en la jarra de la licuadora. Cúbrala y déjela licuar en el ciclo 4
durante alrededor de 30 segundos. Deseche el líquido y enjuague bien la jarra.
ALMACENAMIENTO
Para un práctico almacenamiento, enrolle el cable alrededor de los soportes
en el inferior de la base de la licuadora.
RECETAS
GRANIZADO DE YOGUR CON BAYAS SILVESTRES
2 tazas de zumo de piña
1 taza de yogur de bayas silvestres
1 taza de mango troceado congelado
1 taza de fresas congeladas limpias y
descorazonadas
Mezcle todos los ingredientes en la jarra de la licuadora, en el orden
indicado. Cierre la tapa. Realice tres o cuatro pulsaciones (Pulse) de varios
segundos. Usando la velocidad de los batidos de frutas (Smoothies), bata
hasta que la mezcla haya quedado esponjosa y ligada, unos 30 segundos
aproximadamente.
Para preparar aproximadamente 4
1/2
tazas.
SALSA DE MANGO Y MAÍZ
1/2
taza de pimiento naranja cortado
en trozos de
3/4
pulgada
1/2
taza de cebolla morada cortada en
trozos de
1/2
pulgada
2 ó 3 jalapeños medianos, sin
semillas y cortados en 4 trozos
2 dientes de ajo grandes
El zumo de una lima
1
1/2
taza de tomate troceado
1 mango grande troceado
1/2
taza de hojas de cilantro fresco
1 taza de granos de maíz en lata
Mezcle el pimiento, la cebolla, los jalapeños y el ajo en la jarra de la licuadora.
Coloque la tapa. Realice varias pulsaciones (Pulse) de 5 segundos para picar
los ingredientes. Añada el zumo de una lima, tomate, el mango y el cilantro,
y realice varias pulsaciones (Pulse)) hasta que las verduras se hayan picado
y mezclado bien. Vierta la mezcla en un cuenco y añada el maíz. Tape e
introduzca en el frigorífico hasta el momento de servir.
Sirva acompañada de tortilla de maíz.
Para preparar aproximadamente 4
1/2
tazas.
BL2110BGG_IB_26094.indd 20 5/3/19 12:20 PM
/