Page is loading ...

Owner s Manual
Customer Service Helpline: If you have questions about assembly or grill operation, or if there are damaged or
missing parts when you unpack this unit from the shipping box, call us Monday through Friday at 1-800-752-3085
P80151085B
RV 071008
Design Certified
Unit approved by
CSALaboratories under standard
ANSI Z21.58-2007/CSA1.6-2007
All barbecues and carts are designed for outdoor use only!
All barbecues are not intended for commercial use.
Read this Owner s Manual carefully
and be sure your gas grill is properly
assembled, installed and maintained.
Failure to follow these instructions
could result in serious bodily injury
and/or property damage. This gas grill
is intended for outdoor use only and is
not intended to be installed in or on
recreational vehicles or boats.
Note to Installer: Leave this Owner s
Manual with the consumer after delivery
and/or installation.
Note to Consumer: Leave this
Operator s Manual in a convenient place
for future reference.
Ô·¯«·¼Ð®±°¿²» Ù¿-Ù®·´´
Ò¿¬«®¿´ Ù¿- Ù®·´´
ÓÑÜÛÔÞíè08ßÒÙôÞß×ð8ßÒÙ
ÓÑÜÛÔÞíè08ßÔÐôÞß×08ßÔÐ
America's
Barbecue
Grill
Superstores
n
WARNING:
DANGER
! !
Leaking gas may cause a fire or
explosion which could result in property
damage, personal injury or death.
1.
2
3.
4.
IF YOU SMELL GAS:
Shut off gas to the appliance.
Extinguish any open flame.
Open lid.
If odor continues, keep away from
the appliance and immediately call
your gas supplier or your fire
department.
Do not store or use gasoline or other
flammable liquids or vapors in the
vicinity of this or any other
appliances.
An LP cylinder not connected for use
shall not be stored in the vicinity of
this or any other appliance.
1.
2.
WARNING
! !

Warranty Restrictions
Converting these barbecues to Propane or Natural Gas
requires the use of the appropriate Grand Turbo
Conversion kit that must be installed by a Barbeques
Galore technician or licensed plumber. Failure to follow
these instructions will void the Product Warranty and
may cause fire or serious bodily injury.
Gas Pressure
The Propane Gas Grills (Model B3808ALP,BAI08ALP)
are designed to operate on propane at a gas pressure regu-
lated at 11" water column (W.C.) when equipped with the
correct Propane Orifices on the valves and a Propane re-
on the supply line.
The Natural Gas Grills (Model B3808ANG,BAI08ANG)
are designed to operate on Natural Gas at a gas pressure
regulated at 4" water column (W.C.) when equipped with the
correct Natural Gas Orifice on the valves and a Natural
Gas Regulator on the supply line.
This warranty applies only when the grill is used in the
United States, Canada & Australia.
This warranty gives you specific legal rights, and you may
also have other rights which vary from state to state.
Barbeques Galore Limited Warranty
Barbeques Galore hereby warrants to the ORIGINALPURCHASER of this Barbeques Galore Gas Barbecue that it will be free of defects in
material
and
workmanship
from
the
date
of purchase
as
follows:
Burners & Cooking Grids
. . . . . . . . . . . . . . . . . . . . . . . . . . . . . . . . . . . . . . . . . . . . . . . . . . . . . . . . . . . . .3 years
Stainless Steel Parts . . . . . . . . . . . . . . . . . . . . . . . . . . . . . . . . . . . . . . . . . . . . . . . . . . . . . . . . . . . . . . . . .2
y
ears
Note: Flame Tamers and Igniter Battery are not warrantied
...when assembled and operated in accordance with the printed instructions that accompany it.
High cooking temperatures, excessive humidity, chlorine, fertilizers, lawn pesticides and salt can affect the Stainless Steel
components and for these reasons, the limited warranties DO NOTCOVER DISCOLORATION OR RUST, unless there is a loss
of structural integrity on the grill component.
Barbeques Galore shall not be liable under this or any implied warranty for incidental or consequential damages and Barbeques Galore s
liability is limited to the purchase price of this barbecue. This warranty gives you specific legal rights, and you may also have other rights which
vary from state to state. This warranty is applicable in the United States and Canada. No one else is authorized to perform any obligations under
this warranty.
Barbeques Galore requires reasonable proof of your date of purchase. THEREFORE YOU SHOULD RETAIN YOUR SALES SLIPOR
INVOICE AND RETURN THE BARBEQUES GALORE PRODUCTREGISTRATION CARD IMMEDIATELY.
This limited warranty shall be limited to the repair or replacement of parts which prove defective under normal use and service and which
on examination shall indicate to Barbeques Galore s satisfaction they are defective. Before returning any parts to Barbeques Galore, contact
our Customer Service Center at (800) 752-3085 or email us at customerservice@bbqgalore.com
If Barbeques Galore confirms the defect and approves the claim, Barbeques Galore will elect to repair or replace such part without charge.
Parts returned to Barbeques Galore must be sent freight prepaid to Barbeques Galore, Inc. Customer service center 3001 E. Pioneer Parkway, Arlington,
TX. 76011 or to the nearest Barbeques Galore Store.Barbeques Galore will return parts to the purchaser freight or postage prepaid.
The LPtank manufacturer is solely responsible for the materials, workmanship and performance of the tank. If the tank has a defect, mal-
functions, or you have questions regarding the tank, call the tank manufacturer s customer service center. The phone number is on the warn-
ing decal which is permanently attached to the tank. If the tank manufacturer has not resolved the issue to your satisfaction, then call the
Barbeques Galore store nearest you.
Model Number _____________________________Serial Number ______________________________
Date of Purchase___________________________Purchase From______________________________
Table of Contents
Warranty . . . . . . . . . . . . . . . . . . . . . . . . . . . . . . . . . . . . . . . . . . . . . . . . . . . . . . . . . . . . . . . . . . . . . . . . . . . . . . .1
Safety Instructions . . . . . . . . . . . . . . . . . . . . . . . . . . . . . . . . . . . . . . . . . . . . . . . . . . . . . . . . . . . . . . . . . . . . . . .1-3
Instructions Before Using Your Grill . . . . . . . . . . . . . . . . . . . . . . . . . . . . . . . . . . . . . . . . . . . . . . . . . . . . . . . . . . .3-6
Outdoor BBQ Built-in Installation Specifications . . . . . . . . . . . . . . . . . . . . . . . . . . . . . . . . . . . . . . . . . . . . . . . . . .6-8
Parts Diagram and Lists . . . . . . . . . . . . . . . . . . . . . . . . . . . . . . . . . . . . . . . . . . . . . . . . . . . . . . . . . . . . . . . . . . .9-16
Assembly Instructions . . . . . . . . . . . . . . . . . . . . . . . . . . . . . . . . . . . . . . . . . . . . . . . . . . . . . . . . . . . . . . . . . . . . .24
Operating Fuel Gauge . . . . . . . . . . . . . . . . . . . . . . . . . . . . . . . . . . . . . . . . . . . . . . . . . . . . . . . . . . . . . . . . . . . . .19-24
Checking For Gas Leaks . . . . . . . . . . . . . . . . . . . . . . . . . . . . . . . . . . . . . . . . . . . . . . . . . . . . . . . . . . . . . . . . . . .24
Lighting Instructions . . . . . . . . . . . . . . . . . . . . . . . . . . . . . . . . . . . . . . . . . . . . . . . . . . . . . . . . . . . . . . . . . . . . . .24-31
Cleaning and Maintenance Instructions . . . . . . . . . . . . . . . . . . . . . . . . . . . . . . . . . . . . . . . . . . . . . . . . . . . . . . . .32
Frequently Asked Questions . . . . . . . . . . . . . . . . . . . . . . . . . . . . . . . . . . . . . . . . . . . . . . . . . . . . . . . . . . . . . . . .33
Cooking Instructions . . . . . . . . . . . . . . . . . . . . . . . . . . . . . . . . . . . . . . . . . . . . . . . . . . . . . . . . . . . . . . . . . . . . . .33
Cooking Guides and Recipes . . . . . . . . . . . . . . . . . . . . . . . . . . . . . . . . . . . . . . . . . . . . . . . . . . . . . . . . . . . . . . .34-46
- 1 -
gulator
Cart & Barbecue Assembly . . . . . . . . . . . . . . . . . . . . . . . . . . . . . . . . . . . . . . . . . . . . . . . . . . . . . . . . . . . . . . . . .17-23
Rotisserie motor . . . . . . . . . . . . . . . . . . . . . . . . . . . . . . . . . . . . . . . . . . . . . . . . . . . . . . . . . . . . . . .47-50
. . . . . . . .
All other Grill Parts
. . . . . . . . . . . . . . . . . . . . . . . . . . . . . . . . . . . . . . . . . . . . . . . . . . . . . . . . . . . . . .
. . . .
Lifetime of Grill

READ THESE SAFETY INSTRUCTIONS
Fuels used in gas or oil-fired appliances and the products of
combustion of such fuels, contain chemicals known to the
State of California to cause cancer, birth defects and/ or
other reproductive harm.
This warning is issued pursuant to California Health &
Safety Code Sec. 25249.6.
Failure to comply with these instructions could result in a
fire or explosion that could cause serious bodily injury,
death, or property damage.
Your grill will get very hot. Never lean over the cooking
area while using your grill. Do not touch cooking surfaces,
grill housing, grill lid or any other grill parts while the grill is
in operation, or until the grill has cooled down after use.
Failure to comply with these instructions may result in
serious bodily injury.
Grill lnstallation Codes
This gas grill must be installed in accordance with all
local codes. In areas without local codes, follow the latest
edition of the National Fuel Gas Code ANSI Z223.1. In
Canada, installation must conform to standard CAN/CSA
1b149.1 or 1-b149. 2 (Installation Code for Gas Burning
Appliances and Equipment) and all local codes.
Proper Placement and Clearance of Grill
Neveruse your gas grill in a garage, porch, shed,breeze
breeze way or any other enclosed area. Your gas grill is to
be used outdoors only, at least 36 inches from the back
and 36 inches to the side of any combustible surface.
Your gas grill should not be placed under any surface that
will burn. Do not obstruct the flow of ventilation air around
the gas grill housing.
This outdoor gas grill is not intended to be installed
in or on recreational vehicles and/or boats.
PROPANE MODELS:
Correct LPGas Tank Use
LPgas grill models are designed for use with a standard
20 lb. Liquid Propane Gas (LPgas) tank, not included with
grill box. Never connect your gas grill to an LPgas tank that
exceeds this capacity. Atank of approximately 12 inches in
diameter by 18-1/2 inches high is the maximum size LPgas
tank to use. APropane tank with an OPD (Overfill Prevention
Device) must be used. This safety feature prevents the tank
from being over-filled which can cause malfunction of the LP
gas tank, regulator and/or grill.
The LPgas tank must be constructed and marked in
accordance with specifications of the U.S. Dpt. of
Transportation (DOT). In Canada, the LPgas tank must
meet the Canadian Transportation and Communications
(CTC) specifications. Also be sure to read and follow all LP
instructions on the following page.
If the outdoor cooking gas appliance is not in use, the
gas must be turned off at the supply cylinder.
(a)Do not store a spare LP-gas cylinder under or near
this appliance;
(b)Never fill the cylinder beyond 80 percent full; and
(c)If the information in (a) and (b) is not followed
exactly, a fire causing death or serious injury may
occur.
1.The LPgas tank has a shutoff valve, terminating in an
LPgas supply tank valve outlet, that is compatible with
a Type 1 tank connection device. The LPgas tank must
also have a safety relief device that has a direct com-
munication with the vapor space of the tank.
2.The tank supply system must be arranged for vapor
withdrawal.
3.The LPgas tank used must have a collar to protect the
tank valve.
Never connect an unregulated LPgas tank to your gas
grill. The gas regulator assembly supplied with your gas
grill is adjusted to have an outlet pressure of 11" water
column (W.C.) for connection to an LPgas tank.
Only use the regulator and hose assembly supplied with
your gas grill. Replacement regulators and hose assem-
blies must be those specified by manufacture.
Have your LPgas tank filled by a reputable propane gas
dealer and visually inspected and re-qualified at each
filling.
Never fill the gas tank beyond 80% full. Have your
propane gas dealer check the release valve after every
filling to ensure that it remains free of defects.
Always keep LPgas tanks in an upright position.
Do not store (or use) gasoline or other flammable
vapors and liquids in the vicinity of this gas grill.
An LPgas tank that is not connected for use must NOT
be stored on bottom shelf or in the vicinity of this or any
other gas grill.
Do not subject the LPgas tank to excessive heat.
Never store an LPgas tank indoors. If you store your
CSAlabel
located at
rear of unit
- 2 -
n
WARNING
n
WARNING
n
WARNING

gas grill in the garage or other indoor location, always
disconnect the LPgas tank first and store it safely out-
side and out of reach of children.
LPgas tanks must be stored outdoors in a well-venti-
lated area. Disconnected LPgas tanks must not be stored
in a building, garage or any other enclosed area.
When your gas grill is not in use the gas must be turned
off at the LPgas tank.
The regulator and hose assembly must be inspected
before each use of the grill. If there is excessive abra-
sion or wear or if the hose is cut, it must be replaced
prior to the grill being used again.
Keep the gas regulator hose away from hot grill surfaces
and dripping grease. Avoid unnecessary twisting of
hose. Visually inspect hose prior to each use for cuts,
cracks, excessive wear or other damage. If the hose
appears damaged do not use the gas grill. Call our ser-
vice center at 1-800-752-3085.
Never light your gas grill with the lid closed or before
checking to insure the burner tubes are fully seated over
the gas valve orifices.
Never allow children to operate your grill. Do not allow
children to play near your grill.
Astrong gas smell, or the hissing sound of gas indicates a
serious problem with your gas grill or the LPgas tank.
Failure to immediately follow the steps listed below could
result in a fire or explosion that could cause serious bodily
injury, death, or property damage.
Shut off gas supply to the grill.
Turn the Control Knobs to the OFF position.
Open grill lid.
Get away from the LPgas tank.
Do not try to fix the problem yourself..
If odor continues or you have a fire you cannot extin-
guish, call your fire department.
Do not call near the LPgas tank because your telephone is
an electrical device and could create a spark resulting in
fire and/or explosion.
NOTE: The normal flow of gas through the regulator and
hose assembly can create a humming noise. Alow volume
of noise is perfectly normal and will not interfere with opera-
tion of the grill. If humming noise is loud and excessive you
may need to purge air from the gas line or reset the regula-
tor excess gas flow device. This purging procedure should
be done every time a new LPgas tank is connected to your
grill. For help call the Customer Service Helpline for assis-
tance.
- 3 -
Ò¿¬«®¿´Ù¿-Í¿º»¬§×²-¬®«½¬·±²-
YourNaturalGasGrill isdesignedtooperateon
NaturalGasonly, atapressureof 4"watercolumn
(W.C.)(1/4psigor1.75kpa),regulatedatthe
residential meter.Checkwithyourgas utilitycom-
panyforlocalgaspressureandwithyourlocal
municipalityforbuildingcoderequirements.Ifyour
residentialgaslinepressurehasnotbeen
regulatedto4"W.C.,contactyourlocalgasutility
½±³°¿²§º±® °®±º»--·±²¿´ ¿--·-¬¿²½»ò
ThegaspressureRegulatorsuppliedwiththis
appliancemustbeused.ThisRegulatorisset
foranoutletpressureof4"W.C.
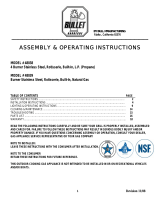
ItisrecommendedthataShutOffValvebeinstalled
atthegassupplysource outdoors.Installatapoint
afterthegaspipeexitstheoutsidewallandbeforethe
QuickDisconnectHose,orinstallitatthepoint
beforethegas linepipingenterstheground.See
Ú·¹«®» ïò
Pipesealingcompoundorpipethreadtaperesistant
totheactionofNaturalGasmustbeusedonallmale
pipethreads whenmakingtheconnection.
Disconnectyourgas grill fromfuelsourcewhen
thegas supplyisbeingtestedat highpressures.
ThisgasgrillanditsindividualShutOffValvemust
bedisconnectedfromthegassupplypipesystem
duringanypressuretestingofthatsystemat
pressureinexcessof1/2psi(3.5kpa).
Turnoffyourgas grillwhen thegas supply is
testedatlowpressures.Thegrillmustbe
isolatedfromthegassupplypipesystem
byclosingitsindividualManualShutOff
Valveduringany pressuretestingofthegas
supplypipesystematpressuresequalto
orless than 1/2 psi (3.5kpa).
TheQuickDisconnectconnectsto a 3/8 inch
NPTthreadfromgassource.TheQuick
Disconnect fitting is a handoperateddevice
thatautomaticallyshutsofftheflowof gas
from the sourcewhen it is disconnected.
øÚ±®Ò¿¬«®¿´Ù¿-Ó±¼»´Ñ²´§÷
ÒßÌËÎßÔ ÙßÍÍËÐÐÔÇ
ÏË×ÝÕ
Ü×ÍÝÑÒÒÛÝÌ
ÓßÔÛ
Ú×ÌÌ×ÒÙ
ÌÑÒßÌËÎßÔÙßÍ
ÎÛÙËÔßÌÑÎ
ÔÑÝÕ×ÒÙÙßÍ
ÍØËÌÑÚÚÊßÔÊÛ
ÔÑÝÕ×ÒÙ
ÙßÍ
ÍØËÌ ÑÚÚ
ÊßÔÊÛ
ß¼¼·¬·±²¿´
Ø¿®¼©¿®»Ò±¬
ײ½´«¼»¼
Figure 1
n
WARNING

Ifthelengthoflinerequireddoesnotexceed50feet,use
a5/8" O.D.tube.Onesize largershouldbeusedfor
lengthsgreaterthan50feet.
Gaspipingmaybecoppertubing,typeKorL;polyeth-
ylene plastictube,with aminimumwall thicknessof .
062inch;orstandardweight(schedule40)steelor
wroughtironpipe.
Coppertubingmustbetin-linedifthegascontainsmore
than0.3 gramsof hydrogensulfideper100cubicfeet
ofgas.
Plastictubingissuitableonlyforoutdoor,underground
use.
Gaspipingincontact withearth, orany othermaterial
whichmaycorrodethepiping,mustbeprotected
againstcorrosioninanapprovedmanner.
Undergroundpipingmust havea minimumof 18"
cover.
GasLinePiping
ܱ²±¬«-»¿²±°»²º´¿³»¬±½¸»½µº±®¹¿-
´»¿µ-òÞ»-«®»¬¸»®»¿®»²±-°¿®µ-±®±°»²
º´¿³»-·²¬¸»¿®»¿©¸·´»§±«½¸»½µº±®¹¿-
´»¿µ-ò̸·-©·´´®»-«´¬·²¿º·®»±®»¨°´±-·±²
©¸·½¸½¿²½¿«-»-»®·±«-¾±¼·´§·²¶«®§±®
¼»¿¬¸ô¿²¼¼¿³¿¹»¬±°®±°»®¬§ò
ÜßÒÙÛÎ
All connections and jointsmust be thoroughly tested
forleaks inaccordancewithlocal codesand alllisted
proceduresinthelatesteditionofANSI Z21.58-2007
TestConnections
/
CSA 1.6 -2007
- 4 -
TheQuickDisconnect fittingcanbe installed
horizontally,orpointingdownward.DONOT
installthefittingwiththeopeningpointing
upwardbecausethefittingcouldcollect water
and debris.
TheDustCovers(plasticplugs)providedwith
theQuickDisconnecthelpkeeptheopen
endscleanwhile disconnected.
Theoutdoorconnectormust befirmlyattachedto
aridgedpermanentconstruction.
TheQuickDisconnectMUSTBEinstalledabove
ground.
ÉßÎÒ×ÒÙæDonotroutethe10footQuick
DisconnectHoseunderadeck.Thehosemust
bevisibleandinspectedpriortoeachgrilluse.
Ю±°¿²» Ù¿- Í¿º»¬§×²-¬®«½¬·±²-
Useacleanpaintbrushanda50/50mildsoapand
watersolution.
BrushsoapysolutionontoLPGastankintheareas
indicatedbythearrows.Seediagra m.
Ifgrowingbubblesapeardonotuseormovethe
LPGastank.CallanLPGasSu lieroryourFire
Department.
Allleak testsmustberepeatedeachtimeyourLPGas
tankisexcha edorrefilled.
Whencheckingforgasleaksdonotsmoke.
Donotuseanopenf lametocheckforgasleaks.
Yourgrillmustbeleak testedoutdoorsinawell-
ventilatedarea,awayfromignitionsourcessuchas
gasfiredorelectricala liances.Duringthelea ktet,
kee p yourgrillawayfromopenflamesorsparks.
Donotusehouseholdcleaningagents.Damageto
gasassemblycomponentscanresult.
Ÿ
Ÿ
Ÿ
Ÿ
Ÿ
Ifgrowingbubblesappeardonotuseormove
theLPGastank.ContactanLPGasSupplier
oryourfiredepartment!
!
!
TurnallBurnerValvestotheOFFposition.
Inspectthevalveconnectionportandregulator
assemblyfordamageordebris.Removeany
debris.Neverusedamagedorpluggedequip-
ment.
Connecttheregulatorassemblytothetankvalve
andHANDTIGHTENnutclockwisetoafullstop.
DONOTuseawrenchtotightenbecauseitcould
damagetheQuickCouplingNutandresultin a
hazardouscondition.
Openthetankvalve1/4to1/2ofaturn(coun-
terclockwise)anduseasoapywatersolutionto
checkallconnectionsforleaksbeforeattempting
tolightyourgrill.See"CheckingforLPGas
Leaks".Ifaleakisfound,turnthetankvalveoff
anddonotuseyourgrilluntiltheleakisrepaired.
LPGasModelonly:
ConnectRegulatorwithHosetoyourLPGasTank
p
pp s
pp
nag
WARNING
! !
This appliance, when installed, must be electri-
cally grounded in accordance with local codes
or, in the absence of local codes, with the
National Electrical Code, ANSI/NFPA 70, or the
Canadian Electrical Code, CSA C22.1.
Keep any electrical supply cord and the fuel
supply hose away from any heated surfaces.
•
•

Built-in Units Utilizing Natural Gas
When connecting a built-in unit to the natural gas sup-
ply in your home, please ensure the pipe joint compound is
resistant to the action of natural gas. In addition, please
observe the following:
The barbecue and its individual shut-off valve must be
disconnected from the gas supply piping system during any
pressure testing of that system at test pressures in excess
of 1/2 psi (3.5 kPa).
The barbecue must be isolated from the gas supply
piping system by closing its individual
manual shut-off valve
during any pressure testing of the gas supply piping system
at test pressures equal to or less than psi (3.5 kPa)
The units are supplied from the factory equipped for
use with natural gas and includes a natural gas regulator.
If operation with propane gas is desired, you must pur-
chase a Propane Model. In addition, a Propane Gas
Regulator MUST be installed in the gas supply line from
the propane gas tank.
Please remember to check all gas connections for
leaks after the piping is completed. Follow the procedure
under the heading "CAUTION: LEAK CHECKING."
CAUTION: BEWARE OF FLASHBACK
CAUTION: Spiders and small insects occasionally spin
webs or make nests in the
grill burner tubes during
transit and warehousing.
These webs can lead to a
gas flow obstruction which
could result in a fire in and
around the burner tubes.
This type of fire is known as a FLASHBACK and can
cause serious damage to your grill and create an unsafe
operating condition for the user.
Although an obstructed burner tube is not the only cause of
FLASHBACK , it is the most common cause.
To reduce the chance of FLASHBACK , you must clean the
burner tubes before assembling your grill, and at least once
a month in late summer or early fall when spiders are most
active. Also perform this burner tube cleaning procedure if
your grill has not been used for an extended period of time.
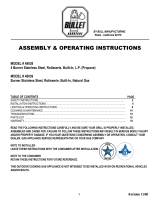
BEFORE USING YOUR GRILL
To reduce the chance of FLASHBACK clean the burn-
er tubes and burners before fully assembling your grill.
Unscrew the bolt at the rear of the burner using a screw-
driver. Carefully lift each burner up and away from the gas
valve orifice, then refer to Fig2 and perform one of these
three cleaning methods:
1.Bend a stiff wire, (a lightweight coat hanger works well)
into a small hook as shown below. Run the hook through
the burner tube and inside the burner several times to
remove any debris.
Type 1 connection per
ANSI Z21.58-2007/CSA
1.
6-2007
Quick
Coupling Nut
CAUTION: When the appliance is not in use the gas
must be turned off at the tank.
Check all connections for LP Gas Leaks
Never test for leaks with a flame. Prior to first use,
at the beginning of each season, or every time
your LP Gas tank is changed, you must check for
gas leaks. Follow these three steps:
Make a soap solution by mixing one part liquid
detergent and one part water.
Turn the grill Control Knobs to the full OFF
position, then turn the gas ON at source.
Apply the soap solution to all gas connections
indicated by the arrows. See diagram. If
bubbles appear in the soap solution the
connections are not properly sealed. Check
eachfittingandtightenorrepairasnecessary.
!!
If you have a gas leak that cannot be repaired
by tightening, turn off the gas at the source,
disconnect fuel line from your grill and call
1-800-752-3085
or your gas supplier for repair
assistance.
Disconnecting A Liquid Propane Gas (LPG)
Tank From Your Grill
Make sure the Burner Valves and LP Gas tank
valve are off. (Turn clockwise to close.)
Detach the hose and regulator assembly from
the LP Gas tank valve by turning the Quick
Coupling Nut counterclockwise.
- 5 -
Regulator with Hose (LPG)
LP Gas Tank
Gas Valve / Manifold Assembly
1/2
n

2.Use a bottle brush with a flexible handle. Run the brush through
the burner tube and inside the burner several times, removing any
debris.
3.Preferably, an air hose should be used to force air through each
burner tube. The forced air should pass debris or obstructions
through the burner and out the ports.
Figure 2
GAS VALVE
ASSEMBLY
BURNER TUBE
ORIFICE
Figure 3
SPARK
ELECTRODE
ASSEMBLY
BURNER TUBE
PHILLIPS HEAD
SCREW
BURNER PORTS
BURNER
GAS
COLLECTOR
BOX
WARNING
The location of the burner tube with
respect to the orifice is vital for safe
operation. Check to ensure the orifice
is inside of the burner tube before
using your gas grill (Figure 2).
If the burner tube does not fit over the
valve orifice, lighting the burner may
cause explosion and/or fire.
- 6 -
Outdoor BBQ Built-in Installation Specifications
Prior to installing unit, side and rear trims must be installed to fully support the unit.
Built-in Trim Kit Installation:
Carefully remove the stainless steel trim pieces from the carton and attach Left, Right & Rear stainless trims to left, right &
rear sides of barbecue using nuts & bolts as shown in Figure 4 . Check to make sure they are aligned flush with the side
barbecue face and top before fully tightening the bolts.
NOTE: When choosing a location for your Gas grill, keep in mind that it should not be located under any overhead com-
bustible construction. The side and bottom of the grill should not be any closer than 18 inches to combustible construction,
and the back of the grill should not be any closer than 24 inches to combustible construction.
TO CLEAN BURNER TUBE
INSERTHOOK HERE
BAI08A NG/LP
Rear Trim:
(A) - (6x) 3/16! x 1/2! Pan Head with Cross Recess Bolt
(B) - (2x) 1/4! x 1/2! Pan Head with Cross Recess Bolt
Left & Right Trim:
(A) - (6x) 3/16! x 1/2! Pan Head with Cross Recess Bolt
(B) - (10x) 1/4! x 1/2! Pan Head with Cross Recess Bolt
Figure 4
Fig 1
Fig 2
Rear Trim:
52" BBQ uses 4 bolts
38" BBQ uses 3 bolts and Wok uses 2 bolts
Rear Trim:
(A) - (3x) 1/4! x 1/2! Pan Head with Cross Recess Bolt
Left & Right Trim:
(A) - (12x) 1/4! x 1/2! Pan Head with Cross Recess Bolt
(B) - (4x) 1/4!Funt Nut
B3808ANG/LP
Models
n
Models

Built-in Units Utilizing Liquid Propane Gas
NOTE: When using Propane, EXTREMECAUTION should
be used to provide ample ventilation of vapor from the enclo-
sure. LPGas vapor is heavier than air and SERIOUS
INJURYfrom a DANGEROUS EXPLOSION could occur if
LPGas is allowed to accumulate in an enclosure and then
ignited. Both the Barbecue enclosure and LPcylinder enclo-
sure require venting that must be provided at the floor level
of the enclosure to allow any leaking LPGas vapor to escape
(see Figure 6). Upper & lower ground-level vents (20 sq. in.
minimum each) MUSTBE PROVIDED on both sides of built-
in construction. Please ask a Barbeques Galore associate for
full details.
NOTE: When installing a barbecue equipped for liquid
propane in an island, the propane tank must be in a separate
enclosure that is completely isolated from the barbecue. It
must be cross-ventilated in accordance with the current
standard. The propane tank MUSTNEVER be installed
directly under the barbecue.
NOTE: Upper & lower ground-level vents (20 sq. in. mini-
mum each) MUSTBE PROVIDED for combustion air on
both sides of built-in construction. Please ask a Barbeques
Galore associate for full details.
- 7 -
Depth
Width
Height
Side*
Rear*
6 minimum clear-
ance from cutout
(for hood)
Model
Height WidthDepth
Side*Rear*
B3808A
10"38-3/4"24-1/2"14"24"
non-combustible
construction
Built-in Model Cutout Dimensions &
Clearance to Combustibles
* Rear &Side Clearances indicated are to combustible
construction
Figure 5
Vapors from products containing Chlorine and other caustic
chemicals can cause Stainless Steel flexible connectors to
corrode. THESE PRODUCTS SHOULD NOTBE STORED
IN AN ISLAND OR NEAR THE connector. Cleaning solu-
tions, Household Chemicals and Solder fluxes can also
cause pinholes if they come in contact with these connec-
tors and MUST be washed off immediately with water.
Stainless
Flexline
Non-combustible
Construction
Vented on
BOTH SIDES
of Island
Vented Access Door
CSAApproved Propane Regulator
CSAApproved
Rubber Gas Hose
QCC-1/OPD
Tank
Figure 6
Clamp down
flexline
Barbecues must be installed in accordance with CSA
specifications and all local building codes.
BAI08A
10"52-3/4"24-1/2"24"24"
nWARNING

- 8 -
NATURAL GAS MODELS ONLY
CSAApproved
Rubber Gas Hose
CART MODEL LP GAS CONNECTION
1/2 FF x 3/8 MF
on Propane models
Figure 10
Air Vents
Louvers on BBQ must
remain unobstructed to
allow for combustion air.
Figure 8
Natural Gas
Installation
Access must
be provided to
Shut-off Valve
LP Tank Retention System For Built-In Islands
The LPTank in the separate compartment needs to be
secured to the floor to prevent tipping (Figure 7).
Tank Support Ring
Ground Floor
of
Built-In Island
Attach with
screws suit-
able to type
of floor.
Thumbscrew
QCC-1/OPD
Tank
Figure 7
IN
OUT
CSAApproved
Natural Gas
Regulator
Yellow Teflon Pipe Thread Sealant
is recommended for use on all
pipe thread connections EXCEPT
flared threads.
Stainless
Flexline
Natural
Gas
Supply
Close Nipple
Shut-off Valve
1/2-1/2! NPT
IMPORTANT: Regulator must be on the Barbecue or your
warranty is void.
Extension Fitting for manifold
Extension Fitting for outlet
(NG only)
Figure 9

BAI08ALP , BAI08ANG
Parts Diagram
- 9 -
37A
76
77
92
58
70A
74
75
93(Optional)

B3808ALP , B3808ANG
Parts Diagram
-
10
-
77A
71
72
93
94
96
95
77B
97
69
70
98(Optional)

Parts List For Model BAI08A
- 11 -
ITEMDESCRIPTIONPART#QTY.
1Lid AssemblyY01300151
2Lid Handle BracketP00303016E2
3Lid HandleP00205064B1
4Lid Handle Heat-Insulating SpacerP06801002A2
5Temperature Gauge SeatP00614015A1
6Temperature GaugeP00601251A1
7Protective PadP05518002I4
8Cooking Rack/SecondaryP01518005B1
9AFlame Tamer/Rack(Large)P01720034B1
9BFlame Tamer/Rack(Small)P01720035B1
10Flame Tamer/CeramicP01804002A12
11Flame Tamer/Rack StopP03328015C2
12Cooking Grid - LargeP0160404164
13Cooking Grid - Small P0160404261
14Smoker BoxP06701020A1
15Burner/MainP02003045B6
16Infrared BurnerP02005020A 2
17Gas Collector Box with Electrode P02610020A3
18Infrared Burner Dual Electrode P02625002C1
19Bowl Side Panel/LeftP0072082EC1
20Bowl Side Panel/Right P0072183EC1
21Bowl Side Panel/Trim Plate/LeftP07514037A1
22Bowl Side Panel/Trim Plate/RightP07514038A1
23Lid Hinge with NutP05511006A2
24Burner BracketP02216024A1
25Grease Tray Heat ShieldP06904008C1
26ALid Spring,LeftP05551001M1
26BLid Spring,RightP05551002M1
27BowlP00713576C1
28Control Panel Frame BracketP03306034C1
29Name PlateP00407014C1
30Control Panel Bracket P03304010C2
31 E.I ProtectorP03328050Q2
32Electric Ignitor, 4-PortsP02502184C2
Gas Valve/Manifold Assembly-LPY00606221
Gas Valve/Manifold Assembly-NGY00606231
34Control PanelP02911943A1
35Lighting SwitchP05360001B1
36Control Knob SeatP03415034A10
37AControl Knob for Main Burner/ Back Burner P03426125W8
37BControl Knob for Infrared BurnerP03426205U2
38Body Panel,LeftP00720886C1
39Body Panel,RightP00721896C1
33

Parts List For Model BAI08A(Continued)
- 12 -
40Body Panel,Rear P00725386C1
41Grease Tray AssemblyY02700071
42Grease Tray Heat Shield,LowerP06904013C1
43Extension Tube P03701011A2
44Lighting TubeP05507003A1
45 Extension Fitting for Manifold (LPG only)P03902016A1
46Regulator with Hose / LPGP03620025A1
47Extension Fitting for Manifold (NG only)P03901015A1
48Extension Fitting - Outlet (NG only) P03901013A1
49Regulator / NGP03628001B1
50Extension Fitting - Inlet (NG only)P03901017A1
51Cart Top Shelf P01010039C1
52Cart Bottom Shelf P01010038C1
53Cart Side Panel,LeftP07602027A1
54Cart Side Panel,RightP07603030A1
55Cart Rear PanelP07701078A1
56ATransformerP05374001B1
56BTransformer BracketP03328057A1
57Cart Bottom Shelf /Trim PlateP07516001A1
58Electric Wires Set/ ElectrodeP02615109D1
60Drawer Bracket,FrontP03304050C2
61Drawer Bracket,RearP03304051C2
62Cart Bracket Panel,Left BottomP03331011F2
63Cart Bracket Panel,Right BottomP03331012F2
64Cart Bracket Panel,Left TopP03331013F1
65Cart Bracket Panel,Right Top P03331014F1
66Door Hinge Bracket-Left BottomP03314037C1
67Door Hinge Bracket -Right BottomP03314038C1
68Door Hinge Bracket -Left TopP03314050C1
69Door Hinge Bracket -Right Top P03314051C1
70Drawer Assembly,UpperY04200141
70-ADrawer Assembly,lowerY04200111
71 Door,LeftP04302046A1
72Door,RightP04303047A1
73Door MagnetP05323007M2
74Caster Seat,left front/right rearP05327062H2
75Caster Seat,right front/left rearP05327063H2
76Caster, 2.5 in.,without Brake/FrontP05117007E2
77Caster, 2.5 in.,with Brake/RearP05110001E2
78Towel Rack BracketP05212008A1
79Spice BasketP05203001A1
80 Towel RackP05209003A1
81Cart ShelfP05204070F1
82 Side Shelf,RightP01107043B1

Parts List For Model BAI08A(Continued)
-
13
-
83 Side Shelf,LeftP01106046B1
84 Side Shelf Spice Basket AssemblyP05204071G1
85Side Shelf Spice BasketP05204072G1
86Cutting BoardP02401004A1
87Lighting Stick AssemblyP05313009B1
88Electric Wires SetP02615134A1
89Lamp Wires SetP02615135A1
90Cart Side Panel,Left/Trim PlateP07509010A1
91Cart Side Panel,Right/Trim PlateP07509011A1
92Bowl Reinforcing PlateP03304022C1
A1Rear Wind ShelfP00725966C1
A2Back Burner FrameP02011064E1
Back Burner Assembly-LPY00300242
Back Burner Assembly-NGY00300252
A4LampP05352003B2
A5Lamp CoverP05352004A2
A6Thermocouple Water ShieldP03327062F2
A7Burner ElectrodeP02614015C2
A8Back Burner Thermocouple P05305030A2
A9Back burner Thermocouple BracketP03328050C2
B1Trim Panel, Left P07505007A1
B2Trim Panel, RightP07504007A1
B3Trim Panel, RearP07515015A1
Owner's ManualP80151085A1
A3
93 Tank Tray(Optional) Y0340022 1

Parts List For Model B3808A
-
14
-
ITEMDESCRIPTIONPART NO. QTY.
1Lid AssemblyY0130016
1
2Lid Handle BracketP00303016E
2
3Lid HandleP00205025B
1
4Lid Handle Heat-Insulating SpacerP06801002A
2
5Temperature Gauge SeatP00614015A
1
6Temperature GaugeP00601251A
1
7Protective PadP05518002I
4
8Cooking Rack/SecondaryP01516010B
1
9Cooking Grid/Large P016040406
2
10Cooking Grid/SmallP016040416
1
12Flame Tamer/RackP01720034B
1
13Flame Tamer/CeramicP01804002A
8
14Smoker BoxP06701020A
1
15Burner/MainP02003045B
4
16Infrared BurnerP02005020A
2
17Gas Collector Box with Electrode P02610020A
2
18Infrared Burner Dual Electrode P02625002C
1
19Bowl Side Panel/Trim Plate/LeftP07514039A
1
20Bowl Side Panel/Trim Plate/RightP07514040A
1
21Lid Hinge with NutP05511006A
2
22Burner BracketP02206294A
1
23Grease Draining Tray Heat ShieldP06904047C
1
24ALid Spring,LeftP05551001M
1
24BLid Spring,RightP05551002M
1
25Grill BowlP00713586C
1
26Bowl FrameP00739476C
1
27Extension Fitting BracketP03328058C
1
28Extension Fitting Bracket SupportP03328059C
1
29Heat Shield Bracket,LeftP03328060C
1
30Heat Shield Bracket,RightP03328061C
1
Gas Valve/Manifold Assembly-LPY0060624
1
Gas Valve/Manifold Assembly-NGY0060625
1
33Electric Ignitor, 6-PortsP02502305C
1
34Control PanelP02914081A
1
35Lighting SwitchP05360001B
1
36Control Knob SeatP03415034A
7
37Control Knob for Main BurnerP03426205U
6
38Grease Tray AssemblyY0270015
1
39Grease Tray Heat Shield,LowerP06904014C
1
40Extension Tube P03701008A
1
41Lighting TubeP05507001A
1
42Extension Fitting for Manifold (LPG only)P03902016A
1
43Regulator with Hose / LPGP03620025A
1
31

Parts List For Model B3808A(Continued)
-
15
-
44Extension Fitting for Manifold (NG only)P03901015A
1
45Extension Fitting - Outlet (NG only) P03901013A
1
46Regulator / NGP03628001B
1
47Extension Fitting - Inlet (NG only)P03901017A
1
48Cart Top Shelf P01010040C
1
49Cart Bottom Shelf P01010041C
1
50Cart Side Panel,LeftP07602027A
1
51Cart Side Panel,RightP07603030A
1
52Cart Rear PanelP07701079A
1
53ATransformerP05374001B
1
53BTransformer BracketP03328057A
1
54Cart Bottom Shelf/Trim PlateP07516002A
1
55Electric Wires Set/ElectrodeP02615046D
1
57Drawer Bracket,FrontP03304050C
1
58Drawer Bracket,RearP03304051C
1
59Cart Bracket Panel,Left BottomP03331011F
2
60Cart Bracket Panel,Right BottomP03331012F
2
61Cart Bracket Panel,Left TopP03331013F
1
62Cart Bracket Panel,Right Top P03331014F
1
63Door Hinge Bracket -Left TopP03314050C
1
64Door Hinge Bracket-Left BottomP03314037C
1
65Drawer Assembly,UpperY0420012
1
66Drawer Assembly,LowerY0420013
1
67DoorP04302049A
1
68Door MagnetP05323007M
1
69Caster Seat,Left Front & Right RearP05327062H
2
70Caster Seat,Right Front & Left RearP05327063H
2
71Caster, 2.5 in., without Brake/FrontP05117007E
2
72Caster, 2.5 in., with Brake/RearP05110001E
2
73Spice BasketP05203001A
1
74Cart Side Panel,Left/Trim PlateP07509010A
1
75Side Burner BodyP01108014B
1
76Side Burner Bracket AssemblyP02215105A
1
77ASide BurnerP02004040B
1
77BSide Burner CapP02013059E
1
78Pot SupportP00815008A
1
79Side Burner Lid P0011550AA
1
80Side Burner Lid HandleP00210006A
2
81Side Burner Connection HoseP03710003F
1
82Side Burner Orifice BracketP03317002A
1
83Control Knob for Infrared Burner/Side Burner P03426125W
1
84Control Knob Seat for Side BurnerP03415034A
1
85Side Burner Gas ValveP03218129G
1
86Side Shelf,LeftP01106046B
1

Parts List For Model B3808A(Continued)
Customer Service Helpline: If you have questions about assembly or grill operation, or if there are damaged or missing parts when you
unpack this unit from the shipping box, call us Monday through Friday at 1-800-752-3085
To make sure you obtain the correct replacement part(s) for your Barbeques Galore Gas Grill, please refer to the parts list
on this page. Also, the following information is required to assure getting the correct part:
1.Gas Model Number (see CSAlabel on grill) see
Page 2 for label location.
2.Part Number
3.Description
4.Quantity of parts needed
Please allow sufficient time to process and ship.
IMPORTANT: Keep this Operator s Manual for convenient referral and for part replacement.
IMPORTANT: Use only factory authorized parts. The use of any part that is not factory authorized can be dangerous. This
will also void your warranty
-
16
-
87Side Shelf Spice Basket AssemblyP05204071G
1
88Side Shelf Spice BasketP05204072G
1
89Cutting BoardP02401004A
1
90Lighting Stick AssemblyP05313009B
1
91Electric Wires SetP02615132A
1
92Lamp Wires SetP02615133A
1
93Side Burner Orifice Connection HoseP03701028F
1
94Extension Fitting for Side BurnerP03901028A
1
95Side Burner ElectrodeP02607058M
1
Side Burner Orifice-LPP06533018A
1
Side Burner Orifice-NGP06533019A
1
97Side Burne Lid ChainP05522001A
1
A1Back Burner Wind ShieldP00725946C
1
A2Back Burner FrameP06906077A
1
Back Burner Assembly-LPY0030026
1
Back Burner Assembly-NGY0030027
1
A4LampP05352003B
2
A5Lamp CoverP05352004A
2
A6Back burner Thermocouple P05305030A
1
A7Back Burner ElectrodeP02614015C
1
A8Back burner Thermocouple BracketP03328050C
1
B1Trim Panel, LeftP07505002A
1
B2Trim Panel, RightP07504002A
1
B3Trim Panel, RearP07515009A
1
Owner's ManualP80151085A
1
A3
96
9
Tank Tray(Optional) Y0340022
1
98

Cart & Barbecue Assembly (requires an assistant)
1.Remove Left & Right Side Panels on both sides of cart as shown in Figure 11.
2.With the help of your assistant, position barbecue on top of Cart and align mounting holes as shown in Figure 11.
3.Secure barbecue to Cart using Mushroom Head bolts (no nuts required) as follows:
B3808A (38 BBQ) 5 bolts at rear & side
See Figure 12.
Do not tighten until all fasteners are in place.
You may need your assistant to adjust the position of the barbecue so that the holes are all aligned.
4.Once barbecue & cart are aligned, tighten all bolts.
5.Replace Left & Right Side Panels.
Figure 12
For
B3808A
Nuts at front
only (2)
Bolts
Figure 11
Side
Panel
Bolts
Nutserts
Mushroom
Head Bolts
BAI08A (52 BBQ) 6 bolts at rear & side
-
17
-
Phillips Head Screw
Qty. 2
B5208ACT
Models
Hex Head Screw
1/4" x 1/2"
Qty. 6
1/4"x1/4"
Phillips Head Screw
1/4" x 1/2"
Qty. 2
Hex Head Screw
1/4" x 1/2"
Qty. 5
Flange Nut 1/4"
Qty. 2
B3808ACT
Models
For
BAI08A

1.Opentheleftdoorfromcabinetcart.Unscrewtheleftcartsidepaneltrimplatefrom theleftcartside
panel.
2.Repeatforrightcartsidepaneltrimplate.
3.Pullouttheupperdrawer,Pushupblacktenonontheleftslideandpushdownblack tenonontheright
slidetoremovetheupperdrawer.
4.Repeatforlowerdrawer.
Cart&CartTrim PlateAssembly (requiresanassistant)
1
2
1.Placethecarttrimplateunderthecart.
2.Besuretherearofcarttrimplateareinsertedintothecarttrimplatebracket.
3/16"x1/2PhillipsHeadScrew
Qty. 12
(fromleft& rightcartside panel
trim plate)
Figure 13
Figure 14
GrandTurboB5208ACT,B3808ACTModels
Cart&CartTrimPlateAssemblyInstructions
"
-
18
-
Modle number-CT=Cart

1/4x1/2PhillipsHeadScrew
Qty. 4
4
1.Installtheleftcartsidepanel trimplatetotheleftcartsidepanel.
2.Repeatforrightcartsidepaneltrimplate.
3.Installtheupperdrawer,Pushupblacktenonontheleftslideandpushdownblack tenonontheright
slidetoinstalltheupperdrawer tocart.
4.Repeatforlowerdrawer.
3/16" 1/2" Phillips Head Screw
Qty. 12
(fromleft& rightcartside panel
trimplate)
Tightensecurelyusing4screwsand3boltprovided.
1/4"x2-1/2"PanHeadwithCross
RecessBolt
Qty.3(for ACTModel)
Qty.2(forB3808ACTModel)
Figure 15
Figure 16
Align the holes on the cart bottom shelf and the caster seats with the threaded holes on the cart trim plate
" "
x
-
19
-
B5208
/