
MODEL NUMBER SERIAL NUMBER
55PFL7 705D
46PFL7 705D
40PFL7 705D
Register your product and get support at
www.philips.com/welcome
EN User manual
FR Manuel d’utilisation
ES Manual del usuario
EN: For further assistance, call the customer support service in your country.
• To obtain assistance in the U.S.A., Canada, Puerto Rico, or the U.S. Virgin Islands, contact Philips
Customer Care Center at 1-866-309-0841
• To obtain assistance in Mexico, contact Philips Customer Care Center at 01 800 504 62 00
Enter below the model and serial numbers located on the back and right side of the TV cabinet.
FR: Pour obtenir de l’aide supplémentaire, communiquez avec le centre de service à la clientèle de
votre pays.
• Pour obtenir de l’aide aux États-Unis, au Canada, à Puerto Rico ou aux Îles Vierges américaines,
communiquez avec le centre de service à la clientèle Philips au : 1-866-309-0841
• Pour obtenir l’aide au Mexique, entrez en contact avec le centre de soin de client de Philips à
01 800 504 62 00
Entrer ci dessous le modèle et le numéro de série situés dérrière à droite sur le dos du téléviseur.
ES: Para obtener más información, llame al servicio de soporte al cliente de su país.
• Para obtener asistencia en los Estados Unidos, en Canadá, Puerto Rico o en las Islas
Vírgenes de los Estados Unidos, comuníquese con Centro de atención al cliente de Philips al
1-866-309-0841
• Solo para Mexico CENTRO DE ATENCIÓN A CLIENTES LADA. 01 800 504 62 00 Solo
Para México.
Escriba a continuación el modelo y número de serie que estan localizados en lado derecho y parte
posterior de el gabinete de el televisor.

1
English
EN
Contents
1 Notice 4
2 Important 5
Product information 5
Screen care 5
Environmental care 5
Regulatory notices 5
3 Your TV 6
Side controls and indicators 6
Remote control 6
4 Get started 8
Supplied accessories 8
Mounting base onto TV for 40” and 46” 8
Positioning the TV 8
Adjusting the swivel angle 8
Installing the remote control batteries 8
Connecting the antenna or cable 9
Managing cables 10
Connecting the AC power cord 10
Switching on and set up the TV 11
5 Use your TV 12
Switching your TV on or to standby 12
Switching channels 12
Adjusting volume 13
Watching channels from a set-top box 13
Watching connected devices 13
Watching a Blu-ray Disc 13
6 Use more of your TV 14
Access TV menus 14
Netfl ix operations 15
Enjoying internet radio with vTuner 16
Changing picture and sound settings 18
Create and use lists of favorite channels 20
Setting the clock 21
Closed caption 21
Sleeptimer 22
Child and rating locks 22
Use the demo mode 25
Use Philips EasyLink 25
EasyLink 25
Set your location to home 26
Network 26
DivX
®
Video on Demand 27
View photos and play music, and watch videos
on a USB storage device 28
7 Install channels 30
Selecting your menu language 30
Autoprogram 30
Weak channel installation 30
Installation mode 30
Uninstall channels 30
Return your settings to default values 30
8 Update your TV software 31
Checking your current software version 31
Preparing for the software update by USB 31
Updating software 31
9 Connect devices 33
Connection overview 33
Selecting your connection quality 34
Connecting your devices 35
Add devices 37
Remove devices 37
10 Troubleshooting 38
Downloading an electronic copy 38
Contact us 38
11 Product information 39
12 Warranty 40
13 Index 41

2
Registering your model with PHILIPS makes you eligible for all of the valuable benefits listed below, so don't miss out.
Complete and return your Product Registration Card at once, or register online at www.philips.com/welcome
to ensure:
Return your Product Registration Card or register online at
www.philips.com/welcome today to get the very most from your purchase.
Visit our World Wide Web Site at http://www.philips.com/welcome
Congratulations on your purchase,
and welcome to the “family!”
Dear PHILIPS product owner:
Thank you for your confidence in PHILIPS.You’ve selected one of
the best-built, best-backed products available today.We’ll do every-
thing in our power to keep you happy with your purchase for many
years to come.
As a member of the PHILIPS “family,” you’re entitled to protection
by one of the most comprehensive warranties and outstanding
service networks in the industry.What’s more, your purchase guar-
antees you’ll receive all the information and special offers for which
you qualify, plus easy access to accessories from our convenient
home shopping network.
Most importantly, you can count on our uncompromising commit-
ment to your total satisfaction.
All of this is our way of saying welcome - and thanks for investing
in a PHILIPS product.
P.S. To get the most from your PHILIPS purchase, be
sure to complete and return your Product Registration
Card at once, or register online at:
www.philips.com/welcome
For Customer Use
Model No.________________________
Serial No. ________________________
This “bolt of lightning” indicates unin-
sulated material within your unit may
cause an electrical shock. For the safety of
everyone in your household, please do not
remove product covering.
The “exclamation point” calls attention
to features for which you should read
the enclosed literature closely to prevent
operating and maintenance problems.
WARNING: To reduce the risk of fire or
electric shock, this apparatus should not be
exposed to rain or moisture and objects
filled with liquids, such as vases, should not
be placed on this apparatus.
CAUTION: To prevent electric shock,
match wide blade of plug to wide slot, fully
insert.
ATTENTION: Pour éviter les choc
électriques, introduire la lame la plus large
de la fiche dans la borne correspondante de
la prise et pousser jusqu’au fond.
Returning the enclosed card guarantees
that your date of purchase will be on file,
so no additional paperwork will be
required from you to obtain warranty
service.
By registering your product, you'll receive
notification - directly from the manufac-
turer - in the rare case of a product
recall or safety defect.
Registering your product guarantees that
you'll receive all of the privileges to
which you're entitled, including special
money-saving offers.
Enter below the model and serial numbers located
on the back and right side of the TV cabinet. Retain
this information for future reference.
Know these
safetysymbols
CAUTION
RISK OF ELECTRIC SHOCK
DO NOT OPEN
CAUTION: TO REDUCE THE RISK OF ELECTRIC SHOCK, DO NOT
REMOVE COVER (OR BACK). NO USER-SERVICEABLE PARTS
INSIDE. REFER SERVICING TO QUALIFIED SERVICE PERSONNEL.
*Proof of Purchase *Product Safety
Notification
*Additional Benefits
EN

3
English
IMPORTANT SAFETY INSTRUCTIONS
Read before operating equipment
1. Read these instructions.
2. Keep these instructions.
3. Heed all warnings.
4. Follow all instructions.
5. Do not use this apparatus near water.
6. Clean only with a dry cloth.
7. Do not block any of the ventilation openings. Install in accordance with
the manufacturer’s instructions.
8. Do not install near any heat sources such as radiators, heat registers,
stoves, or other apparatus (including amplifiers) that produce heat.
9. Do not defeat the safety purpose of the polarized or grounding-type plug.
A polarized plug has two blades with one wider than the other. A
grounding type plug has two blades and third grounding prong. The wide
blade or third prong are provided for your safety. When the provided
plug does not fit into your outlet, consult an electrician for replacement
of the obsolete outlet.
10. Protect the power cord from being walked on or pinched particularly at
plugs, convenience receptacles, and the point where they exit from the
apparatus.
11. Only use attachments/accessories specified by the manufacturer.
12. Use only with a cart, stand, tripod, bracket, or table specified by
the manufacturer, or sold with the apparatus. When a cart is
used, use caution when moving the cart/apparatus combination
to avoid injury from tip-over.
13. Unplug this apparatus during lightning storms or when unused for long
periods of time.
14. Refer all servicing to qualified service personnel. Servicing is required
when the apparatus has been damaged in any way, such as power-supply
cord or plug is damaged, liquid has been spilled or objects have fallen
into apparatus, the apparatus has been exposed to rain or moisture,
does not operate normally, or has been dropped.
15. This product may contain lead or mercury. Disposal of these materials
may be regulated due to environmental considerations. For disposal or
recycling information, please contact your local authorities or the
Electronic Industries Alliance: www.eiae.org.
16. Damage Requiring Service - The appliance should be serviced by
qualified service personnel when:
A. The power supply cord or the plug has been damaged; or
B. Objects have fallen, or liquid has been spilled into the appliance; or
C. The appliance has been exposed to rain; or
D. The appliance does not appear to operate normally or exhibits a
marked change in performance; or
E. The appliance has been dropped, or the enclosure damaged.
17. Tilt/Stability - All televisions must comply with recommended
international global safety standards for tilt and stability properties of its
cabinets design.
• Do not compromise these design standards by applying excessive pull
force to the front, or top, of the cabinet which could ultimately
overturn the product.
• Also,do not endanger yourself, or children, by placing electronic
equipment/toys on the top of the cabinet. Such items could
unsuspectingly fall from the top of the set and cause product damage
and/or personal injury.
18. Wall or Ceiling Mounting - The appliance should be mounted to a
wall or ceiling only as recommended by the manufacturer.
19. Power Lines - An outdoor antenna should be located away from
power lines.
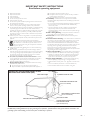
20. Outdoor Antenna Grounding - If an outside antenna is connected to
the receiver, be sure the antenna system is grounded so as to provide
some protection against voltage surges and built up static charges.
Section 810 of the National Electric Code, ANSI/NFPA No. 70-1984,
provides information with respect to proper grounding of the mats and
supporting structure grounding of the lead-in wire to an antenna-
discharge unit, size of grounding connectors, location of antenna-
discharge unit, connection to grounding electrodes and requirements for
the grounding electrode. See Figure below.
21. Objects and Liquid Entry - Care should be taken so that objects do
not fall and liquids are not spilled into the enclosure through openings.
a) Warning: To reduce the risk of fire or electric shock, this apparatus
should not be exposed to rain or moisture and objects filled with
liquids, such as vases should not be placed on this apparatus.
22. Battery Usage CAUTION - To prevent battery leakage that may
result in bodily injury, property damage, or damage to the unit:
• Install all batteries correctly, with + and - alignment as marked on the
unit.
• Do not mix batteries (old and new or carbon and alkaline, etc.)
• Remove batteries when the unit is not used for a long time.
GROUND CLAMP
ANTENNA LEAD IN WIRE
ANTENNA DISCHARGE UNIT
(
NEC SECTION 810-20)
GROUNDING CONDUCTORS
(
NEC SECTION 810-21)
GROUND CLAMPS
POWER SERVICE GROUNDING
ELECTRODE SYSTEM
(
NEC ART 250, PART H)
ELECTRIC SERVICE EQUIPMENT
this reminder is provided to call the CATV system installer’s attention to Article 820-40 of
the NEC that provides guidelines for proper grounding and, in particular, specifies that the cable ground shall be connected to the
grounding system of the building, as close to the point of cable entry as practical.
EXAMPLE OF ANTENNA GROUNDING AS PER
NATIONAL ELECTRICAL CODE (NEC)
Note to the CATV system installer:
This product may contain lead . Disposal of these materials
EN

4
Canadian notice
Standard Television Receiving Apparatus, Canada BETS-7 / NTMR-7.
This Class B digital apparatus meets all requirements of the Canadian
Interference-Causing Equipment Regulations.
Copyright
All other registered and unregistered trademarks are the property of
their respective owners.
ENERGY STAR
®
is a joint program of the U.S.
Environmental Protection Agency and the U.S.
Department of Energy helping us all save money
and protect the environment through energy
effi cient products and practices.
Consumer Notice:
This TV has been set to maximize energy effi ciency while delivering the
best possible picture using the factory installed home mode settings.
Changing or enabling other features in this TV (e.g. brightened backlighting)
will possibly increase energy consumption beyond the original
ENERGY STAR
®
qualifi ed limits.
SRS TruSurround HD™ creates an
immersive, feature-rich surround sound
experience from two speakers, complete
with rich bass, high frequency detail and clear
dialog.
is a trademark of SRS Labs, Inc. TruSurround HD technology is
incorporated under license from SRS Labs, Inc.
Manufactured under license from Dolby
Laboratories. Dolby and the double-D symbol
are trademarks of Dolby Laboratories.
Netfl ix and the Netfl ix logo are trademarks or registered trademarks of
Netfl ix, Inc.
vTuner is a trademark of Nothing Else Matters
Software, Ltd.
DivX
®
, DivX Certified
®
and associated logos
are registered trademarks of DivX, Inc. and
are used under license.
VESA, FDMI and the VESA Mounting
Compliant logo are trademarks of the Video
Electronics Standards Association.
® Kensington and Micro Saver are registered US
trademarks of ACCO World corporation with
issued registrations and pending applications in
other countries throughout the world.
Portions of this software are copyright © The FreeType Project
(www.freetype.org).
The American Academy of Pediatrics discourages television viewing for
children younger than two years of age.
1 Notice
2010 © Koninklijke Philips Electronics N.V. All rights reserved.
Specifi cations are subject to change without notice. Trademarks are
the property of Koninklijke Philips Electronics N.V. or their respective
owners. Philips reserves the right to change products at any time
without being obliged to adjust earlier supplies accordingly.
The material in this manual is believed adequate for the intended use of
the system. If the product, or its individual modules or procedures, are
used for purposes other than those specifi ed herein, confi rmation of
their validity and suitability must be obtained. Philips warrants that the
material itself does not infringe any United States patents. No further
warranty is expressed or implied.
Philips cannot be held responsible neither for any errors in the content
of this document nor for any problems as a result of the content in this
document. Errors reported to Philips will be adapted and published on
the Philips support website as soon as possible.
Pixel characteristics
This LCD product has a high number of color pixels. Although it has
effective pixels of 99.999% or more, black dots or bright points of light
(red, green or blue) may appear constantly on the screen. This is a
structural property of the display (within common industry standards)
and is not a malfunction.
Warranty
No components are user serviceable. Do not open or remove covers
to the inside of the product. Repairs may only be done by Philips
Service Centers and offi cial repair shops. Failure to do so shall void any
warranty, stated or implied.
Any operation expressly prohibited in this manual, any adjustments, or
assembly procedures not recommended or authorized in this manual
shall void the warranty.
Federal Communications Commission Notice
This equipment has been tested and found to comply with the limits
for a Class B digital device, pursuant to part 15 of the FCC Rules. These
limits are designed to provide reasonable protection against harmful
interference in a residential installation. This equipment generates, uses,
and can radiate radio frequency energy and, if not installed and used
in accordance with the instructions, may cause harmful interference
to radio communications. However, there is no guarantee that
interference will not occur in a particular installation. If this equipment
does cause harmful interference to radio or television reception, which
can be determined by turning the equipment off and on, the user is
encouraged to try to correct the interference by one or more of the
following measures:
• Reorient or relocate the receiving antenna.
• Increase the separation between the equipment and the receiver.
• Connect the equipment into an outlet on a circuit different from
that to which the receiver is connected.
• Consult the dealer or an experienced radio or television technician
for help.
Declaration of Conformity
Trade Name : PHILIPS
Responsible Party : P&F USA, Inc.
Model : 55PFL 7 705D, 46PFL 7 705D, 40PFL 7 705D
Address : PO Box 430 Daleville, IN 47334-0430 U.S.A.
Telephone Number : 1-866-309-0841
Modifi cations
The FCC requires the user to be notifi ed that any changes or modifi cations
made to this device that are not expressly approved by Philips Consumer
Electronics may void the user’s authority to operate the equipment.
Cables
Connections to this device must be made with shielded cables with
metallic RFI / EMI connector hoods to maintain compliance with FCC
Rules and Regulations.
EN

5
English
Environmental care
The packaging of this product is intended to be recycled. Contact your
local authorities for information about how to recycle the packaging.
End of life directives
Philips pays a lot of attention to produce environment-friendly products
in green focal areas. Your new TV contains materials which can be
recycled and reused. At the end of its life, specialized companies can
dismantle the discarded TV to concentrate the reusable materials and to
minimize the amount of materials to be disposed of. Please ensure you
dispose of your old TV according to local regulations.
Disposal of used batteries
The batteries supplied do not contain the heavy metals mercury and
cadmium. Nevertheless, in many areas batteries may not be disposed
of with your household waste. Please ensure you dispose of batteries
according to local regulations.
Regulatory notices
Warning
To reduce the risk of fi re or electric shock, this apparatus should not be exposed to rain or
moisture. Objects fi lled with liquids, such as vases, should not be placed on this apparatus.
Caution
To prevent electric shock, match the wide blade of the plug to the wide slot, fully inserted.
Do not place the unit on the furniture that is capable of being tilted by a
child and an adult leaning, pulling, standing or climbing on it.
A falling unit can cause serious injury or even death.
This apparatus should not be placed in a built-in installation such as a
bookcase or rack unless proper ventilation is provided.
Make sure to leave a space of 4 inches (10cm) or more around this
apparatus.
2 Important
Registering your model with Philips makes you eligible for all of the
valuable benefi ts listed below, so don’t miss out.
Complete and return your Product Registration Card at once, or
register online at www.philips.com/welcome to ensure :
• Proof of Purchase
Returning the enclosed card guarantees that your date of purchase
is on fi le, so no additional paperwork is required from you to
obtain warranty service.
• Product Safety Notifi cation
By registering your product you receive notifi cation - directly from
the manufacturer - in the rare case of a product recall or safety
defect.
• Additional Benefi ts of Product Ownership
Registering your product guarantees that you receive all of the
privileges to which you’re entitled, including special money-saving
offers.
For further assistance
For further assistance, call the customer support service in your country.
• To obtain assistance in the U.S.A., Canada, Puerto Rico, or the U.S. Virgin
Islands, contact Philips Customer Care Center at 1-866-309-0841
Product information
This TV consumes minimal energy in standby mode to minimize
environmental impact. The active power consumption is given on the
type plate at the back of the TV. The model and serial numbers of your
TV can be found on the back and right side of the TV as well as on the
packaging.
Screen care
• Avoid stationary images as much as possible. Stationary images
are images that remain on-screen for extended periods of time.
Examples include : on-screen menus, black bars and time displays.
If you must use stationary images, reduce screen contrast and
brightness to avoid screen damage.
• Unplug the TV before cleaning.
• Clean the TV screen and frame with a soft cloth. Never use
substances such as alcohol, chemicals or household cleaners on the
TV screen.
• Risk of damage to the TV screen! Never touch, push, rub or strike
the screen with any object.
• To avoid deformations and color fading, wipe off water drops as
soon as possible.
EN

6
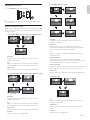
Remote control
b
c
a
d
e
h
o
p
r
q
s
i
j
k
m
n
l
g
f
3 Your TV
Congratulations on your purchase, and welcome to Philips! To fully
benefi t from the support that Philips offers, register your product at
www.philips.com/welcome
Side controls and indicators
e
d
c
b
a
a Standby indicator / remote control sensor
b
.
POWER
Switches the TV on or off. The TV is not powered off completely
unless it is physically unplugged.
c CHANNEL + / −
Switches to the next or previous channel.
d SOURCE
Selects connected devices.
e VOLUME + / −
Increases or decreases volume.
EN

7
English
r AUTO MODE
Cycles through the preset picture and sound setting
(see ‘Using auto mode’ on page 20).
s OPTIONS
Press to access the most usable items extracted from the main
menu.
a
.
(Standby-On)
Switches the TV on or off. The TV is not powered off completely
unless it is physically unplugged.
b FAV
Displays a list of all channels marked as favorite.
(Includes subchannels)
c SLEEP
Sets a delay after which the TV switches to standby.
d Color buttons (red / green / yellow / blue)
Selects tasks or options.
e SOURCE
Selects connected devices.
f NET TV
Display the Net TV menu.
g OK
Activates a selection or accesses the menu.
h
ÎïÍ Æ
(Navigation buttons)
Navigates through the menus.
i INFO
Displays information about the TV channel or accessory device.
The quality and accuracy of the information depends on the
broadcaster. You might see a difference in broadcast time if the
broadcast is from a different time zone.
j EasyLink buttons
E (Backward)
Searches backward.
D (Forward)
Searches forward.
1 F (Play / Pause)
Starts, pauses or resumes playback.
I (Record)
Starts or stops video recording.
C (Stop)
Stops playback.
k CH + / −
Switches to the next or previous channel.
Number buttons
Select a channel, page, setting or input characters.
•
(Dot)
Press the dot (
•
) for digital channels.
PREV. CH
Returns to the previously viewed channel.
l FORMAT
Selects a picture format (see ‘Changing picture format’ on page 19).
m VOL + / −
Increases or decreases volume.
n MUTE
Mutes or unmutes audio.
o BACK
Returns to a previous screen.
p MENU / EXIT
Toggles the home menu on or off.
q DEMO
Displays the demonstration menu.
EN

8
In addition to reading and understanding the safety instructions,
consider the following before positioning your TV :
• Ensure that you always have easy access to the AC power cord or
plug to disconnect the TV from the power.
• If the TV is mounted on a swivel base, ensure that no strain is
placed on the AC power cord when the TV is swiveled. Strain on
the AC power cord can loosen connections.
• The ideal viewing distance for watching TV is three times its screen size.
• Position the TV where light does not fall on the screen.
• Connect your devices before you position the TV.
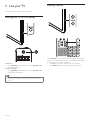
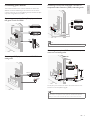
Using a Kensington lock
There is a Kensington security slot on the back of the TV. Prevent theft
by looping a Kensington lock between the slot and a permanent object,
such as a heavy table.
55” / 46”
40”
Adjusting the swivel angle
You can adjust the viewing angle of your TV.
Top of the unit
approx.
approx.
15°
15°
approx.
approx.
15°
15°
approx.
approx.
15°
15°
approx.
approx.
15°
15°
Caution
• While adjusting the swivel angle of your TV, hold the base fi rmly to prevent the TV from
tipping over and falling down.
Installing the remote control batteries
1 Slide the battery cover off the back of the remote control.
2 Insert the 2 supplied batteries (AAA, 1.5V). Be sure the + and −
ends of the batteries line up with the markings inside the case.
3 Slide the cover back into position.
Note
• Remove the batteries if not using the remote control for an extended period of time.
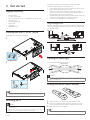
4 Get started
Supplied accessories
• Remote control
• 2 x AAA, 1.5V batteries
• M4 x 10 double sems screw x 4 (available for 40” and 46” only)
• AC Power cord
• Cable management tie
• User manual
• Quick Start
• Netfl ix Box-insert
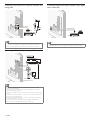
Mounting base onto TV for 40” and 46”
Applicable to TVs without mounted bases.
1
x 4
2
Note
• To wall mount the TV, refer to the addendum.
• If you lose the screws, please purchase M4×10 Philips head screws at your local store.
Positioning the TV
Warning
• Do not insert the AC power cord into the power socket outlet before all the
connections are made.
• Large screen TVs are heavy. 2 people are required to carry and handle a large screen TV.
• Before you move the TV, disconnect the cables to prevent breakage.
EN

9
English
If you connect a set-top box through RF IN / OUT
If the TV is connected to a cable box or satellite set-top box via a
coaxial connection, set the TV to channel 3 or 4, or to the channel
specifi ed by the service provider.
If you connect a set-top box through HDMI
If the TV is connected to a cable box or satellite set-top box via HDMI,
make sure you select the correct HDMI source by using SOURCE on this
unit's remote control.
If you connect a set-top box through component video input
If the TV is connected to a cable box or satellite set-top box via
component video input, make sure you select the correct component
video source by using SOURCE on this unit's remote control.
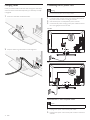
Connecting the antenna or cable
Cable
If you connect to an antenna
Any DTV programs that are broadcast in your area can be received for
free through an antenna connection.
Contact your local content provider or your local electronics retailer if
you are unsure about what HDTV programs are available in your area.
Broadcasters are transitioning from analog to digital TV. This means that
a given broadcaster can have channels available either in analog or in
digital, or both analog and digital at the same time.
The TV produces stereo sound only if a stereo signal is broadcast.
If you connect to a cable
When your TV is connected to the cable socket, you might receive free
digital and high defi nition programs (depending on your cable provider).
The channel number for digital and high defi nition channels includes a
dot “
•
”. For example, 11.1, 46.30, 108.201. Contact your cable provider
for more information.
If you connect to a DBS (Direct Broadcast Satellite)
There are two main DBS systems : DirecTV and DishNetwork. These
systems require a separate, proprietary set-top box to decode signals
and send them to the TV. The set-top box contains a digital TV tuner for
receiving off-air digital broadcasts.
Contact your local DBS provider for more information about the
connections and the TV channels.
If you connect to a set-top box
A cable box or satellite set-top box can be connected to the TV
through the following connections :
• ANT
• A/V (Composite Video and Audio)
• YPbPr (Component Video Input)
• HDMI
For information about how to connect a set-top box, see the Quick
Start provided.
EN

10
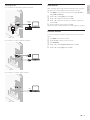
Connecting the AC power cord
Warning
• Verify that your power voltage corresponds with the voltage printed at the back of the
TV. Do not insert the AC power cord if the voltage is different.
1 Locate the power connector at the back of the TV. The location of
the power connector varies according to TV model.
2 Insert the AC power cord fully into the power connector.
3 Connect the AC power cord plug to the power outlet. Ensure that
the cord is tightly secured at both ends.
55” / 46”
40”
Disconnect the TV from the power outlet
Caution
• Pull the AC power cord by the plug; do not pull on the AC power cord.
1 Unplug the AC power cord from the power outlet.
2 Unplug the AC power cord from the power connector at the back
of the TV.
Managing cables
Route your antenna cable and all other cables through the cable holder
at the back of the TV. The holder helps keep your cables tidy and easily
manageable.
1 Attach the cable holder as illustrated below.
2 Keep the cable through this holder to avoid tangle them.
EN

11
English
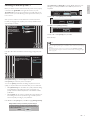
Select
[
Picture A
]
or
[
Picture B
]
by pressing
Í
or
Æ
that is the most
pleasing to you, then press OK. You see 5 different pictures to be
completed.
Cancel
Picture A
Picture A
Picture B
Which side of the picture do you prefer?
Press
Í
or
Æ
to select
[
Store
]
, then press OK.
Cancel
Store
Store your preferences.
Press OK to fi nish
[
Settings assistant
]
.
Exit
The TV has learned your preferences.
Press
Í
or
Æ
to select
[
Finish
]
, then press OK.
Finish the Setup.
Note
• If you are not receiving a signal from your cable service, contact the CATV provider.
• If you press
.
during autoprogram, an installation will be canceled except the language
selection.
• The initial autoprogram function can be executed for either
[
Antenna
]
or
[
Cable
]
only once. When you change the connection (Antenna / Cable), set autoprogram again.
(Refer to page 30.)
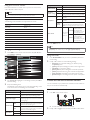
Switching on and set up the TV
Before you switch on the TV, check that the AC power cord is properly
connected. Press
.
POWER at the right side of the TV, or press
.
(
Standby-On
)
on the remote control. The TV normally takes 25-30
seconds to start up and the following screen appears the fi rst time you
turn on the TV.
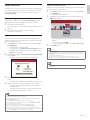
After you read a welcome screen, follow the on-screen instructions
to select your language and complete your TV setup. Installation takes
approximately 20 minutes.
Select your menu
language with the
Up/Down buttons on
your remote control,
press the OK button to
proceed.
●
●
●
English
Français
Español
●
●
En
En
gl
gl
g
g
g
g
is
is
h
h
Press
Î
or
ï
to select the desired mode for energy saving, then press
OK.
Retail store
Home
Location Home is recommended
for normal home use. In the
Retail Store location all settings
are fixed.
Select
[
Retail store
]
if you want backlight to be brighter.
Select
[
Home
]
to reduce the power consumption.
You must set
[
Home
]
. Otherwise, the settings of picture and sound
quality you adjusted will not be memorized after you turn off the unit.
• Select
[
Retail store
]
, the unit will be set up with predefi ned setting
for retail displays. In this setting, the power consumption may
possibly exceed the limited requirement of the ENERGY STAR
®
qualifi cation.
• Select
[
Home
]
, the unit is set to maximize the energy effi ciency for
home setting and it can be adjusted through a choice of picture
and sound quality according to your preference.
Press
Í
or
Æ
to select
[
Start
]
, then press OK to begin
[
Settings assistant
]
.
Settings assistant will allow you to customize your picture settings to
your personal preference. You will see a series of test pictures where
the right side and left side differ. Select the side that is most pleasing to
you with the Left/Right buttons.
Cancel
Start
EN

12
Switching channels
Press CHANNEL + / − on the side of the TV. For digital channels, press
a number (1 to 999) followed by a dot “
•
” and then the corresponding
sub channel number (1 to 999). e.g. 108.30.
• Press CH + / − or enter a number on the remote control.
• Press PREV. CH to return to the previously viewed channel.
5 Use your TV
This section helps you perform basic TV operations.
Switching your TV on or to standby
To switch on
• Press
.
POWER at the side of the TV or press
.
(
Standby-On
)
on the remote control.
To switch to standby
• Press
.
POWER at the side of the TV or press
.
(
Standby-On
)
on the remote control again.
Note
• Energy consumption contributes to air and water pollution. When the AC power
cord is plugged in, your TV consumes energy. Your TV has a very low standby power
consumption.
EN

13
English
Watching channels from a set-top box
To watch channels from a set-top box
1 Switch on the set-top box.
» The picture from your set-top box might appear automatically
on the TV screen.
2 Use the remote control of your set-top box to select channels.
If the picture does not appear
1 Press SOURCE repeatedly to select the set-top box and wait a
few seconds for the picture to appear.
2 Use the remote control of your set-top box to select channels.
Watching connected devices
To watch connected devices
1 Switch on the connected device.
» The picture from your connected device might appear
automatically on the TV screen.
2 Use the remote control of the device to select channels.
If the picture does not appear
1 Press SOURCE repeatedly to select the connected device and wait
a few seconds for the picture to appear.
2 Use the remote control of the device to select channels.
Watching a Blu-ray Disc
To watch a Blu-ray Disc
1 Insert a Blu-ray Disc into your player.
2 Press
►
(play) on the remote control of the Blu-ray Disc player to
select channels.
» The Blu-ray Disc might automatically play on the TV.
If the picture does not appear
1 Press SOURCE repeatedly to select the Blu-ray Disc player and
wait a few seconds for the picture to appear.
2 Use the remote control of the Blu-ray Disc player to play the disc.
Adjusting volume
To increase or decrease volume
• Press VOL + / − on the remote control or press VOLUME + / − on
the side of the TV.
To mute or unmute sound
• Press MUTE on the remote control to mute the sound.
• Press MUTE again or VOL + / − to recover the original sound.
EN

14
Lock or unlock your device from the home menu
This section describes how to lock or unlock specifi ed device.
1 Press MENU on the remote control.
2 Use
Î
/
ï
/
Í
/
Æ
to select a device to lock or unlock.
3 Press OPTIONS on the remote control.
4 Use
Î
or
ï
to select
[
Device lock
]
or
[
Device unlock
]
, then press OK.
• If device lock is unlocked,
[
Device lock
]
will be displayed.
If device lock is locked,
[
Device unlock
]
will be displayed.
• When device lock is locked,
will be displayed at the top right
of the device icons.
5 Enter your PIN (see ‘Setting your PIN’ on page 22).
• Once you have set PIN, PIN input menu does not appear after
the unit is turned on.
Enable or disable RC key forwarding from the home menu
This section describes how to enable or disable RC key forwarding for a
particular device.
1 Press MENU on the remote control.
2 Use
Î
/
ï
/
Í
/
Æ
to select a device to enable or disable
RC key forwarding.
3 Press OPTIONS on the remote control.
4 Use
Î
or
ï
to select
[
Enable RC key forwarding
]
or
[
Disable RC
key forwarding
]
, then press OK.
• If RC key forwarding is set to off,
[
Enable RC key forwarding
]
will
be displayed. If RC key forwarding is set to on,
[
Disable RC
key forwarding
]
will be displayed.
• When you set RC key forwarding on,
will be displayed at the
top left of the device icons.
Note
• This function is available only when your devices are connected to this unit
through HDMI cables and assigned to an HDMI port (HDMI1 to HDMI4) with
[
Add new devices
]
in the home menu.
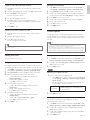
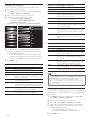
6 Use more of your TV
Access TV menus
Menus help you to install channels, change picture and sound settings
then access other features.
Access the home menu
The home menu gives you easy access to connected devices, picture
and sound settings as well as other useful features.
1 Press MENU on the remote control.
Watch TV
Browse USB
Add new devices
Setup
2 Use
Î
/
ï
/
Í
/
Æ
to select and navigate through one of the
following menus.
•
[
Watch TV
]
Switches back to the antenna source if another
source is selected.
•
[
Browse USB
]
Accesses USB menus.
•
[
Net TV
]
Access
[
NETFLIX
]
or
[
vTuner
]
.
•
[
Add new devices
]
Adds new devices to the home menu.
•
[
Setup
]
Accesses menus that allow you to change picture,
sound and other TV settings.
3 Press OK to confi rm your choice.
4 Press MENU to exit.
Tip
• After selecting
[
Add new devices
]
, follow the on-screen instructions to select
the correct device and connector.
EN

15
English
Watching streaming movies
After you set up the connection to Netfl ix, you can browse the Instant
Queue and watch movies on your TV.
1 Press NET TV on the remote control and then use
Î
/
ï
/
Í
/
Æ
to
select
[
NETFLIX
]
.
• The Instant Queue will appear.
2 Use
Í
/
Æ
to select the desired movie or TV episode, then press
1/ F to start playback.
• After loading, playback of the selected movie or TV episode
will start.
• To stop the playback, press C.
• To go back to the Instant Queue, press Color buttons (red).
3 Press MENU to exit.
Tip
About the Instant Queue
• Instant Queue is the list of movies and TV episodes you add on the Netfl ix website.
(
www.netfl ix.com) You can manage the movies and TV episodes in your Instant Queue
from the Netfl ix website on your PC.
• You cannot add movies or TV episodes to your Instant Queue on this unit.
• You can remove movies or TV episodes from the Instant Queue on this unit.
Note
• The picture quality differs depending on the speed of your Internet connection at the
time of loading.
Netfl ix operations
With this unit, you can watch movies and TV episodes streamed instantly
from Netfl ix via the Internet. In order to use this feature, you must visit
the following website on your PC and become a Netfl ix member.
www.netfl ix.com/Philips
Before activating the connection to Netfl ix
After creating a Netfl ix account at www.netfl ix.com/Philips, follow the
following procedure before activating the connection to Netfl ix.
1 Connect this unit to the Internet.
(See ‘Connecting the TV to the internet using an Ethernet cable’ on
page 36.)
2 Set up the necessary network connection settings.
(See ‘Network’ on page 26.)
Activating the connection to Netfl ix
In order to watch movies and TV episodes streamed instantly from
Netfl ix via the Internet, you must activate the connection between this
unit and your Netfl ix account.
1 Press NET TV on the remote control and then use
Î
/
ï
/
Í
/
Æ
to
select
[
NETFLIX
]
.
• Netfl ix welcome screen will appear.
• For the fi rst time only,
[
Network Service Disclaimer
]
screen
will appear. After confi rming the content, use
Í
/
Æ
to select
[
Agree
]
, then press OK.
2 Use
Î
/ ï to select
[
yes - activate instant streaming from Netfl ix
]
,
then press OK.
• Activation screen with the activation code will appear.
3 On your PC, visit www.netfl ix.com/activate and log into your
account.
• The entry screen of activation code will appear on your PC screen.
4 Enter the activation code which is displayed on the TV screen.
• The Instant Queue will appear. The connection to Netfl ix is
successfully made.
• To browse the Instant Queue and watch movies, skip to step
2 in ‘Watching streaming movies’ on page 15.
Note
• Netfl ix is available only in the United States.
• You cannot create a Netfl ix account on this unit.
• If newer version of software is required, software update screen may appear after
selecting
[
NETFLIX
]
in step 2.
(For software update, see ‘Upgrade your TV software’ on page 31.)
• You can deactivate the connection to Netfl ix by setting the
[
Deactivation
]
to
[
Ye s
]
.
(See ‘Netfl ix connection’ on page 27.)
• The screen image of Netfl ix may change after updating the fi rmware.
• For questions regarding the Netfl ix service, visit www.netfl ix.com/Help
• When you contact the Netfl ix customer service, you may be asked for the ESN
number, which is a serial number to identify this unit by Netfl ix. You can check the ESN
number on the
[
ESN
]
screen. (See ‘Netfl ix connection’ on page 27.)
EN

16
3 In the station / folder list, use
Î
/
ï
to select the desired station,
then press OK.
• After loading, playback of the selected station will start.
• If you select a folder, use
Î
/
ï
to select the desired station in
the next hierarchy, then press OK.
• To stop playback , press C.
• To go back to the previous or next hierarchy, press
Í
/
Æ
.
e.g.) Location
vTuner |...| Sunhall
All Stations 45
..
Tset1
Tset2
Japan
WeatherSpoon
MP3 01:23:45
Hiddy's cafe
Hiddy's cafe
Holy's Pizza
Miyazaks
Favorite Page Down
Hiddy's cafe
y
y
e
e
e
e
e
e
Hid
H
H
H
d'
f
Hid
Hid
Hid
Hid
Hid
Hid
dy'
dy
dy
dy
dy
dy
y
y
y
y
y
sc
sc
sc
sc
sc
s c
afe
afe
afe
afe
afe
afe
Hid
Hid
Hid
Hid
d
dy'
dy
dy
dy
dy
y
y
y
y
y
sc
sc
sc
sc
sc
afe
afe
afe
afe
afe
4 Press MENU to exit.
Note
• This unit cannot play back stations with audio format other than MP3 and WMA.
• For some stations, playback is not available even if the audio format is displayed as MP3
or WMA.
• Internet radio service may not be fully available with narrowband Internet connection.
(e.g. 56k modem) When listening to Internet radio, use broadband Internet connection.
(For details, contact your Internet service provider.)
• Depending on the bit rate of a station or the network environment, it may take a while
to complete loading the station or playback may not be available.
• The streaming audio may be interrupted during playback, when the vTuner server is busy.
• Some stations cannot be displayed in the list, depending on the network environment.
• If the loading time of a station exceeds 3 minutes, the loading will be canceled.
• The order of station / folder in the list depends on the information from vTuner server
and may change without notice.
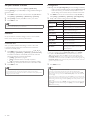
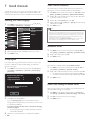
Enjoying internet radio with vTuner
With this unit, you can enjoy Internet radio with vTuner via the Internet.
In order to listen to Internet radio, you must connect this unit to the
Internet.
For the network connection, see ‘Connecting the TV to the internet
using an Ethernet cable’ on page 36.
For the network setup, see ‘Network’ on page 26.
Internet radio playback
After you set up the network connection, follow the following
procedure to listen to Internet radio.
1 Press NET TV on the remote control and then use
Î
/
ï
/
Í
/
Æ
to
select
[
vTuner
]
.
• Category list will appear.
• For the fi rst time only,
[
Network Service Disclaimer
]
screen
will appear. After confi rming the content, use
Í
/
Æ
to select
[
Agree
]
, then press OK.
2 In the category list, use
Î
/
ï
to select the desired category, then
press OK.
vTuner |...| Sunhall
All Stations 45
..
Tset1
Tset2
Japan
WeatherSpoon
MP3 01:23:45
Hiddy's cafe
Hiddy's cafe
Holy's Pizza
Miyazaks
Favorite Page Down
Hiddy's cafe
y
e
e
e
e
e
e
e
Hid
H
H
H
d'
f
Hid
Hid
Hid
Hid
Hid
Hid
Hid
dy'
dy
dy
dy
dy
dy
dy
y
y
y
y
y
sc
sc
sc
sc
sc
s c
s c
afe
afe
afe
afe
afe
afe
afe
Hid
Hid
Hid
Hid
dy'
dy
dy
dy
y
y
y
y
y
sc
sc
sc
sc
afe
afe
afe
afe
• Station / folder list of selected category will appear.
• For
[
Location
]
and
[
Genre
]
, use
Î
/
ï
to select the desired
location or genre after selecting the category, then press OK.
[
Recently Played
]
List of stations which are recently played
[
Favorites
]
List of your favorite radio stations
[
My Added Stations
]
List of stations which are added on vTuner website (This category
will appear only after you add stations on vTuner website. )
[
Location
]
List of stations categorized by location
[
Genre
]
List of stations categorized by genre
[
New Stations
]
List of new stations
[
Most Popular Stations
]
List of popular station
[
Get access code
]
Displays the access code, which will be required when creating a
vTuner account on your PC
[
Reset
]
Removes all stations / folders in
[
Recently Played
]
,
[
Favorites
]
and
[
My Added Stations
]
EN

17
English
Remove from favorite list
1 Follow steps 1 to 2 in ‘Internet radio playback’ on page 16.
2 Use
Î
/
ï
to select
[
Favorites
]
, then press OK.
3 Use
Î
/
ï
to select the station you want to remove from
[
Favorites
]
, then press Color buttons (green).
• Confi rmation message will appear.
4 Use
Í
/ Æ to select
[
Ye s
]
, then press OK.
•The selected station is removed from
[
Favorites
]
folder.
Remove Favorites?
Press “Yes” to remove from Favorites.
Yes
No
No
No
5 Press MENU to exit.
Add stations on the vTuner website
On the vTuner website, you can add stations which are not in the vTuner
station list. To add stations, you must visit http://go2service.vtuner.com/ph/
and create a vTuner account with the access code for this unit.
1 Follow steps 1 to 2 in ‘Internet radio playback’ on page 16.
2 Use
Î
/
ï
to select
[
Get access code
]
, then press OK.
• The access code for this unit will be displayed. Please take a
note of the access code.(This access code will be required
when creating a vTuner account.)
3 On your PC, visit http://go2service.vtuner.com/ph/ and create your
vTuner account.
• Follow the instructions given on the PC screen.
4 Add stations by following the instructions given on the PC screen.
• The stations will be added to
[
My Added Stations
]
.
Reset the station list
You can remove all stations / folders in
[
Recently Played
]
,
[
Favorites
]
and
[
My Added Stations
]
.
1 Follow steps 1 to 2 in ‘Internet radio playback’ on page 16.
2 Use
Î
/
ï
to select
[
Reset
]
, then press OK.
3 Use
Î
/
ï
to select
[
Ye s
]
, then press OK.
• All stations / folders in
[
Recently Played
]
,
[
Favorites
]
and
[
My Added Stations
]
are removed.
4 Press MENU to exit.
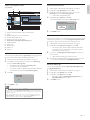
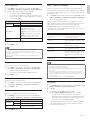
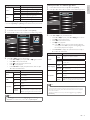
Guide to the playback screen
e.g.) Location
vTuner |...| Sunhall
All Stations 45
..
Tset1
Tset2
Japan
WeatherSpoon
MP3 01:23:45
Hiddy's cafe
Hiddy's cafe
Holy's Pizza
Miyazaks
Favorite Page Down
Hiddy's cafe
y
e
e
e
e
e
e
Hidd
H
H
H
'
f
Hidd
Hidd
Hidd
Hidd
Hidd
dd
y's
ys
ys
ys
ys
ys
y
y
y
y
cafe
cafe
cafe
cafe
cafe
ca e
Hidd
Hidd
Hidd
Hidd
y's
ys
ys
ys
y
y
y
y
y
cafe
cafe
cafe
cafe
1
2
3
4
5
6
7
9
10
8
11
1 Number of stations / folders in the current hierarchy
2 Image
3 Elapsed playing time of the current station
4 Current station / folder name
5 Audio format of the current station
6 Color buttons (red / green / yellow / blue) guide
7 Station / folder list
8 Station icon
9 Playback status
10 Folder icon
11 Directory
Add to favorite list
You can add your favorite stations to
[
Favorites
]
in the category list. To
add your favorite stations, follow the following procedure.
1 Follow steps 1 to 3 in ‘Internet radio playback’ on page 16.
2 Use
Î
/
ï
to select the station you want to add to
[
Favorites
]
,
then press Color buttons (green).
• The selected station is added to
[
Favorites
]
folder.
• Confi rmation message will appear.
• If you select a folder, use
Î
/
ï
to select the desired station in
the next hierarchy, then press Color buttons (green).
3 Press OK.
Favorite added
Favorite added
OK
OK
OK
4 Press MENU to exit.
Note
• You can also add your favorite stations to
[
Favorites
]
on your PC. To add your favorite
stations on your PC, visit http://go2service.vtuner.com/ph/ and create a vTuner account
with the access code, which you can check from the category list. (See ‘Internet radio
playback’ on page 16.)
• You can change folder names or order of lists in your vTuner page on the Internet.
•
[
My_Favorite
]
folder will appear after you add a station to
[
Favorites
]
on this unit.
(Your favorite station will also be added to
[
My_Favorite
]
folder.)
EN

18
Setting items Description
Color
enhancement
Off Sets Color enhancement to off.
On Makes colors more vivid bright colors.
Active control
Off Sets Active control to off.
On with
Light
Sensor
Adjusts backlight for the best picture quality by
dynamically adjusting the backlight intensity in
accordance with lighting condition in the room.
On without
Light
Sensor
Adjusts backlight for best picture quality based
on the incoming video signal.
Picture format
Automatic
Refer to ‘Summary of picture formats’ on
page 19.
Super zoom
4:3
Movie
expand 14:9
Movie
expand 16:9
Wide
screen
Unscaled
Mode selection
PC
Turns off image enhancement features which
makes the TV to act purely as a monitor.
HDTV
Enables image enhancement features to
improve picture quality.
Auto adjustment
The horizontal / vertical position, clock and
phase of the PC screen are automatically
adjusted.
Clock Setting to stabilize the PC screen.
Phase Setting to improve the clarity of the PC screen.
Horizontal shift
Adjusts the horizontal position of the picture
for PC screen.
Vertical shift
Adjusts the vertical position of the picture for
PC screen.
5 Press MENU to exit.
Note
•
[
Mode selection
]
will not be displayed when incoming signals are other than
720 x 480p 60Hz, 1280 x 720p 60Hz and 1920 x 1080p 24 / 30 / 60Hz.
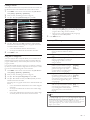
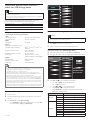
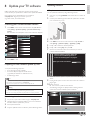
Changing picture and sound settings
You must set
[
Home
]
in
[
Location
]
(refer to page 26).
Otherwise, the settings you adjusted will not be memorized after you
turn off the unit.
Changing picture settings
1 Press MENU on the remote control.
2 Use
Î
/
ï
/
Í
/
Æ
to select
[
Setup
]
>
[
Picture
]
.
Picture
Sound
Features
Installation
Software update
Settings assistant Start now
Contrast
Brightness
Color
Tint
Sharpness
Color temperature Cool
Dynamic contrast Off
3 Use
Î
/
ï
/
Í
/
Æ
to select one of the picture settings, and press OK
to enter the setting.
4 Adjust the picture quality.
The following picture settings can be confi gured. Depending on
the format of the picture source, some picture settings are not
available.
Setting items Description
Settings assistant
Use
[
Settings assistant
]
to guide you through
the best picture and sound settings.
Contrast
Adjusts the intensity of bright areas, keeping
dark areas unchanged.
Brightness Adjusts the intensity and details of dark areas.
Color Adjusts color intensity.
Tint Adjusts the color balance in an image.
Sharpness Adjusts the level of sharpness in image details.
Color
temperature
Cool More blue tones.
Normal Standard tones.
Warm More orange tones.
Dynamic
contrast
Off Sets Dynamic contrast to off.
On Automatically enhances contrast in an image.
Digital Natural
Motion
Off Sets Digital Natural Motion to off.
Minimum Makes an image smoother.
Maximum Makes an image smoothest.
Noise
reduction
Off Sets Noise reduction to off.
On Reduces noise in an image.
MPEG artifact
reduction
Off Sets MPEG artifact reduction to off.
On
Reduces a blockiness and a blurriness and
judder by digital filter.
EN

19
English
For 4:3 (480i, 480p) video signal
[
Automatic
]
[
Super zoom
]
[
Movie expand 16:9
]
[
4:3
][
Wide screen
]
[
Movie expand 14:9
]
Automatic
Enlarges the picture automatically to best fi t the screen. The
subtitles remain visible.
Super zoom
Display a 4:3 picture at a 16:9 size; the picture is stretched
horizontally and vertically and its left and right edges are enlarged.
This crops out the top and bottom of the picture.
4:3
Display a 4:3 picture at its original size. Sidebars appear on both
edges of the screen.
Movie expand 14:9
Display a 4:3 picture at a 14:9 size; the picture is stretched
horizontally and vertically. This crops out the top and bottom of the
picture. Sidebars appear on both edges of the screen.
Movie expand 16:9
Display a 4:3 picture at a 16:9 size; the picture is stretched horizontally
and vertically. This crops out the top and bottom of the picture.
Wide screen
Display a picture that is stretched out of proportion to fi ll the screen.
For PC input signal
[
4:3
][
Wide screen
]
[
Unscaled
]
4:3
Display a proportionately stretched picture. Sidebars appear on
both edges of the screen.
Wide screen
Display a picture that is stretched out of proportion to fi ll the
screen.
Unscaled
Display a picture in its original size.
Changing picture format
1 Press FORMAT on the remote control.
2 Use
Î
or
ï
to select a picture format and press OK to confi rm
your choice.
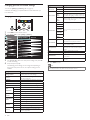
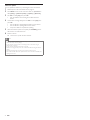
Summary of picture formats
Display modes can be selected when the broadcasting station is sending
16:9 or 4:3 video signal. And 3 types of display modes can be selected
for PC input signal.
For 16:9 (480i, 480p, 720p) video signal / 4:3 (720p) video signal
[
4:3
]
[
Wide screen
]
[
Automatic
]
Automatic
Enlarges the picture automatically to best fi t the screen. The
subtitles remain visible.
4:3
Display a 16:9 picture at a 4:3 size; the picture is shortened
horizontally. Sidebars appear on both edges of the screen.
Wide screen
Display a picture that is stretched horizontally and vertically.
For 16:9 (1080i, 1080p) video signal / 4:3 (1080i, 1080p) video signal
[
Automatic
]
[
Unscaled
]
[
4:3
]
[
Wide screen
]
Automatic
Enlarges the picture automatically to best fi t the screen. The
subtitles remain visible.
4:3
Display a 16:9 picture at a 4:3 size; the picture is shortened
horizontally. Sidebars appear on both edges of the screen.
Wide screen
Display a picture that is stretched horizontally and vertically.
Unscaled
Display a 16:9 picture at its original size.
EN
Page is loading ...
Page is loading ...
Page is loading ...
Page is loading ...
Page is loading ...
Page is loading ...
Page is loading ...
Page is loading ...
Page is loading ...
Page is loading ...
Page is loading ...
Page is loading ...
Page is loading ...
Page is loading ...
Page is loading ...
Page is loading ...
Page is loading ...
Page is loading ...
Page is loading ...
Page is loading ...
Page is loading ...
Page is loading ...
Page is loading ...
Page is loading ...
-
 1
1
-
 2
2
-
 3
3
-
 4
4
-
 5
5
-
 6
6
-
 7
7
-
 8
8
-
 9
9
-
 10
10
-
 11
11
-
 12
12
-
 13
13
-
 14
14
-
 15
15
-
 16
16
-
 17
17
-
 18
18
-
 19
19
-
 20
20
-
 21
21
-
 22
22
-
 23
23
-
 24
24
-
 25
25
-
 26
26
-
 27
27
-
 28
28
-
 29
29
-
 30
30
-
 31
31
-
 32
32
-
 33
33
-
 34
34
-
 35
35
-
 36
36
-
 37
37
-
 38
38
-
 39
39
-
 40
40
-
 41
41
-
 42
42
-
 43
43
-
 44
44


Ask a question and I''ll find the answer in the document
Finding information in a document is now easier with AI
Related papers
-
Philips 46PFL7705DV User manual
-
Philips 40PFL3705D User manual
-
Philips 32PFL4505D/F7 User manual
-
-
Philips 55PFL5705D User manual
-
Philips 46PFL7505D/F7 User manual
-
Philips 32PFL3505D User manual
-
Philips 19PFL3505D User manual
-
-
Other documents
-
Denver LDS-4074 User manual
-
Denver LDS-7511 User manual
-
Denver LDS-4368 UK User manual
-
 TDS PHONEBROADBAND TV User manual
-
-
Insignia NS-WBRDVD2 Important information
-
Seagate FreeAgent Theater+ HD Media Player User guide
-
ClearOne StreamNet Internet Radio - Streaming vTuner Quick start guide
-
Kramer Electronics C-HM/HM-KRTL-1M Datasheet
