Page is loading ...

DOMINION A4 | SERVICE & BLEED GUIDE


3
DOMINION A4 SERVICE & BLEED GUIDE
Limited Warranty:
HAYES warrants its products to be free from defects in materials or workmanship under
normal intended use for a period of one year (two years in European Union countries) from
the date of purchase, subject to normal wear and tear. Unless otherwise prohibited by law,
any such defective products will be repaired or replaced at the option of HAYES when received
with proof of purchase, freight prepaid. This warranty does not cover breakage, bending, or
damage that may result from crashes or falls. This warranty does not cover any defects or
damage caused by alterations or modications of HAYES products or by normal wear, accidents,
improper maintenance, damages caused by the use of HAYES products with parts of dierent
manufacturers, improper use or abuse of the product, application or uses other than those
set forth in the HAYES instruction manual or failure to follow the instructions contained in
the applicable HAYES instruction manual. Instruction manuals can be found on-line at www.
hayescomponents.com. Any modications made by the BUYER or any subsequent user will
render the warranty null and void. This warranty does not apply when the serial number or
production code has been deliberately altered, defaced or removed from the product. The cost
of normal maintenance or replacement of service items, which are not defective, shall be the
BUYER’s responsibility. If permitted by local law, this warranty is expressly in lieu of all other
warranties (except as to title), express or implied, and in particular and without limitation HAYES
disclaims the implied warranties of merchantability or tness for purpose If for any reason
warranty work is necessary, return the component to the place of purchase or contact your
dealer or local HAYES distributor. In the USA, contact HAYES for a return authorization number
(RA#) at (888) 686-3472. At that time, instructions for repair, return, or replacement shall be
given. Customers in countries other than the USA should contact their dealer or local HAYES
distributor.
Limitation of Liability.
Unless required by mandatory law, HAYES shall not be liable for any incidental, indirect, special
or consequential damages.
This warranty does not apply to normal wear and tear. Wear and tear parts are subject to
damage through normal use, failure to service according to recommendations or riding in
conditions other than recommended. The cost of normal maintenance or replacement of service
items, which are not defective, shall be paid for by the original purchaser. Wear and tear parts
that will not be replaced under warranty include but are not limited to the following:
HAYES PERFORMANCE SYSTEMS WARRANTY
Bushings Dust Seals Stripped or Worn Bolts
Rear Shock Air Seals and/or O-rings Remote Lockout Cable
Mount Hardware Bearings Gloves
Handlebar grips Upper Stanchion Tubes Lower Stanchion Tubes(Dorado)
Tubeless Valves Tubeless Tape Pads
Rotors

4
DOMINION A4 SERVICE & BLEED GUIDE
This manual is intended to provide the information necessary for installation,
set-up, normal maintenance and service of the Hayes Dominion A4 disc brake
system. We highly recommend installation be performed by a qualied mechanic.
These instructions can be downloaded from the Hayes Disc Brake website at
www.hayesdiscbrake.com
INTRODUCTION
We highly recommend that service to this brake be performed by a certied
bicycle mechanic. Failure to follow instructions presented in this manual could
lead to serious injury or death. Any questions about the servicing of this brake or
the manual itself should be directed to Hayes Customer Support at:
WARNING
! !
Hayes
Bicycle
USA
5800 W Donges Bay Road Mequon WI 53092
Phone: 888.686.3472
Email: techsupport@hayesbicycle.com
Hayes
Bicycle
Europe
Dirnismaning 20 a 85748 Garching (b. Munich) Germany
Phone: +49 89 203237450
Email: techsupportEU@hayesbicycle.com
Hayes
Bicycle
Asia
16F, No. 37, Sec. 3 Mincyuan E. Rd. Zhongshan District
Taipei City 10476 Taiwan ROC
Phone: 886-2-2518-1108

5
DOMINION A4 SERVICE & BLEED GUIDE
SAFETY INFORMATION
As a serious rider you are well aware of the need to practice safety in all aspects
of the sport. This includes service and maintenance practices as well as riding
practices. Before each ride, always check your brakes for proper function and the
brake pads for wear. When you ride, always wear a helmet.
When you need to install any of the disc brake components, that installation
work should be done by a qualied technician with the proper tools. Improper
installation could cause severe or fatal injuries.
This brake has been designed for use on a single person mountain bike. The use
on any other vehicle or device will void the warranty and can cause serious injury.
When following any of the procedures below, be sure to keep your hands and
ngers from getting caught in the disc. Failure to do so could result in injury.
Do not adjust the caliper while the wheel is spinning.
Do not adjust the caliper while the caliper is hot.
If your bike is involved in a fall or crash it is recommended your brakes are checked
by a qualied mechanic before riding to ensure they are functioning properly. The
following checks should be performed: Check that all components are securely
mounted to the handlebar,frame, fork, or wheel; check for proper pad installation
and retention; check that the brake builds and holds pressure; check hose and
ttings for kinks or leaks; check master cylinder body and caliper for damage.
Always have a qualied bike mechanic check your brakes if you suspect damage.
With use, disc brake components may become very hot. Always allow components
to cool before attempting to service your bike.
The Hayes Dominion A4 brake system uses DOT 5.1 uid. Any spilled on the brake
assembly, bike or otherwise should be cleaned up with isopropyl alcohol. The brake
rotor and pads should only be cleaned with isopropyl alcohol (not disc brake cleaner).
WARNING
! !
WARNING
! !
WARNING
! !
WARNING
! !
WARNING
! !
WARNING
! !
WARNING
! !
WARNING
! !

6
DOMINION A4 SERVICE & BLEED GUIDE
table of contents
SECTION PAGE NUMBER
Tools And Materials 7
Master Cylinder Service 8–10
Caliper Rebuild 11–16
Bleed Instructions 17–22
Exploded Diagrams 23–24

7
DOMINION A4 SERVICE & BLEED GUIDE
tools and materials
Below is a list of tools and materials necessary for installing Dominion A4 brakes.
• Safety Glasses
• Nitrile Gloves
• Isopropyl Alcohol
• Lint-Free Rags
• Plastic Pick
• 5mm Hex Wrench
• 4mm Hex Wrench
• 3mm Hex Wrench
• Torx T10 Wrench
• T10 Torx Bit
• T30 Torx Bit
• 3mm Hex Bit
• Torque Wrench
• Hayes DOT 5.1 Bleed Kit (Hayes Part Number 98-23572)
• Dominion A4 Caliper Rebuild Kit (Hayes Part Number 98-36140-K001)
• Hydraulic Hose Cutter
• 8mm Flair Nut Wrench
• 8mm Crows Foot
• Ratchet
• Compressed Air With Rubber Tipped Nozzle

8
DOMINION A4 SERVICE & BLEED GUIDE
MASTER CYLINDER service
1
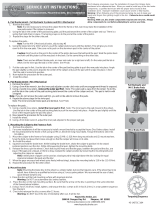
Hose Removal
Using an 8mm air nut wrench,
loosen and remove the hose nut
from the master cylinder (MC).
Slide it down the hose.
Pull the hose out of the MC. There
will be residual uid in the master
cylinder body. Be careful to avoid
spilling the uid.
A new hose insert/compression
bushing combination will be
needed each time the hose is re-
installed. Remove the old hose
insert by cutting the hose next to
it. The cut needs to be clean with
no frayed ends.
2
3

9
DOMINION A4 SERVICE & BLEED GUIDE
MASTER CYLINDER service
1
Hose Assembly
Cut the hose to desired length
using hose or cable cutters.
The cut end must be clean and
perpendicular to itself.
Slide the hose nut onto the hose.
Push the end of the barbed hose
insert into the end of the hose.
To ensure your bushing is fully
seated mark your hose three
millimeters down from your
cut, push your bushing onto
the hose using the side of your
workbench until it reaches your
mark. Always use a new hose
insert/compression bushing.
2
3

10
DOMINION A4 SERVICE & BLEED GUIDE
MASTER CYLINDER service
4
Slide the hose into the MC and
install the hose nut. Be sure that
the hose is inserted completely
into the master cylinder. Be sure
that the hose remains inserted
while tightening the hose nut
down.
Using an 8mm crows foot, torque
the hose nut to 70 ± 5 in lbs
[7.9±0.5 N m]
Bleed the system. (NOTE: See
Bleed Instructions on page 17)
5
6

11
DOMINION A4 SERVICE & BLEED GUIDE
Caliper rebuild
1
Piston Removal
Remove the caliper from the bike
by removing the two M6x1.0 x
18.4mm mounting bolts using a
5mm hex wrench.
If there is nothing wrong with
the hose and the hose tting,
completely remove the caliper
hose assembly using a 3mm hex
wrench.
Remove the two bridge bolts -
with a T30 Torx wrench. When
you remove the two bridge
bolts, the caliper will come apart
into two pieces. There will be an
inner and an outer caliper half
and an O-ring between.
2
3

12
DOMINION A4 SERVICE & BLEED GUIDE
Take the transfer port O-ring
out and inspect it for any cuts
or debris. This O-ring may be
reused when the caliper is put
back together.
Remove the pistons from the
caliper with pressurized air. Avoid
chipping the piston. Ensure bleed
plug is installed, angle the caliper
so the piston is facing downward,
then direct pressurized air thru the
hole that connects the two halves
together. This will force the rst
piston out of the caliper halve. Be
sure you are blowing the piston
into a clean rag. The air pressure
will force the piston out at a high
rate of speed. Place a rag and you
thumb over the open bore and use
air to blow the second piston out.
Carefully remove the square seal
from inside the piston bore. The
replacement kit will consist of a
new piston and square seal.
Caliper rebuild
Do not scratch O-ring groove
when removing the O-ring, as this
could cause the O-ring to leak.
4
5
6
Scratching the sealing surface
of the piston bore can cause
leaking. To prevent this use a
plastic pick to extract the piston
seals.
NOTICE
NOTICE

13
DOMINION A4 SERVICE & BLEED GUIDE
Remove the piston and square
seal from the opposing caliper
half in the same way.
Clean all of the parts. Then
rinse each part with mild soap
and water. Be sure to clean the
caliper through all of the holes.
Wipe down each part to
remove the residue. Then use
compressed air to blow dry and
remove all of the remaining dirt,
etc. For both caliper halves, be
sure to blow compressed air
through both the bleeder hole
and the transfer port, and all
around the square seal groove.
Take extra care to get the
square seal grooves free of any
hair, dirt, scratches, etc. that
could cause the caliper to leak.
Caliper rebuild
8
7
9

14
DOMINION A4 SERVICE & BLEED GUIDE
Piston Assembly
Begin re-assembly of the caliper
by lightly lubricating the new
square seals with Hayes DOT 5.1
uid and installing the new seals
in the caliper halves.
Carefully push the square seal
into its seal groove – making sure
that the seal is worked into the
groove all of the way around and
that it is pushed all of the way to
the back of the seal groove.
Put a coating of Hayes DOT
5.1 all around the piston as a
lubricant, and carefully push the
piston into the bore, past the
seal, until it seats at the bottom
of the bore. The piston should
push in easily, if it doesn’t, take
the piston out and again push
the square seal all of the way to
the back of the groove and then
try again.
Caliper rebuild
1
2
3

15
DOMINION A4 SERVICE & BLEED GUIDE
1
2
3
Caliper Assembly
Place the Transfer port O-ring
into the O-ring seat in the outer
caliper half.
Put the two caliper haves
together and install the bridge
bolts. Torque the bridge bolts to
170 in lbs +/- 5 in lbs [19.2 N m
+/-0.5 N m]
Reattach the hose to the
caliper. Torque the Bajo bolt
to 60 in lbs +/- 5 in lbs [6.78
N m +/-0.5 N m]
Caliper rebuild

16
DOMINION A4 SERVICE & BLEED GUIDE
4
Caliper rebuild
Reattach the hose to the caliper
and bleed the system.
(NOTE: See Bleed Instructions
on page 17)

17
DOMINION A4 SERVICE & BLEED GUIDE
Clamp another handlebar into
a repair stand and attach your
MC. Position the bar so that it
is 45 degrees from horizontal
and position the master cylinder
(MC) 45 degrees from the
bottom of the bar. This positions
the bleed port at the highest
point of the reservoir.
Using a 3mm hex key remove
the KingPin from your caliper
and remove the pads. Push the
pistons back fully. Make sure the
caliper is vertical when bleeding.
Fill space in caliper with
dummy pads and bleed block
or something else. If nothing
is available then be careful
during bleed not to advance the
pistons.
Bleed instructions
1
2
3

18
DOMINION A4 SERVICE & BLEED GUIDE
Bleed instructions
Fill a syringe 3/4 full of DOT
5.1 uid, eliminate all air from
syringe, and close hose clip.
Remove the MC bleed screw
using a T10 Torx wrench. Place
the caliper slightly lower than the
MC, and attach to either caliper
bleeder.
Fill second syringe 1/4 full of
DOT 5.1 uid, eliminate all air
from syringe, and close hose clip.
Remove the MC bleed screw using
a T10 Torx wrench and attach to
the MC bleeder.
Open both syringe hose clips
and pull a small vacuum at the
caliper syringe to pull any air
that was introduced.
4
5
6

19
DOMINION A4 SERVICE & BLEED GUIDE
Push all DOT 5.1 uid from caliper
syringe to MC syringe, then
return. Repeat until no bubbles
are found.
Push DOT 5.1 uid from caliper
syringe to MC syringe while
icking the lever several times,
then return.
Pull a vacuum at the MC syringe
to remove any remaining bubbles.
Bleed instructions
7
8
9

20
DOMINION A4 SERVICE & BLEED GUIDE
Bleed instructions
Once there are no air bubbles,
push all the DOT 5.1 uid from
the caliper syringe to the master
cylinder while icking the lever
several times, and then return
the DOT 5.1 uid back.
Pull a slight vacuum at the
master cylinder to remove any
remaining air bubbles and then
add positive pressure by slightly
depressing the plunger of the
syringe.
Add positive pressure from the
caliper syringe and remove it
from the caliper.
10
11
12
/