Bose Wave music system User manual

Category
Radio receivers
Type
User manual
The Bose
®
Wave
®
Radio
Owner’s Guide
January 7, 2002
AM149204_02_V.pdf
2 January 7, 2002 AM149204_02_V.pdf
WARNING
To reduce the risk of fire or electric shock, do not expose the Wave
®
radio to rain or moisture.
CAUTION
To reduce the risk of shock, do not remove the cover. There are no user-serviceable parts
inside. Refer servicing to authorized service personnel.
These CAUTION marks appear on the bottom of your Wave
®
radio.
The lightning flash, with arrowhead symbol within an equilateral triangle, is intended
to alert the user to uninsulated “dangerous voltage” within the system enclosure
that may be of sufficient magnitude to constitute a risk of electric shock.
The exclamation point, within an equilateral triangle as marked on the system, is
intended to alert the user to the presence of important operating and maintenance
instructions in this owner’s guide.
This equipment has been tested and found to comply with the limits for a Class B digital
device pursuant to Part 15 of the FCC Rules. These limits are designed to provide reasonable
protection against harmful interference in a residential installation. This equipment generates,
uses and can radiate radio frequency energy and, if not installed and used in accordance with
the instructions, may cause harmful interference to radio communications. However, this is no
guarantee that interference will not occur in a particular installation. If this equipment does
cause harmful interference to radio or television reception, which can be determined by turning
the equipment off and on, you are encouraged to try to correct the interference by one or more
of the following measures:
Reorient or relocate the receiving antenna and the power cord.
Increase the separation between the equipment and the receiver.
Connect the equipment to an outlet on a different circuit than the one to which the receiver
is connected.
Consult the dealer or an experienced radio/TV technician for help.
Please read this owners guide
The Bose
®
Wave
®
radio is carefully engineered to provide sound quality far beyond other
radios. This guide will help you set up and operate your radio properly.
Caution: To prevent electric shock,
match wide blade of plug to wide slot,
fully insert.
Attention: Pour éviter les chocs
électriques, introduire la lame la plus
large de la fiche dans la borne
correspondante de la prise et pousser
jusqu’au fond.
Note:
This digital apparatus does not
exceed the Class B limits for radio
noise emissions from digital
apparatus set out in the Radio
Interference Regulations of the
Canadian Department of Commu-
nications.
Le présent appareil numérique
n’émet pas de bruits
radioélectriques dépassant les
limites applicables aux appareils
numériques de la classe B
prescrites dans le Réglement sur
le brouillage radioélectrique édicté
par le Ministére des communica-
tions du Canada.
Note:
Unauthorized modification
of the receiver could void
the user’s authority to operate
this equipment.
RISK OF ELECTRICAL SHOCK—DO NOT OPEN
TO PREVENT ELECTRICAL SHOCK, DO NOT REMOVE COVER.
NO USER-SERVICEABLE PARTS INSIDE. REFER
SERVICING TO QUALIFIED PERSONNEL.
TO PREVENT FIRE OR SHOCK HAZARD, DO NOT EXPOSE
THIS UNIT TO RAIN OR MOISTURE.
CAUTION
AVIS
RISQUE DE CHOC ÉLECTRIQUE—NE PAS OUVRIR
AFIN DE PRÉVENIR UN CHOC ÉLECTRIQUE NE PAS
ENLEVER LE COUVERCLE ARRIÈRE. IL NE SE TROUVE À
L’INTÉRIEUR AUCUNE PIÈCE POUVANT ÊTRE RÉPARÉE PAR
LÚSAGER. S’ADRESSER À UN RÉPARATEUR COMPÉTENT.
AM149204_02_V.pdf January 7, 2002 3
Safety Instructions
Note to CATV system
installer:
This reminder calls the CATV
system installer’s attention to
Article 820-40 of the NEC (of
USA) that provides guidelines for
proper grounding. It specifies that
the cable ground shall be
connected to the grounding
system of the building, as close to
the point of cable entry as is
practical.
If you must move the unit and cart
combination, do so very carefully.
Quick stops, excessive force, and
uneven surfaces may cause it to
overturn.
For your safety
1. Read, Follow And Save All Instructions – Read and follow the complete safety and operating
instructions in this owner’s guide before using the unit. Save this guide for future reference.
2. Pay Attention To Warnings – Observe all warnings on the unit and in the guide.
3. Do Not Let Objects Or Liquid Enter The Unit – Take care to prevent objects or liquids from
entering this unit. Do not use near a bathtub, washbowl, kitchen sink, laundry tub, in a wet base-
ment, near a swimming pool, or anywhere else that water is present. Clean only as directed on page
13.
4. Maintain Proper Ventilation – Place the unit so nothing interferes with its proper ventilation. Do not
place on a bed, sofa, or similar surface that may block the ventilation openings. Do not put it in a
bookcase or cabinet that may keep air from flowing through its ventilation openings.
5. Avoid Excessive Heat – Do not place the unit near heat sources such as radiators, stoves, or other
appliances (including amplifiers) that produce heat.
6. Use Proper Power Sources – Plug the unit into a proper power supply, as described in the
operating instructions or as marked on the unit. This unit has a polarized alternating current line plug
(one blade is wider than the other). As a safety feature, the plug fits into the power outlet only one
way. If you have trouble inserting it, reverse the plug. If it still does not fit, your outlet may be
obsolete and needs to be replaced. Contact an electrician. Do not change the plug to defeat this
safety feature.
7. Protect The Power Cord – Route all power cords so that they are not likely to be walked on or
pinched. Pay particular attention to cords at plugs, at the point where the cord connects to the unit,
and at outlets on the unit.
8. Take Precautions When Unit Is Not In Use – If the unit will not be used for an extended period,
unplug from the outlet and remove the batteries.
9. Be Careful With Carts And Stands – Do not place this unit on an unstable cart, stand, tripod,
bracket, or table. The unit may fall, causing serious injury to a person or damage to the unit. For
advice on use of a particular cart, stand, tripod, bracket, or table, contact Bose
®
Corporation.
10. Avoid Power Lines – Do not install external antennas near overhead power lines or other electric light
or power circuits, nor where an antenna can fall into such circuits or power lines.
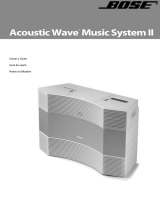
11. Ground All Outdoor Antennas – If an external antenna or cable system is connected to this unit, be
sure the antenna or cable system is grounded. This will provide some protection against voltage
surges and built-up static charges.
Section 810 of the National
Electrical Code ANSI/NFPA No. 70
provides information with respect to
proper grounding of the mast and
supporting structure, grounding of
the lead-in wire to an antenna
discharge unit, size of the ground-
ing conductors, location of
antenna-discharge unit, connection
to grounding electrodes, and
requirements for the ground
electrode. Refer to the antenna
grounding illustration.
12. Obtain Authorized Service When It Is Indicated – Do not attempt to service this unit yourself. All
servicing should be provided by authorized service personnel when:
A. The power supply cord or the plug has been damaged, or
B. Objects have fallen or liquid has spilled into the unit, or
C. The unit has been exposed to rain, or
D. The unit does not appear to operate normally or exhibits a marked change in performance, or
E. The unit has been dropped or the cabinet damaged.
Antenna
Lead In Wire
Antenna
Discharge Unit
(NEC Section 810-20)
Grounding
Conductors
(NEC Section 810-21)
Ground Clamps
Power Service Grounding
Electrode System
(
NEC ART 250 Part H
)
Ground
Clamp
Electric
Service
Equipment
4 January 7, 2002 AM149204_02_V.pdf
Where to find...
Safety Instructions ........................................................................................................ 3
For your safety ....................................................................................................... 3
Setting Up ..................................................................................................................... 5
Unpack the carton.................................................................................................. 5
Install the batteries ................................................................................................. 5
Connect the power cord and antennas ................................................................. 6
The remote control ................................................................................................. 7
The Display ................................................................................................................... 8
How to read the clock display ............................................................................... 8
How to read the radio display ................................................................................ 8
How to customize the display ................................................................................ 8
Functions ...................................................................................................................... 9
Radio functions ...................................................................................................... 9
Clock functions .................................................................................................... 10
Other Components ..................................................................................................... 12
Using other components...................................................................................... 12
Selecting the component ..................................................................................... 12
Maintenance ............................................................................................................... 13
Maintaining the Wave
®
radio ................................................................................ 13
Customer service ................................................................................................. 13
Warranty ..................................................................................................................... 14
Limited warranty................................................................................................... 14
Product Information .................................................................................................... 15
Features................................................................................................................ 15
Size ....................................................................................................................... 15
Contents
AM149204_02_V.pdf January 7, 2002 5
VARIABLE OUT
LR
AUX IN
120V~AC
50-60HZ 50W
172087
++
Setting Up
Unpack the carton
(see Figure 1)
Carefully unpack the carton. Do not attempt to use the Wave
®
radio if any part appears dam-
aged. Instead, repack the carton and notify Bose
®
or your authorized Bose dealer immediately.
Place the Wave
®
radio on a table or other flat surface. Locate the FM and AM antennas, the
power cord, and the AA batteries.
Install the batteries
The Wave
®
radio’s three AA batteries maintain its memory and backup alarm system for up to
a week during a power failure, or while the radio is unplugged. The batteries will not power the
radio or light the display. Operating without batteries leaves the memory unprotected, but will
not harm the radio. Use only 1.5V AA alkaline batteries (IEC-R6 in Europe), available at many
retail stores.
1. Carefully turn your Wave
®
radio
upside down (avoid scratching
its top).
2. Locate the battery compart-
ment on the bottom (see
Figure 2).
3. Press the arrow on the cover to
slide the compartment open.
4. Place the batteries inside,
matching the + and – symbols
with the symbols inside the
compartment.
5. Slide the cover back into place
and turn the radio right side up.
Figure 1
What comes with your Wave
®
radio.
Remote control
Wave
®
radio
One (1) Wave
®
radio
One (1) power cord
Three (3) AA batteries
One (1) FM antenna
One (1) AM antenna
One (1) AM antenna clip
One (1) peel-and-stick tape
One (1) remote control
One (1) lithium battery
AA batteries
Lithium
battery
Figure 2
Match the + and – symbols on the
batteries to the marks inside the
compartment.
®
A
C
O
U
ST
IC
W
A
VE
R
EC
E
IV
E
R
RE
M
O
TE
C
O
N
TR
O
L A
W
R
C
-1
P
R
E
S
E
T
S
T
A
TIO
N
S
STA.
1
2
3
6
4
5
MUTE
TIM
E
A
L
A
R
M
S
L
E
E
P
AU
X
A
M
FM
TUNING
V
O
L
U
M
E
O
N
/O
F
F
FM antenna
Power cord
Peel-and-
stick tape
AM antenna clip AM loop antenna
6 January 7, 2002 AM149204_02_V.pdf
Setting Up
Connect the power cord and antennas
Find the jacks on the back of your radio (see Figure 3). Unwind all cords.
Connect the power cord
1. Plug the small end of the power cord into the power jack.
2. Plug the other end of the power cord into an electric outlet.
The display panel should light up.
Connect the antennas
1. Plug the FM antenna into the “FM 75 External” connector.
2. Plug the AM antenna into the “AM LOOP” jack.
3. Straighten both antennas. Move the AM loop and ends of the FM antenna as far as
possible away from the radio.
4. Use the clip and peel-and-stick tape to attach the AM loop antenna to a smooth, clean
surface, if you wish.
Note:
The time display will begin to flash
after power is connected. Press the
CLOCK SET key once to stop the
flashing.
Figure 3
Plug the antennas and power cord
into their jacks.
Note:
A second FM antenna is built into the
power cord. For best reception,
adjust the antenna by moving the
power cord.
120V~AC
50-60HZ 50W
RL
AUX IN
AM
LOOP
172087
VARIABLE OUT
Peel-and-
stick tape
clip
AM149204_02_V.pdf January 7, 2002 7
The remote control
Install the battery
The battery compartment on the remote control of your Wave
®
radio has a security lock. It must
be unlocked before you open the compartment to insert or remove the battery.
1. Place the remote control face down on a flat surface.
2. Insert the tip of a ball point pen in the left side of the security lock. Push to the right and
hold (Figure 4).
3. Slide the battery compartment open. Insert the battery into the battery carrier, matchng the
+ symbols.
4. Slide the battery compartment closed. It will automatically lock in place.
Setting Up
Note:
Use only a lithium Toshiba CR2025
or Maxell CR2025 battery. It may
be available from a retail dealer or
electronics store.
If you have difficulty finding a
replacement battery, contact
Bose
®
Corporation directly (see
“Customer service” on page 13).
1
2
Figure 5
Insert the battery, matching the
+ symbols.
WARNING:
The remote control battery may
cause a fire or chemical burn if
mishandled. Keep it away from
children. Do not recharge,
disassemble, heat above 100˚C
(212˚F), or incinerate. Dispose of
used battery promptly. Replace
with a battery of the type and
model mentioned in the note
above. Using another battery may
cause a fire or explosion.
Figure 4
Push the security lock to the right
with the tip of a ball point pen.
How to operate
Aim the remote control at your Wave
®
radio. The remote normally works up to 20 feet in front
of the radio, and 6 feet to either side. Use the remote keys in the same way you use the radio
control panel. Replace the remote control battery when it stops operating, or its range seems
reduced (normally every year or two).
8 January 7, 2002 AM149204_02_V.pdf
How to read the clock display
How to read the radio display
Indicates sound
selected for alarm 2.
Indicates sound
selected for alarm 1.
[Numeric display] – Shows current time, wakeup time, time remaining before
automatic shutoff, station frequency, or volume setting.
SLEEP
PM
ALARM
ALARM 2
ON/OFF
Function Keys Action
AM/PM (12 hour) Press to turn the unit off.
or
military (24 hour)
time
Hold down CLOCK SET and press
ON/OFF to “toggle” between AM/PM or
military formats.
Display The display has two brightness settings,
brightness one for normally lit rooms and one for
dimly lit rooms. The normal setting cannot
be adjusted. The dim setting automatically
adjust s as the room darkens. Or you can
adjust it by holding down CLOCK SET
while pressing either VOLUME control.
CLOCK
SET
ON/OFF
and
CLOCK
SET
VOLUME
How to customize the display
Figure 6A
The clock display.
AUX FM
STEREO
VOL AM
SEEK
PRESET
1 2 3 4 5 6
Lights when you
preset a station.
Lights when you select
a preset station.
Lights while
receiving FM
stereo broadcast.
Lights while
radio
automatically
searches for a
strong signal.
Lights to show
selection.
Figure 6B
The radio display.
[Numeric display] –
Shows station
frequency, current
time, wakeup time,
time remaining before
automatic shutoff, or
volume setting.
The Display
AM149204_02_V.pdf January 7, 2002 9
Radio functions
®
WAVE
RAD
IO REMO
TE C
ONTO
L
PR
ES
ET
S
TAT
ION
S
S
TA
.
1
2
3
6
4
5
M
UT
E
TI
M
E ALA
R
M
S
LE
EP
A
UX
A
M
FM
TU
NIN
G
V
OL
UM
E
O
N/OF
F
ON/OFF
AM
FM
AM/FM
AUX
SLEEP
SLEEP/SNOOZE
or
ON/OFF
AUX
ON/OFF
ON/OFF
PRESET STATIONS
AM
FM
AM/FM
PRESET STATIONS
1 2 3
645
Functions
AM/FM
AM
FM
VOLUME
VOLUME
MUTE
TUNING
STA.
TUNING
TUNING
TUNING
TUNING
TUNING
PRESET STATIONS
TUNING
PRESET STATIONS
1 2 3
645
3 ways to Press once to turn on (automatically selects
turn on/off last source played) or to turn off.
Press once to turn on (selects the radio function).
Press once to to turn on (selects an auxiliary
source).
To shut off Press once and the display will show the time
automatically left until automatic shutoff (up to 75 minutes).
Press and hold to reduce the time until shutoff.
Press once to turn off before automatic shutoff.
To select Press to select the radio.
AM or FM
radio Press again to select AM or FM.
To adjust Press and hold while the radio is on or off to
volume reset the volume. The display shows the
volume level from 0 (soft) to 99 (loud).
Press once to silence the radio.
Press again to restore volume.
To display Press both simultaneously to display the
the station current station. The time display will return in
several seconds.
Press and hold.
To tune in Press and hold until desired station is reached.
a station Adjust antennas for best reception.
Note: The power cord contains a second FM
antenna. For best reception, adjust the antenna
by moving the power cord.
To seek a Press and hold briefly, then release to seek
station the next strong signal.
To preset Tune to the desired station.
up to 6 Hold down any preset button until you hear a
stations beep. The station is now preset on that button.
To tune in Choose AM or FM.
a preset
Press the preset button for the station you want.
10 January 7, 2002 AM149204_02_V.pdf
Clock functions
To set While holding down the CLOCK SET key, press
clock the TUNING < or > key. The time display changes
slowly at first, then more quickly, until you stop it
by releasing one of the keys.
To set Press ALARM SET and either tuning key at the
Alarm 1 same time to change wakeup time. The time
display changes slowly at first, then more quickly.
Release when set.
Note: You do not need to turn on the unit
to set the alarm.
Press TIME. The Alarm indicator will flash.
Press either tuning key. The time display changes
slowly at first, then more quickly.
Release when set.
Press TIME to return display to current time.
To set While holding down the ALARM SET key, press
Alarm 2 and release the ALARM MODE key. The Alarm 2
indicator will flash. You now have 10 seconds to
begin setting the alarm time with the tuning keys.
Note: The alarm indicator will continue to flash for
ten seconds after the alarm is set.
Press TIME, then press
. The Alarm 2
indicator will begin to flash. You have 10 seconds
to begin setting Alarm 2 as you did Alarm 1.
Press TIME to return display to current time.
Note: The alarm indicator will continue to flash for
ten seconds after the alarm is set.
To use Press once while the alarm sounds. The alarm will
Auto Reset silence and automatically reset to sound at the
same time tomorrow
To check Press to check Alarm 1 wake up time.
Alarm 1
To check Press both at once to check Alarm 2.
Alarm 2
Press TIME, then press to check Alarm 2.
CLOCK
SET
TUNING
TUNING
ALARM
SET
®
WAVE RADIO R
EMOTE CONT
OL
P
R
E
S
E
T
S
T
A
T
IO
N
S
S
T
A
.
1
2
3
6
4
5
M
U
T
E
T
IM
E
A
L
A
RM
S
L
E
E
P
A
U
X
A
M
F
M
T
U
N
IN
G
V
O
L
U
M
E
O
N
/O
F
F
or
ALARMTIME
TUNING
ALARM
SET
ALARM MODE
TUNING
Functions
TIME ALARM
ON/OFF
ON/OFF
ALARM MODE
ALARM
SET
ALARM
SET
ALARMTIME
TIME ALARM
AM149204_02_V.pdf January 7, 2002 11
®
WAVE RADI
O
R
EMOTE CONT
OL
P
R
E
S
E
T
S
T
A
TI
O
N
S
S
T
A
.
1
2
3
6
4
5
M
U
T
E
T
I
M
E
A
L
A
R
M
S
L
E
E
P
A
U
X
A
M
FM
T
U
N
IN
G
V
O
L
U
M
E
O
N
/O
F
F
or
Clock functions
(continued)
ALARMTIME
ALARM MODE
VOLUME
VOLUME
Functions
To choose Note: The clock must be displaying the current
the alarm time, not alarm time.
sound
ON/OFF
ON/OFF
Press to change from off (blank display) to tone
(
). When the alarm goes off, the tone
volume will gradually increase to a moderate
level or your preset level.
Press again to change from tone to radio (
).
When the alarm goes off the radio volume will
gradually increase to your setting.
Press again to change from radio to tone and
radio (
). When the alarm goes off the
tone will sound, followed by radio.
To set the For tone ( ) choose the alarm sound as above.
volume of Set the alarm to go off. When alarm sounds,
the alarm press to adjust the volume.
For the radio ( ), set the volume as shown on
page 9.
Press to silence the alarm. Automatically resets
the alarm to repeat tomorrow.
To snooze When the alarm is in tone and radio ( )
mode, press to stop the tone and hear the
radio. The tone will sound again in ten minutes.
Press again to silence the radio.
When the alarm is in tone (
) or radio ( ) mode,
press once to pause the alarm for ten minutes.
To stop Press once. The indicators remain lit, and the
the alarm alarm will repeat tomorrow.
Note: If you do not turn off the alarm, it will
continue to sound for one hour. Then it will stop
and automatically reset to sound at the same time
tomorrow.
Press once to turn off the alarm function. The
indicators will turn off and the alarm must be
reset before it will go off again.
To wake Press the ALARM SET or TIME key and a PRESET
to your key at once. The preset indicator and the station
favorite frequency will flash on the display.
station
Release the ALARM SET or TIME key. Alarm 1 will
always play this station until you reset the alarm.
Alarm Backup batteries allow the alarm to function
operation during a power failure. To conserve power, only
during a the tone will sound, even if you selected radio.
power
failure
ON/OFF
ON/OFF
SLEEP/SNOOZE
SLEEP
ON/OFF
ON/OFF
ALARMTIME
ALARM MODE
ALARM
SET
PRESET STATIONS
PRESET STATIONS
1 2 3
645
ALARMTIME
Press to silence the tone. The tone will sound at
the same time each day the power is out until the
batteries run out, approximately one week. Normal
operation will resume when power is restored.
12 January 7, 2002 AM149204_02_V.pdf
Using other components
Use your Wave
®
radio to improve the sound of a CD player, cassette deck, or TV. Or add
powered Bose
®
speakers. You can also use your Wave
®
radio as extension speakers for the Bose
Lifestyle
®
music system. Most audio cables are available at electronics stores. Or call Bose.
Most audio cables are color coded. Match the red plugs to the right (red) jack and the black or
white plugs to the left (white) jack.
Connection at Connection at
Component Cable component Wave
®
radio
CD player, tape
deck, or VCR
Audio output jack
For portable CD
players: the head-
phone jack (set the
headphone volume
control to 7).
If there are two sets of
outputs, use the fixed
outputs.
Although you can record from
your Wave
®
radio to your tape
deck, Bose does not recommend
it because the variable output
volume may not match the input
level required by the tape deck.
One audio
cable
AUX IN jack
Note
Selecting the component
Choose your CD player, tape recorder or other auxiliary source by pressing the AUX key.
Adjust the listening volume with the VOLUME keys. Control all other functions at the source,
referring to its owner’s manual if necessary. Control your auxiliary speakers from the Wave
®
radio. (If the speaker system has a volume control, you may use it.)
or
Other Components
Bose
®
Lifestyle
®
music system
25 to 100 foot stereo
cable with male-to-
male RCA plugs.
TAPE (REC) or FIXED
OUTPUT jack.
AUX IN jack
®
Powered Bose
speakers
Use the audio-input
cables that came with
your speakers.
VARIABLE OUT jack
Speaker system as
described in the
speaker owner’s
manual.
Some audio-input cables have three
connectors at each end. Use only the
two connectors that look alike. DO
NOT INSERT THE THIRD CONNEC-
TOR into the speaker’s SYSTEM
CONTROL jack.
Connecting components or speakers
to the VARIABLE OUT jack will cut
out the radio's speakers.
Television
TVs with stereo output
jacks need a standard
RCA cord.
TVs with single (mono)
audio output jacks use
a standard Y adapter.
TVs with earplug outlets
may need a special
earplug adapter.
To make sure the sound seems to
come from the screen, place the
Wave
®
radio close to the TV. Do
not place it directly on top of the
TV (the magnets in the speakers
may interfere with the TV picture).
Audio output jack
If there are two sets of
outputs, use the fixed
outputs.
AUX IN jack
AM149204_02_V.pdf January 7, 2002 13
Maintenance
Maintaining the Wave
®
radio
The only necessary maintenance is periodic battery replacement and cleaning.
Replace the batteries
To protect your Wave
®
radio’s memory and backup alarm system, replace the batteries every
year and when you have an extended power loss. Dead batteries may leak and cause damage.
Do not unplug your Wave
®
radio from the power outlet while replacing the batteries. If you do
unplug it, you will need to reset the clock, alarm settings, and station presets. For further
information on replacing batteries, see “Install the batteries” on page 5.
For further information on replacing the remote control battery see “Install the battery” on page 7.
How to clean
Use only a cloth to clean the outside of the Wave
®
radio. Do not use any solvents, chemicals, or
cleaning solutions containing alcohol, ammonia, or abrasives. Do not allow liquids to spill into
any openings on the radio. If necessary, you may use a soft-bristled attachment to gently
vacuum the front of the radio.
Customer service
USA
1-800-637-8781 8:30 a.m. to 9 p.m. ET
Canada
1-800-444-BOSE (1-800-444-2673) 9 a.m. to 5 p.m. ET
Limited warranty
What is covered:
All parts defective in material or workmanship.
14 January 7, 2002 AM149204_02_V.pdf
Warranty
For how long:
One year from the purchase date.
What we will do:
We will, at our sole option, repair or replace any defective parts free of charge. We will also pay
shipping or transportation charges from you to us, and from us to you.
What you must do:
We recommend that you return unit with original proof of purchase directly to the BOSE
®
factory. But you can also return unit personally with original proof of purchase to an authorized
BOSE dealer or service agency. To return it directly to the BOSE factory:
A. Call the BOSE Service Department at 1-800-637-8781 (in Canada, call
1-800-444-2673), and ask to be assigned a return authorization number and
shipping instructions;
B. Properly pack the unit in the original carton for shipping. If you need a new carton,
contact BOSE Corporation for a new carton available at a nominal charge;
C. Label and ship, freight prepaid, to the address provided by the Service Department,
and
D. Place any necessary return authorization number prominently on the outside of the
carton. (Cartons not bearing a return authorization number, where required, will be
refused.)
Other conditions:
This warranty is fully transferable provided the current owner furnishes the original proof of
purchase from an authorized BOSE dealer. THE PROVISIONS OF THIS WARRANTY ARE IN
LIEU OF ANY OTHER WARRANTY, WHETHER EXPRESS OR IMPLIED, WRITTEN OR ORAL,
INCLUDING ANY WARRANTY OF MERCHANTABILITY OR FITNESS FOR A PARTICULAR
PURPOSE. BOSE’S MAXIMUM LIABILITY SHALL NOT EXCEED THE ACTUAL PURCHASE
PRICE PAID BY YOU FOR THE PRODUCT. IN NO EVENT SHALL BOSE BE LIABLE FOR
SPECIAL, INCIDENTAL, CONSEQUENTIAL, OR INDIRECT DAMAGES.
This warranty does not cover a defect that has resulted from improper or unreasonable use or
maintenance, accident, improper packing, or unauthorized tampering, alteration, or modifica-
tion as determined solely by us. This warranty is void if the label bearing the serial number has
been removed or defaced.
Other Law Rights:
This warranty gives you specific legal rights, and you may also have other rights which vary
from state to state or country to country. Some places do not allow limitations on implied
warranties or the exclusion or limitation of incidental or consequential damages, so the above
limitations or exclusions may not apply to you.
Features
Acoustic Wave
®
speaker technology provides deep, full bass from a small enclosure
AM149204_02_V.pdf January 7, 2002 15
Product Information
High performance stereo tuner allows 6 AM and 6 FM station presets
Automatic protection circuitry prevents speaker damage from excessive volume
Dual independent alarms let you set two wakeup times
Credit card size remote offers convenient program control
Size
Dimensions
4.5"H x 14"W x 8"D (11.4 x 35.6 x 20.3 cm)
Weight
• 7 lb (3.2 kg)
Power rating
• USA/Canada: 120V~ 50/60 Hz 50W
• International: 220-240V~ 50/60 Hz 50W
• Japan: 100V~ 50/60 Hz 25W
Warranty
© 1993 Bose Corporation, The Mountain, Framingham, MA 01701-9168 USA JN94741 PN149204-Rev. 2
  • Page 1 1
  • Page 2 2
  • Page 3 3
  • Page 4 4
  • Page 5 5
  • Page 6 6
  • Page 7 7
  • Page 8 8
  • Page 9 9
  • Page 10 10
  • Page 11 11
  • Page 12 12
  • Page 13 13
  • Page 14 14
  • Page 15 15
  • Page 16 16

Bose Wave music system User manual

Category
Radio receivers
Type
User manual

Ask a question and I''ll find the answer in the document

Finding information in a document is now easier with AI