SJCAM SJ7 STAR Owner's manual
- Category
- Action sports cameras
- Type
- Owner's manual

ENGLISH
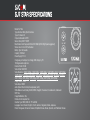
7 STAR
GYRO
ANTI-SHAKE
1 6 M P
4K
30 F PS
TOUCH
SCREEN
User’s Manual
All graphics, words, and layout by Troy Ferrer 2016 [email protected]
FW Ver1.21

We believe everyone has a dream. Our mission is to make you express yourself,
your vision and dreams in order to make them real, and share them with others.
In the last 10 years of experience in Research and Development and Commercialization,
we have gained world recognition from customers and retailers,
with the ambition to give people the possibility to create, explore and empower their dreams.
Having our own factory, controlling the whole production process, and a facility
with more than 500 employees, makes us more versatile and able to reach the market fast,
ensuring that the highest quality standards are met. It is all about dreams.
Dare to join the SJCAM Revolution.
-SJCAM CEO
INTRODUCTION
All graphics, words, and layout by Troy Ferrer 2016 [email protected]

Congratulations on your new SJCAM Action Camera!
We know you’re excited to use your SJ7 STAR, please take me to read this manual before
doing anything with it. This is the very first true-4K resoluon SJCAM, and there’s plenty you
can do, so you need to familiarize yourself with the features now to get the most out of it.
It is important to keep your camera’s firmware up to date. You may connect your camera via
WiFi to the SJCAM ZONE app to automacally download and install the latest firmware, or visit
www.sjcam.com/firmware.
1. This is a high-precision product. Do not drop.
2. Do not expose the unit to strong magnec fields, such as magnets, electrical motors,
and machinery that use strong radio waves.
3. Never leave the unit in high temperature areas. Electronics and opcs can be damaged
under prolonged exposure to heat.
4. Do not submerge the camera without pung it in the included waterproof case.
5. Avoid extended periods of baery charging. Keep it away from children and pets while
charging to avoid accidents.
CAUTION!
All graphics, words, and layout by Troy Ferrer 2016 [email protected]

Model: SJ7 Star
Type: Aluminum Body Sports Camera
Type of Camera: 4K
Chipset: Ambarella A12S75
Sensor: Sony IMX117 12MP
Max External Card Supported: Micro SD 128GB (UHS-3 High Speed suggested)
Screen size: 2 inch LCD Touchscreen
Battery Type: Removable
Capacity: 1000mAh
Power Supply: 5V 1A
Charge way: AC adapter, Car charger, USB charge by PC
166 degree wide angle lens
Decode Format: H.264
Video format: MOV,MP4
Video Resolution: 1080P (120fps), 1080P (30fps), 1080P (60fps), 1440P (2560 x 1440), 1440P (30fps),
1440P (60fps), 2.5K (30fps), 2.5K (60fps), 2.7K (30fps), 2160P (2880 x 2160), 4K (25fps), 4K (30fps),
720P (120fps), 720P (30fps), 720P (60fps), 960P (120fps), 960P (30fps), 960P (60fps)
Image Format : JPEG
Video Output: HDMI
Audio System: Built-in microphone/speaker (AAC)
White Balance: Auto,Cloudy, D4000, D5000, Daylight, Fluorescent, Incandescent, Underwater
WIFI: Yes
Image Stabilization: Yes
Remote Control capable: Yes
Interface Type: HDMI, USB 2.0, TF Card Slot
Language: Czech, Danish, English, French, German, Hungarian, Italian, Japanese,
Polski, Portuguese, Romanian, Russian, Simplified Chinese, Slovak, Spanish, and Traditional Chinese
SJ7 STAR SPECIFICATIONS
7 STAR7 STAR
All graphics, words, and layout by Troy Ferrer 2016 [email protected]

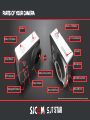
PARTS OF YOUR CAMERA
Power Indicator
Settings/WiFi Button
Power Button
Lens
Shutter / OK Button
7 STAR
Speaker
2.0” Touchscreen
MicroSD Card Slot
Shutter / OK Button
Speaker
Microphone
Mini-USB Port
Micro HDMI Port
All graphics, words, and layout by Troy Ferrer 2016 [email protected]
Battery Door (bottom)
WiFi Indicator
NOTE: Some design elements like mic-hole placement and housing labels may vary slightly.

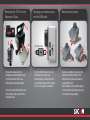
Once your Remote is paired,
you will never need to pair it
again.
Once the SJ7 STAR is powered
on, SJ Remote can begin sending
commands to your camera.
The Remote is tested to work at
a maximum distance of 10 meters
(30 feet) away from your
SJ7 STAR, unobstruced Line-Of-
Sight.
The baery on your Remote
will last you a long me as
it only uses power when
you press any of the buons.
The remote is powered with a
Lithium CR2032 buon-cell
baery.
SJ SMART REMOTE (Optional)
Remote pair?
To pair your remote to your SJ7 STAR: Swipe down from the top > Select Remote Control
Tap the “O” to start pairing. A picture instrucon will appear. Press the Video and the Photo
buons on the Remote simultaneously. “Pairing Compleon ID” will show.
WIFI On/Off Switch
Record Video Start/Stop
Camera-Off Button
Shutter Button
Burst Shot Button
Please press 2 keysPlease press 2 keys
All graphics, words, and layout by Troy Ferrer 2016 [email protected]
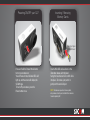
Shown here is Version2.
Can be momentarily submerged in water
up to 3 Meters (approx: 10feet).
Ver.1 has white icon labels, not waterproof,
and producon has been disconnued.

Remove the camera from the
waterproof case by liing the clasp
from the front side of the case,
following the steps shown above.
Once free, swing the backdoor open,
then pull the camera out from the
waterproof case.
Remove your baery by pressing the
buon and sliding the lock at the
boom of the camera to release the
compartment door.
Pull the baery out by the flap, plug it
to an External Dual Charger Accessory
(not shown, sold separately).
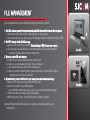
Removing the SJ7 from the
Waterproof Case.
Charging your camera using
the MiniUSB cable.
Removing the battery.
111
222
333
444
555
All graphics, words, and layout by Troy Ferrer 2016 [email protected]
222
333
111
Plug the MiniUSB cable to the slot
on the side of the camera as
indicated above, and the other end
to a USB wall charger with an output
of 5V 1A, or plug it to a computer.
USB
HDMI
MiniUSB Cable

Powering ON/OFF your SJ7 Inserting / Removing
Memory Cards
Class 10 or higher
MicroSD card.
All graphics, words, and layout by Troy Ferrer 2016 [email protected]
Press and hold the Power/Mode buon
to turn your camera on.
You will hear a chime, indicator LEDs will
light up, and the screen will display the
SJCAM logo.
To turn off your camera, press the
Power buon once.
Insert a MicroSD card as shown in the
illustraon above, with the label
facing the touchscreen LCD, unl it clicks
into place. To remove, just push it in
gently and the card will eject.
To make sure you do not lose any data, NOTE:
only remove or insert your card while the camera is
turned completely off.

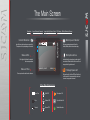
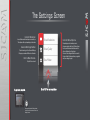
06/02/2017 | 11:36:17 00:00:00
The Main Screen
Battery Level Indicator
Microphone Active
Storage Space Left
Current Mode Icon
Status LEDs
FOV Seng - (W)ide; (M)edium; (N)arrowResoluon Aspect Rao and Framerate Image Quality (Photo or Video)
Date and Time
Icon will show what mode you are currently in.
The opons will vary depending on the mode.
Blue lights will indicate the status of
the camera operaon.
Shows system date and me for reference.
Displays me le on MicroSD (TransFlash) card
or file space le. Icon appears white when card
is present, orange when removed.
Indicates that the microphone is acve and will
record audio. When disabled, this icon will be in
orange with a big slash across it.
Displays approximate power le on the
baery. Baery blinks when almost empty.
16:9
30p
SF
3840
2160
SF
F
M
N
N
Super Fine
Fine
Normal
Wide FOV
Medium FOV
Narrow FOV
Microphone Off
Gyro Anshake On
Moon Detecon
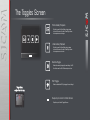
Other Main Screen Icons

Toggles Screen
Modes Screen
These are all the screens nested in the
Main Screen. You can tap or swipe to
access them.
Swiping from the center of the Main Screen
will change the mode from Photo to Video,
and vice versa.
06/02/2017 | 11:36:17 00:00:00
16:9
30p
SF
3840
2160
Slow Motion
Video Resolution
Video Quality
FOV
Settings Screen
You may also press the Sengs buon
on the front of the camera to access the
Sengs Screen.
The Nested Screens
All graphics, words, and layout by Troy Ferrer 2016 [email protected]
Main Screen
[ViewFinder]
VideoLapse
Capture
Self Timer
Photo Burst
PhotoLapse
Record
Scroll down to see the rest of the opons.

The Toggles Screen
Photo Gallery Playback
Video Gallery Playback
Remote Toggle
WiFi Toggle
Swipe Up to return to Main Screen
To get here,
swipe from the top.
Tap this to open the Photo Gallery, tap an image
to view in full screen. Use the Left and Right arrows
to view previous or next image.
Tap this to open the Video Gallery, tap an image
to view in full screen. Use the Left and Right arrows
to view previous or next video.
Enable the remote by tapping this and setting it to ON.
You will also see the Pair SJRemote option in here.
Enable or disable the WiFi by tapping this and setting it.
Swipe this up to hide the Toggles Screen
All graphics, words, and layout by Troy Ferrer 2016 [email protected]

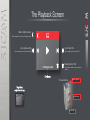
170406000-20104600
The Playback Screen
Back to Main Screen
Go to Next FileGo to previous file
Delete Current File
Visual indicator that you are in Playback mode.
Tap or swipe to get to the previous file. Tap or swipe to get to the next file.
Tap to delete the file currently shown on
screen.
File Name
To get here,
swipe from the top.
All graphics, words, and layout by Troy Ferrer 2016 [email protected]
Start/Stop Playback
Exit File/Gallery
Go to next file
Or use buttons

VideoLapse
Capture
Self Timer
Photo Burst
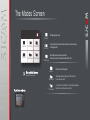
The Modes Screen
VideoLapse
Capture
Self Timer
Photo Burst
To get here, swipe up.
Record
Mode for recording videos
Timelapse photography stitched on-cam
to produce a video.
A series of still photos for creating timelapse.
Each photo will have its own file..
Exit to Main Screen
Tap this X icon to exit.
Sll photograph mode.
A preset delay to me the shuer release to start recording
or taking photos.
Fast mulple succession of snapshots,
choose the number of photos desired (Max: 10).
PhotoLapse
Record
PhotoLapse
All graphics, words, and layout by Troy Ferrer 2016 [email protected]

Video Resolutions
Video Quality
Slow Motion
Gyro Sensor
The Settings Screen
Current Mode Icon
General Settings Button
Exit to Main Screen
Current Menu Options
Scroll UP for more options
Icon will show what mode you are currently in.
The opons will vary depending on the mode.
Tap the icon to go to the General Sengs.
Changes you make will reflect on all modes.
Tap this X icon to exit.
Depending on what mode you are in,
the menu opons will vary. All the opons
for the parcular mode will show on this
side, scroll down for other items.
Once set, the sengs will be the same for
that parcular Mode everyme you go back
unl you change it again.
To get here, tap this.
You may also press the Sengs buon
on the front of the camera to access the
Sengs Screen.
All graphics, words, and layout by Troy Ferrer 2016 [email protected]

7 STAR7 STAR
PHOTO MODE - Page 1
All graphics, words, and layout by Troy Ferrer 2016 [email protected]
Photo Size
Photo Quality
RAW Photo
Long Exposure
Photo Stamp
Self Timer
Photo Burst
Timelapse Photo
Sharpness
AWB
EV Value
ISO
Metering
PHOTO SIZE › Changes the size of still photos that will be recorded. Of course, the bigger
the size the more detailed your pictures are, at the expense of filesize.
PHOTO QUALITY › Refers to how much compression the output image will have.
The higher the setting the bigger the file is, and will contain more detail.
RAW PHOTO › Activates or deactivates recording of RAW image files, which is used to make
adjustments to photos. RAW files need to be processed first using specialized software
before a standard viewable image file is created (JPEG, PNG, BMP etc.).
LONG EXPOSURE › Sets how long the sensor collects light through the lens.
PHOTO STAMP › When enabled, will display the time and date on your photos.
SELF TIMER: Sets a delay timer to trigger the shutter at the set number of seconds.
PHOTO-BURST › Fast multiple succession of snapshots, choose the number of photos desired
(Max: 10 consecutive shots).
TIMELAPSE PHOTO › Sets the interval between a long sequence of shots.
SHARPNESS › Changing the sharpness setting will make your images either crisper or
smoother, adjust according to your preference.
AWB (AUTO WHITE BALANCE) › Adjusts the color temperature of the snapshot/recording
to compensate for ambient lighting. Options are: Auto, Incandescent, D4000, D5000,
Daylight, Cloudy, D9000, D10000, Flash, Water, and Outdoor.
Navigating the menus using
the SJ7 buttons
When in the settings and other menu
screens, you may also move through
the items by using these buttons:
Select / OK
Back / Exit
Short Press: Scroll Down
Long Press: Scroll Up
Available in FW ver1.13 or higher

7 STAR7 STAR
PHOTO MODE - Page 2
Photo Size
Photo Quality
Long Exposure
Photo Stamp
Self Timer
Photo Burst
Timelapse
Sharpness
AWB
EV Value
ISO
Metering
EV › Exposure Value - Changing EV compensates for the amount of light that is allowed in.
You can change this value to a lower setting if the scene is too bright, to compensate.
Or higher, if it is too dark, but still depends on your desired outcome.
A higher EV will take longer for a photo to be taken, and will add blur to photos as they
take longer to expose.
ISO › Sets he image sensor's sensitivity to light. Choose “Auto” on your camera if you are
not familiar with this setting. Depending on the lighting conditions, use the lowest ISO
whenever possible, as higher settings will introduce more noise while pixel sensitivity
also goes up. Adjust depending on your preference.
METERING › Prioritizes the brightness level of specific parts of the scene depending
on the Metering Mode that is used: Center Weighted, Multi, or Spot.
MULTI
METERING MODES
CENTER
SPOT
All graphics, words, and layout by Troy Ferrer 2016 [email protected]

7 STAR7 STAR
VIDEO RECORD - Page 1
VIDEO RESOLUTIONS : A higher resolution will have more detail in your video at the
expense of file size. A lower resolution has a smaller filesize but will have less details in
your video. Conversely, a higher resolution will contain more detail.
Note: FPS (Frames Per Second) is part of the options in video resolution:
The higher the FPS, the more images will be displayed per second, and the smoother the
movement in the video is, at the expense of filesize.
VIDEO QUALITY : Sets how much detail is recorded in the video.
Available in 3 presets: Super Fine, Fine, and Normal.
FOV : Field Of View. The wider the setting, the more parts of the scene are included in
the recording. NOTE: When using the gyro, 1080p in 30 or 60fps will not have FOV options
as they conflict with stabilization.
SLOW MOTION: Sets the framerate to run at the set speed. When recording in higher FPS,
video will appear slow.
AUTO LOW LIGHT : When on, the image sensor will compensate for low light, at the expense
of framecount. Turning the feature off will lock the framecount to the selected framerate (FPS)
regardless of lighting conditions.
GYRO SENSOR : Sets the gyro sensor to stabilize the movement seen in the frame.
DETECTION : Sets the camera to record everytime a movement is detected.
DUAL FILES : Will save 2 versions of the recorded video, one in the selected resolution and
another in low resolution (768x432pixels) for use in editing.
VIDEO STAMP : When enabled, will display the date and time of your recording.
TIMELAPSE VIDEO : Sets the time interval between shots; recorded files will have a
single video output (MP4) instead of multiple image files.
All graphics, words, and layout by Troy Ferrer 2016 [email protected]
Video Resolutions
Video Quality
FOV
Slow Motion
Auto Low Light
Gyro Sensor
Detection
Dual Files
Video Stamp
Timelapse Video
Loop Record
Car DV
Microphone Volume
Sharpness
AWB
EV Value
ISO
Metering

7 STAR7 STAR
LOOP RECORD › Auto-saves your video in small sections, depending on selected
length. It will record over your oldest video once there is no more space on your memory
card.)
CAR DV › Enables powering on the camera and auto-record when the engine is started.
Requires that the camera is plugged in to a car power adaptor.
MICROPHONE VOLUME › Sets the sensitivity of the microphone.
SHARPNESS › Changing the sharpness setting will make your images either crisper or
smoother, adjust according to your preference.
AWB (AUTO WHITE BALANCE) › Adjusts the color temperature of the snapshot/recording
to compensate for ambient lighting. Options are: Auto, Incandescent, D4000, D5000,
Daylight, Cloudy, D9000, D10000, Flash, Fluorescent, Water, and Outdoor.
EV › Exposure Value - Changing EV compensates for the amount of light that is allowed in.
You can change this value to a lower setting if the scene is too bright, to compensate.
Or higher, if it is too dark, but still depends on your desired effect.
A higher EV will take longer for a photo to be taken, and may add blur to videos as each
frame takes longer to expose.
ISO › Sets the image sensor's sensitivity to light. Choose “Auto” on your camera if you are
not familiar with this setting. Depending on the lighting conditions, use the lowest ISO
whenever possible, as higher settings will introduce more noise while pixel sensitivity
also goes up. Adjust depending on your preference.
METERING › Prioritizes the brightness level of specific parts of the scene depending
on the Metering Mode that is used: Center Weighted, Multi, or Spot.
VIDEO RECORD - Page 2
TIP: When using your camera as a
dashcam, use a car charger cable
and remove the internal battery to
make sure it does not die out while
you travel, and to avoid overcharging/
overheating the battery.
WARNING:
Operating your camera
while driving a vehicle is
potentially dangerous. It is strongly
advised to set up your camera before
your trip.
!
EV works by controlling how
much light is allowed in.
Exposure
Value
BRIGHTER
DARKER
+2.0+2.0+2.0
+5/3+5/3+5/3
+4/3+4/3+4/3
+1.0+1.0+1.0
+2/3+2/3+2/3
+1/3+1/3+1/3
0.00.00.0
-1/3-1/3-1/3
-2/3-2/3-2/3
-1.0-1.0-1.0
-4/3-4/3-4/3
-5/3-5/3-5/3
-2.0-2.0-2.0
All graphics, words, and layout by Troy Ferrer 2016 [email protected]
Video Resolutions
Video Quality
FOV
Slow Motion
Auto Low Light
Gyro Sensor
Detection
Dual Files
Video Stamp
Timelapse Video
Loop Record
Car DV
Microphone Volume
Sharpness
AWB
EV Value
ISO
Metering

7 STAR7 STAR
Quick Capture
Delay Off
FPV
TV Mode
Gimbal Control
Light Frequency
Distortion Correction
Image Rotation
Logo Watermark
Auto Shutdown
Screen Off
Status LED
WiFi LED
Beep
Date Setup
Time Setup
Date Format
Language
WiFi
QUICK CAPTURE : Enables automatic recording when the camera is turned on.
DELAY OFF : In dashcam mode, the camera will power down 10 seconds later after
the power from the vehicle is shut off.
FPV : Allows the camera to be controlled remotely via PWM shutter cable.
TV MODE › Options are NTSC or PAL. The color encoding and Framerate for video
recording. Users in the US and Asia use NTSC (60Hz), most other countries use
PAL (50Hz) and is the camera's default. Please check what you use in your country.
GIMBAL CONTROL : Allows SJGimbal to take control of certain camera functions.
LIGHT FREQUENCY : For adjusting the framerate frequency (50Hz or 60Hz).
Also used to counter flicker-effects of fluorescent lamps or jello-effect of fast moving objects.
DISTORTION CORRECTION : Electronically removes the bulging look in images
(A.K.A.: Barrel Distortion) and makes the recorded images look flatter.
IMAGE ROTATION: For use when the camera needs to be mounted upside down,
turn this feature on so that the image is right side up.
LOGO WATERMARK : Sets the SJCAM logo to be superimposed onto the recorded images.
AUTO SHUTDOWN : Time settings to turn off camera when there is no activity.
SCREEN OFF : Sets LCD screen timeout or disables it.
STATUS LED : Enables or disables the LED status indicators.
WIFI LED : Enables or disables the LED status indicator for WiFi.
GENERAL SETTINGS - Page 1
All graphics, words, and layout by Troy Ferrer 2016 [email protected]
TIP: For a more stable video or
photo, turn on the Gyro Sensor.
You will know if it’s active when
you see a blinking hand on the
upper right hand of the Display.
[ Works in certain resolutions only, FOV off ]
LIST OF AVAILABLE RESOLUTIONS:
• 4K 30fps 16:9
• 4K 25fps SuperView
• 2160p 30fps 4:3
• 2.7K 30fps 4:3
• 2.7K 30fps SuperView
• 2.7K 30fps 16:9
• 2.5K 60fps 16:9
• 2.5K 30fps 16:9
• 1440p 60fps 4:3
• 1440p 30fps 4:3
• 1080p 120fps 16:9
• 1080p 60fps 16:9
• 1080p 30fps 16:9
• 1080p 60fps SuperView
• 1080p 30fps SuperView
• 960p 120fps 4:3
• 960p 30fps 4:3
• 720p 240fps 16:9
• 720p 120fps 16:9
• 720p 60fps 16:9
• 720p 30fps 16:9
• 720p 120fps SuperView
• 720p 30fps SuperView

7 STAR7 STAR
BEEP : Enables camera sounds like power on chime, shutter sounds, etc.
DATE SETUP : For adjusting the camera date.
TIME SETUP : For adjusting the camera time.
DATE FORMAT : Sets the preferred date format (Y/M/D; D/M/Y; M/D/Y).
LANGUAGE : Sets the camera language.
WIFI : Options to turn the WiFi on or off.
WIFI SSID : Change from default WiFi name to anything you want.
WIFI PASSWORD : For changing the default password when connecting to a mobile device.
FORMAT : Resets the memory card to factory settings, deletes all files.
DEFAULT SETTING : Resets the camera to factory settings.
SJ7 STAR (VERSION) : Shows the current firmware version number that is installed.
GENERAL SETTINGS - Page 2
All graphics, words, and layout by Troy Ferrer 2016 [email protected]
When plugged into a computer using
a MiniUSB Data-Cable, you will be
asked these three options:
Mass Storage: For transferring files
Ext Power: Charging while On
Charge: Shut down to charge
NOTE: These options will not be
available when using a charge-only
MiniUSB cable.
Like with any real 4K-capable camera,
such high-resolution recordings like 4K
demands a lot of processing power from
the chipset and will generate heat.
This is normal.
The aluminum shell of the SJ7 is
specifically designed to transfer heat
from the internal components so it can
be dissipated properly, even during
prolonged use.
To ensure efficient processing, always
use a UHS-rated MicroSD card, U3
recommended.
Mass Storage
Ext Power
Charge
Auto Shutdown
Screen Off
Status LED
WiFi LED
Beep
Date Setup
Time Setup
Date Format
Language
WiFi
WiFi SSID
WiFi Password
Format
Default Setting
SJ7 STAR (Version)
Page is loading ...
Page is loading ...
Page is loading ...
-
 1
1
-
 2
2
-
 3
3
-
 4
4
-
 5
5
-
 6
6
-
 7
7
-
 8
8
-
 9
9
-
 10
10
-
 11
11
-
 12
12
-
 13
13
-
 14
14
-
 15
15
-
 16
16
-
 17
17
-
 18
18
-
 19
19
-
 20
20
-
 21
21
-
 22
22
-
 23
23


SJCAM SJ7 STAR Owner's manual
- Category
- Action sports cameras
- Type
- Owner's manual
Ask a question and I''ll find the answer in the document
Finding information in a document is now easier with AI
Related papers
Other documents
-
Takara MV137 Owner's manual
-
Pyle PDVRCAM50W User manual
-
Sharper Image 4K Ultra HD Camera User manual
-
 DXG Technology Corp. RD2DSD01001 User manual
-
Cobra Electronics WASPcam 9902 User guide
-
Cobra WASPcam 9902 Gideon WASPcam 9904 Gideon Owner's manual
-
Easypix GoXtreme Wi-Fi Pro User manual
-
Kmart 4K Digital Action Camera User manual
-
Valore WiFi Owner's manual
-
Support OzSpy User manual
