Signature Hardware 446976 Installation guide

Category
Massagers
Type
Installation guide
1
1.800.221.3379
ACRYLIC ALCOVE TUB
BAÑERA DE ACRÍLICO DE ALCOBA
SKU: 948823, 948821, 948056, 948254, 948256, 948258, 948061, 948262, 948062, 948272, 948274, 948276
REVISED 8/28/2019
CODES: SHBDS6032L, SHBDA6032R, SHBDA6032L, SHBDS6032R, SHBDW6032R, SHBDW6032L, SHBDS6030L, SHBDS6030R, SHBDT6032L,
SHBDT6032R, SHBDS6032LBS, SHBDA6032RBS, SHBDA6032LBS, SHBDS6032RBS, SHBDS6030LBS, SHBDS6030RBS, SHPRS6032R, SHPRS6032L,
SHPRA6032R, SHPRA6032L, SHPRW6032R, SHPRW6032L, SHPRS6032RBS, SHPRS6032LBS, SHSKW6032R, SHSKW6030R, SHSKW6030L,
SHSKW6032L, SHSKS6030R, SHSKS6032R, SHSKS6030L, SHSKS6032L, SHSKA6032R, SHSKA6032L, SHSKA6036R, SHSKS6036L, SHSKW6036R,
SHSKT6036L, SHSKW6036L, SHSKS6036R, SHSKA6036L, SHSKT6036R, SHSKS6030RBS, SHSKS6030LBS, SHSKS6032RBS, SHSKS6032LBS,
SHSKW6036LBS, SHSKS6036RBS, SHSKT6036RBS, SHSKS6036LBS, SHSKA6036LBS, SHSKT6036LBS, SHSKA6036RBS, SHSKW6036RBS
GETTING STARTED
BEFORE YOU BEGIN
We recommend consulting a professional if you are
unfamiliar with installing plumbing fixtures. Signature
Hardware accepts no liability for any damage to the
floor, walls, framing, plumbing, electrical fixtures, or
for personal injury during installation.
Observe all local plumbing and building codes.
Unpack and inspect the tub for shipping damage. If
any damage is found, contact our Customer
Relations team at 1-800-221-3379.
Ensure that you have gathered all the required
materials that are needed for the installation.
TOOLS AND MATERIALS:
HERRAMIENTAS Y MATERIALES:
ANTES DE COMENZAR
Le recomendamos que consulte a un profesional si no
sabe cómo instalar accesorios de plomería. Signature
Hardware no asume ninguna responsabilidad con
respecto a los daños causados al suelo, paredes,
marcos, sistema de plomería, accesorios eléctricos, ni
por daños personales que ocurran durante la
instalación.
Cumpla con todas las normas locales de plomería y
construcción.
Desempaque la bañera e inspecciónela; si encuentra
algún daño, comuníquese con nuestro equipo de
Servicio al cliente al 1-800-221-3379.
CÓMO COMENZAR
Asegúrese de haber reunido todos los materiales
necesarios para la instalación.
Tape Measure
Cinta métrica
Pencil
Lápiz
Safety Glasses
Gafas de seguridad
Level
Nivelador
Drop Cloth
Tela protectora
Silicone Sealant
(100% NeutralCure)
Sellador de silicona
(100% curado neutro)
Thinset Mortar
Mortero de cemento
Pipe Wrench
Llave de tubo
2x4’s
Construction
Adhesive
Adhesivo para
construcción
Hacksaw
Sierra para metales
Wood Shims
Cuñas de
madera
2
1.800.221.3379
WARNING!
IMPORTANT SAFETY INSTRUCTIONS
ACRYLIC ALCOVE TUB
BAÑERA DE ACRÍLICO DE ALCOBA
SKU: 948823, 948821, 948056, 948254, 948256, 948258, 948061, 948262, 948062, 948272, 948274, 948276
When using this product, basic precautions should be
followed. Read and follow all instructions pertaining to
risk of fire, electric shock or injury.
! Risk of personal injury. Do not permit children to
use this unit without adult supervision.
! Risk of personal injury. Do not operate this unit
without the guard over the suction fitting.
! Risk of electric shock. Do not permit electrical
appliances (hair dryer, telephone, radio, etc.)
within 60 inches (1524mm) of this unit.
! Risk of hyperthermia and possible drowning.
People using medications and/or having adverse
medical history should consult a physician before
using this product.
! Risk of personal injury. Do not overfill unit before
entering. Entering tub when filled more than 2/3
can cause overflow and slippery conditions.
Exercise caution when entering and exiting.
! No food or alcoholic beverages. Use of your
bathtub immediately after meals is not
recommended. Avoid alcohol consumption before
or during bathing. Alcoholic beverages can cause
drowsiness or hyperthermia resulting in loss of
consciousness or even drowning.
! Pregnancy. If you are or think you may be
pregnant, consult your physician before using the
bathtub. Never drop or insert any object into any
opening. Use this unit only for its intended use
as described in this manual. Do not use any
attachments not recommended by Signature
Hardware. This equipment is intended for indoor
use only.
¡ADVERTENCIA!
INSTRUCCIONES IMPORTANTES DE
SEGURIDAD!
Cuando utilice este producto, deberá tomar las
precauciones básicas. Lea y siga todas las instrucciones
relacionadas con el riesgo de incendio, descarga
eléctrica o lesiones físicas.
!
Riesgo de lesiones personales. No permita que los
niños utilicen esta unidad sin la supervisión de un adulto.
!
Riesgo de lesiones personales. No opere esta unidad
sin la protección sobre el adaptador de succión.
!
Riesgo de descarga eléctrica. No permita el uso de
aparatos eléctricos (secadora para el cabello, teléfono,
radio, etc.) dentro de una distancia de 60 pulgadas
(1524 mm) de esta unidad.
!
Riesgo de hipertermia y posible ahogamiento. Las
personas que usen medicamentos y/o tengan un
historial médico de enfermedad, deben consultar a un
médico antes de usar este producto.
!
Riesgo de lesiones personales. No llene demasiado la
unidad antes de ingresar en ella. Si ingresa a la bañera
cuando el nivel de agua supera los 2/3 de su capacidad,
podría desbordarla y el piso mojado propicia los
resbalones. Tenga cuidado al entrar y salir de la bañera.
!
No introduzca alimentos ni bebidas alcohólicas. No se
recomienda usar la bañera inmediatamente después de
las comidas. Evite consumir bebidas alcohólicas antes y
durante su baño. Las bebidas alcohólicas pueden causar
somnolencia o hipertermia, lo que podría ocasionar
pérdida de conciencia o incluso ahogamiento.
!
Embarazo. Si usted está embarazada o cree que
podría estarlo, consulte con su médico antes de usar la
bañera. Nunca deje caer o inserte ningún objeto por
cualquier abertura. Use la unidad solo para los fines
previstos, tal como se describe en este manual. No
utilice ningún accesorio que Signature Hardware no
recomiende. Este equipo está diseñado para usarse
únicamente en interiores.
3
1.800.221.3379
ELECTRICAL REQUIREMENTS
All connections must be GFCI ( Ground Fault Circuit
Interrupter) protected Whirlpool and Total
Massage units require dedicated 20 Amp, 120V
service. You must provide a receptacle with a 20-amp
configuration. See local codes for proper wire size. If
not specified, use #12 copper only wire. The unit
must be connected to a circuit interrupter (GFCI)
provided by the installer.
ACRYLIC ALCOVE TUB
REVISED 8/28/2019
CODES: SHBDS6032L, SHBDA6032R, SHBDA6032L, SHBDS6032R, SHBDW6032R, SHBDW6032L, SHBDS6030L, SHBDS6030R, SHBDT6032L,
SHBDT6032R, SHBDS6032LBS, SHBDA6032RBS, SHBDA6032LBS, SHBDS6032RBS, SHBDS6030LBS, SHBDS6030RBS, SHPRS6032R, SHPRS6032L,
SHPRA6032R, SHPRA6032L, SHPRW6032R, SHPRW6032L, SHPRS6032RBS, SHPRS6032LBS, SHSKW6032R, SHSKW6030R, SHSKW6030L,
SHSKW6032L, SHSKS6030R, SHSKS6032R, SHSKS6030L, SHSKS6032L, SHSKA6032R, SHSKA6032L, SHSKA6036R, SHSKS6036L, SHSKW6036R,
SHSKT6036L, SHSKW6036L, SHSKS6036R, SHSKA6036L, SHSKT6036R, SHSKS6030RBS, SHSKS6030LBS, SHSKS6032RBS, SHSKS6032LBS,
SHSKW6036LBS, SHSKS6036RBS, SHSKT6036RBS, SHSKS6036LBS, SHSKA6036LBS, SHSKT6036LBS, SHSKA6036RBS, SHSKW6036RBS
BAÑERA DE ACRÍLICO DE ALCOBA
SKU: 948823, 948821, 948056, 948254, 948256, 948258, 948061, 948262, 948062, 948272, 948274, 948276
DANGER!
RISK OF ELECTRICAL SHOCK
!
All pumps and blowers must be connected
to ground fault circuit interrupter (GFCI) protected
outlets. Total Massage units can be operated on a
single service. All heaters must be connected to
ground fault circuit interrupter (GFCI) protected
outlets, separate from the pump and/or blower.
!
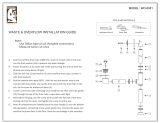
Electrical outlet must be mounted 4” (101mm)
above the floor line and 12’’ max (305mm) from the
edge of the bathtub, or in accordance with local
building and electrical codes.
!
Risks of component overheat. Do not use electric
extension cord to power the unit. Operating the pump
without enough water in bathtub can cause
permanent damage to the pump/motor.
!
If GFCI unit indicates a malfunction, per
manufacturer’s instructions, turn OFF power and do
not attempt to use the bathtub until the source of the
problem has been identified and corrected.
¡PELIGRO!
RIESGO DE DESCARGA ELÉCTRICA
!
Todas las bombas y salidas de aire se deben conectar a
tomacorrientes protegidos por un disyuntor del circuito
de fallos en toma a tierra (GFCI). Las unidades de masaje
total se pueden operar en un servicio único. Todos los
calentadores se deben conectar a
tomacorrientes protegidos por un disyuntor del circuito
de fallos en toma a tierra (GFCI), separados de la bomba
y/o salidas de aire.
!
El tomacorrientes se debe montar 4 pulgadas (101
mm) sobre la línea del piso y 12 pulgadas (305 mm)
como máximo del borde de la bañera o según los
códigos de construcción y eléctricos locales.
!
Riesgos de sobrecalentamiento de los componentes.
No utilice un cable de extensión eléctrica para energizar
la unidad. Operar la bomba sin la suficiente agua en la
bañera puede provocar daño permanente a la bomba o
el motor.
!
Si la unidad GFCI indica algún mal funcionamiento,
según las instrucciones del fabricante, CORTE la energía
y no intente usar la bañera hasta que se haya identificado
el origen del problema y se haya corregido.
REQUISITOS ELÉCTRICOS
Todas las conexiones deben estar protegidas por un
GFCI (disyuntor del circuito de fallos en toma a tierra); las
unidades de hidromasaje y masaje total requieren un
suministro específico de 20 amperes, 120 V. Debe
proporcionar un receptáculo con una configuración de
20 amperes. Consulte los códigos locales para el tamaño
apropiado del cable. Si no se especifica, use únicamente
cable de cobre n.º 12. La unidad debe estar conectada a
un disyuntor de circuito (GFCI) proporcionado por el
instalador.
4
1.800.221.3379
ACRYLIC ALCOVE TUB
BAÑERA DE ACRÍLICO DE ALCOBA
SKU: 948823, 948821, 948056, 948254, 948256, 948258, 948061, 948262, 948062, 948272, 948274, 948276
WHIRLPOOL CIRCUIT WITH OPTIONAL HEATER
CIRCUITO DE HIDROMASAJE CON CALENTADOR OPCIONAL
pump flow
control valve
0.5 amp
válvula de control
de flujo de la bomba
de 0,5 amperes
tms-p/timer
control
tms-p/control
de temporizador
tms-p/timer
control
tms-p/control
de temporizador
On/ Off pump
9 amp
bomba de
encendido/apagado
de 9 amperes
optional
opcional
in-line heater
calentador en línea
electrical feed
alimentación eléctrica
electrical feed
alimentación eléctrica
back of 3 button control
reverso del control de 3 botones
back of 3 button control
reverso del control de 3 botones
power
energía
power
energía
speed
velocidad
speed
velocidad
wave
oleaje
wave
oleaje
120 v, 60 hz
20 amp gfci
120 v, 60 hz
20 amp gfci
120 v, 60 hz
20 amp gfci
120 v/ 20 amp
AIR MASSAGE CIRCUIT
CIRCUITO DE MASAJE DE AIRE
piggy blower
9.25 amp
ventilador de
9,25 amperes
pump flow
control valve
0.5 amp
válvula de control
de flujo de la bomba
de 0,5 amperes
tms-p/timer
control
tms-p/control
de temporizador
optional
opcional
back of 3 button control
reverso del control de 3 botones
120 v, 60 hz
20 amp gfci
120 v, 60 hz
20 amp gfci
piggy blower
9.25 amp
ventilador de
9,25 amperes
5
1.800.221.3379
ACRYLIC ALCOVE TUB
BAÑERA DE ACRÍLICO DE ALCOBA
SKU: 948823, 948821, 948056, 948254, 948256, 948258, 948061, 948262, 948062, 948272, 948274, 948276
On/ Off pump
9 amp
bomba de
encendido/apagado
de 9 amperes
On/ Off pump
9 amp
bomba de
encendido/apagado
de 9 amperes
electrical feed
alimentación eléctrica
electrical feed
alimentación eléctrica
air
aire
jet
inyector
speed
velocidad
speed
velocidad
wave
oleaje
wave
oleaje
piggy blower
9.25 amp
ventilador de
9,25 amperes
TOTAL MASSAGE CIRCUIT WITH OPTIONAL HEATER
CIRCUITO DE MASAJE TOTAL CON CALENTADOR OPCIONAL
BRADENTON & PROVINCETOWN TOTAL MASSAGE CIRCUIT WITH OPTIONAL HEATER
CIRCUITO DE MASAJE TOTAL CON CALENTADOR OPCIONAL BRADENTON Y PROVINCETOWN
in-line heater
calentador en línea
120 v/ 20 amp
in-line heater
calentador en línea
120 v, 60 hz
120 v, 60 hz
9.25 amp
20 amp gfci
air switch
interruptor de aire
air switch
interruptor de aire
control box
caja de control
electrical feed
alimentación eléctrica
6
1.800.221.3379
ACRYLIC ALCOVE TUB
BAÑERA DE ACRÍLICO DE ALCOBA
SKU: 948823, 948821, 948056, 948254, 948256, 948258, 948061, 948262, 948062, 948272, 948274, 948276
BRADENTON & PROVINCETOWN WHIRLPOOL WITH INSTALLED AIR SWITCH
HIDROMASAJE CON INTERRUPTOR DE AIRE INSTALADO BRADENTON Y PROVINCETOWN
120 v, 60 hz
20 amp gfci
air switch
interruptor de aire
pump/motor
bomba/motor
BRADENTON & PROVINCETOWN AIR BATH CIRCUIT
CIRCUITO DE BAÑERA DE AIRE BRADENTON Y PROVINCETOWN
electrical feed
alimentación eléctrica
piggy blower
9.25 amp
ventilador de
9,25 amperes
120 v, 60 hz
20 amp gfci
air switch
interruptor de aire
control box
caja de control
7
1.800.221.3379
Structural measurements should be verified against
the actual tub received to ensure a proper fit. Ensure
that the floor is level and can support a load of 80lbs.
per square foot. An uneven floor may impede proper
installation of the tub.
Se deben verificar las mediciones estructurales en
comparación con la bañera recibida real, para garantizar
un ajuste apropiado. Asegúrese de que el suelo esté
nivelado y que pueda soportar una carga de 80 libras por
pie cuadrado. Un piso desnivelado puede impedir la
instalación apropiada de la bañera.
Clean the installation area of any debris or trash.
Limpie el área de instalación de residuos o basura.
Locate studs as needed. Ensure rough-in dimensions
are proper, plumb, and square.
Ubique los pernos como se requiera. Asegúrese de que
las dimensiones del bosquejo sean correctas, estén a
plomo y a escuadra.
For all Air, Whirlpool, and Total Massage, provisions
must be made in all installations for an access opening
for servicing the pump and controls on the pump or
blower side. The apron should not be used as the
primary access opening (only applicable on air,
whirlpool, total massage tubs).
Para bañeras de masaje de aire, hidromasaje o masaje
total, se debe considerar dejar una abertura de acceso
para darle mantenimiento a la bomba y los controles en
esta o en el lado de las salidas de aire. El faldón no
debería usarse como abertura de acceso primaria (sólo
aplicable a bañeras de aire, de hidromasaje y de masaje
total).
Do not remove the foam base and padding from the
bottom of the tub if equipped.
No retire la base y relleno de espuma del fondo de la
bañera, si se incluyen.
FRAMING AND INSTALLATION
ESTRUCTURACIÓN E INSTALACIÓN
1. Position the tub into the installation opening and
level the deck in both directions, shimming the base of
the tub if necessary. Mark the final position of the
underside of the deck by tracing a line on to the studs.
1. Coloque la bañera dentro de la abertura de la
instalación y nivele la cubierta en ambas direcciones,
calzando la base de la bañera si fuera necesario. Marque
la posición final de la parte inferior de la cubierta,
trazando una línea sobre los pernos.
2. Remove the tub and attach a 2x4 stringer (if a 2x4
won't fit, a 1x4 may be used) to the studs, with the top
of the stringer touching the traced line. Never support
the tub by its deck lip or stringers.
2. Retire la bañera y fije un larguerillo de 2 x 4 (si no
sirviera uno de 2 x 4, se puede usar uno de 1 x 4) a los
pernos, con la parte superior del larguerillo tocando la
línea trazada. Nunca apoye la bañera por el borde de su
cubierta o por los larguerillos.
ACRYLIC ALCOVE TUB
BAÑERA DE ACRÍLICO DE ALCOBA
SKU: 948823, 948821, 948056, 948254, 948256, 948258, 948061, 948262, 948062, 948272, 948274, 948276
STRINGER INSTALLATION
INSTALACIÓN DE LOS LARGUERILLOS
8
1.800.221.3379
3a. INTEGRAL DRAIN
DRENAJE INTEGRAL
Screw the drain’s pop-up mechanism onto the drain
cap. Then, install the assembly into the tub’s
pre-installed drain basket.
Enrosque el mecanismo accionable del drenaje sobre la
tapa del drenaje. Luego, instale el ensamble dentro de la
canastilla del drenaje preinstalada de la bañera.
Apply 100% neutral cure silicone sealant to the
underside of the drain flange and thread it through the
tub and into the drain pipe. Apply thread sealant or
plumber’s tape to the threaded connection to ensure
a water-tight seal. Tighten by hand. Wipe away any
excess sealant using a damp cloth.
Aplique sellador de silicona de 100% curado neutro a la
parte inferior de la brida de drenaje y enrósquela en la
bañera y en la tubería de drenaje. Aplique sellador de
tuercas o cinta de plomería a la conexión roscada para
garantizar un sellado hermético. Ajuste manualmente.
Retire cualquier exceso de sellador con un paño húmedo.
If your tub comes with an integral drain, install the
drain assembly as shown below. Apply a small amount
of silicone to the exposed threads of the drain basket
to act as a sealant when installing the bottom portion
of the assembly.
Instale el ensamble de drenaje como se muestra a
continuación. Aplique una pequeña cantidad de silicona a
las roscas expuestas de la canastilla del drenaje para que
actúe como sellador al momento de instalar la parte
inferior del ensamble.
3. Install drain components to the tub following the
drain installation instructions. Note that this requires a
cutout in the floor. Before replacing your tub for final
installation, bathtubs require a 6’’ x 12’’ floor opening
for the 1-1/2” drain and waste and overflow kit. The
drain/overflow of the bath extends below the bottom
of the bath.
3. Instale los componentes de drenaje a la bañera
siguiendo las instrucciones de instalación del drenaje.
Tome en cuenta que esto requiere una muesca en el piso.
Antes de volver a colocar la bañera para una instalación
final, debe tener en cuenta que las bañeras requieren una
abertura de 6 x 12 pulgadas (15 x 30 cm) para el drenado
y desagüe de 1 a 1/2 pulgadas (2,5 a 1,3 cm) y para el
juego de rebosadero. El drenado/rebosadero de la bañera
se extiende más abajo del fondo de la bañera.
ACRYLIC ALCOVE TUB
BAÑERA DE ACRÍLICO DE ALCOBA
SKU: 948823, 948821, 948056, 948254, 948256, 948258, 948061, 948262, 948062, 948272, 948274, 948276
rubber gasket
junta de goma
rubber gasket
junta de goma
drain basket
locknut
contratuerca
de la canastilla
del drenaje
TYPICAL ALCOVE INTALLATION
INSTALACIÓN ESTILO ALCOVE TÍPICA
note: front edge of bath
must be supported by
stud wall.
nota: el lado frontal de la
bañera se debe apoyar
sobre una pared de
entramado.
access panel must be
located on the same side
as the motor.
el panel de acceso se debe
colocar en el mismo lado
que el motor.
allow open framing on pump motor end for service.
Deje una estructura abierta en el borde del motor de la
bomba para mantenimiento.
leveling
stringers
larguerillos de
nivelación
18” (457.2 mm)
24” (609.6mm)
9
1.800.221.3379
3b. BRASS EXPOSED PIPE DRAIN
TUBERÍA DE DESAGÜE EXPUESTA DE BRONCE
Measure and mark each pipe so that the end of the
pipe reaches at least a little bit over halfway into the
overflow tee. Remove the drain and overflow assembly
from the tub, and trim the pipes at the marked
locations with a hacksaw. Make sure that the blade is
suitable for cutting metal.
Mida y marque cada tubo de forma que el extremo
deltubo llegue un poco más de la mitad de la conexión en
T del desagüe. Retire el montaje del drenado y del
desagüe de la bañera, y corte los tubos en los sitios
marcados con una sierra para metales. Asegúrese de que
la cuchilla sea apta para cortar metal.
If your tub comes with a brass exposed pipe drain, you
will need to trim your drain and overflow pipes to the
appropriate sizes. To trim the drain and overflow pipes
appropriately, you will need to temporarily fit the
overflow and drain assemblies to the tub.
Si adquirió una tubería de desagüe expuesta de bronce,
será necesario que corte su tubería de drenado y
desagüe con las medidas apropiadas. Para cortar la
tubería de drenado y desagüe de forma apropiada,
necesitará colocar provisionalmente los montajes del
drenado y desagüe en la bañera.
The overflow tee (A) will be attached at the points
where the drain pipes intersect (B).
La conexión en T del desagüe(A) se fijará a los puntos
donde las tuberías del drenado se cruzan (B).
Apply thread sealant or plumber’s tape to the
threaded ends of all pipes prior to assembly. If two
pipes arrive attached, be sure to take them apart and
do the same. Do not apply any tape or sealant to any
compression fittings.
Aplique sellador de tuercas o cinta para plomería en los
extremos roscados de todos los tubos antes de
ensamblar. Si dos tubos están unidos, asegúrese de
separarlos y hacer lo mismo. No aplique cinta o sellador a
ninguna junta de compresión.
Attach the waste and overflow tee to the overflow
assembly and shoe assembly with sealing washers and
slip nuts. The beveled end of the sealing washer should
face the tee.
Fije la conexión en T del desagüe y rebosadero al
montaje del rebosadero y el juego de zapatas con
arandelas de sellado y tuercas deslizantes. El extremo
biselado de la arandela de sellado debe estar orientado
hacia la conexión en T.
ACRYLIC ALCOVE TUB
BAÑERA DE ACRÍLICO DE ALCOBA
SKU: 948823, 948821, 948056, 948254, 948256, 948258, 948061, 948262, 948062, 948272, 948274, 948276
A
B
sealing washer
arandela de sellado
nut
tuerca
sealing washer
arandela de sellado
nut
tuerca
10
1.800.221.3379
Attach the drain tube and flange to the waste and
overflow tee with the sealing washer and slip nut. The
beveled end of the sealing washer should face the tee.
Fije el tubo de drenaje y la brida a la conexión en T del
desagüe y del rebosadero con la arandela de sellado y la
tuerca deslizante. El extremo biselado de la arandela de
sellado debe estar orientado hacia la conexión en T.
Place the overflow washer over the overflow elbow.
Place the flange over the gasket and secure with the
nut. Install the handle and secure with the set screw.
Coloque la arandela del rebosadero sobre el codo del
rebosadero. Coloque la brida sobre la junta y asegúrela
con la tuerca. Instale la manija y asegúrela con el tornillo
de sujeción dentro de la abertura ranurada.
Install the overflow assembly with the beveled
washer, overflow plate, mounting screw (provided)
and any other washers or rubber sealing gaskets
included. Apply a bead of silicone sealant to the
underside of the flange.
Instale el montaje del desagüe con la arandela
biselada, la base del desagüe, el tornillo de sujeción
(suministrado) y cualquier otra arandela o junta de sellado
de goma incluida. Aplique una gota de sellador de silicona
a la parte inferior de la brida.
3c. PVC CABLE DRAIN
CABLE DE DRENAJE DE PVC
If you purchased a separate cable drain, or if your tub
comes with a pvc cable drain, you will need to apply
solvent cement to all PVC connections before final
installation and water testing. You will need to apply
silicone sealant to both sides of the overflow gasket,
as well as the back of the tub around the overflow hole.
Si ha adquirido un cable de drenaje necesitará aplicar
cemento solvente a todas las conexiones de PVC.
Necesitará aplicar sellador de silicona a ambos lados de la
junta del rebosadero, así como a la parte posterior de la
bañera alrededor del orificio de rebosadero.
ACRYLIC ALCOVE TUB
BAÑERA DE ACRÍLICO DE ALCOBA
SKU: 948823, 948821, 948056, 948254, 948256, 948258, 948061, 948262, 948062, 948272, 948274, 948276
tub wall
pared de la bañera
tub overflow
hole
orificio del
rebosadero
de la bañera
nut
tuerca
set screw
tornillo de fijación
overflow elbow
codo del rebosadero
cable
cable
overflow gasket
junta del rebosadero
handle drive
manija
flange
brida
handle
manija
11
1.800.221.3379
Place a bead of silicone sealant around the strainer,
ensuring that the waste elbow and the gasket are
centered. Tighten the drain nut and screw onto the
waste elbow.
Aplique una gota de sellador de silicona alrededor del
larguerillo, asegurándose de que el codo y la junta del
desagüe estén centrados. Ajuste la tuerca y el tornillo del
desagüe dentro del codo del desagüe.
4. If included, install the decorative cover plate for the
overflow. Set the cover plate over the opening, then
tighten the two set screws located on the bottom of
the plate. The set screws can be independently
adjusted in order to achieve the desired look.
4. Instale la cubierta decorativa para el rebosadero.
Coloque la cubierta sobre la abertura, luego ajuste los
dos tornillos de sujeción ubicados en la parte inferior de
la cubierta. Los tornillos de sujeción se pueden ajustar de
manera independiente para lograr el aspecto deseado.
5. The bath must be supported along its entire
bottom. Do not remove the foam base and padding
from the bottom of the tub if equipped. Use approxi-
mately 1½” to 2” of mortar as bedding material (do not
use sand or foam). After the mortar has been poured,
and before it sets, re-position the tub within the
recess until the rim is leveled against the stringers.
Note: Adding weight or carefully stepping inside tub
bathing well will help to sink bathtub into mortar. After
weight is applied, ensure bathtub is level and in-line
with previous leveled dimension marks.
5. La bañera debe contar con soporte para todo su
fondo. No retire la base y relleno de espuma
de la parte inferior de la bañera si se incluyen. Use
aproximadamente 1 1/2 a 2 pulgadas (3,8 a 5,1 cm) de
mortero como material de lecho (no use arena ni
espuma). Después de que el mortero se ha vertido,
y antes de que fragüe, vuelva a colocar la bañera dentro
del hueco hasta que la orilla quede nivelada contra los
larguerillos.
Nota: Agregar peso o pisar cuidadosamente dentro de la
bañera ayudará a asentar la bañera en el mortero.
Después de aplicar peso, asegúrese de que la bañera
esté nivelada y alineada con las marcas de dimensión
niveladas con anterioridad.
ACRYLIC ALCOVE TUB
BAÑERA DE ACRÍLICO DE ALCOBA
SKU: 948823, 948821, 948056, 948254, 948256, 948258, 948061, 948262, 948062, 948272, 948274, 948276
waste elbow
codo del desagüe
cable
cable
waste gasket
junta del desagüe
tub wall
pared de la bañera
strainer
larguerillo
drain nut and screw
tuerca y tornillo del desagüe
adjustment screw
tornillo de ajuste
plunger
embolo
12
1.800.221.3379
7. If included, ensure blower and/or pump cords are
properly plugged into the dedicated 120V/20A GFCI
outlet to supply electrical power to the system. To test
run the bath, fill the tub with water at least 3” above the
highest jet and operate the bath for 5 minutes. Check
all bath and piping connections for leaks.
7. Si se incluye, asegúrese de que los cables del
ventilador y/o la bomba estén enchufados
adecuadamente a una toma GFCI para tal fin de 120
V/20 A para suministrar electricidad al sistema. Para
probar el funcionamiento de la bañera, llénela con agua
hasta al menos 3 pulgadas (7,6 cm) por encima del
inyector más alto y hágala funcionar por 5 minutos.
Revise que no haya fugas en todas las conexiones de la
bañera y de la tubería.
6. Allow the mortar material to completely harden
before applying weight to the rim or bottom of the
bath. Any finish material such as tile or wall board must
be self supporting if it contacts the deck of the bath.
Verify that the tub is level in all directions.
6. Deje que el material de mortero se endurezca
completamente antes de aplicar peso al borde o al fondo
de la bañera. Todos los materiales de acabado como el
azulejo o ladrillo deben deben tener soporte propio si
están en contacto con el piso de la bañera. Verifique que
la bañera esté nivelada en todas direcciones.
ACRYLIC ALCOVE TUB
BAÑERA DE ACRÍLICO DE ALCOBA
SKU: 948823, 948821, 948056, 948254, 948256, 948258, 948061, 948262, 948062, 948272, 948274, 948276
stud
perno
waterproof drywall or cement board
placa de cemento o yeso laminado
resistente al agua
tile
azulejo
roofing nail
tachuela
sealant
sellador
tub
bañera
2x4” wood stringer
full length
larguerillo completo
de madera de 2x4"
Reference for Correct Tile Flange Installation
Referencia para Instalación correcta de brida de
azulejo
13
1.800.221.3379
ACRYLIC ALCOVE TUB
BAÑERA DE ACRÍLICO DE ALCOBA
SKU: 948823, 948821, 948056, 948254, 948256, 948258, 948061, 948262, 948062, 948272, 948274, 948276
OPERATING INSTRUCTIONS
INSTRUCCIONES DE OPERACIÓN
1. Fill the bath to at least 3 inches above the jets
before activating the pump. Do not turn on whirlpool
unless jets are completely submersed in water.
1.
Llene la bañera al menos 3 pulgadas (8 cm) por
encima de los inyectores antes de activar la bomba. No
encienda el hidromasaje a menos que los inyectores
estén completamente sumergidos en el agua.
2. The air bath blower and/or whirlpool pump is
activated by pushing the control panel buttons
(Provincetown and Bradenton system tubs
air/whirlpool is turned on by depressing the actuator
button) . Do not repeatedly depress the switch in rapid
order if you do not see the whirlpool function right
away, as it may take a few seconds before you can see
it fully operating. Please see air bath control or total
massage control instructions on the following page for
operation and features.
2. Las salidas de aire y/o la bomba de hidromasaje se
activan oprimiendo los botones del panel de control
(la tubería de aire o el remolino de los sistemas de
Provincetown y Bradenton se encienden oprimiendo el
botón del activador). No oprima el interruptor
repetidamente de manera rápida si no ve que el remolino
se activa de inmediato, ya que puede tomar algunos
segundos antes de que esté funcionando
completamente. Vea las instrucciones de control de
salida de aire o del masaje total en la siguiente página
para revisar la operación y características.
3. If any factory installed fittings are removed; do not
operate the unit. A safety hazard may occur. If a
problem develops, call 1-800-221-3379.
3. No active la unidad si se retiraron accesorios instala-
dos de fábrica. Podría surgir un riesgo de seguridad. Si
surge algún problema, llame al 1-800-221-3379.
4. Do not use bubble bath when you operate the
whirlpool pump. This might cause excessive foaming.
4. No use baño de burbujas cuando utilice la bomba de
hidromasaje. Esto puede provocar un exceso de espuma.
5. Bath oils should not be used when you operate the
whirlpool. If used while soaking, Drain and clean the
tub thoroughly prior to activating the whirlpool
system.
5. No se deben usar aceites de baño cuando opera el
hidromasaje. Si los usa cuando se sumerge, drene y
limpie la bañera cuidadosamente antes de activar el
sistema de hidromasaje.
6. The use of bath salts is not recommended.
6. No se recomienda el uso de sales de baño.
7. Both air and whirlpool systems are plumbed in a way
that water will drain from the plumbing easily.
7. Tanto los sistemas de aire como de hidromasaje están
conectados de manera que el agua se drenará
fácilmente por la tubería.
8. The air system is designed to purge within 20
minutes after use.
8. El sistema de aire está diseñado para purgarse dentro
de los 20 minutos después del uso.
9. There are no user serviceable parts located under
the tub. If a problem develops, call 1-800-221-3379.
9. No hay refacciones para el usuario ubicadas bajo la
bañera. Si surge algún problema, llame al
1-800-221-3379.
14
1.800.221.3379
ACRYLIC ALCOVE TUB
BAÑERA DE ACRÍLICO DE ALCOBA
SKU: 948823, 948821, 948056, 948254, 948256, 948258, 948061, 948262, 948062, 948272, 948274, 948276
JET OPERATION
OPERACIÓN DE LOS INYECTORES
Sitka
The jets can be easily adjusted by pointing the
jet-nozzle in the desired direction. The strength of the
water flow and air induction can be regulated through
twisting the jet- nozzle. Twisting the nozzle
counter-clockwise will decrease the water flow of that
particular jet. If the nozzle is twisted clockwise then
the water flow will increase up to its maximum flow.
Only a 1/4 turn or 90° turn is required from the lowest
flow position to the fully open position.
Los inyectores se pueden ajustar fácilmente apuntando
la boquilla de impulsión en la dirección deseada. La
fuerza del flujo del agua y la inducción del aire se pueden
regular girando la boquilla de impulsión. Al girar la boquilla
hacia la izquierda, disminuirá el flujo del agua de ese
inyector en particular. Si la boquilla se gira hacia la
derecha, el flujo del agua aumentará a su máximo. Sólo
se requiere 1/4 de giro o giro de 90° desde la posición de
menor flujo a la posición de abierto completamente.
Bradenton, Provincetown
The jets can be easily adjusted by pointing the
jet-nozzle in the desired direction. The strength of the
water flow and air induction can be regulated through
twisting the jet- nozzle. Twisting the nozzle clockwise
will decrease the water flow of that particular jet If the
nozzle is twisted counter-clockwise then the water
flow will increase up to its maximum flow. Only a 1/4
turn or 90° turn is required from the lowest flow
position to the fully open position.
Los inyectores se pueden ajustar fácilmente apuntando
la boquilla de impulsión en la dirección deseada. La
fuerza del flujo del agua y la inducción del aire se pueden
regular girando la boquilla de impulsión. Girar la boquilla
hacia la derecha, disminuirá el flujo del agua de ese
inyector en particular. Si la boquilla se gira a la izquierda,
entonces el flujo del agua aumentará a su máximo. Sólo
se requiere 1/4 de giro o giro de 90° desde la posición de
menor flujo a la posición de abierto completamente.
15
1.800.221.3379
ACRYLIC ALCOVE TUB
BAÑERA DE ACRÍLICO DE ALCOBA
SKU: 948823, 948821, 948056, 948254, 948256, 948258, 948061, 948262, 948062, 948272, 948274, 948276
WHIRLPOOL OR AIR BATH
CONTROL CENTER
CENTRO DE CONTROL DE LA
BAÑERA DE MASAJE DE AIRE O
HIDROMASAJE
1. The first button switches the water-pump on or off.
The other features will not operate unless the pump is
turned on.
1. El primer botón enciende o apaga la bomba de agua.
Las otras características no operarán a menos que se
encienda la bomba.
2. The second button sets the power level of the
pump. Holding the button depressed will cycle the
pump power from low to high in a continuous cycle.
When the desired level is reached, remove your finger
quickly from the button to maintain that power
setting.
2. El segundo botón ajusta el nivel de energía de la
bomba. Al mantener el botón oprimido, cambiará el nivel
de energía de bajo a alto en un ciclo continuo. Cuando se
alcance el nivel deseado, quite el dedo rápidamente del
botón para mantener ese ajuste de energía.
3. The third button is a three step wave action button.
Once activated, the jets expel water for the Whirpool
Bath and for the Air Bath the jets expel air in a slow
pulsating flow called wave action. There are 3 levels for
wave strength.
Level 1: operates the pump at a steady flow.
Level 2: quick wave action.
Level 3: slower wave action.
3. El tercer botón es un botón de acción de oleaje de
tres pasos. Una vez que se activa, los inyectores expelen
agua para el baño de hidromasaje y para el baño e aire,
los inyectores expelen aire en flujo pulsante lento,
denominado acción de oleaje. Existen 3 niveles de fuerza
del oleaje.
Nivel 1: opera la bomba en un flujo constante.
Nivel 2: acción de oleaje rápido.
Nivel 3: acción de oleaje más lento
TOTAL MASSAGE CONTROL
CENTER
CENTRO DE CONTROL DE
MASAJE TOTAL
Total Massage units are a combination of whirlpool
and air massages. The left three buttons on the
control panel operate the whirlpool and the right three
buttons operate the air system. The whirlpool and air
massage systems may be used at the same time if
desired. The whirlpool and air bath operations are
explained in section above.
Las unidades de masaje total son una combinación de
hidromasajes y masajes de aire. Los tres botones de la
izquierda en el panel de control operan el hidromasaje y
los tres de la derecha, el sistema de aire. Los sistemas de
hidromasaje y masaje de aire se pueden usar al mismo
tiempo si se desea. Las operaciones de hidromasaje y de
la bañera de masaje de aire están explicadas en la
sección anterior.
IN-LINE HEATER OPERATION
OPERACIÓN DEL CALENTADOR
EN LÍNEA
If your unit has an in-line heater installed, operation is
automatic only during the use of the whirlpool
function. The in-line heater will maintain the water
temperature only while the whirlpool is in operation.
Si su unidad tiene instalado un calentador en línea, la
operación es automática únicamente durante el uso de
la función de hidromasaje. El calentador en línea
mantendrá la temperatura del agua únicamente
mientras esté funcionando el hidromasaje.
16
1.800.221.3379
ACRYLIC ALCOVE TUB
BAÑERA DE ACRÍLICO DE ALCOBA
SKU: 948823, 948821, 948056, 948254, 948256, 948258, 948061, 948262, 948062, 948272, 948274, 948276
OPERATING INSTRUCTIONS
FOR PROVINCETOWN AND
BRADENTON
INSTRUCCIONES DE OPERACIÓN
PARA PROVINCETOWN Y
BRADENTON
Whirlpool baths: Equipped with on/off air switch
actuator. Each depression of the switch will activate
the pump. If off, one depression will turn the pump on.
If on, the next depression will turn it off.
Bañeras de hidromasaje: Equipadas con un accionador
de interruptor de aire de encendido y apagado. Cada vez
que oprima el interruptor, activará la bomba. Si está
apagada y se oprime una vez, se activará la bomba. Si
está encendida, al oprimirlo nuevamente, se apagará.
Air baths:
Equipped with a three-speed air switch
actuator. Each depression of the switch will change
the flow of air. The fourth depression will turn off the
air pump.
Las bañeras de aire: Están equipadas con un accionador
de interruptor de aire de tres velocidades. Cada vez que
oprima el interruptor, cambiará el flujo de aire. La cuarta
vez que oprima el botón, apagará la bomba de aire.
Total massage baths: Equipped with both an on/off air
switch actuator for whirlpool function and
three-speed air switch actuator for air function. See
above for operation details.
Bañeras de masaje total: Equipadas con accionador de
interruptor de aire de encendido/apagado para la función
de hidromasaje y un accionador de interruptor de aire de
tres velocidades para la función aire. Consulte la sección
anterior para los detalles de operación.
17
1.800.221.3379
ACRYLIC ALCOVE TUB
BAÑERA DE ACRÍLICO DE ALCOBA
SKU: 948823, 948821, 948056, 948254, 948256, 948258, 948061, 948262, 948062, 948272, 948274, 948276
CLEANING
Wash your tub using a gentle soap, such as
dishwashing liquid, and warm water. Do not use any
abrasive cleaning pads or materials. We recommend
the use of a soft sponge or microfiber washcloth.
Vinegar can be used to remove hard water buildup and
mildew. Rinse with warm water and dry with a clean,
soft cloth. To maintain the glossy tub finish, we
recommend buffing your tub every three months with
white polishing compound. Do not use metal scrapers,
wire brushers or other harsh abrasive tools.
SCRATCH REMOVAL
1. Using a damp sponge, wash the area with warm
water and dish washing liquid. Rinse thoroughly with
warm water.
2. Do not use any type of abrasive cleaning pads or
chemicals. Read the labels on your cleaners to be sure
they are gentle enough to be used on your acrylic tub.
3. Apply circular, even strokes to the scratched area
using dampened 800 and 1200 grit sandpaper.
4. Wipe the area clean with a damp sponge and rinse
thoroughly.
5. Apply an acrylic polishing compound and water with
a soft, clean cloth. Rub in a circular motion to polish
and buff the area.
6. Wipe off any excess residue and rinse the tub with
warm water. Dry the surface with a clean, soft cloth.
LIMPIEZA
Limpie su bañera con un detergente suave, como un
detergente para lavavajillas, y agua tibia. No utilice
ninguna esponja o material de limpieza abrasivos.
Recomendamos el uso de una esponja suave o un paño
de microfibra. Se puede utilizar vinagre para remover
moho y acumulación de agua calcárea. Enjuague
con agua tibia y seque con un paño limpio y suave. Para
mantener brillante el acabado de la bañera,
recomendamos pulirla cada tres meses con un
compuesto de pulido blanco.
CÓMO ELIMINAR RAYONE
1. Con una esponja mojada, limpie el área con agua
tibia y detergente para lavavajillas. Enjuague
completamente con agua tibia.
2. No utilice ningún tipo de esponjas o productos
químicos de limpieza abrasivos. Lea las etiquetas de sus
limpiadores para asegurarse de que sean lo
suficientemente suaves para utilizar en su bañera de
acrílico.
3. Aplique movimientos circulares y uniformes al área
rayada usando papel de lija de grano 800 y 1200.
4. Seque el área limpia con una esponja húmeda y
enjuague completamente.
5. Aplique un compuesto de pulido de acrílico y agua
con un paño suave y limpio. Frote con movimientos
circulares para pulir y lustrar el área.
6. Limpie los residuos y enjuague la bañera con agua
tibia. Seque la superficie con un trapo limpio y suave.
18
1.800.221.3379
ACRYLIC ALCOVE TUB
BAÑERA DE ACRÍLICO DE ALCOBA
SKU: 948823, 948821, 948056, 948254, 948256, 948258, 948061, 948262, 948062, 948272, 948274, 948276
MAINTENANCE
The use of bath oils and bath salts is not
recommended due to the difficulty in cleaning the
systems and doing so will void the consumer's
warranty.
Air and Total Massage Baths are equipped with an
Automatic Purge Cycle for the air blower only. The air
blower has a pre-programmed purge cycle built in to
expel the remaining water in the air channels. It
activates within 20 minutes after the Air Bath is turned
off and then blows for about 2 to 3 minutes. After the
cycle is completed it will shut off automatically. It is
normal to hear a blowing noise coming from the tub
after the tub has been turned off. The noise you hear
is the cleaning cycle in operation. It is recommended
to activate the air bath routinely to purge water from
the air channel when tub is used as a soaker or shower
only. Purge cycle is only activated when blower has
been used.
Pump and pipe circulation system should be flushed
before first use and on a monthly basis when product
is under normal use.
MANTENIMIENTO
No se recomienda el uso de aceites y sales de baño,
debido a la dificultad para la limpieza de los sistemas, y al
hacerlo anulará la garantía del consumidor.
Las bañeras de masaje de aire y masaje total están
equipadas con un ciclo de limpieza automático
únicamente para las salidas de aire. Las salidas de aire
tienen un ciclo integrado de limpieza preprogramado
para expulsar el agua remanente en los canales de aire.
Se activa dentro de los 20 minutos posteriores a haber
apagado la bañera de masaje de aire y funciona por cerca
de 2 a 3 minutos. Después que el ciclo se ha completado
se apagará automáticamente. Es normal escuchar un
soplido que proviene de la bañera después de haberla
apagado. El ruido que escucha es el ciclo de limpieza en
operación. Se recomienda que active las salidas de aire
de su bañera rutinariamente, para purgar el agua del
canal del aire cuando la tina se usa como un remojador o
únicamente como regadera. El ciclo de purga solo se
activa cuando se ha usado la salida de aire. El sistema de
circulación de la bomba y la tubería se deberían enjuagar
antes de usarlos por primera vez y mensualmente
cuando el producto se usa regularmente.
El sistema de circulación de la bomba y la tubería se
deberían enjuagar antes de usarlos por primera vez y en
forma mensual cuando el producto se usa regularmente.
19
1.800.221.3379
ACRYLIC ALCOVE TUB
BAÑERA DE ACRÍLICO DE ALCOBA
SKU: 948823, 948821, 948056, 948254, 948256, 948258, 948061, 948262, 948062, 948272, 948274, 948276
PROBLEM CAUSES SOLUTION
Motor will not start
- Circuit breaker may be tripped
- Loose/Bad wire connection
- GFCI is tripped
- Incorrect electrical installation
- Jets are closed
- Lose/Bad wire connection
- Incorrect Amp usage
- Air supply to motor
- Jets are closed
- Suction/ strainer may be clogged
- Air valves are closed
- Jets are closed
- Pump does not have space
to operate
- Debris in pump
- Incorrect Amp usage
- Clogged pipe
- Incorrect electrical installation
Water leaks - Leak in the plumbing
TROUBLESHOOTING
Low Water Flow
Motor overheating and
cycling on and off
Pump/motor operates
function
Motor makes humming
noise but won’t start
- Make sure it is a 20 Amp circuit breaker with nothing else tied to the circuit
- Check for incorrect or lose wire connections, and pump/heater has
been properly grounded
- Reset if necessary
- Insure each motor/ in-line heater uses its own 20 Amp circuit breaker
and GFCI plug
- Make sure jets are fully operational and water is flowing
- Check for incorrect or loose wire connections
- Check for low voltage supply
- Make sure motor gets fresh air supply and vents are not clogged
- Open jets fully
- With pump off, remove the suction cover/strainer and remove any debris.
- Open all air control valves
- Make sure jets are fully open
- Make sure the motor shaft turns free
- Check for jammed impeller or an obstruction on the (volute) casing.
- Check for low voltage and undersized wire
- Check for clogged plumbing lines
- Check for low voltage
- Check compression fitting making sure they are properly aligned and
secured. Hand tighten only. Do not use any tools.
- Make sure the o-ring is properly seated and not damaged.
20
1.800.221.3379
ACRYLIC ALCOVE TUB
BAÑERA DE ACRÍLICO DE ALCOBA
SKU: 948823, 948821, 948056, 948254, 948256, 948258, 948061, 948262, 948062, 948272, 948274, 948276
PROBLEMA CAUSAS SOLUCIÓN
El motor no arranca
- El disyuntor puede estar activado
- La conexión del cable está floja o defectuosa
- El GFCI está activado
- Instalación eléctrica incorrecta
- Los inyectores están cerrados
- La conexión del cable está floja o defectuosa
- Uso de amperaje incorrecto
- Suministro de aire al motor
- Los inyectores están cerrados
- La succión o el filtro están obstruidos
- Las válvulas de aire están cerradas
- Los inyectores están cerrados
- La bomba no tiene espacio para funcionar
- Residuos en la bomba
- Uso de amperaje incorrecto
- Tubería obstruida
- Instalación eléctrica incorrecta
Fugas de agua - Fugas en la plomería
RESOLUCIÓN DE PROBLEMAS
Fugas de agua bajo
El motor se sobrecalienta y
se enciende y apaga
constantemente
Función operación de
bomba motor
El motor hace un murmullo
pero no arranca
- Asegúrese de que sea un disyuntor de 20 amperes con nada más vinculado al circuito
- Compruebe que las conexiones no sean incorrectas o estén flojas, y que la bomba o
el calentador se hayan conectado a tierra apropiadamente
- Restablezca si fuera necesario
- Asegúrese que cada motor y calentador en línea utilice su propio disyuntor de 20
amperes y su enchufe GFCI
- Asegúrese de que los inyectores estén funcionando completamente y que el agua
fluya
- Revise que las conexiones de los cables no estén flojas o sean incorrectas
- Compruebe si hay bajo voltaje del suministro
- Asegúrese de que el motor tenga suministro de aire fresco y que las ventilaciones
no estén obstruidas
- Los inyectores deben estar completamente abiertos
- Con la bomba apagada, retire la cubierta o filtro de succión y elimine cualquier
residuo.
- Abra todas las válvulas de control de aire
- Asegúrese de que los inyectores estén completamente abiertos
- Asegúrese de que el eje del motor gire libremente
- Revise si el impulsor está atascado o si hay alguna obstrucción en el difusor (en
espiral).
- Compruebe si hay bajas en el voltaje o un cable de calibre menor
- Revise que las tuberías de plomería no estén obstruidas
- Compruebe si el voltaje es bajo
- Compruebe los ajustes de compresión, asegurándose de que estén alineados y
asegurados
apropiadamente. Solo apriete manualmente. No use herramientas.
- Asegúrese de que la junta tórica esté asentada apropiadamente y no esté dañada.
  • Page 1 1
  • Page 2 2
  • Page 3 3
  • Page 4 4
  • Page 5 5
  • Page 6 6
  • Page 7 7
  • Page 8 8
  • Page 9 9
  • Page 10 10
  • Page 11 11
  • Page 12 12
  • Page 13 13
  • Page 14 14
  • Page 15 15
  • Page 16 16
  • Page 17 17
  • Page 18 18
  • Page 19 19
  • Page 20 20

Signature Hardware 446976 Installation guide

Category
Massagers
Type
Installation guide

Ask a question and I''ll find the answer in the document

Finding information in a document is now easier with AI