Page is loading ...

92451
2.4GHz FHSS-3
The new 92451 Super Response 2.4GHz FHSS-3 receiver is the fastest response (lowest latency) receiver Airtronics has ever offered. With a 2.5ms
response time, you will feel more connected to your model than with all other previous radio control systems. Combined with our specially made Super
Response servos (available separately), the 92451 Super Response receiver will give you reaction speeds like never before.
Receiver Operating Instructions
S
R
Due to the frame rate of the 92451 Super Response 2.4GHz FHSS-3 receiver, there are many older electronic radio control devices, such as ESC's and
analog servos, which will not work with this receiver. It is important to note that some analog servos will DAMAGE this receiver, therefore, analog servos
must NOT be used with this receiver. We have tested this receiver and found that many of the newest ESC's from LRP are 100% compatible, but many older
or off-brand ESC's may not be compatible with this receiver.
All modern digital servos will seemingly work BETTER with this receiver than any standard speed receiver. However, to completely take advantage
of this technology, you must use Airtronics Super Response servos to truly experience the superior response time.
Model: 92451 Super Response
Frequency: 2.4GHz FHSS-3
Input Voltage: 4.8v - 6.0v
Weight: 0.3oz (8.5gr)
Dimensions: 1.43 x 0.94 x 0.59in (36.5 x 24.0 x 15.0mm)
Fail Safe Limit: 3.8v Default / 3.5v - 5.0v Adjustable
Super Response
WARNING This receiver is NOT equipped with BEC circuitry. DO NOT use a receiver battery any greater than 6.0 volts to power the receiver. Use only
a 4.8 volt to 6.0 volt receiver battery, an ESC with a BEC circuit that lowers the voltage to the receiver, or a voltage regulator that lowers the voltage to
the receiver.
receiver compatability - please read before use!
WARNING This receiver will NOT work with analog servos of any kind. Do NOT use ANALOG servos with this product. IT WILL DAMAGE the receiver
and this damage will NOT be covered under warranty.
WARNING This receiver is not compatible with all ESC's.
receiver information
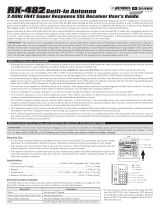
Bind Button
Batt/DSC
CH 4 Auxiliary 2
CH 3 Auxiliary 1
CH 2 Throttle/ESC
CH1 Steering
= Signal
= Positive
= Negative
Bind LED Coaxial Cable
Antenna
Reception Wire
l
This receiver operates on the 2.4GHz frequency band. The 2.4GHz connection is determined by the transmitter and receiver pair. Unlike ordinary
crystal-based systems, your model can be used without frequency control.
l
The 2.4GHz frequency band may be used by other devices, or other devices in the immediate area may cause interference on the same frequency band.
Always before use, conduct a bench test to ensure that the servos operate properly. Also, conduct checks with the transmitter as distant as possible from
your model.
l
The response speed of the receiver can be affected if used where multiple 2.4GHz radio controllers are being used, therefore, carefully check the area
before use. Also, if response seems slow during use, stop your model immediately and discontinue use.
l
If the 2.4GHz frequency band is saturated (too many radio controllers on at once), as a safety precaution, the radio control system may not bind. This
ensures that your radio control system does not get hit by interference. Once the frequencies have been cleared, or the saturation level has dropped, your
radio control system should be able to bind without any problems.
2.4GHz frequency band precautions
This receiver is compatible only with Airtronics FHSS-3 surface transmitters. It is not compatible with FHSS-2 or FHSS-1 transmitters.
l
The receiver antenna consists of a coaxial cable and a reception wire (the thin tip at the end of the coaxial cable). When you mount
the receiver antenna, do not bend the reception wire. Reception performance decreases if the reception wire is bent.
l
The antenna should be installed into a vertical plastic tube per your particular model's assembly instructions. See diagram at right.
Keep the receiver antenna as far away from the motor, battery, and ESC as possible.
l
The antenna should not come into contact with any carbon or metal chassis components.
l
The receiver is susceptible to vibration, shock, and moisture. Take appropriate measures to protect against vibration and moisture.
We suggest wrapping the receiver in shock-absorbing foam when installing it into your model.
l
The antenna is delicate, therefore, handle it with care. Do not pull on the antenna with force. Do not cut or extend the antenna.
l
The coaxial cable (the thicker portion or the antenna) can be bent into gentle curves, however, do not bend the coaxial cable acutely,
or repeatedly bend it, or the antenna core can be damaged.
l
There is a danger of runaway operation if connectors loosen during use. Make sure that the receiver, servo(s), and switch connectors are securely tted.
l
Contact between metal parts mounted on a model can result in electrical noise, which can adversely effect receiver performance and possibly result in
runaway operation or damage to your model.
l
With electric-powered models, be sure to t the motor with a noise suppression capacitor. Without a noise suppression capacitor, excessive electrical noise
generation can cause runaway operation and/or result in damage to your model.
receiver mountinG
Antenna Tube
Coaxial Cable
Antenna
Reception Wire

It is necessary to pair the transmitter and receiver to prevent interference from radio controllers operated by other users. This operation is referred to as
'binding'. Once the binding process is complete, the setting is remembered even when the transmitter and receiver are turned OFF, therefore, this procedure
usually only needs to be done once. Under some circumstances, the receiver may not operate after turning the transmitter and receiver ON. If this occurs,
perform the binding process again.
1) Turn on the transmitter, then press the two Function keys at the same time until Function Menu F3 is
displayed. If the SET-UP menu is not automatically highlighted, continue to press the Function key until
the SET-UP menu is highlighted.
2) With the SET-UP menu highlighted, press the Function key to select [BIND] in the Programming
Window. SET BIND BUTTON will be displayed in the Programming Window.
Before beginning the binding process, plug your receiver battery into the switch, then plug the switch into the BATT/DSC slot in the receiver, making
sure that the polarity is correct. Make sure that both the transmitter and receiver are turned OFF.
When the binding procedure is successful, the Bind LED on the receiver will stay solid blue when both the transmitter and receiver are turned ON. If
the Bind LED on the receiver is blinking rapidly, the transmitter and receiver are not paired. In this case, turn both the transmitter and receiver OFF,
then repeat the binding procedure.
© 2009, All Rights Reserved. Version 1
http://www.airtronics.net
Global Hobby Distributors
18480 Bandilier Circle
Fountain Valley, CA 92708
Telephone: (714) 963-0329
Fax: (714) 964-6236
Email: [email protected]
Airtronics is Distributed Exclusively in North America by:
warranty
Your Airtronics 92451 Super Response 2.4GHz FHSS-3 receiver is warranted against manufacturer defects in materials and workmanship, at the original
date of purchase.
Any modications or abuse of the product will void any warranty. Crash damage will not be covered by any warranty. The receiver is not waterproof.
Water damage will not be covered by any warranty. Damage caused by the use of analog servos will not be covered by any warranty.
bindinG tHe receiver to your transmitter
This section describes binding the 92451 Super Response 2.4GHz FHSS-3 receiver to the Airtronics M11X FHSS-3 transmitter. For information on
binding the receiver to a different FHSS-3 transmitter, such as the Airtronics MX-3X, see your transmitter's Operating Manual.
usinG tHe receiver - nor and sHr response modes
The 92451 Super Response 2.4GHz FHSS-3 receiver can operate in two different modes, based on the Servo Mode Setting in the transmitter's Modulation
Menu. To change the Servo Mode Setting, refer to your transmitter's Operating Manual.
Use the following two modes as described below:
NOR (Normal <> Servo High Response) - When the transmitter Servo Mode Setting is set to NOR Mode, any brand of digital servo can be used. In NOR
Mode, digital servo speed is increased, even beyond the manufacturer's stated speed. This results in ultra-fast servo transit times.
SHR (Servo High Response <> Servo Super Response) - When the transmitter Servo Mode Setting is set to SHR Mode, and only when used in conjunction
with Airtronics Super Response servos, servo reaction time is increased. This results in virtually no lag between the time you move the transmitter controls and
when the servos react. This makes you feel more 'connected' to your model than ever.
To take advantage of SHR Super Servo Response, Airtronics Super Response servos must be used. You will not notice any difference if using another
type of servo. If you use another type of servo, use NOR Mode. For more information on Super Response servos, see your local Airtronics dealer.
5) After ~2 seconds release the Bind Button. The Bind LED on the receiver will continue to blink slowly.
Quickly press the ENTER key on the transmitter. SENDING will be displayed in the Programming
Window, the Bind LED on the receiver will blink rapidly, then the Bind LED on the receiver will turn
solid indicating the binding process is complete.
After releasing the Bind Button, you must press the ENTER key quickly (within a couple of
seconds). If you take too much time, you will need to restart the binding process.
3) Press the key. SEND BIND COMMAND will be displayed in the Programming Window.
4) While holding down the Bind Button on the receiver, turn the receiver ON. The Bind LED on the
receiver will blink slowly.
Use the tip of a pencil or a 1.5mm hex wrench to reach the Bind Button on the receiver.
/