V2 WALLY1/434 Owner's manual

Type
Owner's manual
WALLY
IL n. 163
EDIZ. 06/12/2010
V2 S.p.A.
Corso Principi di Piemonte, 65/67
12035 RACCONIGI (CN) ITALY
tel. +39 01 72 81 24 11 - fax +39 01 72 84 050
[email protected] - www.v2home.com
Fig. 1
ENGLISH
The new superheterodyne receiver always guarantees a correct
functioning in disturbed environments: its good sensitivity and
high selectivity make it immune from most disturbances around
the frequency reception area. The new self-learning
programming system enables the memorization of the
PERSONAL PASS series transmitters.
It is possible to store up to 240 different codes with
self-learning mode.
It is also available in the 4-channel version PLUS, which can
store up to 1008 different codes (WALLY4PLUS,
WALLY4/434P, WALLY4/868P)
Three different functions can be programmed by means of
SW1 key for the outputs: monostable, bistable and timer.
Self-learning of transmitters managed by radio.
Management of the substitutive transmitter.
It is possible to enable or disable the ROLLING CODE mode.
Memory full warning: the receiver blinks 15 times.
It can be connected to the PROG2 portable programmer
(version 3.6 or newer), which allows to manage devices by
means of WINPPCL (version 2.1 or newer)
CAUTION: before inserting the receiver into the relevant
TX connector of the PROG2, make sure that it is not
powered.
PROGRAMMING
The self-learning programming system enables the code
memorization and the setting of the following functioning
modes:
MONOSTABLE: it activates the corresponding relay through the
time of tx transmission. When the transmission stops, the relay
goes automatically off.
BISTABLE: it activates the corresponding relay on the first tx
transmission. The relay goes off on the second transmission.
TIMER: the tx transmission activates the corresponding relay
which goes off after the set time (max 7,5 minutes).
PROGRAMMING OF THE MONOSTABLE
FUNCTION
Select the desired channel in accordance with the following
table:
Press the SW1 key of the receiver N times, as indicated
above: the relevant led goes on
Within 5 seconds, press and hold pressed the push button of
the transmitter
The led of the receiver goes out and goes on again: the code
was stored and the receiver keeps waiting for 5 secs for a
new code to memorize
PROGRAMMING OF THE TIMER FUNCTION
To memorize the TIMER function on the first channel, proceed as
follows:
1. Press and keep pressed the SW1 button of the receiver :
the led L1 (relating to the first channel) lights up for a few
seconds.
2. When led L1 goes off, release the SW1 button. Led L1 starts
a sequence of flashings at low speed (1 flash per second).
The number of flashing corresponds to the time which can
be set as shown in the table.
3. Count the number of led L1 flashings corresponding to the
time you wish to set. Press the rx button SW1 during the
wished flashing: the sequence of flashings stops and led L1
remains on.
4. Within 5 seconds, press and hold pressed the push button of
the transmitter.
5
. The led of the receiver goes out and goes on again: the code
was stored and the receiver keeps waiting for 5 secs for a
new code to memorize.
To programme channels no. 2, 3 and 4, repeat the above
mentioned steps no. 2, 3 and 4, taking into consideration
leds L2, L3 or L4 in accordance with the selected channel.
PROGRAMMING OF THE BISTABLE
FUNCTION
To memorize the bistable function on the first channel, proceed
as follows:
1. Press and keep pressed the receiver SW1 button : led L1
(relating to the first channel) lights up for a few seconds.
2. When led L1 goes off, release SW1 button; led L1 starts
flashing at low speed (1 flash per second). When the 30
flashings of the timer function are over, led L1 remains on.
3. Within 5 seconds, press and hold pressed the push button of
the transmitter.
4. The led of the receiver goes out and goes on again: the code
was stored and the receiver keeps waiting for 5 secs for a
new code to memorize.
To programme channels no. 2, 3 and 4, repeat the above
mentioned steps no. 2, 3 and 4, taking into consideration
leds L2, L3 or L4 in accordance with the selected channel.
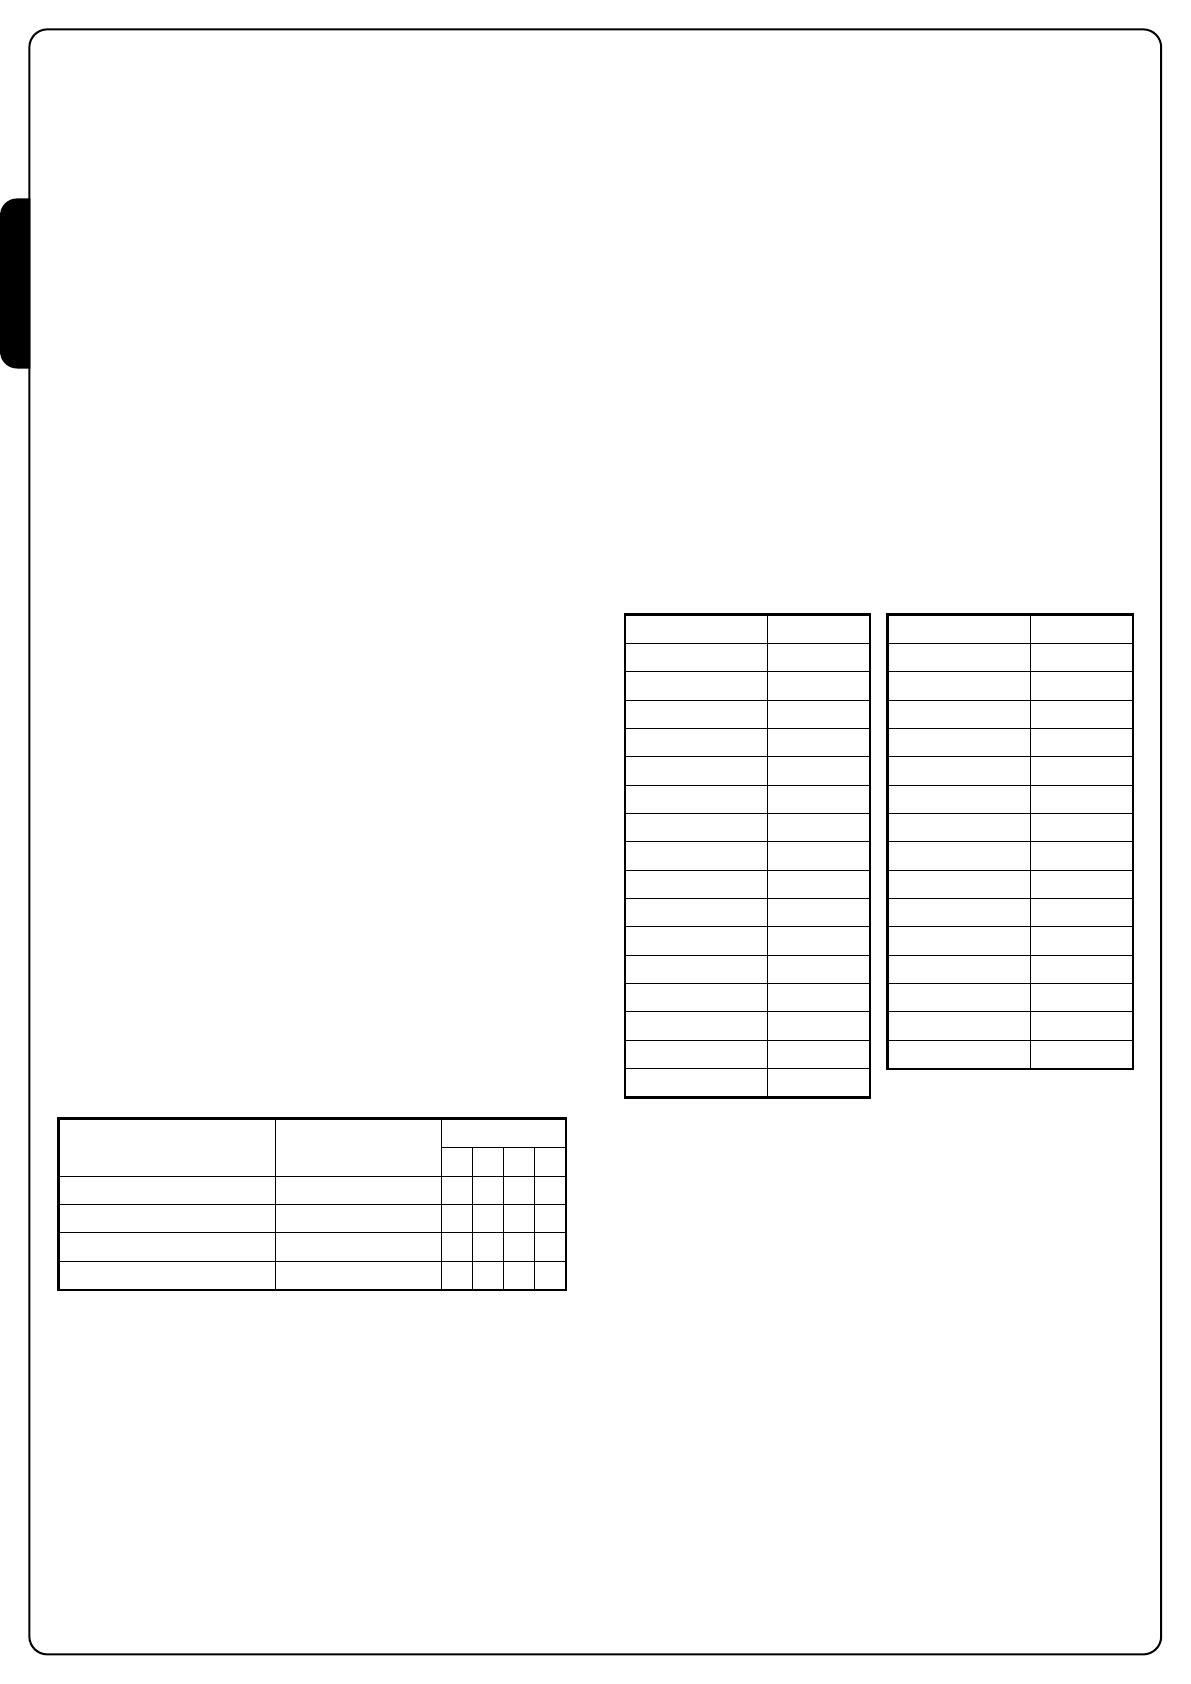
SELECTED CHANNEL N°IMPULSES SW1
LED ON
L1 L2 L3 L4
CHANNEL 1 MONOSTABLE 1
CHANNEL 2 MONOSTABLE 2
CHANNEL 3 MONOSTABLE 3
CHANNEL 4 MONOSTABLE 4
Flashing Time
1 01 sec.
2 02 sec.
3 03 sec.
4 04 sec.
5 05 sec.
6 06 sec.
7 07 sec.
8 08 sec.
9 09 sec.
10 10 sec.
11 11 sec.
12 12 sec.
13 13 sec.
14 14 sec.
15 15 sec.
16 30 sec.
Flashing Time
17 1 min.
18 1,5 min.
19 2 min.
20 2,5 min.
21 3 min.
22 3,5 min.
23 4 min.
24 4,5 min.
25 5 min.
26 5,5 min.
27 6 min.
28 6,5 min.
29 7 min.
30 7,5 min.
31 BISTABLE
ENGLISH
ROLLING CODE MODE
It is possible to activate or disable the ROLLING CODE mode. Its
activation makes any attempt of code duplication impossible.
To activate the "ROLLING CODE" function it is necessary to act
on the Dip-switch 2 on the printed circuit:
Dip 2 ON = ROLLING CODE mode activated
Dip 2 OFF = ROLLING CODE mode not activated
Enabling the ROLLING CODE by means of WINPPCL makes the
Dip-switch 2 position ineffective.
REMOTE RADIO LEARNING
This procedure allows to memorize new transmitters by radio, in
s
equence and without removing the receiver from the
installation.
The transmitter which allows to enable the programming by
radio must be memorized in advance.
All transmitters programmed by radio will share the same key
configuration as the transmitter which activated the
programming.
Example:
TX A transmitter memorized with the following key configuration:
Key 1 on the first channel in monostable mode.
Key 2 on the third channel in timer mode.
Key 3 on the fourth channel in bistable mode.
TX B transmitter to memorize.
Hold for 5 seconds minimum the keys 1+2 or 1+3 of TX A
Release both keys
Press, within 5 seconds, the required key of TX B
Release and press within 5 seconds on the TX B another key
to be memorized. Repeat this operation for other transmitters
To exit the self-learning mode wait for at least 5 seconds
The key configuration of TX B transmitter and other
transmitters, set with this procedure, will be the same as
TX A transmitter.
SUBSITUTIVE TRANSMITTER
The substitutive transmitter, generated only by means of
WINPPCL, allows to replace by radio a transmitter stored in the
receiver.
A single transmition with the specially programmed
SUBSTITUTIVE TX, nearby the receiver, replaces the transmitter
code with the new one without removing the receiver from the
installation.
To synchronise the ROLLING CODE transmit twice with each key
of the SUBSTITUTIVE TX.
Example:
Memorized TX A transmitter
It is possible to make three replacements maximum per code, so
for TX A you can find:
TX B replaces TX A (TX A is no longer operative)
TX C replaces TX B (TX B is no longer operative)
TX D replaces TX C (TX C is no longer operative)
FULL CODE ERASING
To perform a full code erasing do the following:
Turn off the power of the receiver
Press and hold pressed the SW1 key of the receiver
At the same time turn on the power again. The receiver LED
goes on: release the SW1 key
The memory spaces are empty and available for a new
programming.
To perform a partial code erasing the PROG2 portable
programmer is required.
PROGRAMMING LOCK
La funzione di BLOCCO PROGRAMMAZIONE è impostabile solo
t
ramite WINPPCL.
Questa funzione impedisce una qualsiasi riprogrammazione del
ricevitore, sia tramite il tasto SW1 che via radio. Il ricevitore può
essere riprogrammato solo tramite WINPPCL.
RELAY CONTACT
The four output relay contacts are normally open type; it is
possible to change it as normally closed type. Refering to fig. 1
connect point A with point B and cut the trace at point C (Fig.1).
WARNING! IF THE RECEIVER IS SUPPLIED BY 24 VAC-VDC,
DO NOT ACTIVE MORE THAN 2 RELAYS SIMULTANEOUSLY
TECHNICAL DATA
IMPORTANT REMARKS
"This device complies with Part 15 of the FCC Rules. Operation is
subject to the following two conditions: (1) this device may not
cause harmful interference, and (2) this device must accept any
interference received, including interference that may cause
undesired operation."
"Changes or modifications not expressly approved by the party
responsible for compliance could void the user's authority to
operate the equipment."
99/05/CE DIRECTIVE CONFORMITY
The WALLY are in conformity with the provisions of the following
EC directive(s) (including all applicable amendments) and that the
standards referenced here below:
EN 60950-1, EN 301 489-1, EN 301 489-3, EN 300 220-3
Racconigi, 12/01/2010
V2 SPA legal representative
Cosimo De Falco
Power supply 12 Vac/dc (DIP 1 ON) / 24 Vac/dc (DIP 1 OFF)
Relay contacts 1A / 30Vdc
Temperature -20 ÷ +60°C
Consumption 17mA stand by
Sensibility -103 dBm
S/N > 17dB @ 100dBm m=100%
Size 132 x 26 x 74 mm
Protection degree IP55
  • Page 1 1
  • Page 2 2
  • Page 3 3
  • Page 4 4
  • Page 5 5
  • Page 6 6
  • Page 7 7
  • Page 8 8
  • Page 9 9
  • Page 10 10
  • Page 11 11
  • Page 12 12
  • Page 13 13
  • Page 14 14
  • Page 15 15
  • Page 16 16

V2 WALLY1/434 Owner's manual

Type
Owner's manual

Ask a question and I''ll find the answer in the document

Finding information in a document is now easier with AI