Page is loading ...

FileMaker
®
9
Instant Web Publishing Guide

© 2004-2007 FileMaker, Inc. All Rights Reserved.
FileMaker, Inc.
5201 Patrick Henry Drive
Santa Clara, California 95054
FileMaker is a trademark of FileMaker, Inc., registered in the
U.S. and other countries, and ScriptMaker and the file folder logo
are trademarks of FileMaker, Inc. All other trademarks are the
property of their respective owners.
FileMaker documentation is copyrighted. You are not authorized
to make additional copies or distribute this documentation
without written permission from FileMaker. You may use this
documentation solely with a valid licensed copy of FileMaker
software.
All persons and companies listed in the examples are purely
fictitious and any resemblance to existing persons and companies
is purely coincidental. Credits are listed in the
Acknowledgements document provided with this software.
Mention of third-party products is for informational purposes
only and constitutes neither an endorsement nor a
recommendation. FileMaker, Inc. assumes no responsibility with
regard to the performance of these products.
For more information, visit our web site at www.filemaker.com.
Edition: 01

Contents
Chapter 1
About publishing FileMaker Pro databases on the web 5
About this guide 6
Instant Web Publishing requirements 7
Connecting to the internet or an intranet 7
About hosting databases with FileMaker Pro 7
About hosting databases with FileMaker Server Advanced 7
Web publishing improvements 8
Publishing files from previous versions of FileMaker Pro 8
Publishing files from FileMaker Pro 7 and 8 8
Publishing files from FileMaker Pro 6 and earlier 8
Chapter 2
Publishing your database on the web 11
Sharing a database with Instant Web Publishing 11
Choosing a language for Instant Web Publishing 13
Specifying a port number for web publishing 13
Checking the maximum number of web connections 14
Restricting access except to specified IP addresses 14
Disconnecting inactive web accounts 15
Linking to a database from an HTML page 15
Using a custom home page 16
Publishing FileMaker Pro data on static web pages 16
General steps for publishing static data 17
Chapter 3
Working with FileMaker databases on the web 19
Web browser requirements 19
Accessing a FileMaker database from the web 20
Logging in to a file 21
Working with data in Instant Web Publishing 22
Viewing and modifying records in Browse mode 22
Finding records 23
Working with records that contain a web viewer 24
Logging out of a database and closing a web session 24
Displaying a database with the status area hidden 25
Differences between FileMaker Pro and Instant Web Publishing 25
Benefits to accessing databases with Instant Web Publishing 25
Benefits to accessing databases with FileMaker Pro 26

4 FileMaker Instant Web Publishing Guide
Chapter 4
Designing a database for Instant Web Publishing 27
Tips for designing layouts for Instant Web Publishing 27
Tips for rendering layouts in Instant Web Publishing 27
Design considerations for List View and Table View 28
Tips for working with data in a web browser 28
General database design considerations 29
Working with graphics, sounds, and movies on the web 30
Setting the initial layout and view 30
Hiding the status area to customize the interface 31
Specifying the sort order for web users 31
Web viewer design considerations 32
Scripts and Instant Web Publishing 33
Script steps tips and considerations 33
Script Steps 35
Creating a script to log out of a database and close the session 36
Hosting databases with FileMaker Server Advanced: an overview 36
Documenting your solution 36
Chapter 5
Testing, monitoring, and securing your site 37
Testing your database with a network connection 37
Testing your database without a network connection 37
Monitoring web activity with log files 37
Securing your data 38
Index 41

Chapter 1
About publishing FileMaker Pro databases
on
the web
With FileMaker
®
Pro, you can display your databases on the web in a variety of ways. This makes your data:
1 available to many people using a compatible web browser, anywhere in the world. (You can, however,
restrict access to files.)
1 accessible from many locations, for example, while traveling or working remotely.
There are three ways to publish your data using FileMaker Pro.
Instant Web Publishing: With Instant Web Publishing, you can quickly and easily publish your database
on the web. You don’t need to modify your database files or install additional software—anyone with
compatible web browser software and access to the internet or an intranet can connect to your database to
view, edit, sort, or search records, if you give them access privileges. You can use additional software to
perform additional tasks, for example, to configure a firewall to secure your network.
Static publishing: If your data rarely changes, or if you don’t want users to have a live connection to your
database, you can use static publishing. With static publishing, you export FileMaker Pro data to create a
web page that you can further customize with HTML. The web page doesn’t change when information in
your database changes, and users don’t connect to your database. (With Instant Web Publishing, data is
updated in a web browser window each time the browser sends a request to FileMaker Pro.) For more
information, see “Publishing FileMaker Pro data on static web pages” on page 16.
Custom Web Publishing: For more control over the appearance and functionality of your published
database, use the Custom Web Publishing technologies available in the FileMaker Server software.
With XML, XSLT, and PHP, you can:
1 Integrate your database with another website
1 Determine how users interact with data
1 Control how data displays in web browsers
For more information, see FileMaker Server Custom Web Publishing with XML and XSLT and
FileMaker
Server Custom Web Publishing with PHP.
Important Security is increasingly important when you publish data on the web. Review the security
guidelines in the FileMaker Pro User’s Guide, available as a PDF file from www.filemaker.com/downloads.

6 FileMaker Instant Web Publishing Guide
About this guide
This guide provides information about the Instant Web Publishing and static web publishing features in
FileMaker Pro. It explains:
1 what you need to publish databases on the web
1 how to publish your databases using FileMaker Instant Web Publishing
1 what web users need to access databases
1 how web users can access and interact with your database on the internet or an intranet
FileMaker Pro documentation uses the term publishing on the web to refer to databases that users can access
on the internet or on an intranet using a web browser.
This guide uses “FileMaker Pro” to refer to both FileMaker Pro and FileMaker Pro Advanced, unless
describing specific FileMaker Pro
Advanced features.
Important You can download PDFs of FileMaker documentation from www.filemaker.com/downloads.
Any updates to this document are also available from the website.
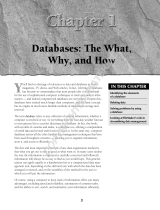
Data displayed in a FileMaker Pro layout
Data from a FileMaker layout displayed in a
web browser with Instant Web Publishing

Chapter 1
|
About publishing FileMaker Pro databases on the web 7
Instant Web Publishing requirements
To publish databases using Instant Web Publishing you need:
1 a Windows- or Mac OS-based computer running FileMaker Pro or FileMaker Server Advanced,
enabled for Instant Web Publishing
1 access to the internet or an intranet
1 one or more open FileMaker Pro databases
1 the FileMaker Pro web publishing components (automatically installed with a complete installation)
1 a web browser for testing database access (see “Web browser requirements” on page 19)
Important You cannot enable Instant Web Publishing in FileMaker Pro if FileMaker Server or
FileMaker Server Advanced is also running on the same computer.
Connecting to the internet or an intranet
When you publish databases on the internet or an intranet, the host computer must be running FileMaker Pro
or FileMaker
Server Advanced, and the databases you want to share must be open.
In addition:
1 It is strongly recommended that you publish your database on a computer with a full-time internet or
intranet connection using TCP/IP. You can publish databases without a full-time connection, but they are
only available to users when your computer is connected to the internet or an intranet.
1 The host computer should have a dedicated static (permanent) IP address or a domain name. If you
connect to the internet with an internet service provider (ISP), your IP address might be dynamically
allocated (it is different each time you connect). A dynamic IP address makes it more difficult for users
to locate your databases. If you are not sure of the type of access available to you, consult your ISP or
network administrator.
About hosting databases with FileMaker Pro
FileMaker Pro Instant Web Publishing is designed for sharing data in small workgroups, or for accessing
your own data on a network. When hosted with FileMaker Pro, Instant Web Publishing can share files with
up to five concurrent web users.
Note You must use FileMaker Server Advanced to use Instant Web Publishing to share files with more than
five web users.
About hosting databases with FileMaker Server Advanced
To share information with more simultaneous web users, you can host the databases with FileMaker Server
Advanced. Other benefits of hosting web published files with FileMaker Server Advanced include:
1 Better support for long running applications
1 Easier maintenance with support for scheduled activities like backups and remote administration
1 Support for hosting more files simultaneously
1 Increased security with SSL encryption
For general information, see “Hosting databases with FileMaker Server Advanced: an overview” on
page 36. For more information, see FileMaker Server Custom Web Publishing with XML and XSLT,
FileMaker Server Custom Web Publishing with PHP and FileMaker Server Help.

8 FileMaker Instant Web Publishing Guide
Web publishing improvements
Web viewers work in Instant Web Publishing. These objects can calculate a URL based on field data and
display the web page directly in a FileMaker Pro layout. For more information about web viewers, see
www.filemaker.com/support/technologies.
For information on other new FileMaker Pro and FileMaker Pro Advanced features, see the Installation and
New Features Guide for FileMaker Pro and FileMaker Pro Advanced.
Publishing files from previous versions of FileMaker Pro
Publishing files from FileMaker Pro 7 and 8
Because FileMaker Pro, versions 7, 8, 8.5, and 9, share the same format, Filemaker Pro 9 can open
FileMaker
Pro 7 and 8 files without converting them. You can even use FileMaker Pro 9 files with
FileMaker
Pro 7 and 8. However, any layout that contains new features will not be supported in
Instant
Web Publishing when you open the file in a previous version.
FileMaker recommends that, once you have created or opened a file in FileMaker Pro 9, you do not make
database design or layout changes using an earlier version of FileMaker
Pro, particularly to features that
have changed in FileMaker
Pro 9.
Publishing files from FileMaker Pro 6 and earlier
Before converting databases from FileMaker Pro 6 and earlier to the new file format, it is important to
review the FileMaker Pro User’s Guide, available as a PDF file from www.filemaker.com/downloads.
Here are some considerations when converting files that are shared with Instant Web Publishing:
1 You are no longer limited to picking a couple of layouts for web views—all layouts are available to web
users, based on their user accounts. The Web Styles available with FileMaker
Pro 6 and earlier are no
longer supported. After you convert your files, re-evaluate which layouts should be available on the web
to each user account.
1 The access privileges model has been improved. Consider re-assigning user names and passwords to take
advantage of the integrated security model. For more information on accounts and privileges, see
FileMaker Pro Help.
1 Script support for the web has been enhanced.
1 Access privileges for web users can be set to allow execution of specific, individual scripts and
prevent execution of others.
1 ScriptMaker
™
script steps are clearly indicated as “web compatible”; special scripts can be created for
web users. After converting your files, open each script that web users might run and enable Indicate
web compatibility to see if your scripts contain steps that might produce unexpected results when
executed from a web browser.
1 On the web, scripts are always executed with Set Error Capture on. If your scripts relied on Set Error Capture
being disabled (off), they may not function the same way. Test your files thoroughly after conversion.
1 Web users can dynamically choose a layout view to work with data, toggling between Form View,
List View, and Table View. You can limit access to a view in the Views of the Layout Setup dialog box.
For more information, see FileMaker
Pro Help.

Chapter 1
|
About publishing FileMaker Pro databases on the web 9
1 FileMaker Pro clients can no longer host databases with Instant Web Publishing. The files must be web
published on the host computer.
1 It is no longer possible to specify the starting and ending points for a range of records in Table View.
Instead, you can specify the starting point and the next 50 records (or remainder of the found set,
whichever is smaller) are displayed.
1 The URL syntax has changed for web-published files. If you manually created a link to access a database
on the web, you must update the link after converting the file. For more information, see
“Linking to a
database from an HTML page” on page 15.
1 The Web Security databases are no longer supported. If you relied on them for web-based security,
you must transfer the accounts, passwords and associated privileges into your converted database files in
FileMaker Pro.

10 FileMaker Instant Web Publishing Guide

Chapter 2
Publishing your database on the web
With FileMaker Pro, it is easy to share your database on the web dynamically with Instant Web Publishing,
or statically, by exporting data as HTML or XML. If you are connected to a LAN or WAN, you can share
your file without requiring additional software. To share files over the internet, contact an Internet Service
Provider (ISP) for internet access and information about hosting a database.
Sharing a database with Instant Web Publishing
To publish databases on the web with FileMaker Pro, you enable the Instant Web Publishing feature,
then determine which user accounts can access each database from a web browser:
To enable Instant Web Publishing:
1. Open the database.
2. Choose File menu > Sharing > Instant Web Publishing to open the Instant Web Publishing dialog box and
enable Instant Web Publishing.
3. Select the filename to publish on the web from the list of open files.
FileMaker Pro Instant Web Publishing dialog box
View the
IP address
Choose a file to
share on the web
Specify port
number, enable log
files, set time out,
and more
Enable Instant
Web Publishing
Specify which
users can
access a
published
database
Suppress filenames
in the Database
Homepage
Choose a
language for the
status area and
Help file

12 FileMaker Instant Web Publishing Guide
4. Choose which users can access the file.
1 The FileMaker Pro Log in using <account name> feature in the File Options dialog box does not work
when accessing files from the web.
1 Web users are not automatically logged in with the Guest account, unless the Guest account is the only account
that has the Instant Web Publishing extended privilege enabled. See
“Logging in to a file” on page 21 and
FileMaker Pro Help for information on enabling the Guest account for Instant Web Publishing.
1 If you make changes to Instant Web Publishing settings while guests are logged into a shared
database, guests lose their sessions and are returned to the Database Homepage. For best results,
change settings when databases are closed, then restart FileMaker
Pro.
5. Repeat steps 3 and 4 for each database you want to publish.
6. Click OK or choose additional settings.
Tip Select Don’t display in Instant Web Publishing homepage in the Instant Web Publishing dialog box to
suppress a filename from appearing in the built-in Instant Web Publishing Database Homepage. This is
useful if your solution includes multiple files and you don’t want all the filenames displayed.
Keep these points in mind:
1 The above instructions are for hosting a database with FileMaker Pro. You may want to host your files
with FileMaker
Server Advanced to share your databases with more web users, or to publish more files.
For more information, see
“Hosting databases with FileMaker Server Advanced: an overview” on page 36.
1 In Mac OS X, you may be asked to provide the operating system passphrase. For more information, see
“Specifying a port number for web publishing” on page 13.
1 Assigning access to files in the Instant Web Publishing dialog box changes the extended privilege
settings in the associated user’s privilege set. You can review and modify the Extended Privileges
settings directly in the Manage Accounts & Privileges dialog box. For more information on setting or
modifying access privileges in Accounts & Privileges, see FileMaker
Pro Help.
1 You can specify which users can access each file without enabling Instant Web Publishing.
1 The list of open files and file access options in the Instant Web Publishing dialog box are dimmed if you
don’t have Full Access privileges or don’t have privileges to manage the extended privileges for a file.
Choose this To provide access to these users
All users Anyone who has the IP address or domain name of your computer hosting the
database.
Specify users by privilege set Allows select users access to the database. Users must enter their account
name and password defined in the Manage Accounts & Privileges dialog box.
No users This default setting prevents any user from accessing the database with
Instant Web Publishing.

Chapter 2
|
Publishing your database on the web 13
Choosing a language for Instant Web Publishing
You can choose a language for the Instant Web Publishing interface, tooltips, and onscreen Help. Choosing
or changing the language has no effect on your actual data.
To specify the language, open the Instant Web Publishing dialog box, select the language to display in the
status area, then click OK.
Specifying a port number for web publishing
The TCP/IP address in the Instant Web Publishing dialog box determines where web browsers can find
FileMaker
Pro databases on the host computer. By default, FileMaker files are shared from port 80. If port
80 is already in use (by a web server or another application), consider changing TCP/IP Port Number to 591.
FileMaker, Inc. has registered port number 591 with the Internet Assigned Numbers Authority (IANA)
specifically for web publishing.
To specify or change the port number:
1. Open the Instant Web Publishing dialog box (see “Sharing a database with Instant Web Publishing” on
page 11).
2. For Advanced Options, click Specify, then type the desired TCP/IP port number.
3. Click OK, then OK to save the changes.
Important If you use a port number other than 80, web users cannot access your database unless they append
a colon, and the new port number, to your IP
address (or domain name). For example, users would type
12.34.56.78:591 or http://accounts.yourcompany.com:591 in a web browser. Or you can provide access to
the database from a link that contains the IP
address and port number. For more information, see “Linking
to a database from an HTML page” on page 15.
Advanced Web Publishing Options dialog box
View the
maximum
number of
connections
Specify the
port number
Allow access
to specified
IP addresses
Enable log
files
Specify time
out for
inactive
accounts

14 FileMaker Instant Web Publishing Guide
Changing the port number on Mac OS X
The first time you enable Instant Web Publishing, Mac OS X requests permission to make a one-time change
to your computer’s setting to facilitate web publishing on a port number below 1024. For security reasons,
Mac
OS X restricts access to ports below 1024. To configure FileMaker Pro to use ports below 1024, you
must provide an administrator password, such as the passphrase created when you first set up Mac
OS X.
You do not need an administrator password to use a port number between 1024 and 65535. For more
information on creating an account with administrator privileges, see the Mac
OS X Help system.
Checking the maximum number of web connections
The number of simultaneous web users allowed to access your files depends on which application you
use to host your database. With FileMaker Pro, you can host up to five concurrent web users. Use
FileMaker
Server Advanced to share files with more web users.
To view the maximum number of web connections allowed:
1. Open the Instant Web Publishing dialog box (see “Sharing a database with Instant Web Publishing” on
page 11).
2. For Advanced Options, click Specify, then view the Maximum number of connections number.
3. Click OK, then OK.
When the maximum number is reached, additional web users see an error message in the web browser when
they try to access the database.
Important If you feel that you have reached the maximum number of users inappropriately, it’s possible that
a web user has not logged out of the database properly. You can wait for the sessions to time out or close
the file to disconnect web users from the database. For more information, see
“Logging out of a database
and closing a web session” on page 24.
Restricting access except to specified IP addresses
You can restrict the IP addresses that can access your databases on the web. For example, you can specify
that only web users from the IP address 12.34.5.6 can access your databases.
To specify which IP addresses can access your databases:
1. Open the Instant Web Publishing dialog box (see “Sharing a database with Instant Web Publishing” on
page 11).
2. For Advanced Options, click Specify.
3. Select Accessible only from these IP addresses and type the IP address that can access your files. Separate
multiple IP addresses with a comma (,).
4. Click OK, then OK to save the changes.
Note Type an asterisk (*) in the section of the IP address to grant access to web users with similar IP
addresses (for example:
12.34.5.* or 12.*). You can’t type an asterisk in the first section, however.

Chapter 2
|
Publishing your database on the web 15
Disconnecting inactive web accounts
You can specify the amount of time web users remain connected to the database when their session, or
connection to the web server, is idle. Sessions are considered idle when web users do not submit requests
from the web browser, such as finding, creating, or submitting changes, changing layouts, and so on. A
session also becomes idle when the web user closes the web browser window, moves to another web site, or
quits the web browser without clicking the Log Out button.
To specify the duration that a session can be idle before it times out:
1. Open the Instant Web Publishing dialog box (see “Sharing a database with Instant Web Publishing” on
page 11).
2. For Advanced Options, click Specify.
3. For Disconnect inactive accounts, specify the amount of time before disconnecting idle web users (from 1
to 60 minutes), then click OK to save the changes.
If you are concerned that web users might not log out of the database properly, specify a short session time
out. You can also create a scripted button to automatically log web users off. See
“Creating a script to log
out of a database and close the session” on page 36 and “Logging out of a database and closing a web
session” on page 24 for more information.
Linking to a database from an HTML page
Instead of having web users type the IP address or domain name to access your database, you can create an
HTML page that specifies a link to your databases.
Keep these points in mind:
1 If you close your files frequently, or if web users access a number of databases, consider linking to the
Database Homepage, which dynamically creates links for all databases that are open and shared with
Instant Web Publishing. For more information on the Database Homepage, see
“Accessing a FileMaker
database from the web” on page 20.
1 The link you provide can access a database and show the default layout. If additional functionality is
desired, consider including a startup script in the database that automates the desired tasks.
1 If possible, host the databases on a static IP address or use a domain name. In some environments,
a new IP address is assigned dynamically to a computer every time it reconnects to the network.
1 The URL syntax for linking to a particular database is different than FileMaker Pro 6 and earlier,
so you must update the link after converting the file.
1 If you’re hosting files with FileMaker Pro, you can store the static HTML pages and any accompanying
images in the Web folder inside the FileMaker
Pro folder.
To view this Use this link
Database Homepage or a
homepage you create
If the database is hosted with FileMaker Pro or FileMaker Pro Advanced:
http://<IP address>:<Port number>
If the database is hosted with FileMaker Server Advanced:
http://<IP address>:<Port number>/fmi/iwp/
A particular database http://<IP address>:<Port number>/fmi/iwp/
cgi?-db=<database name>&-loadframes

16 FileMaker Instant Web Publishing Guide
Using a custom home page
To replace the default Database Homepage, place an HTML file named iwp_home.html in the Web folder
inside the FileMaker
Pro folder. Web users are returned to this page when they log out of a session or the
session times out.
Note If you are hosting databases with FileMaker Server Advanced, place the custom home page in the
Web Publishing/IWP folder where FileMaker Server is installed (Windows) or in the /Library/FileMaker
Server/Web Publishing/IWP folder (Mac OS).
You can use the iwp_home.html file that is on your product CD as a basis for your custom home page.
Be sure to make a copy of the original file before modifying it. Or you can create your own home page, such
as one that redirects web users to another page on your web site.
If there is no file named iwp_home.html in the Web folder (FileMaker Pro, FileMaker Pro Advanced) or
the iwp folder (FileMaker Server Advanced), Instant Web Publishing uses the default Database Homepage.
In order to prevent a custom home page from loading into the Instant Web Publishing layout frame when a
user logs out via a script or a session times out, the following JavaScript should be added to the head section
of the
iwp_home.html file:
if (window != window.top) top.location = "/fmi/iwp/cgi?-home";
You can set top.location to the home URL or any other URL.
Publishing FileMaker Pro data on static web pages
With Instant Web Publishing, data is updated in a web browser window each time the browser requests data
from FileMaker
Pro. This is called dynamic publishing. With static publishing, the data you publish from
FileMaker Pro doesn’t change with each new request.
Static publishing might be a good option for you if:
1 your data doesn’t change often.
1 you don’t have full-time internet access.
1 you don’t want users to connect directly to your database.
To publish static data, you need:
1 a web site hosted on a web server (you can enable Instant Web Publishing to have FileMaker Pro be the
web server for items in the FileMaker
Pro Web folder)
1 FileMaker Pro, and one or more databases with data
1 a computer connected to the internet or an intranet (you only need to connect when you upload your web
page to a web server)
1 an application for copying (uploading) files to your web server application
1 a text-editing or web-authoring application (optional)

Chapter 2
|
Publishing your database on the web 17
General steps for publishing static data
With static publishing, you export data to a web page, then add the web page to your existing web site.
Web users connect to your web site, not to your database.
To publish static data from FileMaker Pro:
1. Find the appropriate records, then choose File menu > Export Records, and choose HTML Table or XML.
1 Choose HTML Table to generate a table of data that can be viewed by supported web browsers.
You can customize the appearance in a text editing or web authoring application.
1 Choose XML if you’d like to transform the table with an XSLT stylesheet.
2. Add links from existing web pages to your new web page.
3. Copy the new web page to your web server.
Static web pages cannot use FileMaker Pro access privileges for protection, but by storing the files in the
FileMaker
Web folder, you can restrict access by specifying which IP addresses can access the files in the
Instant Web Publishing dialog box. For more information, see
“Restricting access except to specified IP
addresses” on page 14. For additional security options, see your web server documentation or check with
your ISP or network administrator.
For more information on exporting records as HTML or XML, see FileMaker Pro Help. Visit
www.filemaker.com/support/technologies for general information on XML and example files.

18 FileMaker Instant Web Publishing Guide

Chapter 3
Working with FileMaker databases on the web
FileMaker Pro Instant Web Publishing automatically provides web pages and forms for interacting with
your database. Web users click buttons in the status area to browse, find, sort, add, edit, and delete records.
When you enable Instant Web Publishing and share files, anyone who has an account for a database and
knows the IP address or domain name where it is hosted can access the file. Depending on their account
privileges, they can:
1 view records on different layouts and views
1 add, duplicate, and delete records
1 add and edit data in fields
1 search the database to view a subset of records
1 sort the database to rearrange the records
Important Manage accounts and privilege sets to restrict user access to database features for both the
desktop and the web.
Web browser requirements
To work with a published FileMaker Pro database, web users need:
1 a web browser.
Note These requirements may differ from those of the FileMaker product that hosts the database.
1 access to the internet or an intranet.
1 the Internet Protocol (IP) address or domain name of the computer that hosts your database file.
1 JavaScript must be enabled in the web browser.
On Windows Vista, Windows XP, Windows
Server 2003, or Windows 2000 Server, use
On Mac OS X, use
Internet Explorer 6.0 and 7.0 Safari 1.2, 1.3 (Mac OS X 10.3), Safari 2.0 (Mac OS X 10.4)
Firefox 2.0 Firefox 2.0

20 FileMaker Instant Web Publishing Guide
Accessing a FileMaker database from the web
To access the Database Homepage, web users open the web browser, then type the IP address of the host
computer.
1 In some cases, web users can type the domain and host name of your computer instead of the IP address, for
example http://accounts.yourcompany.com. Or, they can type the host name, like http://yourcompany.com.
Contact your internet service provider or network administrator for information about mapping a domain
and host name to your IP address.
1 If you configure FileMaker Pro to use a port number other than 80 (the default), that port number must
be appended to your IP address, for example: 10.0.0.1:88. See
“Specifying a port number for web
publishing” on page 13.
1 You can also create an HTML page that contains a link to a database published on the web. For more
information, see
“Linking to a database from an HTML page” on page 15.
The Database Homepage lists the FileMaker Pro databases that are open on the host computer and enabled
for web sharing.
If you don’t see an open, shared database listed:
1 Check its filename: it should be unique and not contain single or double quotation marks.
1 Be sure Don’t display in Instant Web Publishing homepage in the Instant Web Publishing dialog box is cleared.
Web users click a filename to open a database.
Type the IP address or domain name
in the browser window
The Database Homepage lists files shared with Instant Web Publishing
Click a filename
to open the
database
/