Digital Watchdog DWC-MPTZ30X Installation guide

Category
Camera accessories
Type
Installation guide

Digital Watchdog DWC-MPTZ30X is a high-performance PTZ camera with 30x optical zoom and 1080p resolution, providing exceptional image quality for various surveillance applications. It features pan, tilt, and zoom capabilities, allowing you to monitor large areas with precision and flexibility. With its advanced motion detection and alarm input/output ports, the camera can trigger alerts and activate external devices upon detecting suspicious activities.

Digital Watchdog DWC-MPTZ30X is a high-performance PTZ camera with 30x optical zoom and 1080p resolution, providing exceptional image quality for various surveillance applications. It features pan, tilt, and zoom capabilities, allowing you to monitor large areas with precision and flexibility. With its advanced motion detection and alarm input/output ports, the camera can trigger alerts and activate external devices upon detecting suspicious activities.

NOTE: Download All Your Support Materials and Tools in One Place
1. Go to: http://www.digital-watchdog.com/support-download/
2. Search your product by entering the part number in the ‘Search by Product’ search
bar. Results for applicable part numbers will populate automatically based on the
part number you enter.
3. Click Search. All supported materials, including manuals, Quick Start Guides
(QSG), software and firmware will appear in the results.
No Connector Wire Color Description
1 DC Jack Black Camera Power
2 RJ-45 Black Ethernet, RJ-45 Port Compatible with 10/100Mbps
3 RCA Black Audio Input
4 RCA Gray Audio Output
55-Pin Cable
Yellow Alarm Input 1
White Alarm Input 2
Violet Alarm Input 3
Brown Alarm Input 4
Gray GND
62-Pin Cable
Red Alarm Out
Black GND
1. Select mounting location and verify cable lead through wall mount bracket.
2. Drill the mounting holes on the surface using the Wall Mount Flange.
3. Pull out cables required to connect to the PTZ camera from the wall.
4. Set and fix wall mount bracket using plastic anchors and M8x35 screws.
5. Open the access plate and pull out cables through rectangular access hole
of the wall mount bracket.
6. Attach the 1.5 inch adapter to wall mount bracket and fix it using set screw.
7. Attach the cameras safety wire to the wall mount bracket and organize
cables.
8. Close the access plate of the wall mount bracket.
9. Push in and turn clockwise the camera into the adapter, and fix it using set
screw of the adapter.
Tel: +1 (866) 446-3595 / (813) 888-9555
Technical Support Hours:
9:00AM – 8:00PM EST, Monday thru Friday
digital-watchdog.com
Attention: This document is intended to serve as a quick reference for initial
set-up. It is recommended that the user read the entire instruction manual for
complete and proper installation and usage.
DWC-MPTZ30X
Quick Start GuideQuick Start Guide
Default Login Information
Username: admin Password: admin
ACCESSORIES NEEDED TO INSTALL DWC-MPTZ30X
For Wall Mount:
DWC-P30WM
For Ceiling Mount:
DWC-P30CM
Parapet Bracket:
DWC-P30PARAM
For Corner and Pole Mount Bracket:
DWC-P30CNM (Must be
purchased with DWC-P30WM)
STEP 2 – INSTALLING THE CAMERA
Wall Mount Example (DWC-P30WM)
STEP 1 – CAMERA WIRING
NOTE: The camera must be installed by qualified service personnel in
accordance with all local and federal electrical and building codes.
NOTE: Mounting accessories are required and sold separately.
WHAT’S IN THE BOX
QSG Manual 1 Set Adaptor Ring 1 Set
PoE Injector 1 Set Waterproof Cap 1 Set
Safety Wire 1 Set
2P – 5P
Screw Type
Connector
1 Set
AC Cord 1 Set
1
2
3
4
5
6
Set Screw (1x)
Safety Wire
Plastic Anchor (4x)
Tapping Screw 8x35 (4x)
Mounting Bracket (1x)
Access Plate
Screw Machine 3x5 (2x)
Adapter(Option) PT 1.25 inch (1x)
Set Screw (1x)
PF 1.25 inch
Start Point Set Point
Twist
(Long Indicator) (Short Indicator)
1. Select mounting location and verify cable lead through ceiling mount bracket.
2. Drill the mounting holes on the surface using the Wall Mount Flange.
3. Pull out cables required to connect to the PTZ camera from the ceiling.
4. Attach the ceiling mount bracket using plastic anchors and screws.
5. Open the access plate and pull out cables through rectangular access hole
of the wall mount bracket.
6. Attach the 1.5 inch adapter to wall mount bracket and fix it using set screw.
7. Attach the cameras safety wire to the wall mount bracket and organize
cables.
8. Close the access plate of the wall mount bracket.
9. Push in and turn clockwise the camera into the adapter, and fix it using set
screw of the adapter.
Ceiling Mount Example (DWC-P30CM)
Plastic Anchor (3x)
Ceiling Mount (1x)
Locking Nut (1x)
Tapping Screw 6x35 (3x)
Safety Wire (1x)
Screw Machine M5x6 (1x)
Socket Pipe PF 1.5 inch (1x)
Set Screw (3x)
Set Screw (2x)
Socket (1x)
Adapter PT 1.5 inch (1x)
Set Screw (1x)
Start Point
Set Point
Twist
(Long Indicator)
(Short Indicator)
NOTE: Please see the full product manual for web viewer setup,
functions and camera settings options.
1. Open the Micro-SD card cover.
2. Insert or remove Micro-SD card.
3. Tightly close the Micro-SD card cover to ensure it is waterproof.
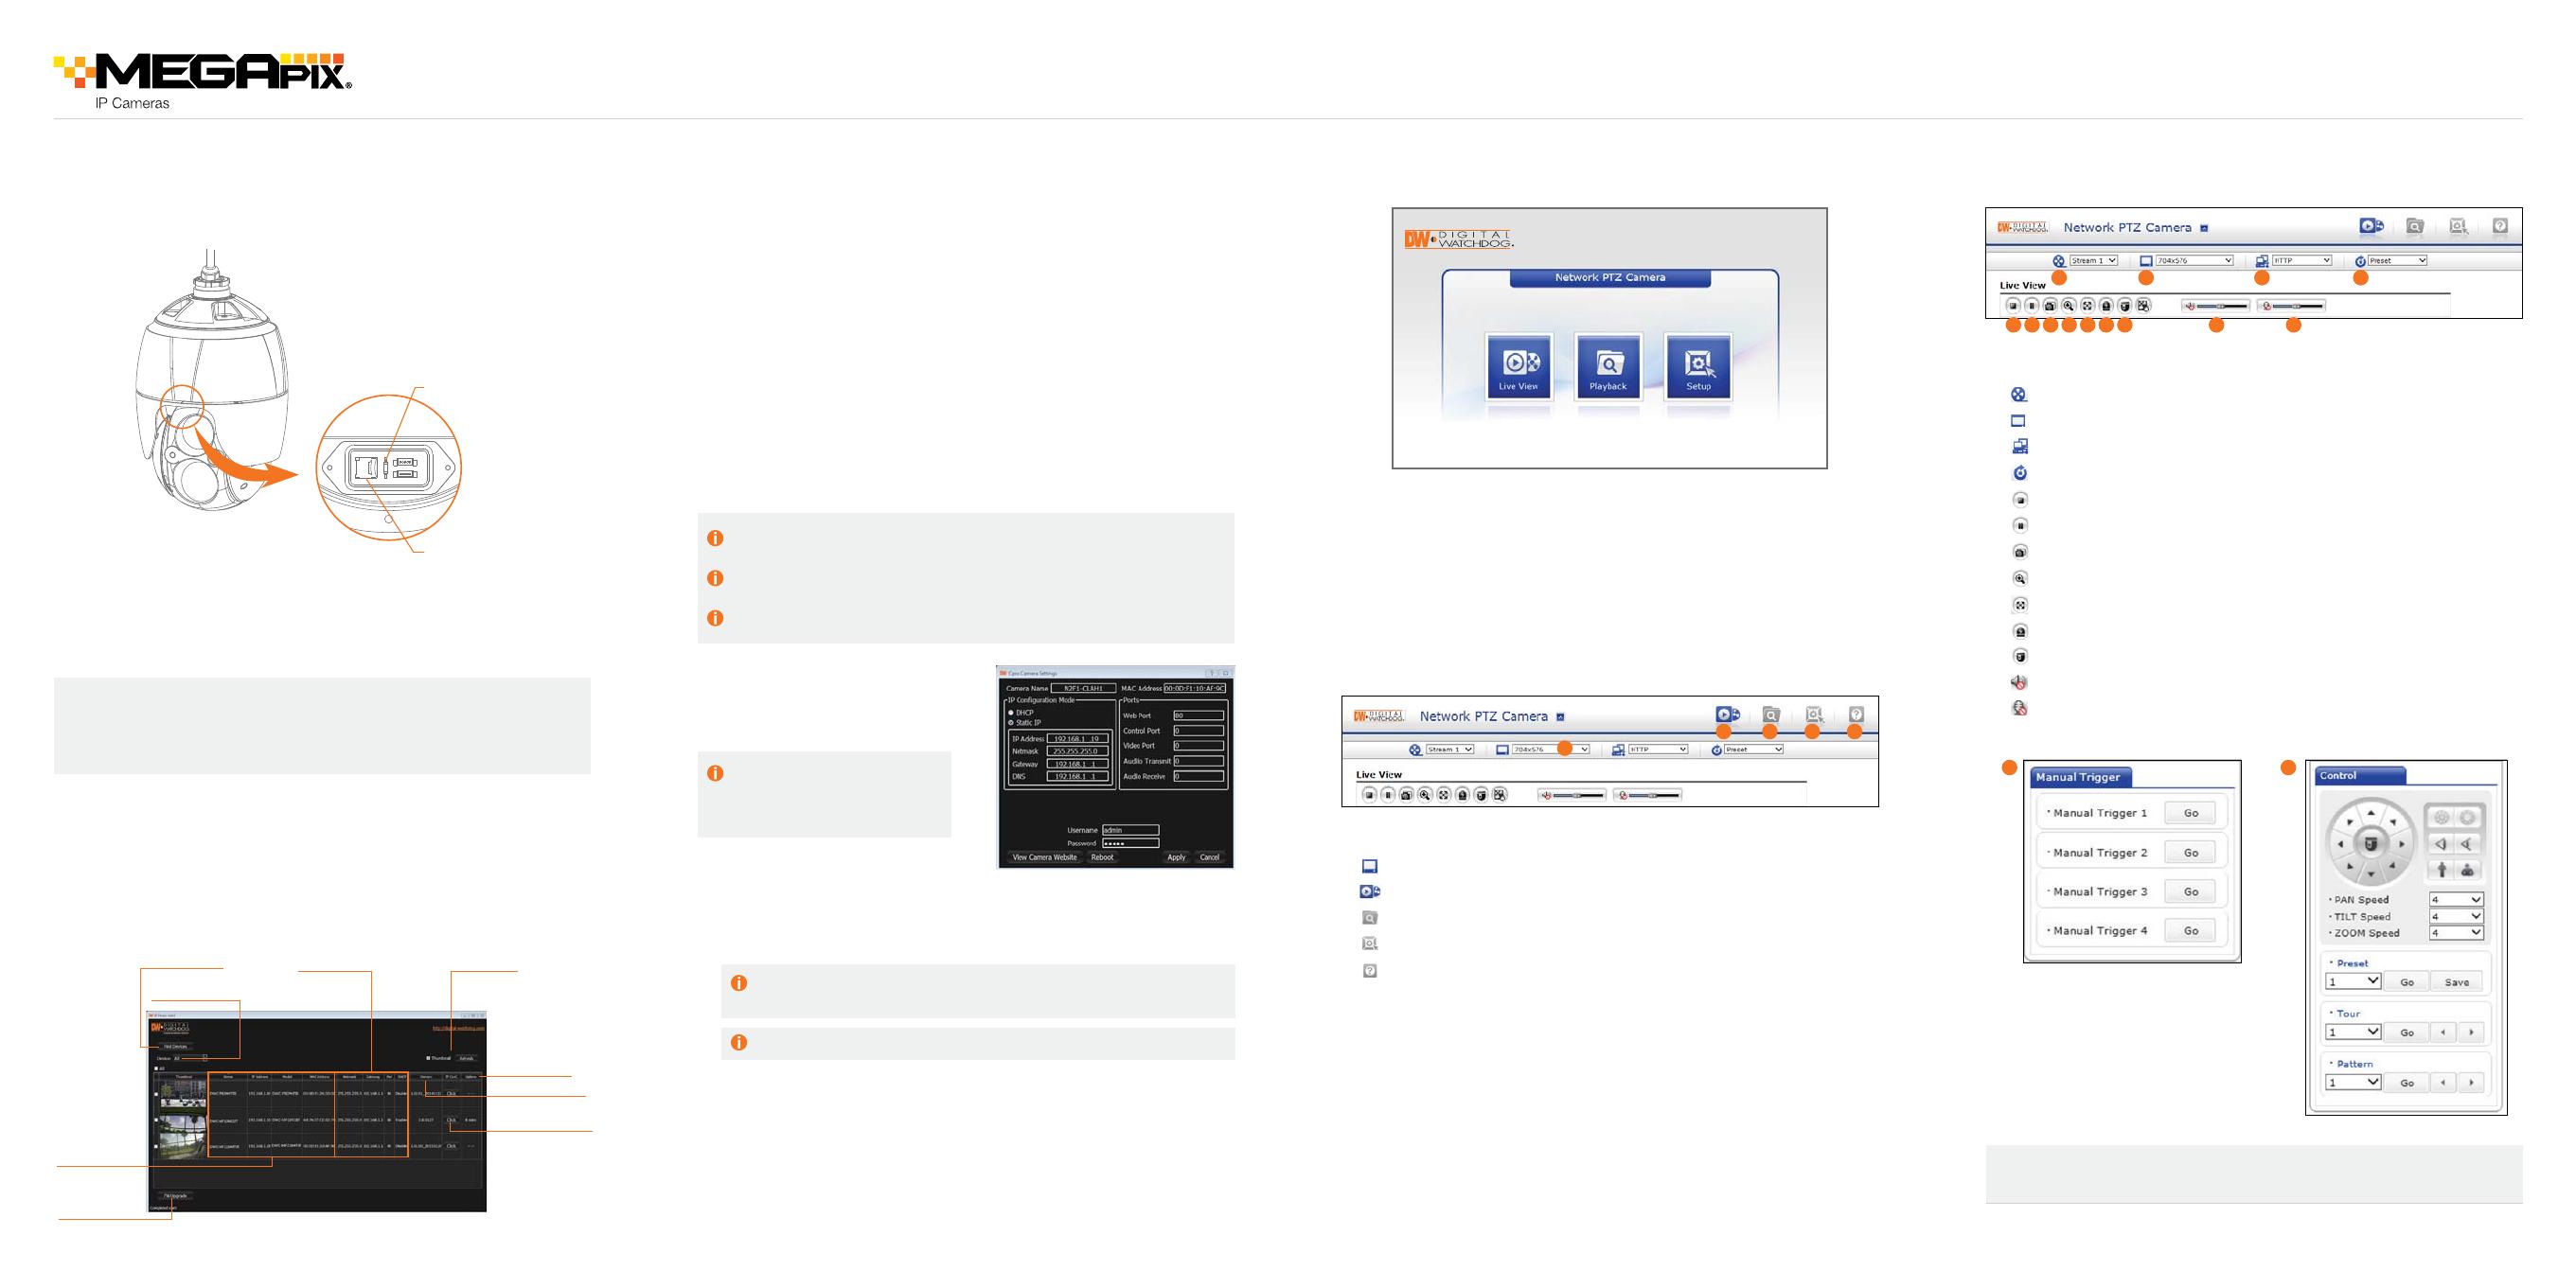
Use the DW IP Finder
software to scan the network and detect all MEGApix
®
cameras, set the camera’s network settings or access the camera’s web client.
User can insert and remove Micro-SD card as shown in the following picture.
STEP 3 – MANAGING THE SD CARD
STEP 4 – DW IP FINDER
STEP 5 – NETWORK ACCESS (WEB) STEP 7 – LIVE VIEW
STEP 6 – LIVE VIEW (WEB)
Search for Cameras
Camera’s
Network Settings
View Camera’s
Thumbnail View
Camera’s Firmware
Camera Uptime
Open Cameras IP
Conguration Screen
Filter Search Results
Camera Name,
Model, IP Address,
and MAC Address
Firmware Upgrade
Rev Date: 03/17
Copyright © Digital Watchdog. All rights reserved.
Specifications and pricing are subject to change without notice.
Quick Start Guide
Micro-SD Card Slot
Reset Button
1. Input IP address of network PTZ Camera
2. Click between Live View, Playback, and Setup for operation
3. Login (default admin / admin) for setup is necessary
1. Change stream resolution
2. Live view mode
3. Playback mode
4. Setup menu
5. Click to open Help menu
1. Select Stream 1 (H.264), Stream 2 (MJPEG), Stream 3 (H.264)
2. Select resolution up to 1920x1080
3. Select network protocol between HTTP, TCP, and UDP
4. Call preset up to 256
5. Stop and start for live stream
6. Stream pause
7. Snapshot
8. Zoom
9. Full screen
10. Manual trigger
11. Pop-up PTZ control panel
12. Speaker volume
13. Microphone control
1
1
5 6 7 8 9 10
10
11
11
12 13
2
2
3
3
54
4
Resetting the camera: To reset the camera, use the tip of a paper clip
or a pencil and press the reset button. Pressing the button for five (5)
seconds will initiate a camera-wide reset of all the settings, including
network settings.
7. To view the camera’s web viewer, click on ‘View Camera Website’. Enter the
cameras username and password (default: admin/ admin) to login to the
camera.
8. To save the changes made to the cameras settings, input the ID and PW of
the camera for authentication and click ‘Save’.
9. If the camera needs to be rebooted after the settings were changed, press
the ‘Reboot’ button. The camera will cycle power and will appear back in the
search results once the reboot is complete.
6. The camera’s default network
information is:
Select DHCP if the internet service is dynamic IP. This will allow the camera to
receive its IP address from the DHCP server.
Select STATIC to manually enter the camera’s IP address, subnet mask,
Gateway and DNS information.
Contact your network administrator for more information.
Default TCP/IP information
• IP: DHCP
‘Port Forwarding’ has to be set in your network’s router for external access
to the camera.
Default ID / PW : admin / admin
Network Setup
1. Go to: http://www.digital-watchdog.com
2. Search for ‘IP Finder’ on the quick search bar at the top of the page.
3. The latest IP Finder software will appear in the search results. Click on the
link to download the file to your computer.
4. The software will scan your network for all supported cameras and display
the results in the table. Allow up to 5 seconds for the IP Finder to find the
camera on the network.
5. Select a camera from the list by double-clicking on the cameras image
or clicking on the ‘Click’ button under the IP Conf. column. The camera’s
network information will appear. If necessary, you can adjust the camera’s
network type.
  • Page 1 1
  • Page 2 2

Digital Watchdog DWC-MPTZ30X Installation guide

Category
Camera accessories
Type
Installation guide

Digital Watchdog DWC-MPTZ30X is a high-performance PTZ camera with 30x optical zoom and 1080p resolution, providing exceptional image quality for various surveillance applications. It features pan, tilt, and zoom capabilities, allowing you to monitor large areas with precision and flexibility. With its advanced motion detection and alarm input/output ports, the camera can trigger alerts and activate external devices upon detecting suspicious activities.

Ask a question and I''ll find the answer in the document

Finding information in a document is now easier with AI