Page is loading ...

D
.....1
I
.....5
N
.....9
GR
.....13
TR
.....17
BG
.....21
RO
.....25
GB
.....2
NL
.....6
FIN
.....10
CZ
.....14
SK
.....18
EST
.....22
CN
.....26
F
.....3
S
.....7
PL
.....11
H
.....15
SLO
.....19
LV
.....23
RUS
.....27
E
.....4
DK
.....8
UAE
.....12
P
.....16
HR
.....20
LT
.....24
Design & Quality Engineering GROHE Germany
Atrio
Atrio
19 918
D
.....1
I
.....3
N
.....5
GR
.....7
TR
.....9
BG
.....11
RO
.....13
GB
.....1
NL
.....3
FIN
.....5
CZ
.....7
SK
.....9
EST
.....11
CN
.....13
F
.....2
S
.....4
PL
.....6
H
.....8
SLO
.....10
LV
.....12
RUS
.....14
E
.....2
DK
.....4
UAE
.....6
P
.....8
HR
.....10
LT
.....12
19 287
96.562.131/ÄM 221779/02.12

I
06 574
46 635
*46 627
19 287
19 918
3
m
m
10mm
Please pass these instructions on to the end user of the fitting!
S.v.p remettre cette instruction à l'utilisateur de la robinetterie!
Bitte diese Anleitung an den Benutzer der Armatur weitergeben!
32 635
*19 332
46 374
19 287
19 918

1
D
Technische Daten
• Durchfluss bei 3 bar Fließdruck: ca. 12,5 l/min
Installation
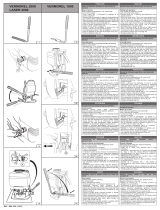
Einbauschablone entfernen, siehe Klappseite II, Abb. [1].
Rohrleitungssystem vor und nach der Installation
gründlich spülen (DIN 1988/DIN EN 806 beachten)!
Mengenbegrenzer
Diese Armatur ist mit einer Mengenbegrenzung ausgestattet.
Damit ist eine stufenlose, individuelle Durchflussmengen-
begrenzung möglich. Werkseitig ist der größtmögliche
Durchfluss voreingestellt.
In Verbindung mit hydraulischen Durchlauferhitzern ist
der Einsatz der Durchflussmengenbegrenzung nicht zu
empfehlen.
Zur Aktivierung siehe Klappseite II, Abb. [2].
Kalt- und Warmwasserzufuhr absperren.
I. Rosette und Hebel montieren, siehe Abb. [3], [4] und [5].
1. Kappe (A) aufstecken, siehe Abb. [3].
2. Dichtung (B1) einfetten und Rosette (B) aufschieben,
siehe Abb. [4].
3. Isoliereinsatz (C) und Hebel (D) aufstecken und mit Set (E)
befestigen, siehe Abb. [5].
4. Kappe (F) aufstecken.
Falls sich die Rosette nicht weit genug auf die Kappe schieben
lässt, muss zusätzlich eine Verlängerung eingebaut werden
(siehe Ersatzteile Klappseite I, Best.-Nr.: 46 627 = 25mm).
II. Auslauf montieren, siehe Abb. [6] und [7].
1. Maß „Y“ von der Oberkante des Unterputz-Gehäuses bis
zur Fliesenoberkante ermitteln, siehe Abb. [6].
2. Anschlussnippel (G) ablängen, so dass sich ein
Gesamtmaß von „Y“ + 46mm ergibt.
3. Anschlussnippel (G) mit einem 10mm Innensechskant-
schlüssel so in das Unterputz-Gehäuse einschrauben, dass
sich ein Einbaumaß von 34mm ergibt. Auslauf (H) mit
einem 3mm Innensechskantschlüssel von unten befestigen,
siehe Abb. [7].
Kalt- und Warmwasserzufuhr öffnen und Anschlüsse auf
Dichtheit prüfen.
Funktion der Armatur prüfen, siehe Abb. [8].
Wartung
Alle Teile prüfen, reinigen, evtl. austauschen und mit
Spezialarmaturenfett einfetten.
Kalt- und Warmwasserzufuhr absperren.
I. Austausch der Kartusche, siehe Klappseite II, Abb. [9].
Montage in umgekehrter Reihenfolge.
Einbaulage beachten!
Beim Einbau der Kartusche auf richtigen Sitz der
Dichtungen achten.
Verschraubung (I) einschrauben und fest anziehen.
II. Mousseur (J), siehe Klappseite II, Abb. [9].
Montage in umgekehrter Reihenfolge.
Ersatzteile, siehe Klappseite I (* = Sonderzubehör).
Pflege
Die Hinweise zur Pflege dieser Armatur sind der beiliegenden
Pflegeanleitung zu entnehmen.
GB
Technical data
• Flow rate at 3 bar flow pressure: approx. 12,5 l/min
Installation
Remove the fitting template, see fold-out page II, Fig. [1].
Flush piping system prior and after installation of fitting
thoroughly (Consider EN 806)!
Flow rate limiter
This fitting is equipped with a flow rate limiter, permitting an
infinitely variable individual reduction in flow rate. The highest
possible flow rate is set at the factory before dispatch.
The use of flow rate limiters in combination with hydraulic
instantaneous heaters is not recommended.
For commissioning, see fold-out page II, see Fig. [2].
Shut off hot and cold water supply.
I. Install escutcheon and lever, see Figs. [3], [4] and [5].
1. Attach cap (A), see Fig. [3].
2. Grease seal (B1) and push on escutcheon (B), see Fig. [4].
3. Attach insulating insert (C) and lever (D) and fasten with
set (E), see Fig. [5].
4. Attach cap (F).
If the escutcheon will not slide far enough onto the cap, you
must additionally install an extension (see replacement parts
fold-out page I, Prod. no.: 46 627 = 25mm).
II. Install spout, see Figs. [6] and [7].
1. Determine dimension “Y” from the leading edge of built-in
fitting housing to face of tiles, see Fig. [6].
2. Cut connection nipple (G) so that the installation dimension
is “Y” + 46mm.
3. Using an 10mm allen key, screw connection nipple (G) into
the built-in fitting housing until the installation dimension
is 34mm. Tighten spout (H) from below using an 3mm allen
key, see Fig. [7].
Open hot and cold water supply and check connections
for watertightness!
Check fitting for correct operation, see Fig. [8].
Maintenance
Inspect and clean all parts, replace as necessary and lubricate
with special grease.
Shut off hot and cold water supply.
I. Replacing the cartridge, see fold-out page II, Fig. [9].
Assemble in reverse order.
Observe the correct installation position!
When installing the cartridge, ensure that the seals are
correctly seated.
Install and tighten screw coupling (I).
II. Mousseur (J), see fold-out page II, Fig. [9].
Assemble in reverse order.
Replacement parts, see fold-out page I (* = special
accessories).
Care
For directions on the care of this fitting, refer to the
accompanying Care Instructions.
/