Thrustmaster 4160598 4160603 4169071 4161078 4160616 4160624 4160626 4160651 User manual
- Type
- User manual


1/12
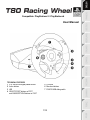
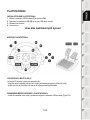
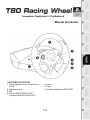
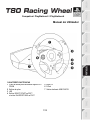
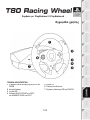
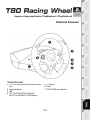
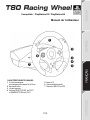
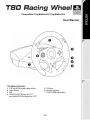
Compatible: PlayStation®3 / PlayStation®4
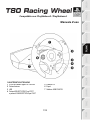
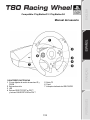
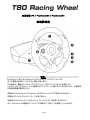
User Manual
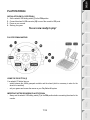
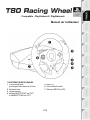
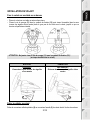
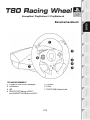
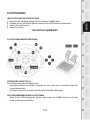
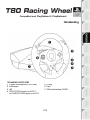
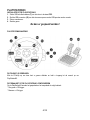
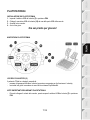
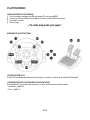
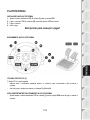
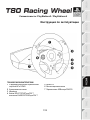
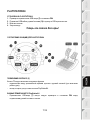
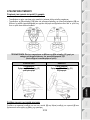
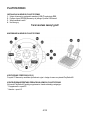
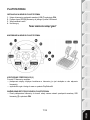
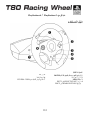
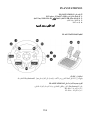
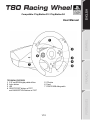
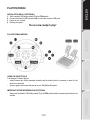
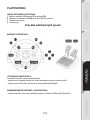
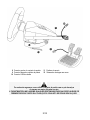
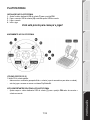
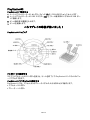
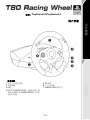
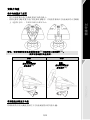
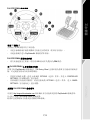
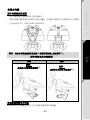
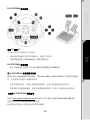
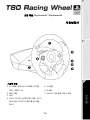
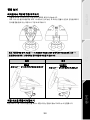
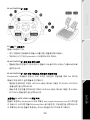
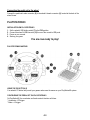
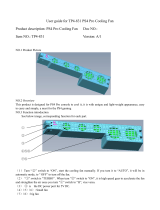
TECHNICAL FEATURES
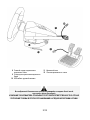
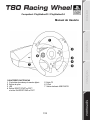
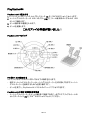
1 2 UP and DOWN digital paddle shifters
2 Action buttons
3 LED
4 SELECT/START buttons on PS3™
and SHARE/OPTIONS buttons on PS4™
5 PS button
6 Directional buttons
7 PS4/PS3 USB sliding switch

2/12
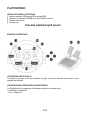
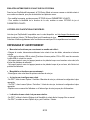
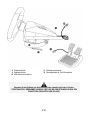
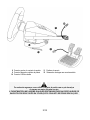
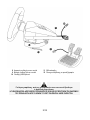
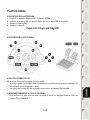
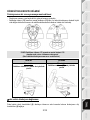
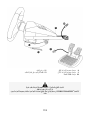
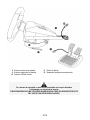
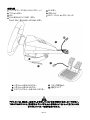
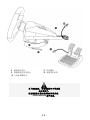
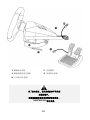
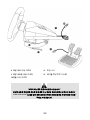
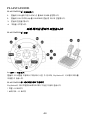
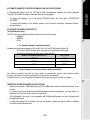
8 Pedal set’s male connector
9 Female connector for pedal set
10 Wheel’s USB connector
11 Fastening screw
12 Table/desk mounting system
For safety reasons, never use the pedal set with bare feet
or while wearing only socks on your feet.
THRUSTMASTER® DISCLAIMS ALL RESPONSIBILITY IN THE EVENT OF INJURY RESULTING
FROM USE OF THE PEDAL SET WITHOUT SHOES.

3/12
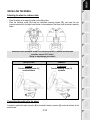
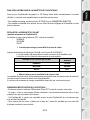
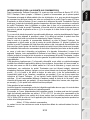
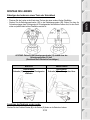
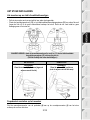
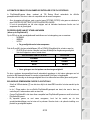
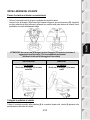
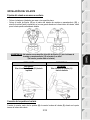
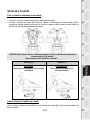
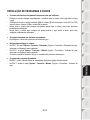
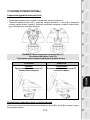
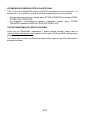
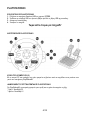
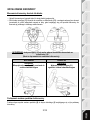
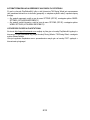
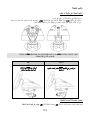
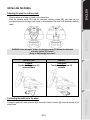
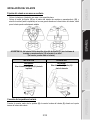
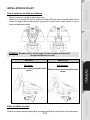
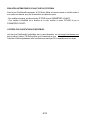
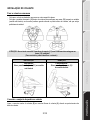
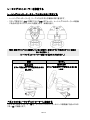
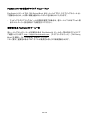
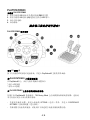
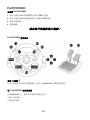
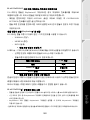
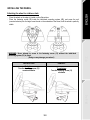
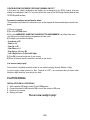
INSTALLING THE WHEEL
Attaching the wheel to a table or desk
- Place the wheel on the edge of a table or other flat surface.
- Place the fastening screw (11) inside the table/desk mounting system (12), and screw the unit
(counterclockwise) into the large screw thread on the underside of the wheel, until the wheel is perfectly
stable.
WARNING: Never attempt to screw in the fastening screw (11) without the table/desk
mounting system (12) in place!
(Doing so may damage your wheel.)
INSTALLATION
REMOVAL
To tighten:
Turn the fastening screw (11)
counterclockwise
To untighten:
Turn the fastening screw (11)
clockwise
Connecting the pedal set to the wheel
Connect the pedal set’s male connector (8) to the wheel’s female connector (9), located at the back of the
wheel’s base.

4/12
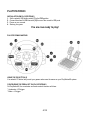
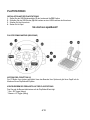
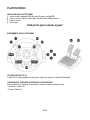
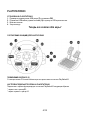
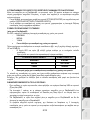
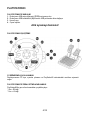
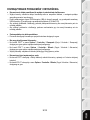
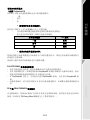
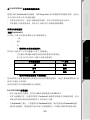
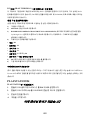
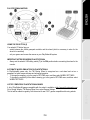
PLAYSTATION®3
INSTALLATION ON PLAYSTATION®3
1. Set the wheel’s USB sliding switch (7) to the PS3 position.
2. Connect the wheel’s USB connector (10) to one of the console’s USB ports.
3. Power on your console.
4. Start up your game.
You are now ready to play!
PLAYSTATION®3 MAPPING
USING THE PS BUTTON (5)
Your wheel’s PS button lets you exit your games and access the menus on your PlayStation®3 system.
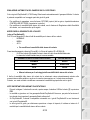
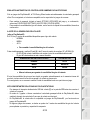
CONFIGURING THE PEDAL SET ON PLAYSTATION®3
On PlayStation®3, the accelerator and brake controls function as follows:
* Accelerator = R2 trigger
* Brake = L2 trigger

5/12
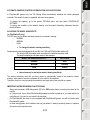
AUTOMATIC GAMEPAD CONTROLLER EMULATION ON PLAYSTATION®3
In PlayStation®3 games only, the T80 Racing Wheel automatically emulates the official gamepad
controller. The wheel is therefore compatible with most racing games.
- To change the mapping, go to the game’s OPTIONS menu, and then select CONTROLLER
SETTINGS.
- To change the sensitivity of the wheel’s steering, use the wheel’s Sensitivity Adjustment function,
described below.
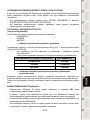
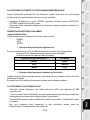
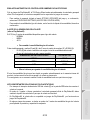
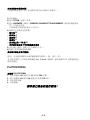
ADJUSTING THE WHEEL’S SENSITIVITY
(on PlayStation®3 only)
On PS3, there are 3 available sensitivity modes for your wheel’s steering:
- NORMAL
- MEDIUM
- HIGH
• To change the wheel’s steering sensitivity:
Simultaneously press and release the D-pad (6) + the 2 UP and DOWN paddle shifters (1):
- The wheel’s LED (3) changes color according to the selected sensitivity level.
- The wheel’s steering is now either more or less sensitive.
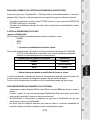
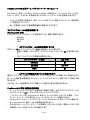
WHEEL’S STEERING SENSITIVITY
LED COLOR
NORMAL
RED
MEDIUM
ORANGE
HIGH
GREEN
• Internal memory for saving the wheel's steering sensitivity:
The steering sensitivity level that you have chosen is automatically saved in the product’s internal
memory, even when the console is powered off or the wheel is disconnected.
Therefore, there’s no need to change the sensitivity level again every time you start up a game.
IMPORTANT NOTES REGARDING PLAYSTATION®3
- Always set the wheel’s USB sliding switch (7) to the PS3 position before connecting the wheel to the
console.
- In 1 player mode: if your official PlayStation®3 gamepad controller is powered on, you must switch it to
controller port 2 in order for your wheel to be functional.
- On PlayStation®3, the wheel is only compatible with PlayStation®3 games, and will not function with
Playstation®2 games.
- In some racing games, don’t hesitate to test out your wheel’s 3 steering sensitivity modes, to optimize
its precision and responsiveness.

6/12
CONFIGURATION PROCEDURE FOR GRAN TURISMO® ON PS3
In this game, by default, acceleration and braking are not assigned to the R2/L2 controls, and gear
shifting is not assigned to the R1/L1 controls (which is the case for the T80 Racing Wheel’s pedal set and
UP/DOWN paddle shifters).
Procedure to configure and optimize the wheel:
(This procedure only needs to be carried out once, as the changes will then automatically be saved in the
game.)
1) Start up your game.
2) Go to the OPTIONS menu.
3) Go to the HARDWARE / GAMEPAD CHANGE BUTTON ASSIGNMENTS menu.
(by clicking on the symbol depicting the gamepad and the cross)
4) Configure your controller as follows:
• Accelerate on R2
• Brake on L2
• Gear Up on R1
• Gear Down on L1
• Rear View on L3 and/or R3
• Left & Right View on D-Pad Left & Right
5) Click OK (in the lower-right part of your screen).
6) Return to the main menu to select the race track of your choice.
You are now ready to play!
Note: there are 3 available sensitivity modes for your wheel’s steering (Normal, Medium or High).
In order to enjoy optimal precision in Gran Turismo® on PS3™, we recommend that you select either
Medium or High sensitivity, according to your taste.

7/12
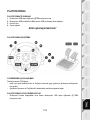
PLAYSTATION®4
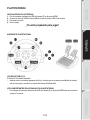
INSTALLATION ON PLAYSTATION®4
1. Set the wheel’s USB sliding switch (7) to the PS4 position.
2. Connect the wheel’s USB connector (10) to one of the console’s USB ports.
3. Power on your console.
4. Start up your game.
You are now ready to play!
PLAYSTATION®4 MAPPING
USING THE PS BUTTON (5)
Your wheel’s PS button lets you:
- switch between the official gamepad controller and the wheel (which is necessary in order for the
wheel to be enabled),
- exit your games and access the menus on your PlayStation®4 system.
IMPORTANT NOTES REGARDING PLAYSTATION®4
- Always set the wheel’s USB sliding switch (7) to the PS4 position before connecting the wheel to the
console.

8/12
AUTOMATIC WHEEL EMULATION ON PLAYSTATION®4
In PlayStation®4 games only, the T80 Racing Wheel is recognized as a real wheel and not as a
gamepad, for better responsiveness and enhanced precision.
- To change the mapping, go to the game’s OPTIONS menu, and then select WHEEL SETTINGS.
- To change the sensitivity of the wheel’s steering, go to the game’s OPTIONS menu, and then select
WHEEL SETTINGS.
LIST OF COMPATIBLE PLAYSTATION®4 GAMES
A list of PlayStation®4 games compatible with the wheel is available at http://support.thrustmaster.com.
Go to Racing Wheels / T80 Racing Wheel, then select Games Settings.
This list will be added to regularly, with the arrival of new PS4 games compatible with racing wheels.

9/12
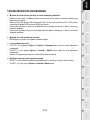
TROUBLESHOOTING AND WARNING
• My wheel is not functioning correctly or seems improperly calibrated:
- Switch off your console, completely disconnect your wheel and all cables, reconnect everything and
then restart your game.
- Make sure that the wheel’s USB sliding switch (7) is in the correct position (PS4 or PS3) before
connecting the wheel's USB connector (10) to the console.
- Never move the wheel or press on the pedals when connecting your wheel, in order to avoid any
calibration problems.
- Never move the wheel or press on the pedals when the game is starting up, in order to avoid any
calibration problems.
• My pedal set is not functioning correctly:
- Reconfigure your wheel in your game’s controller options.
• I can't configure my wheel:
- On PS3™, in your game’s Options / Controller / Gamepads menu: select the most appropriate
configuration.
- On PS4™, in your game’s Options / Controller / Wheels menu: select the most appropriate
configuration.
- Refer to your game’s user manual or online help for more information.
• My wheel’s steering is not responsive enough:
- On PS3™, use the wheel’s Sensitivity Adjustment function, described on page 5 of this manual.
- On PS4™, go to the game’s Options / Controller / Wheels menu.

10/12
CONSUMER WARRANTY INFORMATION
Worldwide, Guillemot Corporation S.A., whose registered office is located at Place du Granier, B.P.
97143, 35571 Chantepie, France (hereinafter “Guillemot”) warrants to the consumer that this
Thrustmaster product shall be free from defects in materials and workmanship, for a warranty period
which corresponds to the time limit to bring an action for conformity with respect to this product. In the
countries of the European Union, this corresponds to a period of two (2) years from delivery of the
Thrustmaster product. In other countries, the warranty period corresponds to the time limit to bring an
action for conformity with respect to the Thrustmaster product according to applicable laws of the country
in which the consumer was domiciled on the date of purchase of the Thrustmaster product (if no such
action exists in the corresponding country, then the warranty period shall be one (1) year from the original
date of purchase of the Thrustmaster product).
Should the product appear to be defective during the warranty period, immediately contact Technical
Support, who will indicate the procedure to follow. If the defect is confirmed, the product must be returned
to its place of purchase (or any other location indicated by Technical Support).
Within the context of this warranty, the consumer’s defective product shall, at Technical Support’s option,
be either replaced or returned to working order. If, during the warranty period, the Thrustmaster product is
subject to such reconditioning, any period of at least seven (7) days during which the product is out of use
shall be added to the remaining warranty period (this period runs from the date of the consumer’s request
for intervention or from the date on which the product in question is made available for reconditioning, if
the date on which the product is made available for reconditioning is subsequent to the date of the
request for intervention). If permitted under applicable law, the full liability of Guillemot and its subsidiaries
(including for consequential damages) is limited to the return to working order or the replacement of the
Thrustmaster product. If permitted under applicable law, Guillemot disclaims all warranties of
merchantability or fitness for a particular purpose.
This warranty shall not apply: (1) if the product has been modified, opened, altered, or has suffered
damage as a result of inappropriate or abusive use, negligence, an accident, normal wear, or any other
cause unrelated to a material or manufacturing defect (including, but not limited to, combining the
Thrustmaster product with any unsuitable element, including in particular power supplies, rechargeable
batteries, chargers, or any other elements not supplied by Guillemot for this product); (2) if the product
has been used for any use other than home use, including for professional or commercial purposes
(game rooms, training, competitions, for example); (3) in the event of failure to comply with the
instructions provided by Technical Support; (4) to software, said software being subject to a specific
warranty; (5) to consumables (elements to be replaced over the product’s lifespan: disposable batteries,
audio headset or headphone ear pads, for example); (6) to accessories (cables, cases, pouches, bags,
wrist-straps, for example); (7) if the product was sold at public auction.
This warranty is nontransferable.
The consumer’s legal rights with respect to laws applicable to the sale of consumer goods in his or her
country are not affected by this warranty.

11/12
Additional warranty provisions
During the warranty period, Guillemot shall not provide, in principle, any spare parts, as Technical Support
is the only party authorized to open and/or recondition any Thrustmaster product (with the exception of
any reconditioning procedures which Technical Support may request that the consumer carry out, by way
of written instructions – for example, due to the simplicity and the lack of confidentiality of the
reconditioning process – and by providing the consumer with the required spare part(s), where
applicable).
Given its innovation cycles and in order to protect its know-how and trade secrets, Guillemot shall not
provide, in principle, any reconditioning notification or spare parts for any Thrustmaster product whose
warranty period has expired.
Liability
If permitted under applicable law, Guillemot Corporation S.A. (hereinafter “Guillemot”) and its subsidiaries
disclaim all liability for any damages caused by one or more of the following: (1) the product has been
modified, opened or altered; (2) failure to comply with assembly instructions; (3) inappropriate or abusive
use, negligence, an accident (an impact, for example); (4) normal wear; (5) the use of the product for any
use other than home use, including for professional or commercial purposes (game rooms, training,
competitions, for example). If permitted under applicable law, Guillemot and its subsidiaries disclaim all
liability for any damages unrelated to a material or manufacturing defect with respect to the product
(including, but not limited to, any damages caused directly or indirectly by any software, or by combining
the Thrustmaster product with any unsuitable element, including in particular power supplies,
rechargeable batteries, chargers, or any other elements not supplied by Guillemot for this product).
TECHNICAL SUPPORT
http://support.thrustmaster.com

12/12
COPYRIGHT
© 2017 Guillemot Corporation S.A. All rights reserved. Thrustmaster
®
is a registered trademark of Guillemot
Corporation S.A.
Licensed for sale in Europe, Africa, Middle East, Russia, India and Oceania. For use exclusively with
PlayStation
®3 and PlayStation®4.
All other trademarks and brand names are hereby acknowledged and are property of their respective
owners. Illustrations not binding. Contents, designs and specifications are subject to change without notice
and may vary from one country to another. Made in China.
Manufactured and distributed by Guillemot Corporation S.A.
ENVIRONMENTAL PROTECTION RECOMMENDATION
In the European Union and Turkey: At the end of its working life, this product should
not be disposed of with standard household waste, but rather dropped off at a
collection point for the disposal of Waste Electrical and Electronic Equipment (WEEE)
for recycling.
This is confirmed by the symbol found on the product, user manual or packaging.
Depending on their characteristics, the materials may be recycled. Through recycling
and other forms of processing Waste Electrical and Electronic Equipment, you can
make a significant contribution towards helping to protect the environment.
Please contact your local authorities for information on the collection point nearest you.
For all other countries: Please adhere to local recycling laws for electrical and electronic equipment.
Retain this information. Colours and decorations may vary.
Plastic fasteners and adhesives should be removed from the product before it is used.
www.thrustmaster.com
*Applicable to EU and Turkey only
*
*
Page is loading ...
Page is loading ...
Page is loading ...
Page is loading ...
Page is loading ...
Page is loading ...
Page is loading ...
Page is loading ...
Page is loading ...
Page is loading ...
Page is loading ...
Page is loading ...
Page is loading ...
Page is loading ...
Page is loading ...
Page is loading ...
Page is loading ...
Page is loading ...
Page is loading ...
Page is loading ...
Page is loading ...
Page is loading ...
Page is loading ...
Page is loading ...
Page is loading ...
Page is loading ...
Page is loading ...
Page is loading ...
Page is loading ...
Page is loading ...
Page is loading ...
Page is loading ...
Page is loading ...
Page is loading ...
Page is loading ...
Page is loading ...
Page is loading ...
Page is loading ...
Page is loading ...
Page is loading ...
Page is loading ...
Page is loading ...
Page is loading ...
Page is loading ...
Page is loading ...
Page is loading ...
Page is loading ...
Page is loading ...
Page is loading ...
Page is loading ...
Page is loading ...
Page is loading ...
Page is loading ...
Page is loading ...
Page is loading ...
Page is loading ...
Page is loading ...
Page is loading ...
Page is loading ...
Page is loading ...
Page is loading ...
Page is loading ...
Page is loading ...
Page is loading ...
Page is loading ...
Page is loading ...
Page is loading ...
Page is loading ...
Page is loading ...
Page is loading ...
Page is loading ...
Page is loading ...
Page is loading ...
Page is loading ...
Page is loading ...
Page is loading ...
Page is loading ...
Page is loading ...
Page is loading ...
Page is loading ...
Page is loading ...
Page is loading ...
Page is loading ...
Page is loading ...
Page is loading ...
Page is loading ...
Page is loading ...
Page is loading ...
Page is loading ...
Page is loading ...
Page is loading ...
Page is loading ...
Page is loading ...
Page is loading ...
Page is loading ...
Page is loading ...
Page is loading ...
Page is loading ...
Page is loading ...
Page is loading ...
Page is loading ...
Page is loading ...
Page is loading ...
Page is loading ...
Page is loading ...
Page is loading ...
Page is loading ...
Page is loading ...
Page is loading ...
Page is loading ...
Page is loading ...
Page is loading ...
Page is loading ...
Page is loading ...
Page is loading ...
Page is loading ...
Page is loading ...
Page is loading ...
Page is loading ...
Page is loading ...
Page is loading ...
Page is loading ...
Page is loading ...
Page is loading ...
Page is loading ...
Page is loading ...
Page is loading ...
Page is loading ...
Page is loading ...
Page is loading ...
Page is loading ...

1/12
Compatible: PlayStation®3 / PlayStation®4
User Manual
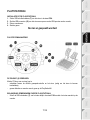
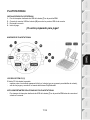
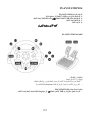
TECHNICAL FEATURES
1 2 UP and DOWN digital paddle shifters
2 Action buttons
3 LED
4 SELECT/START buttons on PS3™
and SHARE/OPTIONS buttons on PS4™
5 PS button
6 D-pad
7 PS4/PS3 USB sliding switch

2/12
8 Pedal set’s male connector
9 Female connector for pedal set
10 Wheel’s USB connector
11 Fastening screw
12 Table/desk mounting system
For safety reasons, never use the pedal set with bare feet
or while wearing only socks on your feet.
THRUSTMASTER® DISCLAIMS ALL RESPONSIBILITY IN THE EVENT OF INJURY RESULTING
FROM USE OF THE PEDAL SET WITHOUT SHOES.

3/12
INSTALLING THE WHEEL
Attaching the wheel to a table or desk
- Place the wheel on the edge of a table or other flat surface.
- Place the fastening screw (11) inside the table/desk mounting system (12), and screw the unit
(counterclockwise) into the large screw thread on the underside of the wheel, until the wheel is perfectly
stable.
WARNING: Never attempt to screw in the fastening screw (11) without the table/desk
mounting system (12) in place!
(Doing so may damage your wheel.)
INSTALLATION
REMOVAL
To tighten:
Turn the fastening screw (11)
counterclockwise
To untighten:
Turn the fastening screw (11)
clockwise
Connecting the pedal set to the wheel
Connect the pedal set’s male connector (8) to the wheel’s female connector (9), located at the back of the
wheel’s base.

4/12
PLAYSTATION®3
INSTALLATION ON PLAYSTATION®3
1. Set the wheel’s USB sliding switch (7) to the PS3 position.
2. Connect the wheel’s USB connector (10) to one of the console’s USB ports.
3. Power on your console.
4. Start up your game.
You are now ready to play!
PLAYSTATION®3 MAPPING
USING THE PS BUTTON (5)
Your wheel’s PS button lets you exit your games and access the menus on your PlayStation®3 system.
CONFIGURING THE PEDAL SET ON PLAYSTATION®3
On PlayStation®3, the accelerator and brake controls function as follows:
* Accelerator = R2 trigger
* Brake = L2 trigger

5/12
AUTOMATIC GAMEPAD CONTROLLER EMULATION ON PLAYSTATION®3
In PlayStation®3 games only, the T80 Racing Wheel automatically emulates the official gamepad
controller. The wheel is therefore compatible with most racing games.
- To change the mapping, go to the game’s OPTIONS menu, and then select CONTROLLER
SETTINGS.
- To change the sensitivity of the wheel’s steering, use the wheel’s Sensitivity Adjustment function,
described below.
ADJUSTING THE WHEEL’S SENSITIVITY
(on PlayStation®3 only)
On PS3™, there are 3 available sensitivity modes for your wheel’s steering:
- NORMAL
- MEDIUM
- HIGH
• To change the wheel’s steering sensitivity:
Simultaneously press and release the D-pad (6) + the 2 UP and DOWN paddle shifters (1):
- The wheel’s LED (3) changes color according to the selected sensitivity level.
- The wheel’s steering is now either more or less sensitive.
WHEEL’S STEERING SENSITIVITY
LED COLOR
NORMAL
RED
MEDIUM
ORANGE
HIGH
GREEN
• Internal memory for saving the wheel's steering sensitivity:
The steering sensitivity level that you have chosen is automatically saved in the product’s internal
memory, even when the console is powered off or the wheel is disconnected.
Therefore, there’s no need to change the sensitivity level again every time you start up a game.
IMPORTANT NOTES REGARDING PLAYSTATION®3
- Always set the wheel’s USB sliding switch (7) to the PS3 position before connecting the wheel to the
console.
- In 1 player mode: if your official PlayStation®3 gamepad controller is powered on, you must switch it to
controller port 2 in order for your wheel to be functional.
- On PlayStation®3, the wheel is only compatible with PlayStation®3 games, and will not function with
Playstation®2 games.
- In some racing games, don’t hesitate to test out your wheel’s 3 steering sensitivity modes, to optimize
its precision and responsiveness.

6/12
CONFIGURATION PROCEDURE FOR GRAN TURISMO® ON PS3™
In this game, by default, acceleration and braking are not assigned to the R2/L2 controls, and gear
shifting is not assigned to the R1/L1 controls (which is the case for the T80 Racing Wheel’s pedal set and
UP/DOWN paddle shifters).
Procedure to configure and optimize the wheel:
(This procedure only needs to be carried out once, as the changes will then automatically be saved in the
game.)
1) Start up your game.
2) Go to the OPTIONS menu.
3) Go to the HARDWARE / GAMEPAD CHANGE BUTTON ASSIGNMENTS menu.
(by clicking on the symbol depicting the gamepad and the cross)
4) Configure your controller as follows:
• Accelerate on R2
• Brake on L2
• Gear Up on R1
• Gear Down on L1
• Rear View on L3 and/or R3
• Left & Right View on D-Pad Left & Right
5) Click OK (in the lower-right part of your screen).
6) Return to the main menu to select the race track of your choice.
You are now ready to play!
Note: there are 3 available sensitivity modes for your wheel’s steering (Normal, Medium or High).
In order to enjoy optimal precision in Gran Turismo® on PS3™, we recommend that you select either
Medium or High sensitivity, according to your taste.

7/12
PLAYSTATION®4
INSTALLATION ON PLAYSTATION®4
1. Set the wheel’s USB sliding switch (7) to the PS4 position.
2. Connect the wheel’s USB connector (10) to one of the console’s USB ports.
3. Power on your console.
4. Start up your game.
You are now ready to play!
PLAYSTATION®4 MAPPING
USING THE PS BUTTON (5)
Your wheel’s PS button lets you:
- switch between the official gamepad controller and the wheel (which is necessary in order for the
wheel to be enabled),
- exit your games and access the menus on your PlayStation®4 system.
IMPORTANT NOTES REGARDING PLAYSTATION®4
- Always set the wheel’s USB sliding switch (7) to the PS4 position before connecting the wheel to the
console.
Page is loading ...
Page is loading ...
Page is loading ...
Page is loading ...
Page is loading ...
Page is loading ...
Page is loading ...
Page is loading ...
Page is loading ...
Page is loading ...
Page is loading ...
Page is loading ...
Page is loading ...
Page is loading ...
Page is loading ...
Page is loading ...
Page is loading ...
Page is loading ...
Page is loading ...
Page is loading ...
Page is loading ...
Page is loading ...
Page is loading ...
Page is loading ...
Page is loading ...
Page is loading ...
Page is loading ...
Page is loading ...
Page is loading ...
Page is loading ...
Page is loading ...
Page is loading ...
Page is loading ...
Page is loading ...
Page is loading ...
Page is loading ...
Page is loading ...
Page is loading ...
Page is loading ...
Page is loading ...
Page is loading ...
Page is loading ...
Page is loading ...
Page is loading ...
Page is loading ...
Page is loading ...
Page is loading ...
Page is loading ...
Page is loading ...
Page is loading ...
Page is loading ...
Page is loading ...
Page is loading ...
Page is loading ...
Page is loading ...
Page is loading ...
Page is loading ...
Page is loading ...
Page is loading ...
Page is loading ...
Page is loading ...
Page is loading ...
Page is loading ...
Page is loading ...
Page is loading ...
Page is loading ...
Page is loading ...
Page is loading ...
Page is loading ...
Page is loading ...
Page is loading ...
Page is loading ...
Page is loading ...
Page is loading ...
Page is loading ...
Page is loading ...
Page is loading ...
Page is loading ...
Page is loading ...
Page is loading ...
Page is loading ...
Page is loading ...
Page is loading ...
Page is loading ...
Page is loading ...
-
 1
1
-
 2
2
-
 3
3
-
 4
4
-
 5
5
-
 6
6
-
 7
7
-
 8
8
-
 9
9
-
 10
10
-
 11
11
-
 12
12
-
 13
13
-
 14
14
-
 15
15
-
 16
16
-
 17
17
-
 18
18
-
 19
19
-
 20
20
-
 21
21
-
 22
22
-
 23
23
-
 24
24
-
 25
25
-
 26
26
-
 27
27
-
 28
28
-
 29
29
-
 30
30
-
 31
31
-
 32
32
-
 33
33
-
 34
34
-
 35
35
-
 36
36
-
 37
37
-
 38
38
-
 39
39
-
 40
40
-
 41
41
-
 42
42
-
 43
43
-
 44
44
-
 45
45
-
 46
46
-
 47
47
-
 48
48
-
 49
49
-
 50
50
-
 51
51
-
 52
52
-
 53
53
-
 54
54
-
 55
55
-
 56
56
-
 57
57
-
 58
58
-
 59
59
-
 60
60
-
 61
61
-
 62
62
-
 63
63
-
 64
64
-
 65
65
-
 66
66
-
 67
67
-
 68
68
-
 69
69
-
 70
70
-
 71
71
-
 72
72
-
 73
73
-
 74
74
-
 75
75
-
 76
76
-
 77
77
-
 78
78
-
 79
79
-
 80
80
-
 81
81
-
 82
82
-
 83
83
-
 84
84
-
 85
85
-
 86
86
-
 87
87
-
 88
88
-
 89
89
-
 90
90
-
 91
91
-
 92
92
-
 93
93
-
 94
94
-
 95
95
-
 96
96
-
 97
97
-
 98
98
-
 99
99
-
 100
100
-
 101
101
-
 102
102
-
 103
103
-
 104
104
-
 105
105
-
 106
106
-
 107
107
-
 108
108
-
 109
109
-
 110
110
-
 111
111
-
 112
112
-
 113
113
-
 114
114
-
 115
115
-
 116
116
-
 117
117
-
 118
118
-
 119
119
-
 120
120
-
 121
121
-
 122
122
-
 123
123
-
 124
124
-
 125
125
-
 126
126
-
 127
127
-
 128
128
-
 129
129
-
 130
130
-
 131
131
-
 132
132
-
 133
133
-
 134
134
-
 135
135
-
 136
136
-
 137
137
-
 138
138
-
 139
139
-
 140
140
-
 141
141
-
 142
142
-
 143
143
-
 144
144
-
 145
145
-
 146
146
-
 147
147
-
 148
148
-
 149
149
-
 150
150
-
 151
151
-
 152
152
-
 153
153
-
 154
154
-
 155
155
-
 156
156
-
 157
157
-
 158
158
-
 159
159
-
 160
160
-
 161
161
-
 162
162
-
 163
163
-
 164
164
-
 165
165
-
 166
166
-
 167
167
-
 168
168
-
 169
169
-
 170
170
-
 171
171
-
 172
172
-
 173
173
-
 174
174
-
 175
175
-
 176
176
-
 177
177
-
 178
178
-
 179
179
-
 180
180
-
 181
181
-
 182
182
-
 183
183
-
 184
184
-
 185
185
-
 186
186
-
 187
187
-
 188
188
-
 189
189
-
 190
190
-
 191
191
-
 192
192
-
 193
193
-
 194
194
-
 195
195
-
 196
196
-
 197
197
-
 198
198
-
 199
199
-
 200
200
-
 201
201
-
 202
202
-
 203
203
-
 204
204
-
 205
205
-
 206
206
-
 207
207
-
 208
208
-
 209
209
-
 210
210
-
 211
211
-
 212
212
-
 213
213
-
 214
214
-
 215
215
-
 216
216
-
 217
217
-
 218
218
-
 219
219
-
 220
220
-
 221
221
-
 222
222
-
 223
223
-
 224
224
-
 225
225
-
 226
226
-
 227
227
-
 228
228
-
 229
229
-
 230
230
-
 231
231
-
 232
232
-
 233
233
-
 234
234
-
 235
235
-
 236
236


Thrustmaster 4160598 4160603 4169071 4161078 4160616 4160624 4160626 4160651 User manual
- Type
- User manual
Ask a question and I''ll find the answer in the document
Finding information in a document is now easier with AI
in other languages
- italiano: Thrustmaster 4160598 4160603 4169071 4161078 4160616 4160624 4160626 4160651 Manuale utente
- français: Thrustmaster 4160598 4160603 4169071 4161078 4160616 4160624 4160626 4160651 Manuel utilisateur
- español: Thrustmaster 4160598 4160603 4169071 4161078 4160616 4160624 4160626 4160651 Manual de usuario
- Deutsch: Thrustmaster 4160598 4160603 4169071 4161078 4160616 4160624 4160626 4160651 Benutzerhandbuch
- русский: Thrustmaster 4160598 4160603 4169071 4161078 4160616 4160624 4160626 4160651 Руководство пользователя
- Nederlands: Thrustmaster 4160598 4160603 4169071 4161078 4160616 4160624 4160626 4160651 Handleiding
- português: Thrustmaster 4160598 4160603 4169071 4161078 4160616 4160624 4160626 4160651 Manual do usuário
- polski: Thrustmaster 4160598 4160603 4169071 4161078 4160616 4160624 4160626 4160651 Instrukcja obsługi
- Türkçe: Thrustmaster 4160598 4160603 4169071 4161078 4160616 4160624 4160626 4160651 Kullanım kılavuzu
- 日本語: Thrustmaster 4160598 4160603 4169071 4161078 4160616 4160624 4160626 4160651 ユーザーマニュアル
Related papers
-
Thrustmaster 2961067 2960778 Owner's manual
-
-
Thrustmaster T80 Ferrari 488 GTB Edition User manual
-
-
-
Thrustmaster T-Pedals User manual
-
-
-
Thrustmaster 2960822 User manual
-
Thrustmaster 4460180 Quick start guide
Other documents
-
DreamGEAR Racing Wheel In New Gift Box for Wii User guide
-
TRUSTMASTER Ferrari GT Experience Owner's manual
-
-
Bigben Blu-Ray Remote Owner's manual
-
Hori D001 Racing Wheel Apex for PlayStation 4 and PC User manual
-
Genius pandora User manual
-
-
Hama 00051869 Owner's manual
-
PlayCool Master Pro Wireless Controller User manual
-
 doBe TP4-831 User manual
