Bush Hog Rear Blade Owner's manual
- Category
- Tractor
- Type
- Owner's manual
This manual is also suitable for

ASSEMBLY l OPERATION l MAINTENANCE
12/08 $4.00
50064420
SERIES 91
REAR MOUNTED BLADE
Operator’s Manual
BUSH HOG
®

CONGRATULATIONS!
You have invested in the best implement of its type on the market today.
The care you give your Bush Hog implement will greatly determine your satisfaction
with its performance and its service life. We urge a careful study of this manual to provide
you with a thorough understanding of your new implement before operating, as well as
suggestions for operation and maintenance.
If your manual should become lost or destroyed, Bush Hog will be glad to provide you with
a new copy. Order from Bush Hog, 2501 Griffin Ave., Selma, Alabama 36703. Most of
our manuals can also be downloaded from our website at www.bushhog.com.
As an authorized Bush Hog dealer, we stock genuine Bush Hog parts which are
manufactured with the same precision and skill as our original equipment. Our trained
service personnel are well informed on methods required to service Bush Hog equipment,
and are ready and able to help you.
Should you require additional information or assistance, please contact us.
YOUR AUTHORIZED
BUSH HOG DEALER
BECAUSE BUSH HOG MAINTAINS AN ONGOING
PROGRAM OF PRODUCT IMPROVEMENT, WE
RESERVE THE RIGHT TO MAKE IMPROVEMENTS IN
DESIGN OR CHANGES IN SPECIFICATIONS WITH-
OUT INCURRING ANY OBLIGATION TO INSTALL
THEM ON UNITS PREVIOUSLY SOLD.
BECAUSE OF THE POSSIBILITY THAT SOME
PHOTOGRAPHS IN THIS MANUAL WERE TAKEN OF
PROTOTYPE MODELS, PRODUCTION MODELS MAY
VARY IN SOME DETAIL. IN ADDITION, SOME
PHOTOGRAPHS MAY SHOW SHIELDS REMOVED
FOR PURPOSES OF CLARITY. NEVER OPERATE
THIS IMPLEMENT WITHOUT ALL SHIELDS IN PLACE.

BUSH HOG
SERIES 91 REAR MOUNTED BLADES
Operator’s Manual
TABLE OF CONTENTS
RETAIL CUSTOMER’S RESPONSIBILITY
UNDER THE BUSH HOG WARRANTY
It is the Retail Customer and/or Operator’s responsibility to read the Operator’s Manual, to operate,
lubricate, maintain and store the product in accordance with all instructions and safety procedures.
Failure of the operator to read the Operator’s Manual is a misuse of this equipment.
It is the Retail Customer and/or Operator’s responsibility to inspect the product and to have any part(s)
repaired or replaced when continued operation would cause damage or excessive wear to other parts
or cause a safety hazard.
It is the Retail Customer’s responsibility to deliver the product to the authorized Bush Hog Dealer, from
whom he purchased it, for service or replacement of defective parts which are covered by warranty.
Repairs to be submitted for warranty consideration must be made within forty-five (45) days of failure.
It is the Retail Customer’s responsibility for any cost incurred by the Dealer for traveling to or hauling
of the product for the purpose of performing a warranty obligation or inspection.
SECTION PAGE
Warranty . . . . . . . . . . . . . . . . . . . . . . . . . . . . . . . . . . . . . . . . . . . . . . . . . . . . . . . . . . . . . . . . . . . . . . . . . . . . .2
Dealer Preparation Check List . . . . . . . . . . . . . . . . . . . . . . . . . . . . . . . . . . . . . . . . . . . . . . . . . . . . . . . . . . . .3
Safety Precautions . . . . . . . . . . . . . . . . . . . . . . . . . . . . . . . . . . . . . . . . . . . . . . . . . . . . . . . . . . . . . . . . . . . . .4
Federal Laws and Regulations . . . . . . . . . . . . . . . . . . . . . . . . . . . . . . . . . . . . . . . . . . . . . . . . . . . . . . . . . . . .5
I OPERATION . . . . . . . . . . . . . . . . . . . . . . . . . . . . . . . . . . . . . . . . . . . . . . . . . . . . . . . . . . . . . . . . . . . . . . . . . .6
Specifications . . . . . . . . . . . . . . . . . . . . . . . . . . . . . . . . . . . . . . . . . . . . . . . . . . . . . . . . . . . . . . . . . . . . . . . . .6
II MAINTENANCE . . . . . . . . . . . . . . . . . . . . . . . . . . . . . . . . . . . . . . . . . . . . . . . . . . . . . . . . . . . . . . . . . . . . . . . .8
III ASSEMBLY . . . . . . . . . . . . . . . . . . . . . . . . . . . . . . . . . . . . . . . . . . . . . . . . . . . . . . . . . . . . . . . . . . . . . . . . . . .8
Hydraulic Cylinders . . . . . . . . . . . . . . . . . . . . . . . . . . . . . . . . . . . . . . . . . . . . . . . . . . . . . . . . . . . . . . . . . .9-10
Plumbing Diagram . . . . . . . . . . . . . . . . . . . . . . . . . . . . . . . . . . . . . . . . . . . . . . . . . . . . . . . . . . . . . . . . . . . .11
Safety Decals . . . . . . . . . . . . . . . . . . . . . . . . . . . . . . . . . . . . . . . . . . . . . . . . . . . . . . . . . . . . . . . . . . . . . . . .12
Torque Specifications . . . . . . . . . . . . . . . . . . . . . . . . . . . . . . . . . . . . . . . . . . . . . . . . . . . . . . . . . . . . . . . . . .13
1
®

LIMITED WARRANTY
OOOOOOOOOOOOOOOOOOOOOOOOOOOOOOO
Bush Hog warrants to the original purchaser of any new Bush Hog equipment, purchased from an
authorized Bush Hog dealer, that the equipment be free from defects in material and workmanship for a period
of one (1) year for non-commercial, state, and municipalities’ use and ninety (90) days for commercial use from
date of retail sale. The obligation of Bush Hog to the purchaser under this warranty is limited to the repair or
replacement of defective parts.
Replacement or repair parts installed in the equipment covered by this limited warranty are warranted
for ninety (90) days from the date of purchase of such part or to the expiration of the applicable new equip-
ment warranty period, whichever occurs later. Warranted parts shall be provided at no cost to the user at an
authorized Bush Hog dealer during regular working hours. Bush Hog reserves the right to inspect any equip-
ment or parts which are claimed to have been defective in material or workmanship.
DISCLAIMER OF IMPLIED WARRANTIES & CONSEQUENTIAL DAMAGES
Bush Hog’s obligation under this limited warranty, to the extent allowed by law, is in lieu of all war-
ranties, implied or expressed, INCLUDING IMPLIED WARRANTIES OF MERCHANTABILITY AND FITNESS
FOR A PARTICULAR PURPOSE and any liability for incidental and consequential damages with respect to
the sale or use of the items warranted. Such incidental and consequential damages shall include but not be
limited to: transportation charges other than normal freight charges; cost of installation other than cost
approved by Bush Hog; duty; taxes; charges for normal service or adjustment; loss of crops or any other loss of
income; rental of substitute equipment, expenses due to loss, damage, detention or delay in the delivery of
equipment or parts resulting from acts beyond the control of Bush Hog.
THIS LIMITED WARRANTY SHALL NOT APPLY:
1. To vendor items which carry their own warranties, such as engines, tires, and tubes.
2. If the unit has been subjected to misapplication, abuse, misuse, negligence, fire or other accident.
3. If parts not made or supplied by Bush Hog have been used in connection with the unit, if, in the sole judge-
ment of Bush Hog such use affects its performance, stability or reliability.
4. If the unit has been altered or repaired outside of an authorized Bush Hog dealership in a manner
which, in the sole judgement of Bush Hog, affects its performance, stability or reliability.
5. To normal maintenance service and normal replacement items such as gearbox lubricant, hydraulic fluid,
worn blades, or to normal deterioration of such things as belts and exterior finish due to use or
exposure.
6. To expendable or wear items such as teeth, chains, sprockets, belts, springs and any other items that in the
company’s sole judgement is a wear item.
NO EMPLOYEE OR REPRESENTATIVE OF BUSH HOG IS AUTHORIZED TO CHANGE THIS LIM-
ITED WARRANTY IN ANY WAY OR GRANT ANY OTHER WARRANTY UNLESS SUCH CHANGE IS MADE
IN WRITING AND SIGNED BY BUSH HOG’S SERVICE MANAGER, 2501 GRIFFIN AVE., SELMA, ALABAMA
36703.
OOOOOOOOOOOOOOOOOOOOOOOOOOOOOOO
Record the model number, serial number and date
purchased. This information will be helpful to your
dealer if parts or service are required.
MAKE CERTAIN THE WARRANTY REGISTRATION
CARD HAS BEEN FILED WITH BUSH HOG/
SELMA, ALABAMA
MODEL NUMBER
SERIAL NUMBER
DATE OF RETAIL SALE
2

DEALER PREPARATION CHECK LIST
91 SERIES BLADES
BEFORE DELIVERING MACHINE — The following check list should be completed.
Use the Operator’s Manual as a guide.
r 1. Assembled completed.
r 2. All fittings lubricated.
r 3. All fasteners torqued to specifications given in Torque Chart
r 4. All decals in place and readable. (See decal page.)
r 5. Overall condition good (i.e. paint, welds)
r 6. Operators manual has been delivered to owner and he has been instructed
on the safe and proper use of the blade.
Dealer’s
Signature
Purchaser’s
Signature
THIS CHECKLIST TO REMAIN IN OWNER’S MANUAL
It is the responsibility of the dealer to complete the procedures listed
above before delivery of this implement to the customer.
3

IMPORTANT SAFETY PRECAUTIONS
This symbol is used to call attention to safe-
ty precautions that should be followed by
the operator to avoid accidents. When you
see this symbol, carefully read the message
that follows and heed its advice. Failure to
comply with safety precautions could result
in serious bodily injury.
In addition to the design and configuration of equipment, hazard control and accident prevention are depen-
dent upon the awareness, concern, prudence and proper training of personnel in the operation, transport,
maintenance and storage of equipment. Lack of attention to safety can result in accident, personal injury,
reduction of efficiency and worst of all—loss of life. Watch for safety hazards and correct deficiencies
promptly. Use the following safety precautions as a general guide to safe operations when using this
machine. Additional safety precautions are used throughout this manual for specific operating and mainten-
ance procedures. Read this manual and review the safety precautions often until you know the limitations.
1. Read the Operator’s Manual. Failure to read the Operator’s Manual is considered a misuse of this
equipment.
2. Become familiar with all the machine’s controls and all the caution, warning and danger decals
affixed to the machine before attempting to start or operate.
3. Before starting or operating the machine, make a walk around inspection and check for obvious
defects such as loose mounting bolts and damaged components. Correct any deficiency before
starting.
4. Do not allow children to operate the implement. Do not allow adults to operate it without proper
instruction.
5. Do not carry passengers.
6. Keep the area of operation clear of all persons, particularly small children and pets. The operator
should cease operation whenever anyone comes within the operating area.
7. Use a piece of cardboard or wood rather than hands to search for hydraulic leaks. Escaping
hydraulic oil under pressure can penetrate skin. If fluid is injected into the skin, it must be surgically
removed within a few hours by a doctor familiar with this form of injury or gangrene may result.
8. Lower implement to ground, stop tractor engine, apply parking brake, and allow blades to complete
ly stop before leaving the tractor.
9. Keep hands and feet away from blades.
10. Wear personal protective equipment such as, but not limited to, protection for eyes, ears, feet, hands
and head when operating or repairing the equipment. Do not wear loose clothing or jewelry that may
catch on equipment moving parts.
11. When performing adjustments or maintenance on the blade, first lower it to the ground or block it
securely at a workable height.
12. Never stand between tractor and implement while tractor is being backed to the hitch.
13. Reduce speed when transporting implement to avoid bouncing and momentary loss of steering.
14. Use tractor flashing warning lights, day or night, when transporting cutter on road or highways unless
prohibited by law.
15. It is recommended that tractor be equipped with Rollover Protective System (ROPS) and seat belt be
used in all implement operations.
4

IMPORTANT FEDERAL LAWS AND REGULATIONS* CONCERNING
EMPLOYERS, EMPLOYEES AND OPERATIONS.
*(This section is intended to explain in broad terms the concept and effect of the following federal laws and
regulations. It is not intended as a legal interpretation of the laws and should not be considered as such).
U.S. Public Law 91-596 (The Williams-Steiger Occupational and Health Act of 1970) OSHA
This Act Seeks:
“...to assure so far as possible every working man and woman in the nation safe and healthful working
conditions and to preserve our human resources...”
DUTIES
Sec. 5 (a) Each employer—
(1) shall furnish to each of his employees employment and a place of employment
which are free from recognized hazards that are causing or are likely to cause
death or serious physical harm to his employees;
(2) shall comply with occupational safety and health standards promulgated under
this Act.
(b) Each employee shall comply with occupational safety and health standards
and all rules, regulations and orders issued pursuant to this Act which are
applicable to his own actions and conduct.
OSHA Regulations
Current OSHA regulations state in part: “At the time of initial assignment and at least annually thereafter, the
employer shall instruct every employee in the safe operation and servicing of all equipment with which the
employee is, or will be involved.” These will include (but are not limited to) instructions to:
Keep all guards in place when the machine is in operation;
Permit no riders on equipment;
Stop engine, disconnect the power source, and wait for all machine movement to stop before
servicing, adjusting, cleaning or unclogging the equipment, except where the machine must be
running to be properly serviced or maintained, in which case the employer shall instruct employees
as to all steps and procedures which are necessary to safely service or maintain the equipment.
Make sure everyone is clear of machinery before starting the engine, engaging power, or operating
the machine.
Child Labor Under 16 Years Old
Some regulations specify that no one under the age of 16 may operate power machinery. It is your
responsibility to know what these regulations are in your own area or situation. (Refer to U.S. Dept. of
Labor, Employment Standard Administration, Wage & Home Division, Child Labor Bulletin #102.)
EMPLOYEE TRACTOR OPERATING INSTRUCTIONS:
1. Securely fasten your seat belt if the tractor has a
ROPS.
2. Where possible, avoid operating the tractor near
ditches, embankments, and holes.
3. Reduce speed when turning, crossing slopes, and
on rough, slick, or muddy surfaces.
4. Stay off slopes too steep for safe operation.
5. Watch where you are going, especially at row
ends, on roads, and around trees.
6. Do not permit others to ride.
7. Operate the tractor smoothly - no jerky turns,
starts, or stops.
8. Hitch only to the drawbar and hitch points recom-
mended by tractor manufacturers.
9. When tractor is stopped, set brakes securely and
use park lock if available.
5

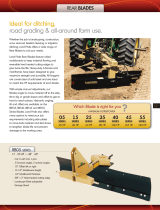
Moldboard Width ________________7’ & 8’
Moldboard Height
& Thickness___________________19” x 5/16”
Moldboard
Cutting Edge ___________________1/2” x 6”
Hitch __________________________3-Point
Cat. I & II or
Quick Coupler
Approximate
Weight _______________________807 lbs. (7’)
827 lbs. (8’)
Maximum
Tractor HP _____________________90 (2wd)
70 (4wd)
King Pin
Diameter _________________________3”
Tilt ___________________________15° up or
down (manual
or hydraulic)
Offset_________________________20” left or
Adjustment right (manual
or hydraulic)
Angle_______________________45° left or right
Adjustment (manual or
hydraulic)
Skid Shoes_____________________Optional
Parking Jack ___________________Standard
SECTION 1
91 SERIES OPERATION
SPECIFICATIONS
Series 91 Rear Mounted Blade
DURING BLADE ADJUSTMENT:
• KEEP BODY, HANDS AND FEET CLEAR OF
BLADE.
• KEEP FINGERS CLEAR OF HOLES.
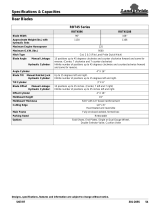
The lift hitch is designed to fit Category I & II 3-point
hitches and quick couplers. (Figure 1-1) A bolt and
bushing is supplied for the upper quick coupler
hook. Use the pin provided with the tractor in the
top hole for the upper link for Category I & II 3-point
hitches.
The lower lift pin is machined to allow fitting either
Cat. I or II type hitches.
On Category I, 3-point hitch, the smaller diameter
section of pin is used.
On Category II, 3-point hitches and Category II
quick couplers, the larger diameter section of the pin
is used.
The pin is inserted through the lower hitch lugs with
the shorter small diameter section installed through
the inside hitch lug.
A parking stand is provided on the blade to allow
easy hook-up to the tractor. Raise the parking stand
up and pin it in the storage position after hooking the
blade up to the tractor.
WHEN DETACHING THE BLADE, SUPPORT
THE MAST END OF THE BOOM TO PRE-
VENT IT FROM FALLING. KEEP BODY,
HANDS AND FEET CLEAR OF IMPLEMENT.
The operating angles of the blade are controlled
either by means of adjustable pin jacks (Figure 1-2)
or hydraulically (Figure1-3).
All 3 pin jacks have 5-holes to obtain the correct
position. Pull the pin and telescope the jack to the
desired position. Reinstall the pin, and secure with
the hair pin (Figure1-2).
The blade can be offset to the left or right either
hydraulically or with the 5-position 16” stroke pin jack.
The angle of the blade is controlled by the 5-position
16” stroke pin jack or 16” stroke hydraulic cylinder.
The tilt angle of the blade can be controlled either
hydraulically or with an 8” stroke pin jack assembly.
For back blading, disconnect the pin jack or
hydraulic cylinder from the pivot arm. Swing the
blade to the rear. Reconnect the cylinder or pin
jack.
WARNING
6
Figure 1-1 Hitch
Lift Hitch
Bolt and
Bushing
for Quick
Coupler
Top Hole -Standard Hitch
Lower Lift Pin
Large Pin for Cat. II and
Quick Coupler
Small Pin for
Standard Hitch
CAUTION

NOTE
Before initial operation, cycle hydraulic
cylinders several times to purge air from
system. This will prevent etrratic, jerky
operation.
Figure 1-2 Model 91-08 with Pin Jacks
Figure 1-3 Model 91-08 with Hydraulics
Tilt
Adjustment
Pin Jack
Angle
Adjustment
Pin Jack
Optional
Skid Shoe
Parking
Stand
Offsetting
Adjustment
Pin Jack
Offsetting
Adjustment
Cylinder
Angle
Adjustment
Cylinder
Tilt
Adjustment
Cylinder
Skid shoes are used to control the depth of the cut.
(Figure 1-4)
Skid shoes on the Model 91 Series are optional and
may be purchased through your local Bush Hog
dealer. The skid shoes are provided with two series
of holes to obtain the desired height. Secure the
shoes in the desired position with skid shoe pin and
hairpin (Figure 1-4). When the skid shoe use is not
desired, install the skid shoe with the pad up and
retain using the pin and hair pin.
OPERATION
Care should be exercised during use of the blade to
prevent hanging the ends on immovable objects or
otherwise use the implement under conditions
beyond its designed capacity. Back fills may be
made by reversing the moldboard and pushing
instead of pulling.
WHEN EQUIPMENT IS TRANSPORTED,
USE NECESSARY DEVICES REQUIRED BY
LOCAL REGULATIONS FOR ADEQUATE
WARNING TO OPERATORS OF OTHER
VEHICLES.
ADDITIONAL TRACTOR FRONT BALLASTS
MAY BE NEEDED FOR STABLE OPERA-
TION AND TRANSPORT OF IMPLEMENT.
SEE TRACTOR OPERATOR’S MANUAL
FOR RECOMMENDED WEIGHTS. IT IS
RECOMMENDED THAT TRACTOR BE
EQUIPPED WITH ROLLOVER PROTECTIVE
SYSTEM (ROPS).
NOTE
Tractor must be equipped with enough hydraulic
outlets to accommodate all cylinder hoses.
Example: Two hydraulic cylinders require two
sets (4 outlets) of hydraulic outlets.
Figure 1-4
CAUTION
CAUTION
Pin
Hairpin
7

SECTION II
MAINTENANCE
Keep all nuts and bolts tight. Refer to Torque Chart
for correct torque.
Store the blade out of the weather when it is not in
use. This prevents rusting of the moldboard and
other components.
Inspect your blade periodically and replace any worn
or broken parts in order to have your implement
ready for use when needed.
Inspect hydraulic lines and fittings for wear or leaks.
Repair or replace if needed.
USE A PIECE OF CARDBOARD OR WOOD
RATHER THAN HANDS AND WEAR EYE
PROTECTION WHEN SEARCHING FOR
HYDRAULIC LEAKS. ESCAPING
HYDRAULIC OIL UNDER PRESSURE CAN
PENETRATE THE SKIN. IF OIL IS INJECT-
ED INTO THE SKIN, IT MUST BE SURGI-
CALLY REMOVED WITHIN A FEW HOURS
BY A DOCTOR OR GANGRENE MAY
RESULT.
WARNING
LUBRICATION - Lubricate the king pin grease fitting,
accessible through the hole in the rear of the boom,
before operating and every 50 hours thereafter with
a multipurpose grease. (Figure 2-1)
Lubricate the pivot pin at the front of the boom
through its exposed grease fitting at the same inter-
vals.
Remove and apply a liberal coat of multipurpose
grease to all other pins before operating and every
150 hours thereafter.
Figure 2-1
Lubrication
King Pin
Pivot Pin
SECTION III
ASSEMBLY
Prepare for assembly by (Figure 3-1) first removing
the pivot pin from the front of the boom. A cotter pin
at the bottom end must be removed and retained for
re-installation.
Slide the boom frame into alignment with the lift hitch
and reinsert the pivot pin. Replace the cotter pin.
The hitch and frame assembly may then be connect-
ed to a tractor 3-point hitch and raised to allow fur-
ther assembly.
Remove the three bolts, washers and cap from the
top of the swivel assembly.
Insert the swivel assembly up through the frame and
replace the cap, washers and bolts that were previ-
ously removed. The lug on the swivel assembly
used to mount the pin jack or hydraulic which con-
trols blade tilt should extend to the right side.
Remove the two bolts, and locknuts holding the
moldboard pivot pin in place and remove the pin.
(Figure 3-2)
Raise the frame until the moldboard can be posi-
tioned under the swivel tube. (Figure 3-2)
INSURE THAT MOLDBOARD IS SECURELY
SUPPORTED DURING ASSEMBLY TO PRE-
VENT IT FROM FALLING ONTO FEET,
HANDS OR BODY.
CAUTION
8

Figure 3-1
Front Hose Holder
Lift Hitch
Rear Hose Holder
Cap - Swivel Top
Swivel
Moldboard Pivot Pin
Skid Shoe
Boom Pivot Pin
Boom
Lower the frame guiding the swivel tube into position
until the pivot pin can be installed. Secure the pivot
pin to the moldboard using the bolts previously
removed. (Figure 3-2)
Figure 3-2 Moldboard Pivot Pin Swivel Tube
Install the 8” stroke pin jack or hydraulic cylinder that
controls “tilt” at this time. Pin jack outer housing to
be pinned to the lug on the mold board. (Figure 1-2
and Figure 1-3)
A 16” stroke pin jack or cylinder may be used to
control the ”offset” of the blade. The pin jack hous-
ing should be pinned to the lift hitch and the inner
link, or rod end, pinned to the boom. (Figure 1-2 and
Figure 1-3)
A 16” stroke pin jack, or cylinder, may be used to con-
trol the angle of the blade. The pin jack outside hous-
ing should be pinned to the boom and the inner link or
rod end, pinned to the swivel assembly. (Figure 1-2
and Figure 1-3)
SKID SHOE - (Optional) Insert shoe support bracket
between the lugs provided on the moldboard and
secure with the bolts, lockwashers and nuts provid-
ed. Insert skid shoe into bracket to desired position
and secure with “L” pin and hair pin. (Figure 1-4)
HYDRAULIC CYLINDERS
Fasten front hose holder to right side of the lift hitch
as shown, using carriage bolt, lockwasher and hex
nut. The rear hose holder attaches to the swivel
assembly cap using one of the existing bolts. (Figure
3-1)
The offsetting cylinder should be mounted with the
head end connected to the lift hitch and the rod end
to the boom frame. The ports should be located
upward. (Figure 1-3)
9

The angling cylinder should be mounted as shown.
(Refer to Figures 1-3)
The tilt cylinder should be mounted with the head
end connected to the swivel assembly and the rod
end to the moldboard lug. (Refer to Figure 1-3)
Refer to plumbing diagrams for locations of adap-
tors, swivels, hoses, etc. (Figure 3-4)
CUSHION VALVE - A cushion valve is available for
use with the 16” stroke hydraulic cylinders to absorb
sudden shock loads, and to help protect from over-
loading the blade. (Figure 3-3)
One cushion valve can be installed to protect either
the offset or the angling cylinder as desired. Two
cushion valves can be installed to protect both cylin-
ders at the same time.
SINGLE VALVE INSTALLATION - To install the sin-
gle valve unit, bolt the cushion valve to the top
mounting plate. Then, install the 1/2” Pipe to 9/16”
JIC fittings in the valve.
DOUBLE VALVE INSTALLATION - To install the
unit, bolt both cushion valves to the top mounting
plate. Then install the 1/2” Pipe to 9/16” JIC fittings
in the valves.
Install the offset cylinder hoses to the rear bottom
cushion valve ports. Install the tractor line hoses to
the front bottom cushion valve ports.
Install angling cylinder hoses to the rear top cushion
valve ports. Install the tractor line hoses to the front
top cushion valve ports as shown.
Refer to plumbing diagrams for locations of fittings,
hose lengths, etc. (Figure 3-4)
USE A PIECE OF CARDBOARD OR WOOD
RATHER THAN HANDS AND WEAR EYE
PROTECTION WHEN SEARCHING FOR
HYDRAULIC LEAKS. ESCAPING
HYDRAULIC OIL UNDER PRESSURE CAN
PENETRATE THE SKIN. IF OIL IS INJECT-
ED INTO THE SKIN, IT MUST BE SURGI-
CALLY REMOVED WITHIN A FEW HOURS
BY A DOCTOR OR GANGRENE MAY
RESULT.
WARNING
Figure 3-3 Double Cushion Valve Arrangement
Hydraulic Hoses Cushion Valves
Mounting Plate 1/2 “ Pipe to 9/16” Jic Fitting
10

Figure 3-4 HYDRAULIC PLUMBING DIAGRAM
NOTE
Tractor must be equipped with
enough hydraulic outlets to accomo-
date all cylinder hoses. Example: Two
hydraulic cylinders require two sets (4
outlets) of hydraulic outlets.
Offset & Angle Cylinder
Without Cushion Valve
To Tractor
Offset & Angle Cylinder
With Cushion Valve
To Cushion Valve
Tilt Cylinder
144’ Hose
To Tractor
144’ Hose
To Tractor
96” Hoses To Tractor
Cushion Valve
Hose To Rod End Of Angle Or Offset cylinder
Hose To Base End Of Angle Or Offset Cylinder
96” Hose Angle & Offset
96” Hose Angle & Offset
24” Hose Angle, 40” Hose Offset
24” Hose Offset, 40” Hose Angle
3/4” 90° “O” ring to 9/16” JIC
1/2” Pipe to 9/16” JIC
3/4” “O” Ring to 9/16” JIC
3/4” “O” Ring to 9/16” JIC
11

SAFETY DECALS
To promote safe operation, Bush Hog supplies safety decals on all products manufactured. Because damage
can occur to safety decals either through shipment, use or reconditioning, Bush Hog will, upon request, provide
safety decals for any of our products in the field at no charge. Contact your authorized Bush Hog dealer for
more information.
89475
12

BOLT DIAMETER
WRENCH (IN.) “B” AND SAE SAE SAE
SIZE (IN.) “A” THREAD SIZE GRADE 2 GRADE 5 GRADE 8
7/16 1/4 - 2O UNC 6 (7) 8 (11) 12 (16)
7/16 1/4 - 28 UNF 6 (8) 10 (13) 14 (18)
1/2 5/16 - 18 UNC 11 (15) 17 (23) 25 (33)
1/2 5/16 - 24 UNF 13 (17) 19 (26) 27 (37)
9/16 3/8 - 16 UNC 20 (27) 31 (42) 44 (60)
9/16 3/8 - 24 UNF 23 (31) 35 (47) 49 (66)
5/8 7/16 - 14 UNC 32 (43) 49 (66) 70 (95)
5/8 7/16 - 20 UNF 36 (49) 55 (75) 78 (106)
3/4 1/2 - 13 UNC 49 (66) 76 (103) 106 (144)
3/4 1/2 - 20 UNF 55 (75) 85 (115) 120 (163)
7/8 9/16 - 12 UNC 70 (95) 109 (148) 153 (207)
7/8 9/16 - 18 UNF 79 (107) 122 (165) 172 (233)
15/16 5/8 - 11 UNC 97 (131) 150 (203) 212 (287)
15/16 5/8 - 18 UNF 110 (149) 170 (230) 240 (325)
1-1/8 3/4 - 10 UNC 144 (195) 266 (360) 376 (509)
1-1/8 3/4 - 16 UNF 192 (260) 297 (402) 420 (569)
1-5/16 7/8 - 9 UNC 166 (225) 430 (583) 606 (821)
1-5/16 7/8 - 14 UNF 184 (249) 474 (642) 668 (905)
1-1/2 1 - 8 UNC 250 (339) 644 (873) 909 (1232)
1-1/2 1 - 12 UNF 274 (371) 705 (955) 995 (1348)
1-1/2 1 - 14 UNF 280 (379) 721 (977) 1019 (1381)
1-11/16 1-1/8 - 7 UNC 354 (480) 795 (1077) 1288(1745)
1-11/16 1-1/8 - 12 UNF 397 (538) 890 (1206) 1444 (1957)
1-7/8 1-1/4 - 7 UNC 500 (678) 1120 (1518) 1817 (2462)
1-7/8 1-1/4 - 12 UNF 553 (749) 1241 (1682) 2013 (2728)
2-1/16 1-3/8 - 6 UNC 655 (887) 1470 (1992) 2382 (3228)
2-1/16 1-3/8 - 12 UNF 746 (1011) 1672 (2266) 2712 (3675)
2-1/4 1-1/2 - 6 UNC 870 (1179) 1950 (2642) 3161 (4283)
2-1/4 1-1/2 - 12 UNF 979 (1327) 2194 (2973) 3557 (4820)
TORQUE SPECIFICATIONS
Proper toque for American fasteners used on Bush Hog equipment.
Recommended Torque in Foot Pounds (Newton Meters).*
Proper torque for metric fasteners used on Bush Hog equipment.
Recommended torque in foot pounds (newton Meters).*
WRENCH BOLT
SIZE DIA. ASTM ASTM ASTM ASTM
(mm) “A” (mm) “B” 4.6 8.8 9.8 10.9
851.8 (2.4) 5.1 (6.9) 6.5 (8.8)
10 6 3 (4) 8.7 (12) 11.1 (15)
13 8 7.3 (10) 21.1 (29) 27 (37)
16 10 14.5 (20) 42 (57) 53 (72)
18 12 25 (34) 74 (100) 73 (99) 93 (126)
21 14 40 (54) 118 (160) 116 (157) 148 (201)
24 16 62 (84) 167 (226) 181 (245) 230 (312)
30 20 122 (165) 325 (440) 449 (608)
33 22 443 (600) 611 (828)
36 24 211 (286) 563 (763) 778 (1054)
41 27 821 (1112) 1138 (1542)
46 30 418 (566) 1119 (1516) 1547 (2096)
*Use 75% of the specified torque value for plated
fasteners. Use 85% of the specified torque values
for lubricated fasteners.
Numbers appearing on bolt heads
indicate ASTM class.
METRIC
AMERICAN
Bolt Head Markings
Wrench
Size “A”
Bolt
Diameter “B”
SAE Grade 8
(6 Dashes)
SAE Grade 2
(No Dashes)
SAE Grade 5
(3 Dashes)
Wrench
Size “A”
8.8
Bolt
Diameter “B”
13


2501 Griffin Ave.
ll
Selma, AL 36703
Telephone (334) 874-2700
ll
www.bushhog.com
-
 1
1
-
 2
2
-
 3
3
-
 4
4
-
 5
5
-
 6
6
-
 7
7
-
 8
8
-
 9
9
-
 10
10
-
 11
11
-
 12
12
-
 13
13
-
 14
14
-
 15
15
-
 16
16
-
 17
17
-
 18
18


Bush Hog Rear Blade Owner's manual
- Category
- Tractor
- Type
- Owner's manual
- This manual is also suitable for
Ask a question and I''ll find the answer in the document
Finding information in a document is now easier with AI
Related papers
-
Bush Hog BH Rotary Cutter 2415 Owner's manual
-
-
-
-
-
-
-
-
-
Bush Blade Owner's manual
Other documents
-
 Land Pride RBT4096 User manual
-
 Land Pride RBT3596 User manual
-
Brinly-Hardy PP-51BH User guide
-
 Land Pride RBT40 User manual
-
 Land Pride RB05 Series User manual
-
 Land Pride RBT15 User manual
-
 Land Pride Rear Blades RB 15 Product information
-
New Holland LS160 User manual
-
 Land Pride RB35 Series User manual
-
 Land Pride RBT45108 User manual


