Page is loading ...

Aquasource® is a registered trademark
of LF, LLC. All Rights Reserved.
ATTACH YOUR RECEIPT HERE
HIGH-EFFICIENCY TOILET
Español p. 16
Français p. 8
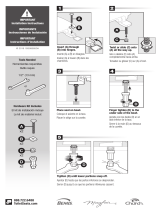
DO YOU HAVE?
Supply Line
Adjustable
Wrench
Putty Knife
Flathead
Screwdriver
Hacksaw
Carpenter’s
Level
NOTE: Items not included
ARE YOU READY?
Remove Old Toilet
1
2.
3.
4.
5.
Estimated Installation: 55 Minutes
ITEM #0098923, 0312795, 0352027, 0395278, 0395280
MODEL #AT1203-00, AT1203-03, LW0207W, LW0209W,
LW0210W
Please read and understand this entire manual before attempting to
assemble, operate or install the product.
CAUTION: Handle with care. Vitreous chinaware is glass-like
with sharp edges if broken. Do not drop or handle roughly.
Do not overtighten bolts.
WARNING: Risk of hazardous gases. If new toilet is not
installed immediately after removing an old toilet, temporarily
plug floor flange hole with a towel (or cover) to block sewer
gases from escaping. Observe local plumbing and building
codes.
Questions, problems, missing parts? Before returning to your retailer, call our customer service
department at 1-866-417-7564, 8 a.m. - 8 p.m., EST, Monday - Friday.
1
Turn off water supply and flush tank completely. Use a towel to
dry remaining water from tank and bowl.
Disconnect and remove old water supply line.
Remove tank from bowl by removing old tank-to-bowl hardware.
Remove bowl from floor by removing bolt caps and floor bolt nuts.
Remove floor bolts from toilet flange and clean old wax, putty and
sealant from base area. (Temporarily plug floor flange with a
towel or cover to block sewer gases from escaping.)
If replac
ing an existing toilet, follow these general guidelines. (Not all
toilets and connections are the same. Therefore, these guidelines may
or may not apply.)
NOTE: Mounting surface must be clean and level before new
toilet is installed.

PACKAGE CONTENTS
A
C
Hardware Contents
AA
DD
HH
KK
* *
LL MM NN
II JJ
EE FF GG
BB CC
Part Description Quantity Part Description Quantity
AA Floor Flange Brass Bolt 2 HH Plastic Seat Bolt 2
BB Small Metal Washer 2 II Plastic Seat Washer 2
CC Small Nut 2 JJ Plastic Seat Nut 2
DD Brass Bolt with Round Head 2 KK Foam Gasket (*Not shown to size) 1
EE Large Black Rubber Washer 2 LL Retaining Washer 2
FF Large Metal Washer 2 MM Wax Ring (*Not shown to size) 1
GG Large Nut 2 NN Floor Bolt Cap 2
Part Description Quantity
A Tank 1
B Bowl 1
C Seat 1
NOTE: Before beginning, make sure all parts are
present. Compare parts with package contents diagram
here. If any part is missing or damaged, do not attempt
to assemble, install or operate the product. Contact
customer service for replacement parts.
All hardware is shown to size unless otherwise noted. Hardware will use these identiflers throughout the manual.
B
2

Once bowl (B) is in position, press down with a slight
twisting motion on the top center of the bowl (B), eventually
applying full body weight to evenly compress the wax ring
(MM) to create a watertight seal. Make sure the bowl (B) is
as level as possible.
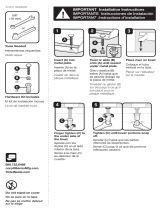
INSTALLATION INSTRUCTIONS
1.
Install Floor Bolts
Floor
Flange
AA
2.
Install Wax Ring
3.
Position Bowl on Floor Flange
Floor
Flange
AA
B
NOTE: Inspect existing floor flange for damage. If it
is damaged, replace the flange before proceeding.
NOTE: If wax ring has an integral plastic flange, be
sure flange taper points away from the toilet.
NOTE: Keep the bowl level as it is lowered onto the
floor flange. You may need a second person to help lift
the bowl.
CAUTION: Do not rock the bowl back and forth as
this may break the seal.
TIP: It may be necessary to use small wedges or
shims (not included)
under the edge of the bowl due
to slight variations in vitreous chinaware or uneven
floors. Bowl should be firmly seated on the floor so
it does not wobble or rock.
Insert floor flange brass bolts (AA) into the toilet flange (not
included) with bolt heads down and threaded ends facing up.
(Bolts should be parallel to wall and 6 in. apart.)
Turn bowl (B) upside down onto a cushioned surface. Place
wax ring (MM) over the raised outlet ring of the bowl (B).
Press firmly and slightly twist wax ring (MM) against bowl (B)
so the wax adheres to the bowl (B).
Unplug floor flange (if necessary). Gently lower the bowl (B)
into position with the floor flange brass bolts (AA) protruding up
through the holes in the base of the bowl (B).
B
MM
3

4.
Secure Bowl to Floor
AA
LL
BB
CC
B
5.
Cut Off Excess
NN
6.
Install Tank
A
DD
EE
FF
GG
KK
B
7. Attach Water Supply Line
A
If you cannot fit the floor bolt caps (NN) over the floor flange
brass bolts (AA) use a hacksaw (not included) to remove the
excess bolt threads. Leave about 1/4 in. of the floor flange brass
bolt (AA) above the small nut (CC).
Place retaining washers (LL) (note “This Side Up”), small metal
washers (BB) and small nuts (CC) on floor flange brass bolts
(AA). Alternately tighten small nuts (CC) until bowl (B) is firmly
seated on floor.
CAUTION: Do not overtighten small nuts because
vitreous china can easily crack or chip.
Pour water into bowl (B) to prevent the escape of sewer gases.
Install foam gasket (KK) over outlet on tank (A) and lower onto
bowl (B) so tapered end of foam gasket (KK) fits evenly into
inlet on bowl (B). Place the large black rubber washers (EE) on
the brass bolts with round heads (DD) and insert them
downward through the holes in the inside of the tank (A) and
through holes in the bowl (B). With the tank (A) parallel to the
wall (level and upright), position large metal washers (FF) and
large nuts (GG) on the brass bolts with round heads (DD) and
alternately hand tighten.
Push down on the tank (A) and alternately hand tighten large
nuts (GG) again, keeping tank (A) level. Using pliers or
wrench (not included), alternately give the large nuts (GG)
another 1/2 turn to level tank (A).
Connect the water supply line (not included) between the tank
(A) and shut-off valve. Tighten the coupling nut on the tank
connection 1/4 turn beyond hand tight.
Turn on supply valve and allow tank (A) to fill. Check for leaks
at all connections and tighten or correct as needed.
CAUTION: Do not turn bolts with screwdriver from
inside the tank. Instead, tighten large nuts from
below, holding brass bolts in place as necessary. To
avoid cracking the bowl, do not overtighten the nuts.
CAUTION: Do not overtighten the tank connection
nut.
AA
4
INSTALLATION INSTRUCTIONS

8.
Adjust Tank Water Level
Adjustment
Screw
9.
Install Seat
C
JJ
HH
II
CARE AND MAINTENANCE
CAUTION: Do not use in-tank cleaners. Products containing chlorine (calcium hypochlorite) can seriously
The manufacturer
(calcium hypochlorite).
The toilet is made of stain-, acid- and abrasion-resistant vitreous china. Clean the outside surfaces with mild soap, warm
water and a soft cloth. On stubborn stains use a powdered detergent and damp sponge or nylon scouring pad. Never use
abrasive scouring powders, cleansers or pads because they will scratch, damage and dull the surface.
When cleaning the toilet seat, wash it with mild soapy water. Rinse seat thoroughly with clean water and dry with a soft
cloth. Avoid detergents, disinfectants or cleaning products in aerosol cans. NEVER use abrasive scouring powders
on the seat. Some bathroom chemicals may cause damage to the seat’s finish, so test your cleaning solution on an
inconspicuous area before applying to the entire surface.
ONE-YEAR LIMITED WARRANTY
of manufacturing defects in materials and workmanship. This warranty is not transferable.
The manufacturer, at its election, may repair, replace or make appropriate adjustments where inspection discloses any
such defects occurring in normal usage. No warranty is given for installation mistakes, water damage or misuse. For a
or replacement. Purchaser shall be responsible for all shipping charges for returned product. This warranty gives you
o obtain warranty service, contact 1-866-
417-7564.
The fill valve and tank water level are set at the factory and
should not require adjustment. However, the water level is
controlled by the float on the fill valve and can be adjusted by
turning the adjustment screw as desired.
Place seat (C) on bowl (B), centering the hinges over the
holes in the bowl (B). Place plastic seat washers (II) on
plastic seat bolts (HH) and insert plastic seat bolts (HH) into
hinge holes. Use a screwdriver and plastic seat nuts (JJ) to
secure seat (C) to bowl (B). Close hinge covers.
5
INSTALLATION INSTRUCTIONS

1
32
6 7
4 5
REPLACEMENT PARTS LIST
For replacement parts, call our customer service department at 1-866-417-7564, 8 a.m. - 8 p.m., EST, Monday - Friday.
8
9
1110 1312 14 15
16
25 26
17 18 19 20 21 23 2422
710009
710013-2 (W)
710026-2 (B)
730022-1 730021-1 730010-1
730001-1 (W)
730006-1 (B)
710116
730001-2 (W)
730006-2 (B)
730001-3 (W)
730006-4 (B)
710010-1 710010-2
710111
710011
710012 (W)
710025 (B)
710013-1
LW6207WA-E
LW6203WA-E
LW6203BA-E
LW6209WA-E
730010-2730022-2
6

REPLACEMENT PARTS LIST
Part Description Part #
1 710010-1
2 710010-2
3
710011
4 710012
5
710025
6
Toilet tank-to-bowl connection kit
710013-1
7
710009
8
White toilet bowl bolt cap covers
710013-2
9
Biscuit toilet bowl bolt cap covers
710026-2
710111
10
White RF toilet seat (for item #0395278)
11
White EL toilet seat (for item #0098923)
White EL toilet seat (for item #0395280)
White EL toilet seat (for item #0352027)
730001-1
Biscuit EL toilet seat (for item #0312795)
730006-1
730022-1
730021-1
730010-1
710116
12
White toilet tank lid (for item #0098923)
LW6203WA-E
13
Biscuit toilet tank lid (for item #0312795)
White toilet tank lid (for item #0395278, #0395280)
White toilet tank lid (for item #0352027)
LW6203BA-E
LW6209WA-E
LW6207WA-E
14
White toilet seat bolts (for item #0098923)
White toilet seat bolts (for item #0395278, #0395280)
White toilet seat bolts (for item #0352027)
730001-2
15
Biscuit toilet seat bolts (for item #0312795)
730006-2
16
White toilet seat hinges (for item #0098923)
730001-3
17
Biscuit toilet seat hinges (for item #0312795)
730006-4
730022-2
730010-2
18
19
20
21
22
23
24
25
26
White toilet flush lever (for item #0098923)
Toilet flush valve with flapper (3 inch)
Toilet flapper (3 inch)
Toilet bowl wax ring and floor hardware
Chrome toilet flush lever (for item #0395278, #0395280)
White toilet flush lever (for item #0352027)
Biscuit toilet flush lever (for item #0312795)
Printed in China
7
/