Petsafe PRF-304W Owner's manual

Category
Pet care
Type
Owner's manual

The PetSafe PRF-304W is a wireless pet fence system that allows you to create a safe play area for your pet while keeping them away from dangerous areas. It features a waterproof and rechargeable receiver collar with 5 levels of static correction, a tone-only mode for training, and a low battery indicator. The system also includes a transmitter with a range of up to 3/4 of an acre and a boundary wire of 500 feet.

The PetSafe PRF-304W is a wireless pet fence system that allows you to create a safe play area for your pet while keeping them away from dangerous areas. It features a waterproof and rechargeable receiver collar with 5 levels of static correction, a tone-only mode for training, and a low battery indicator. The system also includes a transmitter with a range of up to 3/4 of an acre and a boundary wire of 500 feet.

BATTERY 6V
RFA-67
deluxe ultralight
receiver collar
operating guide
Model Number
PUL-275
PLEASE READ THIS ENTIRE GUIDE BEFORE BEGINNING
2 1-800-732-2677
Important Safety Information
Explanation of Attention Words and Symbols used in this guide
This is the safety alert symbol. It is used to alert you to
potential personal injury hazards. Obey all safety messages
that follow this symbol to avoid possible injury or death.
WARNING indicates a hazardous situation which, if not
avoided, could result in death or serious injury.
CAUTION, used without the safety alert symbol, indicates
a hazardous situation which, if not avoided, could result in
harm to your pet.
• Not for use with aggressive dogs. Do not use this product
if your dog is prone to aggressive behavior. Aggressive
dogs can cause severe injury or death to their owners and
others. If you are not sure that this product is right for your
dog, please talk to your veterinarian or a certified trainer.
www.petsafe.net 3
This PetSafe
®
In-Ground Fence
is not a solid barrier. This
system is designed to act as a deterrent to remind pets by
Static Correction to remain in the boundary established. It
is important that you reinforce training with your pet on a
regular basis. Proper fit of the collar is important. A collar
worn for too long or made too tight on the pet’s neck may
cause skin damage. Ranging from redness to pressure
ulcers; this condition is commonly known as bed sores.
• Avoid leaving the collar on the dog for more than 12 hours
per day.
• When possible reposition the collar on the pet’s neck
every 1 to 2 hours.
• Check the fit to prevent excessive pressure; follow the
instructions in this manual.
• Never connect a lead to the electronic collar; it will cause
excessive pressure on the contacts.
• When using a separate collar for a lead, don’t put
pressure on the electronic collar.
• Wash the dog’s neck area and the contacts of the collar
weekly with a damp cloth.
• Examine the contact area daily for signs of a rash or a
sore.
4 1-800-732-2677
• If a rash or sore is found, discontinue use of the collar
until the skin has healed.
• If the condition persists beyond 48 hours, see your
veterinarian.
• For additional information on bed sores and pressure
necrosis, please visit our website.
These steps will help keep your pet safe and comfortable.
Millions of pets are comfortable while they wear stainless
steel contacts. Some pets are sensitive to contact pressure.
You may find after some time that your pet is very tolerant
of the collar. If so, you may relax some of these precautions.
It is important to continue daily checks of the contact area.
If redness or sores are found, discontinue use until the skin
has fully healed.
You may need to trim the hair in the area of the Contact
Points. Never shave the dog’s neck; this may lead to a rash
or infection.
• The Receiver Collar should not be on your dog when the
system is tested. Your pet may receive an unintended
correction.
www.petsafe.net 5
• The Boundary Width of the system must be tested
whenever an adjustment is made to the containment field
to prevent unintended corrections to your pet.
• If you use a collar and leash for training, be sure the extra
collar does not put pressure on the contact points.
• Always remove your dog’s Receiver Collar before
performing any Transmitter testing.
• If possible, DO NOT use an AC circuit protected with a
Ground Fault Circuit Interrupter (GFCI) or Residual Current
Device (RCD). In rare cases, nearby lightning strikes may
cause the GFCI or RCD to trip. Without power your dog
may be vulnerable to escape. You will have to reset the
GFCI or RCD to restore power to the system.
6 1-800-732-2677
Thank you for choosing PetSafe
®
brand. You and your pet
deserve a companionship that includes memorable moments
and a shared understanding together. Our products and
training tools promote a lifestyle of protection, teaching, and
love — essentials that influence memories for a lifetime. If you
have any questions about our products or training your pet,
please visit our website at www.petsafe.net or contact our
Customer Care Center at 1-800-732-2677.
To get the most protection out of your warranty, please register
your product within 30 days at www.petsafe.net. By registering
and keeping your receipt, you will enjoy the products full
warranty and should you ever need to call the Customer Care
Center, we will be able to help you faster. Most importantly,
PetSafe
®
will never give or sell your valuable information to
anyone. Complete warranty information is available online at
www.petsafe.net.
Fence installation and training help: www.petsafe.net.
www.petsafe.net 7
How the System Works
A radio signal travels from the Fence Transmitter through a buried wire,
marking the boundaries you wish to set for your dog. Your dog wears
a Receiver Collar that detects the signal at the boundary. As your dog
approaches the boundary, the receiver issues a warning tone. If he
proceeds further, he receives a safe but startling Static Correction. While
harmless, the correction will persuade him to stay in the containment
area you’ve established. Boundary flags are a temporary visual aid for
your pet; remove them after training. This PetSafe
®
In-Ground Fence
has been proven safe, comfortable, and effective for pets over 8 pounds.
8 1-800-732-2677
Operating Guide
Prepare the Receiver Collar
Your Receiver Collar comes with short Contact
Points. Long Contact Points for pets with long or
thick hair are available through our Customer Care
Center. Tighten the Contact Points using Test Light
Tool (A) one-half turn beyond finger tight. Check
the tightness weekly.
To Insert and Remove the Battery
Note: Do not install the battery while the Receiver
Collar is on your pet.
This Receiver Collar utilizes a replaceable PetSafe
®
battery (RFA-67). This unique battery is designed
to make battery replacement easier and increase
water protection.
To insert the battery, align the symbols on the
battery (arrow) and Receiver Collar (triangle) (B).
A
B
C
www.petsafe.net 9
Use the edge of the Test Light Tool to turn the battery clockwise until the
arrow lines up with the lock symbol on the housing.
To remove the battery, turn the battery counter-clockwise using the edge
of the Test Light Tool (C). DO NOT attempt to cut into or pry open the
battery. Be sure to discard the used battery properly. Battery life will vary
depending on how often your pet tests the system and receives a Static
Correction. Check the Receiver Collar every month to ensure the battery
is working properly.
If the Receiver LED Indicator Light is flashing every 4 to 5 seconds, battery
replacement is required. Remove the old battery from the Receiver Collar.
Discharge all power by holding the correction level button down until the
LED is no longer illuminated. Replace with a new battery.
A replacement PetSafe
®
battery (RFA-67) can be found at many retailers.
Contact the Customer Care Center or visit our web site at www.petsafe.
net to locate a retailer near you.
10 1-800-732-2677
To Set the Static Correction Level
Read all steps before attempting to set the Static Correction Level.
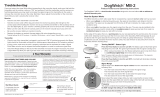
1. Remove the clear plastic cover with the Test Light
Tool to expose the Correction Level Button (D).
2. With the battery installed, press the Correction
Level Button and release when the Receiver
Indicator Light lights up (E).
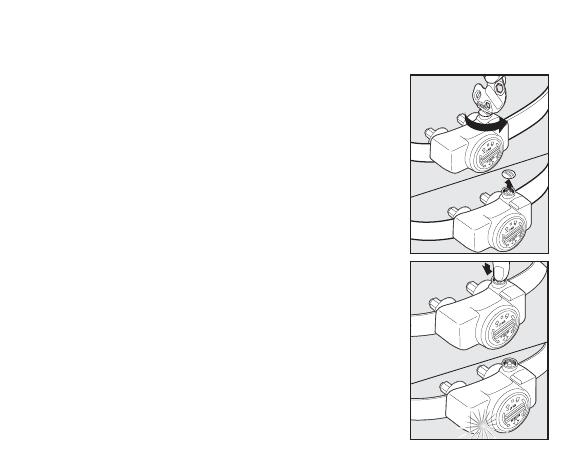
3. The Receiver Indicator Light will emit a series of
flashes representing the Static Correction Level.
4. Increase the Static Correction Level by pressing
and releasing the Correction Level Button within
5 seconds of the previous series of flashes.
5. After setting the Static Correction Level, replace
the cover to protect the Correction Level Button.
The Static Correction levels increase in strength
from 1 to 5. Pushing the Correction Level Button
while the Receiver Collar is on level 5 will cause the
Receiver Collar to revert to Level 1. Refer to the
Function and Response Table to choose the Static
Correction level that best fits your pet.
D
E
www.petsafe.net 11
The Receiver Collar is equipped to automatically increase the level of
Static Correction the longer your pet remains in the Static Correction
Zone if the collar is set at level 2 or above.
The Receiver LED Indicator Light acts as a low battery indicator, flashing
every 4 to 5 seconds when replacement is required.
Over Correction Protection
In the unlikely event that your pet “freezes” in the Static Correction
Zone, this feature limits the static correction duration to a maximum of
30 seconds. While the system locks out further static correction, the
warning tone will continue until the pet leaves the Static Correction
Zone.
12 1-800-732-2677
Function and Response Table
Indicator Light
Response
Static Correction
Level
Receiver Collar
Function
Temperament
of Pet
1 Flash 1
No Static
Correction,
Tone Only
Initial Training
Mode
2 Flashes 2
Low Static
Correction
Timid
3 Flashes 3
Medium Static
Correction
Timid or
Average
4 Flashes 4
Medium
High Static
Correction
Average or
High Energy
5 Flashes 5
High Static
Correction
High Energy
Flashes
once every
4 to 5 seconds
Indicates Low
Battery
www.petsafe.net 13
Fit the Receiver Collar
Important: The proper fit and placement of your Receiver Collar is
important for effective training. The Contact Points must have direct
contact with your pet’s skin on the underside of his neck. See important
safety information on pages 3-5.
To assure a proper fit, please follow these steps:
1. Make sure that the battery is not installed in
the Receiver Collar.
2. Start with your pet standing comfortably (F).
3. Place the Receiver Collar on your pet so that
the “PetSafe” logo is facing your pet’s chin.
Center the Contact Points underneath your
pet’s neck, touching the skin.
F
14 1-800-732-2677
4. The Receiver Collar should fit
snugly, yet loose enough to
allow one finger to fit between a
contact point and your pet’s neck
(G).
Allow your pet to wear the
collar for several minutes then
recheck the fit. Check the fit
again as your pet becomes more
comfortable with the Receiver
Collar.
5. Once you are satisfied with the
fit of the Receiver Collar then you
may trim any excess collar strap
as follows (H):
a. Mark the desired length of
G
H
the Receiver Collar with a pen. Allow for growth if your pet is
young or grows a thick winter coat.
b. Remove the Receiver Collar from your pet and cut off the excess.
c. Before placing the Receiver Collar back onto your pet, seal the
edge of the cut collar by applying a flame along the frayed edge.
www.petsafe.net 15
To Re-Thread the Collar
Slide Buckle
Ridges
The slide buckle prevents the
collar from becoming loose
around your pet’s neck.
The ridges must be facing
up; the collar will slip if it is
not properly threaded.
16 1-800-732-2677
Taking Your Pet Out of the Pet Area
Important: Remove the Receiver Collar and leave it in the Pet Area.
Once your pet learns the Boundary Zone, he will
be reluctant to cross it for walks or car rides.
Option 1: Replace the Receiver Collar with a
regular collar. Put your pet in a car that is within
the Pet Area and drive him out of the Pet Area.
Option 2: Replace the Receiver Collar with a
regular collar and leash. Walk your pet out of the
Pet Area while giving a command such as “OK”
at a specific place of the Boundary Zone (the end
of your driveway, sidewalk, etc.). Always leave the
Pet Area with a leash at this place and your pet
will associate leaving the Pet Area only on a leash, only at this place, and
only with a person. You may initially need to convince your pet to leave
the Pet Area with a food treat and lots of praise.
Note: You may also carry your pet out of the Pet Area.
www.petsafe.net 17
Please refer to your PetSafe
®
In-Ground Fence
Operating and Training
Guide for a complete list of Troubleshooting or visit www.petsafe.net.
Troubleshooting
Receiver Collar
is not beeping or
correcting.
• Check battery to make sure it is installed properly.
• Check that both lights are lit on the Fence
Transmitter. Refer to In-Ground Fence
Operating
and Training Guide.
The Receiver
Collar is beeping,
but the pet is not
responding to the
Static Correction.
• Test the Receiver Collar with the Test Light walking
toward the Boundary Wire.
• If the Test Light flashes, check the fit of the Receiver
Collar.
• Trim your pet’s fur where the Contact Points touch
the neck and/or purchase longer Contact Points by
contacting the Customer Care Center.
• Increase the Static Correction Level.
• Repeat training steps to reinforce training.
• Purchase a stronger Receiver Collar by contacting the
Customer Care Center.
18 1-800-732-2677
The Receiver Collar
has to be held on
top of the Boundary
Wire to activate.
• Replace battery.
• Adjust Boundary Width Control knob clockwise to
increase the distance from the Boundary Wire that
the Receiver Collar activates. Verify the Boundary
Control Switch is placed at the proper setting
according to the amount of Boundary Wire used.
• If the Receiver Collar still has to be held on top of the
Boundary Wire, refer to In-Ground Fence
Operating
and Training Guide.
The Receiver Collar
activates inside the
house.
• Turn the Boundary Width Control knob
counterclockwise to decrease the distance from the
Boundary Wire that the Receiver Collar activates.
• Make sure the Boundary Wire is not running within
15 feet of the house. The signal can transmit through
the walls of your house.
• Make sure Boundary Wires are twisted from
Boundary to the Fence Transmitter.
The Receiver LED
Indicator Light is
flashing every 4 to 5
seconds and I have
just installed a new
battery.
• To reset the low battery indicator, remove the battery
from the Receiver Collar. Discharge all power by
holding the correction level button down until the
LED is no longer illuminated. Reinstall battery.
www.petsafe.net 19
Additional Information
• The system should only be used with healthy pets. Contact your
veterinarian if you have concerns about the medical condition of your
pet (medication, pregnant, heart conditions, etc.).
• The PetSafe
®
In-Ground Fence
is for residential use only.
• The Static Correction will get your pet’s attention, but will not cause
harm. It is designed to startle, not to punish.
• Test the Receiver Collar at least once a month to verify that it is
functioning properly. Check that it activates at the Boundary Wire.
Battery life depends upon how often the Receiver Collar is activated.
• Remove the Receiver collar from your pet when indoors for the comfort
of your pet.
• Never leave the Receiver Collar on your pet for more than 12
consecutive hours.
20 1-800-732-2677
Test Light Instructions
1. Make sure the Receiver Collar battery
is properly installed. Set the Correction
Level to 2 or above.
2. Hold the Test Light Contacts to the
Contact Points (I).
3. Walk toward the Boundary Wire with
Contact Points pointing up and holding
the Receiver Collar at your pet’s neck level
(J) until the Receiver Collar tones and the
I
Test Light flashes (K).
J
B
o
u
n
d
a
r
y
Z
o
n
e
Pet
Area
K
  • Page 1 1
  • Page 2 2
  • Page 3 3
  • Page 4 4
  • Page 5 5
  • Page 6 6
  • Page 7 7
  • Page 8 8
  • Page 9 9
  • Page 10 10
  • Page 11 11
  • Page 12 12
  • Page 13 13
  • Page 14 14
  • Page 15 15
  • Page 16 16
  • Page 17 17
  • Page 18 18
  • Page 19 19
  • Page 20 20
  • Page 21 21
  • Page 22 22
  • Page 23 23
  • Page 24 24
  • Page 25 25
  • Page 26 26
  • Page 27 27
  • Page 28 28

Petsafe PRF-304W Owner's manual

Category
Pet care
Type
Owner's manual

The PetSafe PRF-304W is a wireless pet fence system that allows you to create a safe play area for your pet while keeping them away from dangerous areas. It features a waterproof and rechargeable receiver collar with 5 levels of static correction, a tone-only mode for training, and a low battery indicator. The system also includes a transmitter with a range of up to 3/4 of an acre and a boundary wire of 500 feet.

Ask a question and I''ll find the answer in the document

Finding information in a document is now easier with AI