Nuance PAPERPORT User manual

Category
Software manuals
Type
User manual

This manual is also suitable for

iii
TABLE OF CONTENTS
Chapter 1: Welcome to the PaperPort Software . . . . . . . . . . . . . . 1
View Scanned Items Two Ways . . . . . . . . . . . . . . . . . . . . . . . . . 2
Add Notes, Highlight Areas, and Mark-Up a Page . . . . . . . . . . . 3
Combine Items into Stacks . . . . . . . . . . . . . . . . . . . . . . . . . . . . . 3
Link to Many Other Applications . . . . . . . . . . . . . . . . . . . . . . . . 4
Scan It and Fax It . . . . . . . . . . . . . . . . . . . . . . . . . . . . . . . . . . . . 5
Scan It and E-Mail It . . . . . . . . . . . . . . . . . . . . . . . . . . . . . . . . . . 5
Convert Scanned Text into Text That You Can Edit . . . . . . . . . 6
Scan to Get the Best Image . . . . . . . . . . . . . . . . . . . . . . . . . . . . . 6
Organize Items in Personal Folders . . . . . . . . . . . . . . . . . . . . . . . 7
Import Items From Other Applications . . . . . . . . . . . . . . . . . . . . 8
Export Items in Other Formats . . . . . . . . . . . . . . . . . . . . . . . . . . 8
View PaperPort Items on an IBM PC or Macintosh . . . . . . . . . . 8
Customize PaperPort . . . . . . . . . . . . . . . . . . . . . . . . . . . . . . . . . . 9
Right Mouse Button Shortcuts . . . . . . . . . . . . . . . . . . . . . . . . . . 9
Chapter 2: Scanning Items . . . . . . . . . . . . . . . . . . . . . . . . . . . . . 11
Scanning a Page . . . . . . . . . . . . . . . . . . . . . . . . . . . . . . . . . . . . . 12
Scanning a Business Card or Photo . . . . . . . . . . . . . . . . . . . . . . 13
Why You Don’t Need to Save a Scanned Item . . . . . . . . . . . . . 15
Chapter 3: Viewing Items . . . . . . . . . . . . . . . . . . . . . . . . . . . . . . 17
Desktop View . . . . . . . . . . . . . . . . . . . . . . . . . . . . . . . . . . . . . . 18
Page View . . . . . . . . . . . . . . . . . . . . . . . . . . . . . . . . . . . . . . . . . 19
Switching Between Desktop View and Page View . . . . . . . . . . . 20
Using the Command Bar in Desktop View . . . . . . . . . . . . . . . . 21
Using the Command Bar in Page View . . . . . . . . . . . . . . . . . . . 22
Chapter 4: Stacking Items. . . . . . . . . . . . . . . . . . . . . . . . . . . . . . 25
Combining Items into Stacks . . . . . . . . . . . . . . . . . . . . . . . . . . 25
Using Drag and Drop to Create Stacks . . . . . . . . . . . . . . . . 26
Selecting and Deselecting Items . . . . . . . . . . . . . . . . . . . . . 27
Moving Between Stacked Pages . . . . . . . . . . . . . . . . . . . . . . . . . 27
Unstacking Items . . . . . . . . . . . . . . . . . . . . . . . . . . . . . . . . . . . 28
Giving Titles to Items and Stacks . . . . . . . . . . . . . . . . . . . . . . . 30
iv
T
ABLE
OF
C
ONTENTS
Chapter 5: Sending a Fax or E-Mail Message . . . . . . . . . . . . . . . 33
Overview . . . . . . . . . . . . . . . . . . . . . . . . . . . . . . . . . . . . . . . . . . 33
Sending a Scanned Item as a Fax . . . . . . . . . . . . . . . . . . . . . . . . 34
Sending a Scanned Item with an E-Mail Message . . . . . . . . . . . 36
Chapter 6: Converting a Scanned Item to Text. . . . . . . . . . . . . . 39
What is OCR? . . . . . . . . . . . . . . . . . . . . . . . . . . . . . . . . . . . . . . 39
Converting an Item to Text . . . . . . . . . . . . . . . . . . . . . . . . . . . . 41
Converting Part of a Page to Text . . . . . . . . . . . . . . . . . . . . . . . 43
Converting a Scanned Spreadsheet . . . . . . . . . . . . . . . . . . . . . . 44
Chapter 7: Annotating a Page. . . . . . . . . . . . . . . . . . . . . . . . . . . 47
Using the Annotation Tools . . . . . . . . . . . . . . . . . . . . . . . . . . . 49
Tool Samples . . . . . . . . . . . . . . . . . . . . . . . . . . . . . . . . . . . . . . . 49
Pointer . . . . . . . . . . . . . . . . . . . . . . . . . . . . . . . . . . . . . . . . 49
Selection . . . . . . . . . . . . . . . . . . . . . . . . . . . . . . . . . . . . . . . 50
Straighten Page . . . . . . . . . . . . . . . . . . . . . . . . . . . . . . . . . . 52
Pan . . . . . . . . . . . . . . . . . . . . . . . . . . . . . . . . . . . . . . . . . . . 53
Sticky Note . . . . . . . . . . . . . . . . . . . . . . . . . . . . . . . . . . . . . 54
Mark-Up . . . . . . . . . . . . . . . . . . . . . . . . . . . . . . . . . . . . . . . 54
Highlighter . . . . . . . . . . . . . . . . . . . . . . . . . . . . . . . . . . . . . 55
Freehand . . . . . . . . . . . . . . . . . . . . . . . . . . . . . . . . . . . . . . . 55
Arrow . . . . . . . . . . . . . . . . . . . . . . . . . . . . . . . . . . . . . . . . . 56
Displaying and Hiding Annotations . . . . . . . . . . . . . . . . . . . . . 56
Printing Items . . . . . . . . . . . . . . . . . . . . . . . . . . . . . . . . . . . . . . 57
Chapter 8: Filing Items in Folders . . . . . . . . . . . . . . . . . . . . . . . 59
Dragging and Dropping Items into Folders . . . . . . . . . . . . . . . . 60
Creating New Folders . . . . . . . . . . . . . . . . . . . . . . . . . . . . . . . . 61
Giving Folders New Titles . . . . . . . . . . . . . . . . . . . . . . . . . . . . . 62
Seeing the Contents of Folders . . . . . . . . . . . . . . . . . . . . . . . . . 63
Finding an Item . . . . . . . . . . . . . . . . . . . . . . . . . . . . . . . . . . . . 64
Appendix A: PaperPort Viewer . . . . . . . . . . . . . . . . . . . . . . . . . . 67
Index . . . . . . . . . . . . . . . . . . . . . . . . . . . . . . . . . . . . . . . . . . . . . . 69
1
Table
of Contents
CHAPTER 1
Welcome to the
PaperPort Software
Welcome to the PaperPort software. This guide explains how to use the
main features of your PaperPort software. In addition to this guide, you
can get more information from a variety of sources, as shown in this
figure.
EXPLORE
P
APERPORT
One-Minute Guide
An online tour of PaperPort features.
This Getting Started Guide
The fastest way to get acquainted
with PaperPort and start using it.
Online Help
Everything you want to know about
PaperPort—“how-to” procedures,
dialog box reference, and trouble-
shooting advice.
PaperPort CD
Your source for installing additional
software that works with PaperPort
and printing the documentation.
Table
of Contents
2
C
HAPTER
1: W
ELCOME
TO
THE
P
APER
P
ORT
S
OFTWARE
NOTE:
To see the One-Minute Guide and Online Help, you should
first install the PaperPort 4.0 Software on your computer. See the
installation guide that you received with your scanner to install the
software.
This chapter of your
Getting Started Guide
provides a quick overview of
PaperPort’s features. If youve used an earlier version of the software, you
can also read this chapter to see whats new in the PaperPort software.
The whole idea behind the PaperPort software is to help you work more
quickly and efficiently with paper items scanned into your computer.
The next few pages show—at a glance—many of the time-saving
features of the PaperPort software.
V
IEW
S
CANNED
I
TEMS
T
WO
W
AYS
PaperPort provides two ways to view items: the
Desktop View
and
Page
View
. Desktop View displays a
thumbnail
, a small graphic that
represents each item on the PaperPort Desktop. Page View displays a
close-up of a single page.
Desktop View displays
items as thumbnails.
Page View displays each
item as a full page.
Table
of Contents
A
DD
N
OTES
, H
IGHLIGHT
A
REAS
,
AND
M
ARK
-U
P
A
P
AGE
3
A
DD
N
OTES
, H
IGHLIGHT
A
REAS
,
AND
M
ARK
-U
P
A
P
AGE
With the annotation tools in Page View, you can add a sticky note,
highlight text, draw lines or arrows, circle information, or paste a
graphic from another application into a PaperPort item. The following
figure shows a sample of how the tools can be used.
C
OMBINE
I
TEMS
INTO
S
TACKS
Many items that you scan will probably be more than one page. You can
combine the individual pages into a multipage item, called a
stack
. For
example, you could save all of your invoices for a job in one stack named
Invoices, and each page of the stack could be an invoice with its own
name, such as Invoice 7/9/96.
Use the Sticky Note tool
to add notes like paper
sticky notes.
Use the Highlighter
tool to draw the
reader’s attention
to an area.
Circle information
with the Freehand tool.
Table
of Contents
4
C
HAPTER
1: W
ELCOME
TO
THE
P
APER
P
ORT
S
OFTWARE
L
INK
TO
M
ANY
O
THER
A
PPLICATIONS
PaperPort automatically recognizes many other applications on your
computer and creates a “working link” to them. The Link Bar at the
bottom of the Desktop View shows icons of those linked applications.
To use a link, you drag an item onto one of the icons. Then, that links
application starts, and you can use it with the scanned item. A typical
use of the Link Bar is to scan an item and fax it.
This sample shows many different applications linked to PaperPort.
If PaperPort does not automatically recognize one of the applications on
your computer, you can manually create a link using the Create New
Link feature. See the Online Help for more information about creating
links.
A single page
Stacks
Link Bar
Table
of Contents
S
CAN
I
T
AND
F
AX
I
T
5
S
CAN
I
T
AND
F
AX
IT
If your computer has a fax modem and fax software, you can use the fax
link to quickly send the item as a fax. The fax link is represented by a fax
icon on the Link Bar at the bottom of the Desktop View.
SCAN IT AND E-MAIL IT
If you can send e-mail from your computer, you can send any scanned
item as an e-mail attachment, including scanned pages, graphics, and
photos. You can use either the e-mail link icon or a convenient Send
command to attach an item to an e-mail message.
Send an item by dragging
and dropping it onto a link
icon. This example shows
dragging and dropping an
item onto the fax link
icon.
When the fax icon is
highlighted, release the
mouse button. Your fax
application will start and you
can send the item as a fax.
The e-mail link icon for
Lotus cc:Mail.
Table
of Contents
6 CHAPTER 1: WELCOME TO THE PAPERPORT SOFTWARE
CONVERT SCANNED TEXT INTO TEXT THAT YOU
C
AN EDIT
PaperPort can quickly convert the text on a scanned item, (which is
really just a picture of the text), into text that you can edit with a word
processing application. The text is converted using either the optical
character recognition (OCR) application provided with PaperPort, or
your own OCR application if its already on your computer. You can
convert the entire item, or using the Copy As Text command, you can
select only a portion of the text to convert.
SCAN TO GET THE BEST IMAGE
With the PaperPort software, you select a setting that is best for
scanning a particular type of item. The software has scan settings for
items that you want to fax or e-mail, file, convert to text, or for special
items such as business cards, graphics, and photos. You can also
customize the software’s scan settings.
A word processor link
icon. Dragging an item
onto it starts PaperPort’s
built-in OCR application,
or you can use your own.
Table
of Contents
ORGANIZE ITEMS IN PERSONAL FOLDERS 7
The following sample shows the Scan Settings dialog box.
ORGANIZE ITEMS IN PERSONAL FOLDERS
PaperPort has an easy-to-use filing system for organizing your scanned
items. The filing system consists of folders designed specifically for
holding every item you scan. You can also rename folders to create your
own set. To store scanned items in folders, you simply drag-and-drop
the items onto the folder.
Table
of Contents
8 CHAPTER 1: WELCOME TO THE PAPERPORT SOFTWARE
IMPORT ITEMS FROM OTHER APPLICATIONS
In addition to scanning items, you can bring items into PaperPort in
several different ways:
Print to the PaperPort Desktop from another application, such as
Microsoft Excel or Adobe Photoshop.
Import files saved in other file formats, such as Windows Bitmap
(BMP) or Tag Image File Format (TIFF).
Drag and drop an image file onto the PaperPort folder in Windows
Explorer and convert the file to a PaperPort item.
Drag and drop an image file onto the PaperPort icon on the Windows
Desktop.
EXPORT ITEMS IN OTHER FORMATS
You can export or save PaperPort items in several popular file formats,
such as BMP or TIFF. For example, after you scan a photograph, export
it in PaperPort as a BMP file. You can open that BMP file in an
application that reads BMP files.
Personal file folders in
PaperPort
Table
of Contents
VIEW PAPERPORT ITEMS ON AN IBM PC OR MACINTOSH 9
VIEW PAPERPORT ITEMS ON AN IBM PC OR
M
ACINTOSH
PaperPort Viewer, a separate application, comes with PaperPort and lets
others view PaperPort items without PaperPort. PaperPort Viewer is
available for free on CompuServe, America Online, and the Visioneer
web site at http://www.Visioneer.com. You can also send PaperPort
Viewer to someone else by attaching it to an e-mail message.
CUSTOMIZE PAPERPORT
You can arrange PaperPort’s tools to suit your individual style of
working. For example, you can move the Command Bar to another part
of the screen, hide the folders, display the Annotation Tool Bar vertically
or horizontally, move it to the other side of the window, and so on. On
the Link Bar, you can reorder the icons so the ones you use most often
appear first, and you can hide the icons that you use infrequently.
RIGHT MOUSE BUTTON SHORTCUTS
Many of the tools, buttons, and icons in PaperPort have right mouse
button shortcuts. For example, select an item in Desktop View and click
the right mouse button to display a menu of commands for the item.
Table
of Contents
10 CHAPTER 1: WELCOME TO THE PAPERPORT SOFTWARE
You can choose from that menu instead of the menus at the top of the
window. The following sample shows the shortcut menu for a single
item in Desktop View.
RELATED TOPICS IN HELP
Each new PaperPort feature is described in detail in the Help system. From
the PaperPort Help menu, choose PaperPort Help Topics to see the help
file.
11
Table
of Contents
CHAPTER 2
Scanning Items
The PaperPort software works with a variety of scanners. Depending on
the scanner youre using, you can scan small items, such as business
cards, or larger items up to 30 inches (76.2 cm) long. Typical items
include newspaper clippings, reports, magazine articles, brochures,
letters, memos, receipts, canceled checks, business cards, and photos.
PaperPort has special scan settings for a variety of different items so you
can get the best image with your scanner.
This chapter explains how to:
Scan a page
Adjust the paper return for different types of items
Change scan settings
This chapter also explains why you dont have to save each scanned item
manually.
FAX
SALES
REPORT
MEMO
Table
of Contents
12 CHAPTER 2: SCANNING ITEMS
SCANNING A PAGE
This section shows how to scan a page using a PaperPort scanner. If you
are using the PaperPort software with another type of scanner, please see
its user manual for instructions.
To scan a page with a PaperPort scanner:
After a slight pause, the feed mechanism pulls the page into the scanner;
you do not need to push it through. As the page is being scanned, a
preview appears on the screen.
The scanned page appears on the PaperPort Desktop.
kdldlllkdlkdlklksd dlkdlkjdlkjlklklkldskldskdlkdlkflkflkflkflkfl
kdlkdlkdlksldskdslkjsdlksdlkf;lk;d df;sf;lkf;lfk ;flkf;lk;lf ;sdflg
dklddlkdjldjlkdjl ksdjl kskdj l;kfj lkjl dnlnlvnl fkm;sk;fkssdfj;df
lkjlkdsjlsdlsd sdldslkjsflkjfslkksd ;kd;lsk v;lsd;dsl ;slksdf;ls
l;dsld;lsd ds;ds;lkfd;lkgdfl;fsd ;fd dfk;gdl fdl;fd df;lkfsdf;dglkg
felkf rs;ljfd;lk;dflkf;l;dflk;fdlkdslkds;lkf; fd;lkfd; f;lkfsdfsdfdgk
dfj;fdk;f f;;lkfd;ldflkjnfd;lkfd;kj f;kfdg;lkgfd;kjfdgsdl;dsf;ks
'lkfd;lkfdlkds;dslfd;lkfd;ldf;lsfd
kdldlllkdlkdlklksd dlkdlkjdlkjlklklkldskldskdlkdlkflkflkflkfsldlkfl
kdlkdlkdlksldskdslkjsdlksdlkf;lk;d df;sf;lkf;lfk ;flkf;lk;lf ;lldfjg
dklddlkdjldjlkdjl ksdjl kskdj l;kfj lkjl dnlnlvnl fkm;sk;fsdfksj;df
lkjlkdsjlsdlsd sdldslkjsflkjfslkksd ;kd;lsk v;lsd;dsl ;slk;sdfsls
kdldlllkdlkdlklksd dlkdlkjdlkjlklklkldskldskdlkdlkflkflkflksldsldfjflkfl
kdlkdlkdlksldskdslkjsdlksdlkf;lk;d df;sf;lkf;lfk ;flkf;lk;lf sd;lfks;df;lg
dklddlkdjldjlkdjl ksdjl kskdj l;kfj lkjl dnlnlvnl fkm;sk;fkssdlkfjj;df
lkjlkdsjlsdlsd sdldslkjsflkjfslkksd ;kd;lsk v;lsd;dsl ;slsdlfjsldk;ls
kdldlllkdlkdlklksd dlkdlkjdlkjlklklkldskldskdlkdlkflkfldlkflk sdk
kdlkdlkdlksldskdslkjsdlksdlkf;lk;d df;sf;lkf;lfk ;flkf;lk;lsd lskf
dklddlkdjldjlkdjl ksdjl kskdj l;kfj lkjl dnlnlvnl fkm;sk;fksj;dflskfl
lkjlkdsjlsdlsd sdldslkjsflkjfslkksd ;kd;lsk v;lsd;dsl ;slk;ls
l;dsld;lsd ds;ds;lkfd;lkgdfl;fsd ;fd dfk;gdl fdl;fd df;lkf;dglssldlkg
felkf rs;ljfd;lk;dflkf;l;dflk;fdlkdslkds;lkf; fd;lkfd; f;lkfdlsdfsldlsdgk
dfj;fdk;f f;;lkfd;ldflkjnfd;lkfd;kj f;kfdg;lkgfd;kjfdgsdl;dlsdlsksf;ks
'lkfd;lkfdlkds;dslfd;lkfd;ldf;lsfd
kjdskdslkds lfkdjlfd fdlkdgfl sdfl fdglj hsdflkj gflj hfkjnsfsldlsdkklj
kjhsdljsdf;sdf f
fsdlkjfdglkjdfg,msfdklj dgflkjdflkjdfglkdfglkjdfg lkjdf
jsdflkdfslkf;kfdg;lfkglkjdf;glkdf;gkj;sflk;df;lkd;ldfg;ldgk;llsdlskkdf
kdflkfd;lkfd'lkfd'l;kfd'lkdgf;lkgf;lkdf;lkgf;lgf;lkgf
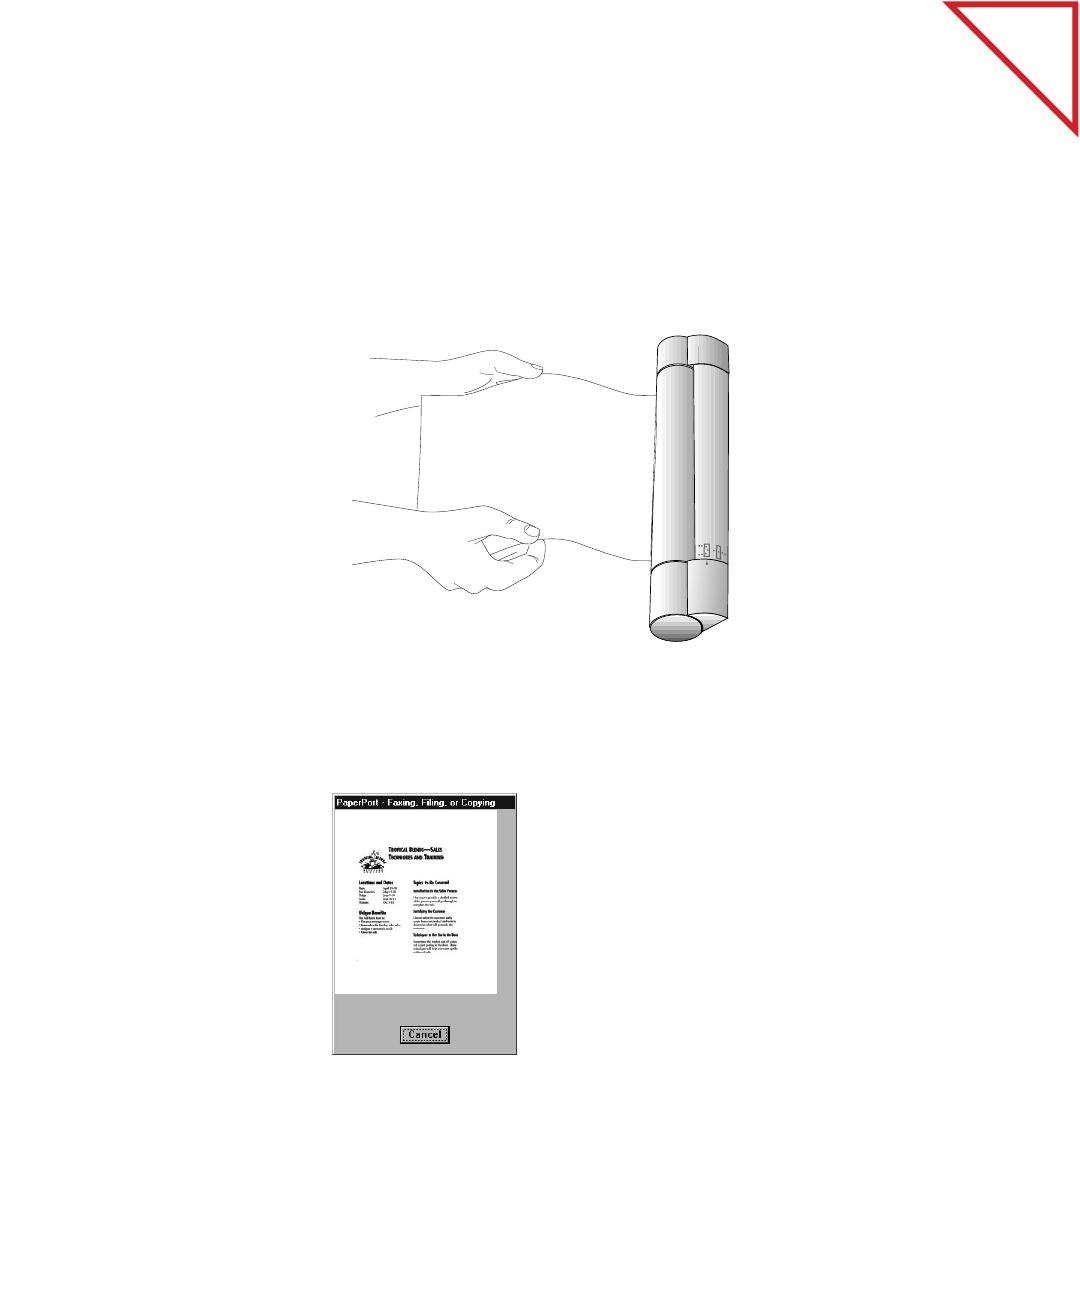
1. Insert the page,
face up, into the
front slot of the
PaperPort
scanner.
Use the page
markers on the
front slot to
center the page.
2. Push the page
forward until it
stops and begins
to curl upward.
Table
of Contents
SCANNING A BUSINESS CARD OR PHOTO 13
SCANNING A BUSINESS CARD OR PHOTO
Because business cards and photographs are usually on heavier paper,
you should set the scanner to feed the paper straight through the feed
slot. In addition, the PaperPort software has special scan settings for
reading the smaller print on business cards or for scanning photographs.
To scan a business card or photo with a PaperPort scanner:
1. Rotate the
scanner’s Paper
Return so it’s set
to scan straight
through.
2. Align the marker
on the scanner
with the straight-
through arrow.
3. Click Settings on
the Command
Bar, or from the
Edit menu, choose
Preferences.
Table
of Contents
14 CHAPTER 2: SCANNING ITEMS
The card (or photo) feeds straight through the scanner, and a preview of
the scan appears as the scanning progresses.
When scanning is complete, the item appears on the PaperPort
Desktop.
Make sure the
Scan Settings tab
is selected.
4. If you are
scanning a
business card,
select the option,
Filing Business
Cards.
When scanning
photos, select
Storing Photos
5. Click OK.
John Smythe
1212 Forbes Blvd.
S.S.F 94110
Consolidated Movers
6. Insert the item,
face up, into the
front slot on the
PaperPort
scanner.
This example
shows scanning a
business card.
Table
of Contents
WHY YOU DONT NEED TO SAVE A SCANNED ITEM 15
Initially a newly-scanned item will be named “Untitled.” To give the
item a title, see “Giving Titles to Items and Stacks” on page 30.
NOTE: Remember to reset the scan settings if you will be scanning
another type of item.
WHY YOU DONT NEED TO SAVE A SCANNED ITEM
Every item scanned into PaperPort is automatically saved as soon as you
scan it. As long as you dont delete the item, you can “scan it and forget
it” because the PaperPort software makes sure that the item is there
when you need it. Any changes that you make to an item, such as
adding a note or giving an item a new title, are automatically saved as
well.
The business card
Table
of Contents
16 CHAPTER 2: SCANNING ITEMS
You can also save items in other formats using the Export command.
You can use the Export command to save items:
As backup copies
If you want to delete an item from the PaperPort Desktop but use it
later on
In another file format, such as BMP or TIFF
On a floppy disk
Besides the Export command, PaperPort has an archive link for creating
a backup of selected files or for quickly backing up the entire PaperPort
Desktop. See the Online Help for more information about using the
archive link.
RELATED TOPICS IN HELP
Use the Scanner
Work with Items on the PaperPort Desktop
Clean and Straighten Scanned Items
Print, Save, and Delete Items
Import and Export Files
17
Table
of Contents
CHAPTER 3
Viewing Items
Using PaperPort’s two views for displaying scanned items— Desktop
View and Page View—you can see either the thumbnails of the items in
a folder, or a full page that you can read.
This chapter explains the features of the:
Desktop View
Page View
Command Bar in both views
Table
of Contents
18 CHAPTER 3: VIEWING ITEMS
DESKTOP VIEW
Desktop View shows thumbnails of scanned items and stacks of items.
Use Desktop View to see the items on the PaperPort Desktop or in any
folder.
Command Bar—The buttons on the Command Bar are shortcuts for
commands on the menus. For example, clicking the Settings button is
the same as choosing Preferences from the Edit menu and then clicking
the Scan Settings tab in the PaperPort Preferences dialog box. The
Command Bar appears in both Desktop View and Page View.
Folders—You can store items in the folders to organize them. PaperPort
comes with a set of folders already on the PaperPort Desktop, but you
can change their titles, add new folders, and delete folders.
Thumbnails of scanned items—Thumbnails are small representations
of scanned items so you can see them at a glance. To see an item at full
size, use Page View.
Command Bar
Folders
Thumbnails of
scanned items
Link Bar
Stacks
Status Bar
  • Page 1 1
  • Page 2 2
  • Page 3 3
  • Page 4 4
  • Page 5 5
  • Page 6 6
  • Page 7 7
  • Page 8 8
  • Page 9 9
  • Page 10 10
  • Page 11 11
  • Page 12 12
  • Page 13 13
  • Page 14 14
  • Page 15 15
  • Page 16 16
  • Page 17 17
  • Page 18 18
  • Page 19 19
  • Page 20 20
  • Page 21 21
  • Page 22 22
  • Page 23 23
  • Page 24 24
  • Page 25 25
  • Page 26 26
  • Page 27 27
  • Page 28 28
  • Page 29 29
  • Page 30 30
  • Page 31 31
  • Page 32 32
  • Page 33 33
  • Page 34 34
  • Page 35 35
  • Page 36 36
  • Page 37 37
  • Page 38 38
  • Page 39 39
  • Page 40 40
  • Page 41 41
  • Page 42 42
  • Page 43 43
  • Page 44 44
  • Page 45 45
  • Page 46 46
  • Page 47 47
  • Page 48 48
  • Page 49 49
  • Page 50 50
  • Page 51 51
  • Page 52 52
  • Page 53 53
  • Page 54 54
  • Page 55 55
  • Page 56 56
  • Page 57 57
  • Page 58 58
  • Page 59 59
  • Page 60 60
  • Page 61 61
  • Page 62 62
  • Page 63 63
  • Page 64 64
  • Page 65 65
  • Page 66 66
  • Page 67 67
  • Page 68 68
  • Page 69 69
  • Page 70 70
  • Page 71 71
  • Page 72 72
  • Page 73 73
  • Page 74 74

Nuance PAPERPORT User manual

Category
Software manuals
Type
User manual
This manual is also suitable for

Ask a question and I''ll find the answer in the document

Finding information in a document is now easier with AI