Formax 7200 Series User manual
- Category
- Folding machines
- Type
- User manual
This manual is also suitable for

7200 Series
Mid-Volume Modular Inserting System
OPERATOR MANUAL
FIRST EDITION
12/2011

1
Table Of Contents
1 Introduction ........................................................................................ 3
1.1 Pictograms ........................................................................... 3
1.2 Notes on the use of this handbook ............................................. 4
2 Safety notes ........................................................................................ 4
2.1 General safety notes ................................................................ 5
2.2 End of life ............................................................................... 6
3 Description of machine ........................................................................ 8
3.1 Description of operation ............................................................ 8
3.2 Identication of parts ............................................................... 9
4 Control Panel ..................................................................................... 11
4.1 The Job Screen .......................................................................11
4.2 The Run Screen ......................................................................12
4.2.1 The Run Screen displayed .............................................12
4.2.2 To adjust the Envelope Inserter settings ..........................13
4.2.3 To adjust the Document Unit settings ..............................15
4.3 The Menu Screen ....................................................................16
5 Running an existing job ..................................................................... 17
6 Switching the user ............................................................................. 19
6.1 How to switch the user ............................................................19
6.2 User access rights ...................................................................19
7 Creating a job .................................................................................... 21
7.1 Creating the Job Settings .........................................................21
7.1.1 Dening the mailset .....................................................22
7.1.2 Dening the fold ..........................................................31
7.1.3 Dening the output settings ..........................................33
7.1.4 Saving the job .............................................................35
7.2 Creating an envelope ..............................................................36
7.3 Creating a document ...............................................................38
7.4 Creating an enclosure .............................................................40
8 Loading the paper hoppers ................................................................ 41
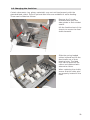
8.1 Loading the envelope hopper ....................................................41
8.2 Loading the versatile feeder hopper ..........................................42
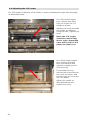
8.3 Loading the ex folder hoppers .................................................45
8.4 Paper Control Lever ................................................................48
8.5 Daily Mail (Handfeed) ..............................................................49
8.5.1 Stapling Restrictions .....................................................49
8.5.2 Using Daily Mail ...........................................................49
8.5.3 Setting the Separator Gap (see also section 8.2 ‘Adjusting the
Separator’). .........................................................................50

2
9 Operator Maintenance ....................................................................... 51
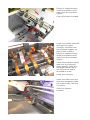
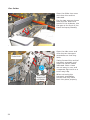
9.1 Cleaning the sensors ...............................................................51
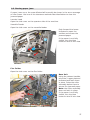
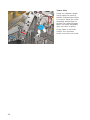
9.2 Clearing paper jams ................................................................57
9.3 Changing the feed tyres ..........................................................59
9.4 Adjust the CIS reader ..............................................................60
10 Technical Specication .................................................................... 61
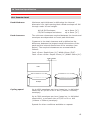
10.1 Inserter head .......................................................................61
10.2 Flex tower ............................................................................66
10.3 Versatile feeder ....................................................................68
10.4 Mechanical & Electrical ..........................................................69
11 Glossary of terms ............................................................................ 70

3
1 Introduction
With this inserter you have an advanced, medium-volume folding and inserting machine.
Its modular construction allows up to 8 feed units to be tted, with a maximum of 11 feed
trays. Its sophisticated software control optimises the order and ow of documents for
collating at the insert head before insertion into the envelope. All fold and adjustments take
place automatically according to the requirements programmed in by the operator.
In order to ensure the long usage of this machine and its components, and above all the
safe use of the machine, you must read and adhere to the operating instructions and safety
notes. Always be aware of all warnings and notes that are mounted or noted on the machine
itself.
All persons entrusted with the handling of this machine must also be familiar with the
operating manual.
Save this handbook carefully, so that the information it contains may be available at all
times.
1.1 Pictograms
General Warnings
Warning of danger from electricity or electrical shock
Information / Note indicating important information regarding the handling of
the machine.

4
1.2 Notes on the use of this handbook
This document contains all general information and explanatory text necessary in order to
be able to carry out the operation of the machine.
When some action is expected from the operator, this will always be explicitly stated, and
where relevant, accompanied by an illustration or graphic.
Always read through each step, so that you will obtain all of the necessary information. Do
not anticipate what you believe will follow in the handbook: It will prevent you from making
mistakes!
Chronology and Reference
This handbook is structured chronologically, and therefore ordered sequentially for the
operationally ready machine. It assumes that the machine has been installed in the
correct environment by an Authorised Service Engineer and that the operator or his or her
supervisor has had a degree of operator training.
When you are unfamiliar with the machine, it is best to read through the handbook from
beginning to end. You will be guided step by step, and in this way you can easily and quickly
have the machine in operation.
If you are already familiar with the machine, it will make thing easy if you use this
handbook as a reference work.
2 Safety notes
For your own safety and the operating safety of the machine, read the following notes
carefully before starting your machine. Always be aware of all warnings and notes that
are mounted or noted on the machine itself. Save this handbook carefully, so that the
information it contains may be available at all times.
The machine is of advanced construction and reliable in operation. Nevertheless, the device
does present hazards when operated by untrained personnel. The same applies to use that
is inappropriate and not in keeping with its intended purpose.
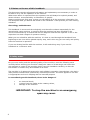
In not adhering to this handbook, there is the danger of
• an electrical shock,
• injuries from the intake at the rotating rollers,
• damage to the machine.
IMPORTANT: To stop the machine in an emergency,
open any cover.

5
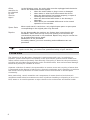
Caution!
Please, read these notes with care.
Save these instructions for later use.
All notes and warnings found on the machine are to be followed.
Important! The machine must be installed only by an Authorised
Service Engineer. A safe, level position is necessary, when installing the
machine, with sufcient space all round to operate it. The machine is to be
protected from moisture. If moving the machine, ensure that the castor
brakes are off, and push on the stand, not the machine.
Ensure there is at least 1 metre of free space between the operator side of
the machine and a wall or barrier. To provide access to the mains switch, the
opposite side of the machine must be at least 150mm from a wall or barrier.
Do not place surrounding furniture or other objects where your path may be
obstructed.
The machine may only be connected to a voltage of 230V/50Hz or 115V/60
Hz,depending upon model.
The mains plug may only be connected with a socket having an installed
protective contact! The protective effect will be compromised by the use of
an extension line without a protective grounding conductor. All interruptions
of the protective grounding conductor, within or outside of the machine,
are prohibited. The device is double pole fused! When fuse failure occurs,
electrical machine parts can still carry voltage. When making the connection
to the mains power, be aware of the connection values on the nameplate.
Inspect the voltage setting on the device’s power input module. Run the
supply lines in such a way, that no-one may trip over them. Do not place any
objects upon the supply line. When the machine is not in use over a long
period of time, it should be disconnected from the power supply. In this way,
damage would be prevented in the event of excess voltage. Protect the device
from moisture. When moisture enters the machine, there is the danger of
electrical shock. Never open the machine except the top cover. For reasons
of electrical safety, the machine may only be opened by authorized Service
Agents.
Never reach into the machine when it is running! This could only occur if a
safety interlock were to fail.
The danger of injuries exists, through pulling in and crushing on the rotating
rollers. In addition, keep long hair and parts of loose clothing far from the
machine in operation. If a safety interlock fails, your Service Agent must
be contacted immediately!
In order to prevent damage to the machine, only factory authorized accessory
parts should be used.
Prior to cleaning the exterior of the machine, it should be disconnected from
the power supply. When cleaning the machine, do not use liquid or spray
cleaners, but only a cloth dampened with water.
When cleaning sensors use only non-ammable airdusters, eg. part number
9103707C. Other types may use ammable propellants, which could result in
re or explosion.
Installing
the
machine
Electrical
danger
Operating
safety
Cleaning
the
machine
Cleaning
sensors
2.1 General safety notes

6
In the following cases, the mains plug must be unplugged and the device
left for the authorized Service Agents:
• When the mains cable or plug is worn or damaged.
• When water or other liquid has entered the device.
• When the device does not function properly, in spite of
following the instructions provided.
• When the device has fallen down or the housing is
damaged.
• When there are noticeable differences in the normal
operation of the machine.
When repair work is carried out, only original spare parts or spare parts
corresponding to the original parts may be used.
Do not disassemble the machine any further than is described in this
handbook. Other than the top cover, the opening of the machine by
unauthorized personnel is not permitted. Repairs may only be carried out
by an authorized Service Agent.
Modication is not permitted:
For safety reasons, your own reworking and modications are not
permitted.
Please contact your Service Agent, for all questions relating to service and
repair. In this way, you ensure the operational safety of your machine.
2.2 End of life
The objectives of the European Community’s environment policy are, in particular, to
preserve, protect and improve the quality of the environment, protect human health and
utilise natural resources prudently and rationally. That policy is based on the precautionary
principle and principles that preventive action should be taken, that environmental damage
should as a priority be rectied at source.
Separate collection of waste is the precondition to ensure reuse and recycling of waste that
is generated at the disposal of electrical or electronic equipment and is necessary to achieve
the chosen level of protection of human health and the environment in the European
Community.
More particularly, certain materials and components of waste electrical and electronic
equipment needs selective treatment as their injudicious handling or disposing of on or into
land, water or air would represent a major threat to the environment and human health.
Allow
machine to
be checked
by the
Service
Agent
Spare Parts
Repairs

7
In order to facilitate collection and treatment separated from normal domestic waste,
electrical and electronic equipment is marked with the following logo:
Not only are you by law not allowed to dispose of the waste equipment via other waste-
streams, but we encourage you to actively contribute to the success of such collection and
to the common good and better quality of life of present and future generations.
For more information on the correct disposal of this product please contact your local dealer.
Do not mix with normal domestic waste.
Please use the subjoined return or
collection system dedicated to electrical
and electronic waste.
Equipment produced after
August 13 2005

8
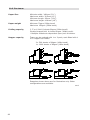
3 Description of machine
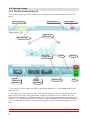
Feeder Folder• - Mounts on the track,
either in conjunction with a tower (see
below) or as the last station. Fitted with
one feed hopper, and folds forms up to
14” long using a 2-plate folding mecha-
nism. An OMR/Barcode version is also
available.
Tower• - Mounts at the end of the
machine. Folds documents either sepa-
rately or in groups, using an accumula-
tor if required. Fitted with either one or
two feed pods, each consisting of either
2 x 500 sheet trays or 1 x 1000 sheet
tray. Uses a 3-plate folding mechanism.
An OMR/Barcode version is also avail-
able.
The machine is equipped with PC controlled
operating software from where jobs can be
programmed and run. The number of jobs
that can be programmed is limited only by
the capacity of the PC. Input is via touch-
screen monitor or keyboard/mouse.
A daily post function can be used as an
otional feature on a tower. This allows
groups of documents, stapled or loose, to
be hand-fed; they will then be folded and
inserted into an envelope. If other hoppers
are loaded, further forms can be collated.
No manual setting of the fold plates or
envelope closer is required, these being
adjusted automatically according to the
settings in the selected program.
An optional output conveyor can be speci-
ed, to replace the standard receiving tray.
This is available in two lengths.
3.1 Description of operation
The function of the machine is to fold forms
to ‘C’, ‘Z’, ‘V’ or double forward fold, ei-
ther singly, in xed multiples or in varying
groups. Enclosures such as inserts, BR enve-
lopes etc. may be added. Folded forms and
enclosures are collated in the collation area
in the inserter head before insertion into the
envelope. Forms may be inserted without
sealing the envelope for subsequent check-
ing or hand insertion.
There is a batch processing facility, allowing
a preset number of cycles to be completed
before the machine automatically stops.
The machine is OMR/Barcode compatible
for use with a mark-reading feeder or tower
folder, allowing a group of forms to be col-
lated on the track prior to folding. A number
of barcode symbologies may be read.
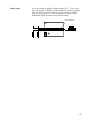
The machine consists of a number of mod-
ules, depending upon the build ordered -
these modules are briey described below:
Inserter head
• - Collates all documents
in a pocket before insertion, feeds the
envelope, inserts the pack and seals the
ap.
Versatile-Feeder - Feeds shortform inserts
(cards, BR envelopes, booklets etc.) onto
the track for subsequent insertion. Avail-
able as a single feeder with one feed
hopper or a double feeder with two feed
hoppers. An OMR/Barcode version (with
one feed hopper) is also available.

9
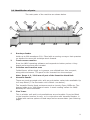
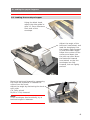
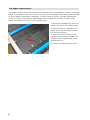
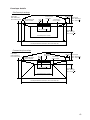
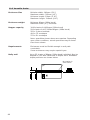
3.2 Identication of parts
The main parts of the machine are shown below.
1
2
3
4
5
8
7
6
1 Envelope feeder
Holds up to 800 envelopes (DL). Fiited with a sensing conveyor that operates
on demand to move the envelope stack forward.
2 Touch-screen monitor
Runs the IMOS operating software and responds to button pushes. A key-
board and mouse are also included.
3 Collation and insertion area
Folded forms, either singly or in groups, are collated here into one pack,
along with enclosures. The pack in then inserted into the envelope.
Note: Items 1, 2, 3 & 8 are all part of the Insertion Head Unit.
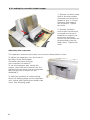
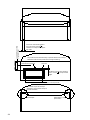
4 Versatile Feeder
These are track mounted units, with an end-station variant also available. Up
to 8 may tted (7 if a ex tower unit is tted - see below).
The Versatile Feeder feeds enclosures such as inserts, yers, BREs etc. The
hopper holds up to 1000 80gsm inserts. A mark reading variant for OMR/
Barcode/2D is also available.
5 Flex Tower
This is a folder unit and is only available as an end module. It can be tted
to the insertion head on its own, or in conjunction with Versatile Feeders. It
is tted with various options of feed trays and an accumulator (see following
page).

10
6 Feed Pods
Fitted to the Flex Tower. Either a 1-Tray or a 2-Tray Flex Tower is available.
Each one is tted with either 2 x 500-sheet trays, or 1 x 1000-sheet tray;
both variants can be mark reading as an option.
7 Accumulator
Fitted to the Flex Tower and allows groups of forms to be collated together
before folding as a group. It is an optional item, it is also tted with a divert-
er tray.
8 Closer/Eject Area
This is where the envelope ap is closed and sealed before ejected the lled
envelope into a receiving tray or onto a conveyor.

11
4 Control Panel
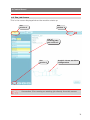
4.1 The Job Screen
This is the screen displayed when the machine starts up.
See
section 5
List of
existing jobs–
see section 5
See
section 6
See
section 7
Graphic shows machine
conguration
See section 5 for running an existing job directly from this screen.

12
4.2 The Run Screen
4.2.1 The Run Screen displayed
This is the screen you will see after an existing job has been selected in the Job
Menu.
Speed
controls &
indicator
See section 4.1
See section 6
Count
& time
indicators
Zero the
counts etc.
Run
Pause
Single cycle
Paper load
indicators
See section 3
Close IMOS*
Autoend
* This button closes down the IMOS operating software - it does not switch the
machine off.
To change the current user or job, click on the buttons and you will be presented
with a list of all those that have been created, and allow you to select any one.
Note that to change to a different user will require the appropriate password to be
entered. To view and adjust the settings for the envelope and document inserters,
click on the relevant part of the machine graphic (see the following pages for de-
tails).

13
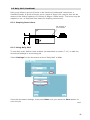
4.2.2 To adjust the Envelope Inserter settings
Unit Fine Tuning
All ne adjustments apply only to the current job and will not
affect any other jobs.
Select the inserter icon on
the machine graphic in the
Run screen to display the
ne tuning screen. Select
Hardware Fine Tuning to
display further information.
You can change:
a: The width of the collate
pocket guides.
b: The overall width of the
insert ngers.
c: The time allowed for
the ap to seal before the
envelope is ejected.
d: Adjustment of the point
at which the wetter beam
drops to wet the ap. +ve
increases wetting in 1mm
steps (moves start point
towards insertion area).
e: Adjustment of the point at which the wetter beam lifts. +ve increases duration,
ie. a greater length of ap is wetted befor the beam is lifted.
f. Adjustment of the amount of envelope travel into the sealing rollers. +ve = fur-
ther forward, away from exit direction.
g. Adjustment of the envelope stop position for insertion. +ve = further forwards,
towards exit direction.
h. Adjustment of the amount of insertion of the insert pack into the env
elope. +ve
= further forwards past the ap crease.
i. Adjustment of the amount of envelope foward tra
vel after ap wetting, before
reversing to enter the sealing rollers. +ve = further forward into the output rollers,
towards the exit direction. Note: for high-window envelopes, this should be
set to 20 - 50mm +ve.
When all adjustments are complete, select the ‘Unit’ button for hopper set-
tings, as described overleaf.

14
Hopper Fine Tuning
From here you can adjust
hopper settings. Select the
envelope icon on the ma-
chine graphic in the Run
screen then Document
Fine Tuning to display
further information. You
can change:
a: Whether or not the envelope is sealed. Select ‘Off’ if, for example, later hand
insertion of an insert or any other item will be required.
b: The setting of the amount of envelope deskew required. Note a higher level will
slow the machine more.
Important: All ne adjustments apply only to the current job and will not
affect any other jobs.
Important: All ne adjustments apply only to the current job
and will not affect any other jobs

15
4.2.3 To adjust the Document Unit settings
Unit Fine Tuning
The ne tuning options available will depend upon whether a
Versatile Feeder or Flex Folder is tted.
Select the document or insert icon on the machine graphic in the Run
screen to display the ne tuning screen.
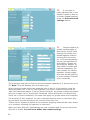
Hopper Fine Tuning
From here you can adjust
hopper settings. You can
select:
a: Feed Always or not. If you
select Off, the unit is disused
until it is turned back on
again.
b: Whether doubles detection
is turned on or off. Turn off if
booklets or very thick inserts
are being fed. Note: refers only to optical detection - mechanical detection may also be t-
ted.
c: Only for Reading units. Retrieve CIS Image - if selected, images of the label as seen
by the CIS reader will be displayed. The images will be of the nal 2 documents in the group
and can be useful for error checking by conrming that the whole label was read, for exam-
ple, or comparing the 2 images.
Important: All ne adjustments apply only to the current job
and will not affect any other jobs

16
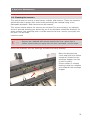
4.3 The Menu Screen
The Menu screen allows various functions to be selected. These functions are de-
scribed in detail further in this document.

17
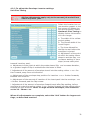
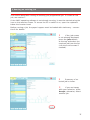
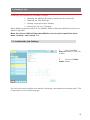
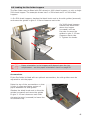
5 Running an existing job
This section describes running an existing pre-programmed job. To create a new
job, see section 7.
If the IMOS operating software is not already running, it must be started using the
icon on the monitor screen. To access the PC to switch it on, open the cupboard
below the inserter head.
Before running a job, the paper hoppers must be loaded with stationery - see sec-
tion 8 for details.
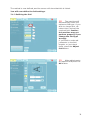
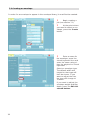
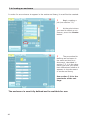
1 If the Job screen
is not already displayed,
press the Jobs button
at the top and select the
required job from the list
(use the scroll arrows if
needed).
2 Summary of se-
lected job is shown.
3 If you are happy
with your selection, press
Accept, otherwise, select
another job.

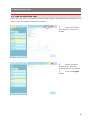
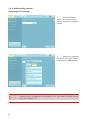
18
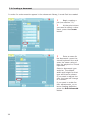
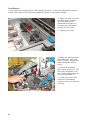
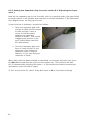
4 Load the paper and
envelopes in the hoppers
indicated.
5 Press the Run but-
ton to begin operating.
See also section 4.2 for
a full description of the
controls.
Paper is normally loaded in the Tower face-up and feet-rst if non-
reading, face down and head-rst if reading. This may vary: see
also appendix A.

19
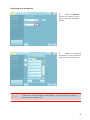
6 Switching the user
6.1 How to switch the user
Each user has their own password and access rights, allocated by the Supervisor. To
switch user, the password must be known.
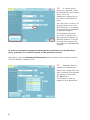
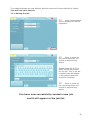
1 Press the Switch
User button in the Job
screen
2 Select the user
from the list. Use the
scroll arrows if necessary.
3 Press the Logon
button.
Page is loading ...
Page is loading ...
Page is loading ...
Page is loading ...
Page is loading ...
Page is loading ...
Page is loading ...
Page is loading ...
Page is loading ...
Page is loading ...
Page is loading ...
Page is loading ...
Page is loading ...
Page is loading ...
Page is loading ...
Page is loading ...
Page is loading ...
Page is loading ...
Page is loading ...
Page is loading ...
Page is loading ...
Page is loading ...
Page is loading ...
Page is loading ...
Page is loading ...
Page is loading ...
Page is loading ...
Page is loading ...
Page is loading ...
Page is loading ...
Page is loading ...
Page is loading ...
Page is loading ...
Page is loading ...
Page is loading ...
Page is loading ...
Page is loading ...
Page is loading ...
Page is loading ...
Page is loading ...
Page is loading ...
Page is loading ...
Page is loading ...
Page is loading ...
Page is loading ...
Page is loading ...
Page is loading ...
Page is loading ...
Page is loading ...
Page is loading ...
Page is loading ...
Page is loading ...
Page is loading ...
Page is loading ...
Page is loading ...
Page is loading ...
-
 1
1
-
 2
2
-
 3
3
-
 4
4
-
 5
5
-
 6
6
-
 7
7
-
 8
8
-
 9
9
-
 10
10
-
 11
11
-
 12
12
-
 13
13
-
 14
14
-
 15
15
-
 16
16
-
 17
17
-
 18
18
-
 19
19
-
 20
20
-
 21
21
-
 22
22
-
 23
23
-
 24
24
-
 25
25
-
 26
26
-
 27
27
-
 28
28
-
 29
29
-
 30
30
-
 31
31
-
 32
32
-
 33
33
-
 34
34
-
 35
35
-
 36
36
-
 37
37
-
 38
38
-
 39
39
-
 40
40
-
 41
41
-
 42
42
-
 43
43
-
 44
44
-
 45
45
-
 46
46
-
 47
47
-
 48
48
-
 49
49
-
 50
50
-
 51
51
-
 52
52
-
 53
53
-
 54
54
-
 55
55
-
 56
56
-
 57
57
-
 58
58
-
 59
59
-
 60
60
-
 61
61
-
 62
62
-
 63
63
-
 64
64
-
 65
65
-
 66
66
-
 67
67
-
 68
68
-
 69
69
-
 70
70
-
 71
71
-
 72
72
-
 73
73
-
 74
74
-
 75
75
-
 76
76


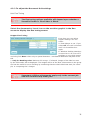
Formax 7200 Series User manual
- Category
- Folding machines
- Type
- User manual
- This manual is also suitable for
Ask a question and I''ll find the answer in the document
Finding information in a document is now easier with AI
Related papers
-
Formax 7100 Series User manual
-
-
-
-
-
-
-
-
-
Other documents
-
Rexel Gladiator Heavy Duty Stapler Silver/Black Datasheet
-
-
-
MartinYale 1611 Datasheet
-
Neopost HCVS-1 User manual
-
-
Martin Yale 1611 Quick Instructions
-
-
-
quadient DS-200iQ User guide