Spektrum DX5e 5-Channel Full-Range Transmitter Only MD2 Quick start guide
- Category
- Remote controlled toys
- Type
- Quick start guide

The Spektrum trademark is used with permission of Bachmann Industries, Inc.
DX5e Quick Start Guide
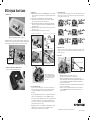
1. Install Receiver
Example of AR500 installed in E-flite
®
Apprentice
Though in general it is non-critical, optimum installation of the antenna is to
orient the tip of the long antenna perpendicular to the short antenna. The tip
on the long antenna should be a least 2 inches from the short antenna.
Example of AR500 installed in Hangar 9
®
Pulse
™
XT 60
2. Install AA Size Heavy-Duty or Alkaline Batteries
Note: Observe polarity when installing batteries.
3. Bind Receiver
A. Plug the bind plug into the receiver’s BATT/BIND port. In systems utiliz-
ing a separate battery pack and 3-wire switch, plug the bind plug into the
charge jack.
B. Power up the receiver. The LED on the receiver will be flashing.
C. Move the sticks and switches on the transmitter to the desired failsafe
positions (low throttle and neutral control positions).
D. Pull and hold the Trainer Switch on the transmitter while turning the
transmitter on. Release the trainer switch once the LEDs on the front of
the transmitter flash.
E. The LED on the receiver will go solid amber and the system will connect
after several seconds.
F. Remove the bind plug from the charge jack or bind port.
Typical Electric - Rx uses the ESC for power. Typical Glow/Gas - uses receiver pack and 3-wire switch.
4. Test System Battery Voltage
Lack of power to the receiver and servos is a leading cause of failure. If you
are using a receiver pack, ensure that it is properly charged and check the
voltage under load (HAN172). Do not fly if voltage is below 4.8V for a
4-cell pack.
In systems using a BEC, ensure that you are not driving more than the man-
ufacturer’s recommended number of servos for your BEC/Speed control.
If at anytime, the voltage should fall below the receiver’s operating threshold,
an interruption in the link may occur followed by a blinking light on the
receiver. A more accurate way to test a questionable setup is to measure the
voltage per the instructions on page 17.
Note: If the receiver power is cycled without cycling the transmitter, a blink-
ing light will also occur. In this case, this does not indicate a problem.
Cycle the Tx power, and then the Rx, to reset the light.
5. Control Surface Check
Turn on the transmitter followed by the receiver and check that the direction of each
channel is correct. Use the servo reversing switches on the front of the transmitter
to change the direction if necessary.
6. Re-Bind the System
After you’ve set up your model, it’s important to re-bind the system so the true low
throttle position is stored. If the signal is lost, the throttle servo will drive to a low
throttle safe position.
7. Range Check
How to Range Check
1. With the model resting on the ground, stand 30 paces
(approximately 90 feet/28 meters) away from the model.
2. Face the model with the transmitter in your normal flying position
and pull and hold the Trainer Switch while toggling the HI/LO Rate Switch
four times. The LEDs will flash and the alarm will sound indicating the
system is in range check mode.
3. You should have total control of the model with the Trainer Switch pulled
at 30 paces (90 feet/28 meters).
4. If control issues exist, call the Horizon Support Team at 1-877-504-0233
or go to horizonhobby.com to find a local Spektrum distributor in your
country of service.
Revised 12/08 13639.1
Pull and hold the Trainer Switch
30 paces (90 feet/28 meters)
Elevator Stick UP Elevator Stick DOWN
Aileron Stick LEFT Aileron Stick RIGHT
Rudder Stick LEFT Rudder Stick RIGHT
Leaders in Spread Spectrum Technology
Tape antenna in place.
Do not allow tip to
touch metal.
A. Insert Bind Plug
Receiver pack and 3-wire switch
B. Apply power to system
A, B. Insert bind plug into charge
jack, apply power
C, D. Pull trainer switch, turn power on
Note: Continuing to hold the
trainer switch during the binding
process will prevent preset failsafe
positions from being learned by
the receiver.
-
 1
1

Spektrum DX5e 5-Channel Full-Range Transmitter Only MD2 Quick start guide
- Category
- Remote controlled toys
- Type
- Quick start guide
Ask a question and I''ll find the answer in the document
Finding information in a document is now easier with AI
Related papers
-
Spektrum DX5e 5-Channel Full Range Transmitter Only MD1 Owner's manual
-
-
Spektrum SPM7800C Owner's manual
-
Spektrum DX7 7Ch Heli User manual
-
-
-
Spektrum DX8 User manual
-
Spektrum DX6 Transmitter System MD2 User manual
-
Spektrum SPM7000 Owner's manual
-
Spektrum DX9 Black Edition System Owner's manual
Other documents
-
E-flite Apprentice 15e PNP Specification
-
 JR X9503 2.4 Instruction And Programming Manual
-
RCS PRO-3 Instructions Manual
-
E-flite Apprentice S 15e BNF User manual
-
-
-
-
E-flite Apprentice Assembly Manual
-
ParkZone Archer User manual
-
iON PIANO APPRENTICE Quick start guide
