Trotec PAC 4600 Operating instructions
- Category
- Mobile air conditioners
- Type
- Operating instructions
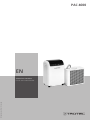
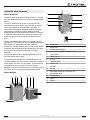
Trotec PAC 4600 is a powerful air conditioner that provides efficient cooling, ventilation, and dehumidification for rooms up to 120 square meters. It operates on an eco-friendly R290 refrigerant and features three fan speeds, a programmable timer, and a remote control for convenient operation. With its automatic swing function, the device ensures optimal air distribution, while the activated carbon filter effectively removes odors for a refreshing indoor climate.
Trotec PAC 4600 is a powerful air conditioner that provides efficient cooling, ventilation, and dehumidification for rooms up to 120 square meters. It operates on an eco-friendly R290 refrigerant and features three fan speeds, a programmable timer, and a remote control for convenient operation. With its automatic swing function, the device ensures optimal air distribution, while the activated carbon filter effectively removes odors for a refreshing indoor climate.


-
 1
1
-
 2
2
-
 3
3
-
 4
4
-
 5
5
-
 6
6
-
 7
7
-
 8
8
-
 9
9
-
 10
10
-
 11
11
-
 12
12
-
 13
13
-
 14
14
-
 15
15
-
 16
16
-
 17
17
-
 18
18
-
 19
19
-
 20
20


Trotec PAC 4600 Operating instructions
- Category
- Mobile air conditioners
- Type
- Operating instructions
Trotec PAC 4600 is a powerful air conditioner that provides efficient cooling, ventilation, and dehumidification for rooms up to 120 square meters. It operates on an eco-friendly R290 refrigerant and features three fan speeds, a programmable timer, and a remote control for convenient operation. With its automatic swing function, the device ensures optimal air distribution, while the activated carbon filter effectively removes odors for a refreshing indoor climate.
Ask a question and I''ll find the answer in the document
Finding information in a document is now easier with AI
Related papers
-
Trotec PAC 3900 X User manual
-
Trotec PAC 2010 E Owner's manual
-
Trotec PT 2700 SP User manual
-
Trotec PAC 3200 E A+ Operating instructions
-
Trotec PAC 3500 X Operating instructions
-
-
Trotec IR 2400 User manual
-
-
Trotec PWLS 05-10 User manual
-
Other documents
-
DeLonghi PAC 35 Instructions For Use Manual
-
-
Remko RKL 495 DC S-Line Owner's manual
-
Samsung AF55JS3MAAPNMG User manual
-
-
-
Soleus Air TM-PAC-08E3 Operating Instructions Manual
-
-
Air-Con TM-PAC-08E3 Operating instructions
-
Liebert CR035 User manual