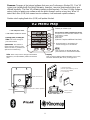
Smai Ski Machine User manual
- Type
- User manual

SKI MACHINE
OWNER’S MANUAL

2
Table of Contents
INTRODUCTION PAGE 3
IMPORTANT SAFETY INFORMATION PAGE 4
CARE AND MAINTENANCE PAGE 5-9
OVERVIEW OF THE PERFORMANCE MONITOR PAGE 10-11
SAFETY USING INSTRUCTION PAGE 12-15
MUSCLE TRAINING INSTRUCTION PAGE 16-17
GENERAL PARTS INDENTIFICATION PAGE 18
ASSEMBLY INSTRUCTION PAGE 19-32
EXPLODED VIEW PAGE 33
PART LIST PAGE 34-36
(2019/ 06) (SKI-01)

3
INTRODUCTION
Congratulations!
Welcome to the world of the SKI MACHINE aka AIR SKIER. The AIR SKIER is
one of the finest and most comprehensive Ski Simulators available.
The AIR SKIER is designed to provide relevant skiing related exercises. In addition,
the AIR SKIER gives several option for regular light strength training.
By choosing AIR SKIER, you have made a decision that will improve the health
and fitness and well being for you and your family.
Fit and healthy will improve your energy levels and your quality of life.
Cardiovascular training is vital for all ages and the AIR SKIER provides a more
effective workout, producing better results and will encourage you have always
wanted.
All you need to do is to spend 15 to 30 minutes three times a week to get the
benefits of a regular exercise program on the AIR SKIER.
We want you to enjoy the full benefits of your exercise program and so we
recommend that you read this manual thoroughly and by doing so you will:
•
Save valuable exercise time in the long run.
•
Exercise safely and more effectively.
•
Learn proper techniques.
•
Be able to better define your fitness goals.

4
Important Safety Information
We suggest that you read this User Manual thoroughly to familiarize yourself with
the AIR SKIER before using it.
Before beginning any exercise program, consult your physician. He or she can help
evaluate your present fitness level and determine the exercise program that is the
most appropriate for your age and physical condition.
If you experience any pain or tightness in the chest, irregular heartbeat, shortness of
breath, faintness, or unusual discomfort upon exercising, stop exercising and
consult a physician.
The maximum weight capacity of this unit is 320 pounds (145 KGS).
Adult supervision is required at all times when children are on or near the AIR
SKIER. Unsupervised children should keep away from the equipment at all times.
Keep fingers and limbs, loose clothing and hair away from moving parts.
Before each workout, we advise that a precautionary safety check is wise. All
equipment should be safety check for wear and damage. If you find any damage or
defective components, stop using the AIR SKIER immediately and contact your
dealer for help. Keep the equipment out of use until repaired by a certified
technician.
To avoid injury, care should be taken when getting on or off your AIR SKIER.
Wear comfortable, lightweight, well ventilated clothing to help sweat evaporation.
Make sure your shoes fit you properly and provide external and lateral stability
support to prevent ankle and knee injuries. Wear cross-training, walking or running
shoes.
It’s very important not to become dehydrated. Your body needs water during
exercise.
Don’t forget to warm-up and cool-down. Limbering up “cool” muscles and cooling
down after exercise are important injury-prevention measures. If you have not
warmed up prior to mounting your AIR SKIER, to avoid injury we suggest you
exercise slowly for at least five minutes before beginning any intense exercise
programs.

5
CARE AND MAINTENANCE
Your AIR SKIER is made of the high quality materials. However it is still important
that you take care of your AIR SKIER on a regular basis. Your AIR SKIER is for
indoor use only and should not be used or stored in damp areas. Wipe all
perspiration after each use.
For safety, inspect your AIR SKIER on a regular basis. Always do safety check and
clean before and after use.
CORD ROUTING SETTING TIPS & SCHEMATIC
The cord suffers a lot of friction and can easily fray. Check for frayed cord
consistently. When the cord is damaged we suggest that you replace it yourself or
contact your dealer for assistance. The cord proper routing setting tips &
schematic –Pls refer to page (6) & (7).
CORD USING INSTRUCTION & MAINTENANCE TIPS
In order to avoid the cords are frayed easily, pls refer to cord proper cord using
instruction & maintenance tips on pages (8) & (9).
ALL FASTENERS [Nuts, Bolts, and Screws]
Due to vibration, over time some of the fasteners may become loose. We strongly
suggest the owner periodically check all visible fasteners at least once a year to
ensure that they remain tight.
If your AIR SKIER is wall mounted, examine the wall mount fasteners carefully
before using
WARNING: Do not apply oil to any moving parts as this will wash the grease away
and damage your AIR SKIER
WARNING: Use only the accessory / attachments recommended by the
manufacturer. Do not attempt to modify or alter your AIR SKIER as injury may result

6
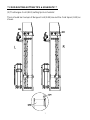
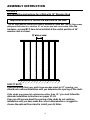
** CORD ROUTING SETTING TIPS & SCHEMATIC **
(1) The Handle Cord (G04) setting tips & schematic
There should be 15 wraps of white Handle Cord (G04) around the Cord Spool (G13)
as shown.

7
** CORD ROUTING SETTING TIPS & SCHEMATIC **
(2) The Bungee Cord (G24) setting tips & schematic
There should be 2 wraps of Bungee Cord (G24) around the Cord Spool (G13) as
shown.

8
****CORD USING INSTRUCTION & MAINTENANCE TIPS ****
(1) Untwist the Cords
When you grasp the handles to use your AIR SKIER, you may be inadvertently twisting the cords,
this may cause the cords to twist around each other inside AIR SKIER, it will affect the tangled
feeling when you pull on the handles and this may cause premature wear of the cord.
To avoid this, check the cords regularly and untwist them as needed. You will be able to see the
twist in the cord; simply untwist by turning the handle in the opposite direction to the twist or adjust
the cords by the below steps:
1. Pull out both handles as far as they go
2. Hold the cords at the mounting bracket allowing the handles to dangle and spin freely.
3. Run your hand down the length of each cord to untwist the cord.
4. Return the handles to the top position.
5. Repeat above step 1 ~ 4 two times at least.
(2) Inspect the Cords (about after 50 hours of use)
There are two separate cords and two bungee cords have to be inspected after a
period time of regular use.
1. Each handle cord is a single cord connected to both
handles and can be easily inspected by pulling the
handles all the way out and visually checking for wear.
2. To inspect the cords working inside the vertical frame,
The Right Side Panel (A05) must be removed in advance for this
Inspection by the following steps:
A• Remove the Right Side Panel (A05) by removing the
eight Screws(B11). This will expose the cord that winds
onto the flywheel spool, the handle cord that winds
onto the spool (this is a separate cord from the one
attached to the handles), and the bungee cord.
B• Have a helper slowly pull the handles all the way out
and observe the condition of the cords. Pulling the
handles out will allow you to see the entire working
length of these cords.

9
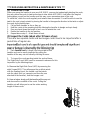
(3) Inspect the Cord Wear/Damage:
• Over time the surface of the cords will show
“fuzzing.” If this “fuzzing” becomes worse in a
localized spot on the cord it is time to replace the cord. (pls see the photo)
• Over time the bungee cord will appear some “fuzzing” is normal, but once the white fibers are
exposed the cord should be replaced immediately.

10
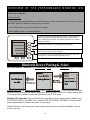
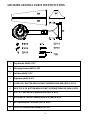
OVERVIEW OF THE PERFORMANCE MONITOR (V2)
For Dynamic Indoor Air Rower, and the Air Skier.
Getting Started:
General Operation
• The V2 will automatically displays your workout data as you start your workout on the machine, or press
the MENU button/Any buttons to power up the V2 monitor.
• Press MENU button to go back to the previous display.
• Use the MENU button to access all features.
Just Row
Select Workout
New Workout
Bluetooth Set
More Option
Main Menu
Units
Display
Menu
Row or ski without a pre-set distance or time. The PM 5 will begin
recording your workout data when you take your first stroke. Your results
will be saved if you row/ski longer than one minute and press MENU.
Set your own time, distance or interval, or choose from a selection of pre-
programmed standard or custom workouts.
There different workouts you can try, enter it to have more fun workouts
in it.
Use this menu to set and pairing Blutooth, you can use it to
connect to Kinomap HR monitor and smartphone.
Access additional functions and information.
Bluetooth Device Pairing & Select.
BLE Heart Monitor Connection: use Bluetooth Set at Menu, Once enter Bluetooth Set display will shows
Connect Heart Rate and Enable App Bluetooth, select Connect Heart Rate, V2 will find all the BLE heart
rate monitor and showing on the display, please select device you have. Then it will connect each together,
if you can not find your device, please use Refresh to re-find all BLE device.
KinoMap APP connection: Turn your Bluetooth of smart phone, the use system setting to finding Vmax
XXXXX(BLE SERIAL NUMBER), Once VmaxXXXXX (BLE SERIAL NUMBER) Is found on smart
phone, please connect it, then you can work it on your phone.
Memory Workout: from Kinomap all of your workout can be saved in your workout database. You can
review it any time.
Choose from a selection of pre-programmed standard
Row or ski without a pre-set distance or time. The V2 will begin
recording your workout data when you take your first stroke.
Your results will be saved if you row/ski longer than one minute
and press MENU.
Set your own time, distance or calories ---etc different workouts.
you can try to have more fun workouts.
Access additional functions and information
Use this button to open and set Bluetooth, you can use it to connect to
Kinomap APP, or Bluetooth Heart Rate monitor device

11
Firmware: Firmware is the internal software that runs your Performance Monitor(V2). Your V2
comes pre-installed with the latest firmware, however, new and improved versions are
offered regularly. The free V2 software makes posted regularly. The free V2 Utility Software
makes it easy to update your software with the latest firmware version at any time. When V2
detect flash drive (USB) with newest version software, it will automatic update software,
Caution: don’t unplug flash drive (USB) until update finished.
V2 Menu Map
Units
Display
Menu
:17
23
45 120
2: 33.8
43
5708
m
avg
/500m
split
meters
projects
/m 30:00
2:23
s/m
Total elapsed time
Total meters row or skied
.
.
Strokes pre minutes (s/m)
Average paces pre 500m.
This is the average for your
entire workout
Pace(in time) pre 500m(caculated each stroke
Your Pace in the account of time. It takes to row
or ski 500m. A smaller time is faster.
Split meters. the number of
rowed or skied in given
distance or time. In Just Row
Splits are five minutes long
MENU.
push to power up PM. display the previous
menu or saved workout results.
(optional. Require additional chest belt.
Heart Rate
Projected meters in 30 minutes. if the current
pace is maintained.
push any between Meters(m), Pace(time/500m),
Watts and Calories(Cal)
Units:
Push to change display between all data. Force Curve.
Paceboot/Pace. Bar Chart, and Large Print.
DISPLAY
Battery cover
USB flash drive
Reset bottom(Fire ware update)
sensor cable
to flywheel
Change battery
please open battery cover
and only use18650
Li-on battery
Units: Push at any time to change units between
Meters(m), Pace (time/500m), Watts and Calories
(Cal).
Average pace (in time) per
500m. This is the average for
your entire workout
Split meters. The number of
meters rowed or skied in a given
distance or time. In Just Row / Ski
splits are five minutes long.
Strokes per minute (s/m).
Display
Push to change display between All Data, Force Curve,
Paceboat /Pace Skier, Bar Chart, and Large Print.
Pace (in time) per 500m (calculated each stroke).
Your pace is the amount of time it takes to row
or ski 500m. A smaller
time is faster.
Heart rate
(Optional. Requires additional chest belt.)
Projected meters in 30 minutes if the
current average pace is maintained.
Push to power up the PM, display the
previous menu or save workout results.
Total elapsed time.
Total meters rowed or skied

12
3
5
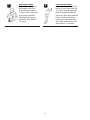
Safety Using Instruction
Stretching should be included in both your warm up and cool down, and should be performed
after 3-5 minutes of low intensity aerobic activity or callisthenic type exercise. Movements
should be performed slowly and smoothly, with no bouncing or jerking. Move into the stretch
until slight tension, not pain, is felt in the muscle and hold for 20-30 seconds. Breathing should
be slow, rhythmical and under control, making sure never to hold your breath.
1
Head rolls
Rotate your head to the right for
one count, feeling the stretch up
the left side of your neck. Next
rotate your head back for one
count, stretching your chin to the
ceiling and letting your mouth
open. Rotate your head to the left
for one count, and finally, drop
your head to your chest for one
count.
2
Toe touches
Slowly bend forward from
your waist, letting your back
and shoulder relax as you
stretch toward your toes.
Reach down as far as you
can and hold for 15
seconds.
3
Shoulder lifts
Lift your right shoulder up
toward your ear for one
count. Then lift your left
shoulder up for one count
as you lower your right
shoulder.
4
Quadriceps stretch
With one hand against a wall
for balance, reach behind you
and pull your right foot up.
Bring your heel as close to
your buttocks as possible.
Hold for 15 counts and repeat
with left foot up.
5
Side stretches
Open your arms to the side
and continue lifting them until
they are over your head.
Reach your right arm as far
upward toward the ceiling as
you can for one count. Feel
the stretch up your right side.
Repeat this action
with your left arm.
6
Hamstring stretches
Sit with your right leg straight in
front of you. Straighten your leg
out while trying to hold on to your
outstretched leg with your hand.
Starting up with your back
straight. Slowly exhale and try to
bring your chest to the knee of
your outstretched leg. Hold, then
repeat on the other side for 15
seconds.

13
7
Inner thigh stretch
Sit with the soles of your
feet together with your
knees pointing outward.
Pull your feet as close into
your groin as possible.
Gently push your knees
toward the floor. Hold for
15 counts.
8
Calf/ Achilles stretch
Lean against a wall with your
left leg in front of the right and
your arms forward. Keep your
right leg straight and the left
foot on the floor; then bend the
left leg and lean forward by
moving your hips toward the
wall. Hold, then repeat on the
other side for 15 seconds.

14
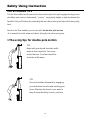
Safety Using Instruction
USE & TRAINING TIPS
This Air Skier offers terrific exercise for the entire body. Each pull engages the legs, arms,
shoulders and core in a downwards“crunch,”using body weight to help accelerate the
handles. Each pull finishes by extending the arms down along the hips with knees partly
bent.
Also this Air Skier enables you to train with the double-pole motion
–It is essential to both skate and classic skiing by the below using tips :
1.The using tips for double-pole motion
TIP1
Begin with your hands shoulder-width
apart at about eye level. Your arms
should be bent. Your feet should be
shoulder-width apart.
TIP2
Drive the handles downward by engaging
your abdominal muscles and bending your
knees. Maintain the bend in your arms to
keep the handles fairly close to your face.

15
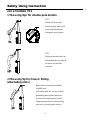
Safety Using Instruction
USE & TRAINING TIPS
1.The using tips for double-pole motion
2.The using tip for Classic Skiing
(alternating arms)
TIP3
Finish the drive with
knees slightly bent, and
arms extended down
alongside your thighs
TIP4
Bring your arms back up
and straighten your body
to return to the start
position.
Begin with one arm raised and
slightly bent.
Pull down with the top arm, while
gradually raising the lower arm.
Continue to alternate arm pulls,
keeping some bend in the pulling
arm, as it is a stronger position.

16
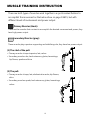
MUSCLE TRAINING INSTRUCTION
There are both types of muscles work together in a synchronized fashion to
accomplish the movement as the below show on page 14&15, but with
different levels of involvement and power output.
Primary Muscles (black):
These are the muscles that contract to accomplish the desired movement and power; they
have high power output.
Secondary Muscles (grey):
These muscles play a posture supporting and stabilizing role; they have low power output.
(1) The start of the pull:
• Primary muscles: triceps trapezius, lats, calves
• Secondary muscles: abs, back extensors, glutes, hamstrings,
hip flexors, quads and shins
M
(2) The pull:
• Primary muscles: triceps, lats, abdominal muscles, hip flexors,
shins
• Secondary muscles: quads, back extensors, glutes, hamstrings,
calves

17
MUSCLE TRAINING INSTRUCTION
(3) Finishing the pull:
• Primary muscles: triceps abdominal muscles, hip flexors, shins
• Secondary muscles: quads, back extensors, glutes, hamstrings, calves
(4) Returning to start:
• Primary muscles: quads, glutes, hamstrings, back extensors, deltoid front part, trapezius
upper part, pectoralis upper part, calves
• Secondary muscles: abdominals, shins, hip flexors

18
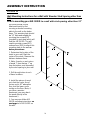
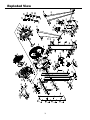
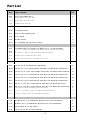
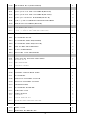
AIR SKIER GENERAL PARTS IDENTIFICATION
1
Top Bracket (#A06) X 1PC
2
Mounting Bracket (#A07) X 1PC
3
Left Arm (#A08) X 1PC
4
Right Arm (#A09) X 1PC
5
1/4-20 X 5/8” BUTTON HEAD SOCKET SCREW(STAINLESS) (B12) X 6 PCS
6
M6 X P1.0 X 15L BUTTON HEAD SOCKET SCREW(STAINLESS) (B14) X 4PCS
7
5/16 “X 2” HEX HEAD SCREW(SILVER) (B17) X 6PCS
8
Φ23 X Φ8.0 X 2.0t FLAT WASHER(SILVER) (D02) X 6PCS
9
BOTTOM BRACKET SPACER (G27) X 2PCS
10
TOOL (SCREWDRIVER& WRENCH) X1 SET

19
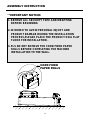
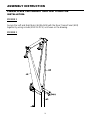
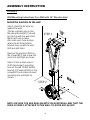
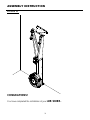
ASSEMBLY INSTRUCTION
**IMPORTANT NOTICE:
CORD FIXED
PAPER ROLLS
1. REMOVE ALL SECURITY TAPE AND WRAPPING
BEFORE BEGINNING
2. IN ORDER TO AVOID PERSONAL INJURY AND
PRODUCT DAMAGE DURING THE INSTALLATION
PROCESS,PLEASE PLACE THE PRODUCT ON A FLAT
FLOOR FOR INSTALLATION .
3. PLS DO NOT REMOVE THE CORD FIXED PAPER
ROLLS BEFORE COMPLETING THE MACHINE
INSTALLATION TO THE WALL.

20
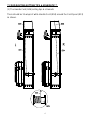
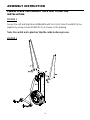
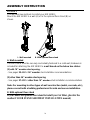
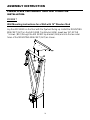
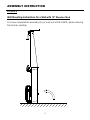
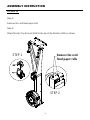
ASSEMBLY INSTRUCTION
PLEASE PLACE THE PRODUCT ON A FLAT FLOOR FOR
INSTALLATION.
FIGURE 1
Secure the Left and Right Arms(A08&A09) with the Front Frame Panel(A02) to be
together by using screws (B12X4 PCS) as shown on the drawing.
Note: Be careful not to pinch or nip the cords in above process.
FIGURE 1
Page is loading ...
Page is loading ...
Page is loading ...
Page is loading ...
Page is loading ...
Page is loading ...
Page is loading ...
Page is loading ...
Page is loading ...
Page is loading ...
Page is loading ...
Page is loading ...
Page is loading ...
Page is loading ...
Page is loading ...
Page is loading ...
-
 1
1
-
 2
2
-
 3
3
-
 4
4
-
 5
5
-
 6
6
-
 7
7
-
 8
8
-
 9
9
-
 10
10
-
 11
11
-
 12
12
-
 13
13
-
 14
14
-
 15
15
-
 16
16
-
 17
17
-
 18
18
-
 19
19
-
 20
20
-
 21
21
-
 22
22
-
 23
23
-
 24
24
-
 25
25
-
 26
26
-
 27
27
-
 28
28
-
 29
29
-
 30
30
-
 31
31
-
 32
32
-
 33
33
-
 34
34
-
 35
35
-
 36
36


Smai Ski Machine User manual
- Type
- User manual
Ask a question and I''ll find the answer in the document
Finding information in a document is now easier with AI
Other documents
-
Ada Home Decor RUUB4001 User guide
-
 XSTRAP STANDARD XSTRAP 10PK Bungee Cords 24-Inch Finger-Hole 3-Time Strength Black User manual
-
Furinno 14032 Assembly Instruction
-
-
 3R Studios DA2840 Operating instructions
-
-
 Cambridge Casual HD-350083T Installation guide
-
 Hontech HT-A05 User manual
-
-
 AeroLife Motion Navi User manual


