

© 2020 Motorola Mobility LLC. All rights reserved.
MOTOROLA, the stylized M logo, MOTO, and the MOTO family of marks are trademarks or registered trademarks
of Motorola Trademark Holdings, LLC. LENOVO is a trademark of Lenovo. Google, Android, Google Play and
other marks are trademarks of Google LLC. microSD Logo is a trademark of SD-3C, LLC. All other product or
service names are the property of their respective owners.
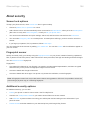
Certain features, services and applications are network dependent and may not be available in all areas; additional
terms, conditions and/or charges may apply. Contact your service provider for details.
All features, functionality, and other product specifications, as well as the information contained in this help content,
are based upon the latest available information and believed to be accurate at the time of release. Motorola
reserves the right to change or modify any information or specifications without notice or obligation.
Some images in help content are examples only.
You can also read this help on your phone at Settings > Help.

Contents
Set up phone 1
About your hardware 1
Insert and remove SIM and SD cards 3
Manage dual SIMs 4
Set up voicemail 5
Set up email 6
Prepare for emergencies 7
Make it yours 9
Accessibility settings 10
Visual assistance 10
Hearing assistance 12
Dexterity assistance 13
Use accessibility shortcuts 14
Learn the basics 16
About your home screen 16
About your lock screen 17
New to Android? 18
If this is your first smartphone 18
If you had an iPhone 19
About your Google account 20
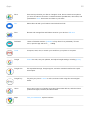
Status bar icons 21
Phone terms you should know 25
Get around on your phone 27
Learn gestures 27
Use edge action bar 28
Move between apps and screens 28
Use quick settings 29
Turn screen off and on 32
Adjust volumes 32
Frequently used tools 34
Turn flashlight on and off 34
Take screenshots 34
Measure with a ruler 35
Control phone with your voice 35
Get directions to a location 36
Use Time and Weather widget 37
Manage time spent on your phone 38
Work with text 42
Use onscreen keyboard 42
Cut, copy, paste text 43
motorola edge iii

Use voice typing 44
Fill in forms automatically 44
Personalize your phone 45
Home screen 45
Change wallpaper 45
Customize your Favorites tray 45
Add widgets, shortcuts, or folders 45
Remove widgets, shortcuts, or folders 48
Remake your home screen with launchers 48
Lock screen 49
Use a screen saver 49
Sounds 50
Set ringtones 50
Enhance sound 51
Avoid interruptions with Do Not Disturb 52
Stop phone from speaking 55
Other sound settings 56
Silence power on sound 56
Turn off charging sounds 56
Apps 57
About your apps 57
View two apps on screen 61
View notifications 62
About Moto experiences 63
Enhance your gaming 64
Manage your apps 67
Install or update apps 67
Manage or delete apps 69
Protect against harmful apps 71
Search and browse 72
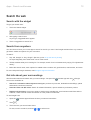
Search the web 72
Search your phone 74
Browse websites 75
Text messaging 77
About text and multimedia messages 77
Read, send, manage text messages 77
Add attachments 79
Save attachments from text message 80
Turn group messaging on or off 81
Change default messaging app 81
motorola edge iv

Control notifications for text messages 81
Change text message reply to incoming calls 82
Get text messages on your computer 82
Email 84
Read, send, manage emails 84
View email attachments 85
Preview inboxes from home screen 86
Add email signature 86
Control email notifications 86
Calendar app 88
About the calendar 88
Find calendar events 88
Create and manage events 89
Control notifications for calendar events 89
Clock app 91
Set alarms 91
Use timer or stopwatch 91
Set date and time 93
Photos app 94
Share photos and videos 94
Upload photos and videos 94
Calls, contacts, voicemail 96
Phone calls 96
Answer calls 96
Make calls 97
During a call 98
Make video calls 99
Make conference calls 100
Block calls and texts 100
Turn on call waiting 101
View and delete call history 101
Make emergency call from locked phone 103
Contacts 104
Add contacts 104
Edit or delete contacts 105
Star your favorite contacts 106
Sort contacts 106
Share contacts 107
Voicemail 109
Use voicemail 109
Send all calls from contact to voicemail 110
motorola edge v

Music 111
Listen to music 111
Transfer music files 112
Connect a MIDI device 113
Battery 114
Charge phone 114
Extend battery life 114
Use Battery Saver mode 115
Show battery percentage in status bar 116
Storage 117
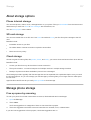
About storage options 117
Manage phone storage 117
Manage SD card 118
Find downloaded files 119
Recover recently deleted files 120
Upload music to cloud 120
Upload photos and videos 120
Scan documents and make copies 121
Network and internet 123
Connect to Wi‑Fi networks 123
Use Airplane mode 124
Control data usage 125
Share your internet connection 126
Connect to VPNs 128
Connected devices 130
Connect with Bluetooth™ 130
Connect with Wi-Fi Direct 132
Tap & pay with NFC 132
Share or receive with NFC 133
Cast screen or media to TV 134
Transfer files between phone and computer (USB) 135
Print from your phone 136
About wireless sharing 137
Other settings 140
Apps & notifications 140
Change app settings 140
Choose how apps notify you 141
Display 144
Adjust screen brightness 144
Change display style 144
Set Dark theme 144
motorola edge vi

Adjust Edge lights 145
Control display on edge of the screen 146
Show apps full screen 146
See Peek Display notifications 147
Change screen timeout 148
Stop automatic rotation 148
Choose color mode 149
Adjust display refresh rate 149
Change font and display size 149
Customize Edge touch 150
Set lock screen preferences 151
Location 153
Use location services 153
Security 154
About security 154
Protect against harmful apps 155
Be ready to find a lost phone 155
Lock and unlock phone 156
Set screen lock 156
Adjust lock options 157
Unlock with trusted devices 158
Unlock with your face 159
Unlock at trusted places 160
Keep phone unlocked while it's on you 161
Use fingerprint security 161
Pin your screen 163
Lock SIM card 163
Accounts 165
Add or remove accounts 165
Sync accounts and apps 166
Manage information in your Google account 167
System 168
Languages & input 168
Customize the keyboard 168
Use multiple languages 169
Open apps faster with Adaptive performance 170
Gestures 171
Change System navigation 171
Turn flashlight on and off 171
Twist phone to open camera 171
Adjust screenshot settings 172
motorola edge vii

Back up phone 172
Users and guests 174
Share your phone 174
Add, modify, remove users 175
Add or delete guest 176
About phone 177
Record your IMEI number 177
Find legal and product information 177
Fix a problem 178
Hardware issues 178
Phone is slow or unstable 178
Phone feels warm or hot 178
Phone won't turn on 179
Phone restarts or crashes 179
Screen lags, is frozen, or won't respond 180
SD card problems 181
Call and SIM issues 183
Problems making/receiving calls 183
Problems during calls 185
Battery issues 187
Charging problems 187
Battery drains too fast 187
Bluetooth, Wi-Fi, USB issues 188
Bluetooth problems 188
Wi-Fi problems 190
Can't transfer files or connect to computer 191
Account and sign-in issues 192
Forgot unlock code 192
Can't sign in to Google 192
Account sync issues 192
App issues 194
Apps not working 194
Fix a problem 195
Messaging problems 197
Gmail problems 198
Play Store problems 198
Maintenance procedures 199
Update Android software 199
Reset Wi-Fi, cellular data, and Bluetooth 199
Reset phone 200
motorola edge viii


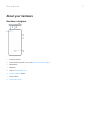
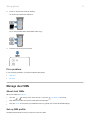
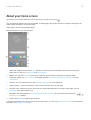
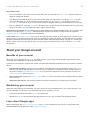
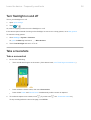
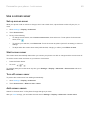
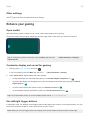
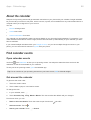
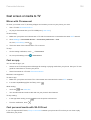
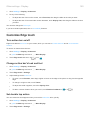
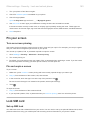
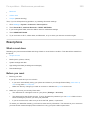
1. Laser auto-focus
2. Telephoto camera (To learn more, read help in Camera app.)
3. Main camera
4. Wide angle camera
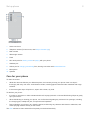
5. Flash
6. NFC touchpoint for sharing content or paying with your phone
7. Headset jack
8. USB-C port for charging, transferring files, sharing connection with tethered devices.
9. Microphone
10. Speaker
Care for your phone
To clean the screen:
•
While this does not disinfect your Motorola phone, the best way to keep your phone clean is to wipe it
thoroughly with a dry soft cloth. Avoid abrasive cloths, including paper towels and other materials with rough
surfaces.
•
If the screen gets drops of liquid on it, wipe it with a clean, dry cloth.
To disinfect your phone:
•
It is okay to use wipes or cloths moistened with 70% isopropyl alcohol or Clorox® Disinfecting Wipes to gently
wipe your screen.
•
When disinfecting or cleaning your phone, turn it off and avoid getting any moisture in its openings, including
the charging port, headphone jack, microphones and speakers.
•
Don't submerge your phone in any cleaning agents, avoid using any cleaners with bleach or abrasives, and
avoid spraying cleaners directly on the screen.
The CDC advises to clean and disinfect frequently touched surfaces daily.
Set up phone
2

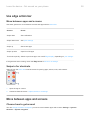
Insert and remove SIM and SD cards
About the SD card
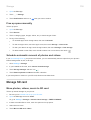
Your phone supports a microSD card up to 1 TB.
A Class 2, 4, or 6 card is sufficient.
Your phone uses the card as portable storage for media files: photos, videos, and music. Because it's portable, you
can easily swap the card and its content between devices. After you insert the card, be sure to update settings
within media apps (like camera, music, and podcast apps), so they use the card to store content you create or
download.
You can't store apps on the SD card because it is portable storage.
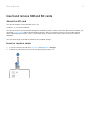
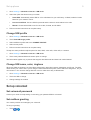
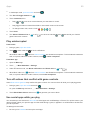
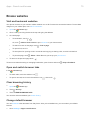
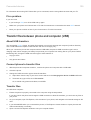
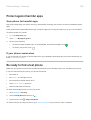
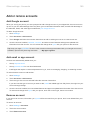
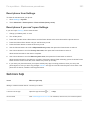
Insert or replace cards
1. If you are removing an SD card, unmount it first (Settings > Storage).
2. Insert the tool into the hole in the tray and gently push to pop it out.
Set up phone 3

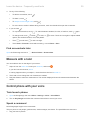
3. Insert or remove the cards as needed.
To use an SD card and a SIM card:
Or, to use two SIM cards (dual-SIM models only):
4. Push the tray back into the phone.
Fix a problem
If you’re having problems, try these troubleshooting steps:
•
SIM card
•
SD card
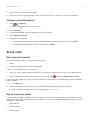
Manage dual SIMs
About dual SIMs
When two SIMs are inserted:
•
You see at the top of the home screen. If you see , troubleshoot the issue.
•
Both SIMs can make and receive calls and text messages.
•
Only the owner of the phone (not additional users or guests) can access dual SIM settings.
Set up SIM profile
Set SIM options based on how you expect to use the cards:
Set up phone
4

1. Go to Settings > Network & internet > SIM cards.
2. Select the option that best meets your needs:
•
Smart SIM: Automatically select SIM for voice calls based on your call history. In Brazil, selection is also
based on your contact's carrier.
•
Personal and Work: Use one SIM for personal and the other for work-related voice calls.
•
Manual: Choose which SIM to use for voice calls, for data, and for SMS.
3. Follow onscreen instructions to complete setup.
Change SIM profile
1. Go to Settings > Network & internet > SIM cards.
2. Touch Dual SIM usage profile.
3. Select a different profile and touch CHANGE PROFILE.
4. Select a new profile.
5. Follow onscreen instructions to complete setup.
To keep the same profile but adjust options for data, SMS, voice calls, video calls, or contacts:
1. Go to Settings > Network & internet > SIM cards.
2. Touch each preferred SIM and contact option to change.
This information applies only to phones that support dual SIM cards and have both cards inserted.
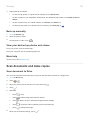
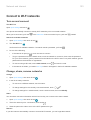
Change SIM name, color, ringtone
When two SIMs are inserted, you'll see them referenced in apps like Contacts, Messages, and Phone. The SIM
name shows your carrier and, if you're using the Personal and Work profile, shows which it’s assigned to, but you
can rename it. You can also change SIM icon color to make them easy to differentiate.
1. Go to Settings > Network & internet > SIM cards.
2. Touch the SIM to change.
3. Change settings as needed.
Set up voicemail
Set voicemail password
Contact your carrier for help setting or recovering your password/PIN for voicemail.
Set mailbox greeting
Your carrier provides and manages your voicemail.
To set your greeting:
1.
Touch > .
Set up phone
5

2.
Touch & hold to dial into your mailbox.
3. Follow your carrier’s system prompts. If your voicemail is not set up, contact your carrier for instructions.
Change voicemail options
1.
Touch > > Settings.
(If you don't see , swipe down on the screen.)
2. Touch Voicemail.
3. If you have dual SIMS, touch the SIM for the account to change.
4. Touch Advanced Settings.
5. Change any of the options:
•
To change voicemail service from your provider to another voicemail service or app, touch Service.
•
To change the number dialed to access voicemail, touch Setup.
Set up email
Set up personal email
You can add multiple email accounts of the following types:
•
Gmail
•
Personal email from other providers (IMAP/POP)
If you added a Google account on your phone:
•
When you open the Gmail app for the first time, you'll see your email for that account. You're already set up.
•
To set up additional accounts, open Gmail, touch your profile icon , then touch Add another account.
If you didn’t add a Google account to your phone and want to set up email for an IMAP/POP provider (an address
that's not Gmail):
1. Open the Gmail app.
2. Follow the onscreen instructions to enter your email address, password, and account options.
If you have problems setting up the account, read Google's help for Gmail.
Set up corporate email
If you use Microsoft Office Outlook on your work computer, your phone can synchronize emails, calendar events,
and contacts with the Microsoft Exchange server. Before you start, you'll need the following information from your
company's IT department:
•
Email address
•
Email password
•
Domain name
Set up phone
6

•
Username
•
Server name
•
Security type/SSL settings
•
Client certificate requirement
To set up corporate email:
1. Open the Gmail app.
2. Do one of the following:
•
If this is your first time opening the Gmail app, touch Add another email address.
•
If you have been using Gmail with another account, touch your profile icon , then touch Add another
account.
3. Touch Exchange and Office 365.
4. Follow the onscreen instructions to enter your email address, password, and other information from your
company's IT department.
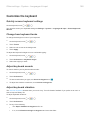
Switch account views
In the Gmail app, touch your profile icon , then select an account.
To open each inbox with one touch from your home screen, add task shortcuts:
1.
Touch & hold .
2.
Drag for each account to a blank space on your home screen.
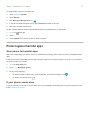
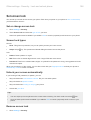
Prepare for emergencies
Set up emergency information
You can set up emergency information for first responders or others to view from your lock screen, such as your
emergency contact and medical information (blood type, allergies).
To set up your emergency information:
1. Go to Settings > About phone.
2. Touch Emergency information.
3. Set up your information.
Note: Anyone who picks up your phone can see your emergency info without unlocking your phone.
Set up phone
7

View emergency information
1. From the lock screen:
•
Swipe up and touch Emergency below the keypad.
•
Or, press and hold the Power button, then touch Emergency.
2. Touch Emergency information twice.
Add message to lock screen
To add your name or a short message to your lock screen for anyone who finds your phone:
1. Go to Settings > Display > Advanced > Lock screen display.
2. Touch Lock screen message.
3. Type the text to display and touch Save.
Tip: Don't put your mobile number as your contact info unless you can access your voicemail from another
device.
Send your location to emergency services
Not all carriers and countries support this feature.
If Android Emergency Location Service (ELS) works in your country and on your carrier's network and if you
haven't turned off ELS, when you call or text an emergency number, ELS sends your location to authorized
emergency responders to help them locate you.
If ELS is off, your carrier might still send the phone’s location during an emergency call. For more information,
check with your carrier.
To turn ELS on or off:
1. Go to Settings > Location > Advanced.
2. Touch Emergency Location Service.
3.
Turn it on or off .
To learn more about ELS, read Google's help.
Turn emergency alerts off/on
Your phone can receive free, life-saving emergency alerts from the Federal Emergency Management Agency
(FEMA) to inform you of extreme weather or other threatening emergencies in your area, AMBER Alerts, and
Presidential Alerts during national emergencies.
When an emergency alert is sent out, appears in the status bar. Touch the notification to read the alert.
You can turn most alerts off or on (Presidential Alerts cannot be disabled) and adjust alert notification settings.
Note: Because alerts are intended to save lives, please consider carefully before turning alerts off. For more
information, visit http://www.fema.gov/wireless-emergency-alerts.
1. Go to Settings.
Set up phone
8

2. Touch Apps & notifications > Advanced > Wireless emergency alerts.
3. Adjust settings as needed.
Make it yours
Now that you're up and running (battery charged, contacts imported, accounts added), it's time for fun:
•
Set the wallpaper.
•
Assign ringtones or photos to friends you call.
•
Find some games.
•
Play some music.
•
Start taking and sharing those selfies.
To protect your phone, be sure to:
•
Set up a screen lock.
•
Set up fingerprint security to unlock your screen safely and quickly with a touch.
•
In case you ever lose your phone, set up Find My Device and record your IMEI number.
You'll probably also want to:
•
Set up your Bluetooth and Wi-Fi connections.
•
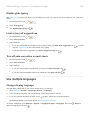
If you use multiple languages, set them up so they appear on your keyboard.
•
Set your schedule for Do Not Disturb, to automatically silence your phone when you don't want to be
interrupted.
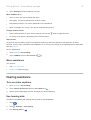
Find your phone number
1. Go to Settings.
2. Touch About phone > Phone number.
Set up phone 9

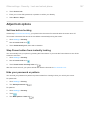
Visual assistance
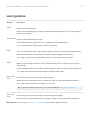
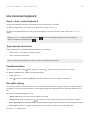
Adjust colors if you’re color blind
1. Go to Settings > Accessibility.
2.
Touch Color correction and turn Use color correction on .
3. Touch Correction mode and choose an option.
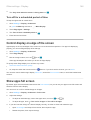
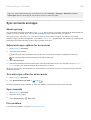
How you see colors Option to choose
It’s difficult to tell violet from blue. Yellow and green appear redder. Deuteranomaly (red-green)
Colors aren’t bright. Red, orange, and yellow appear greener. Protanomaly (red-green)
It’s difficult to tell yellow and red from pink. Blue appears greener. Tritanomaly (blue-yellow)
Color correction is an experimental feature and might not work correctly everywhere on your phone.
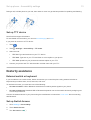
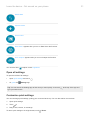
Magnify the screen
You can magnify the screen by triple tapping it or by swiping up from the bottom of the screen with two fingers. If
you're using 3-button navigation, you can add to magnify.
Set it up
To set up the way to start (zoom in) and stop (zoom out) magnification:
1. Go to Settings > Accessibility > Magnification.
2.
Select an option and turn it on :
•
To touch the screen three times, choose Magnify with triple-tap.
•
To swipe up from the bottom of the screen with two fingers (gesture navigation), choose Magnify with
shortcut.
•
To add to the buttons (3-button navigation), choose Magnify with shortcut.
When magnification is on, you’ll see an orange border around the screen.
Use magnification
To zoom in/out:
1. Start magnification using the method you selected: triple tap, swipe up from bottom of screen with two fingers,
or touch .
Set up phone : Accessibility settings
10

2. Touch the area of the screen to magnify, then:
•
Drag two or more fingers to scroll.
•
Pinch two or more fingers to adjust zoom.
To zoom temporarily:
1. Start magnification using the method you selected: triple tap, swipe up from bottom of screen with two fingers,
or touch .
2. Touch & hold anywhere on the screen, then:
•
Drag to move around the screen.
•
Lift your finger to zoom out.
You can't zoom in on the keyboard or the buttons.
Tip: You can also adjust font and display size.
Turn touch sounds on/off
1. Go to Settings > Sound > Advanced.
2. Do any of the following:
•
To hear a tone when you dial a number, turn on Dial pad tones.
•
To hear a click when you lock or unlock the screen, turn on Screen locking sounds.
•
To hear a click when you touch something on the screen, turn on Touch sounds.
•
To feel a vibration when you type on the keyboard, turn on Touch vibration.
If you don't want any of these sounds, just turn them off .
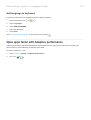
Hear other notification sounds
You can assign a ringtone for notifications from specific apps.
You can also control sounds that notify you of other events:
1. Go to Settings > Sound > Advanced.
2. To hear a confirmation tone and feel a vibration when you successfully connect your phone to a charger, turn
Charging sounds and vibration on .
If you don't want any of these sounds, just turn them off .
Use TalkBack to read screens
Hear descriptions of everything you touch.
Enable TalkBack
1. Go to Settings > Accessibility.
2.
Touch TalkBack and turn Use service on .
Set up phone : Accessibility settings
11
Page is loading ...
Page is loading ...
Page is loading ...
Page is loading ...
Page is loading ...
Page is loading ...
Page is loading ...
Page is loading ...
Page is loading ...
Page is loading ...
Page is loading ...
Page is loading ...
Page is loading ...
Page is loading ...
Page is loading ...
Page is loading ...
Page is loading ...
Page is loading ...
Page is loading ...
Page is loading ...
Page is loading ...
Page is loading ...
Page is loading ...
Page is loading ...
Page is loading ...
Page is loading ...
Page is loading ...
Page is loading ...
Page is loading ...
Page is loading ...
Page is loading ...
Page is loading ...
Page is loading ...
Page is loading ...
Page is loading ...
Page is loading ...
Page is loading ...
Page is loading ...
Page is loading ...
Page is loading ...
Page is loading ...
Page is loading ...
Page is loading ...
Page is loading ...
Page is loading ...
Page is loading ...
Page is loading ...
Page is loading ...
Page is loading ...
Page is loading ...
Page is loading ...
Page is loading ...
Page is loading ...
Page is loading ...
Page is loading ...
Page is loading ...
Page is loading ...
Page is loading ...
Page is loading ...
Page is loading ...
Page is loading ...
Page is loading ...
Page is loading ...
Page is loading ...
Page is loading ...
Page is loading ...
Page is loading ...
Page is loading ...
Page is loading ...
Page is loading ...
Page is loading ...
Page is loading ...
Page is loading ...
Page is loading ...
Page is loading ...
Page is loading ...
Page is loading ...
Page is loading ...
Page is loading ...
Page is loading ...
Page is loading ...
Page is loading ...
Page is loading ...
Page is loading ...
Page is loading ...
Page is loading ...
Page is loading ...
Page is loading ...
Page is loading ...
Page is loading ...
Page is loading ...
Page is loading ...
Page is loading ...
Page is loading ...
Page is loading ...
Page is loading ...
Page is loading ...
Page is loading ...
Page is loading ...
Page is loading ...
Page is loading ...
Page is loading ...
Page is loading ...
Page is loading ...
Page is loading ...
Page is loading ...
Page is loading ...
Page is loading ...
Page is loading ...
Page is loading ...
Page is loading ...
Page is loading ...
Page is loading ...
Page is loading ...
Page is loading ...
Page is loading ...
Page is loading ...
Page is loading ...
Page is loading ...
Page is loading ...
Page is loading ...
Page is loading ...
Page is loading ...
Page is loading ...
Page is loading ...
Page is loading ...
Page is loading ...
Page is loading ...
Page is loading ...
Page is loading ...
Page is loading ...
Page is loading ...
Page is loading ...
Page is loading ...
Page is loading ...
Page is loading ...
Page is loading ...
Page is loading ...
Page is loading ...
Page is loading ...
Page is loading ...
Page is loading ...
Page is loading ...
Page is loading ...
Page is loading ...
Page is loading ...
Page is loading ...
Page is loading ...
Page is loading ...
Page is loading ...
Page is loading ...
Page is loading ...
Page is loading ...
Page is loading ...
Page is loading ...
Page is loading ...
Page is loading ...
Page is loading ...
Page is loading ...
Page is loading ...
Page is loading ...
Page is loading ...
Page is loading ...
Page is loading ...
Page is loading ...
Page is loading ...
Page is loading ...
Page is loading ...
Page is loading ...
Page is loading ...
Page is loading ...
Page is loading ...
Page is loading ...
Page is loading ...
Page is loading ...
Page is loading ...
Page is loading ...
Page is loading ...
Page is loading ...
Page is loading ...
Page is loading ...
Page is loading ...
Page is loading ...
Page is loading ...
Page is loading ...
Page is loading ...
Page is loading ...
Page is loading ...
Page is loading ...
Page is loading ...
-
 1
1
-
 2
2
-
 3
3
-
 4
4
-
 5
5
-
 6
6
-
 7
7
-
 8
8
-
 9
9
-
 10
10
-
 11
11
-
 12
12
-
 13
13
-
 14
14
-
 15
15
-
 16
16
-
 17
17
-
 18
18
-
 19
19
-
 20
20
-
 21
21
-
 22
22
-
 23
23
-
 24
24
-
 25
25
-
 26
26
-
 27
27
-
 28
28
-
 29
29
-
 30
30
-
 31
31
-
 32
32
-
 33
33
-
 34
34
-
 35
35
-
 36
36
-
 37
37
-
 38
38
-
 39
39
-
 40
40
-
 41
41
-
 42
42
-
 43
43
-
 44
44
-
 45
45
-
 46
46
-
 47
47
-
 48
48
-
 49
49
-
 50
50
-
 51
51
-
 52
52
-
 53
53
-
 54
54
-
 55
55
-
 56
56
-
 57
57
-
 58
58
-
 59
59
-
 60
60
-
 61
61
-
 62
62
-
 63
63
-
 64
64
-
 65
65
-
 66
66
-
 67
67
-
 68
68
-
 69
69
-
 70
70
-
 71
71
-
 72
72
-
 73
73
-
 74
74
-
 75
75
-
 76
76
-
 77
77
-
 78
78
-
 79
79
-
 80
80
-
 81
81
-
 82
82
-
 83
83
-
 84
84
-
 85
85
-
 86
86
-
 87
87
-
 88
88
-
 89
89
-
 90
90
-
 91
91
-
 92
92
-
 93
93
-
 94
94
-
 95
95
-
 96
96
-
 97
97
-
 98
98
-
 99
99
-
 100
100
-
 101
101
-
 102
102
-
 103
103
-
 104
104
-
 105
105
-
 106
106
-
 107
107
-
 108
108
-
 109
109
-
 110
110
-
 111
111
-
 112
112
-
 113
113
-
 114
114
-
 115
115
-
 116
116
-
 117
117
-
 118
118
-
 119
119
-
 120
120
-
 121
121
-
 122
122
-
 123
123
-
 124
124
-
 125
125
-
 126
126
-
 127
127
-
 128
128
-
 129
129
-
 130
130
-
 131
131
-
 132
132
-
 133
133
-
 134
134
-
 135
135
-
 136
136
-
 137
137
-
 138
138
-
 139
139
-
 140
140
-
 141
141
-
 142
142
-
 143
143
-
 144
144
-
 145
145
-
 146
146
-
 147
147
-
 148
148
-
 149
149
-
 150
150
-
 151
151
-
 152
152
-
 153
153
-
 154
154
-
 155
155
-
 156
156
-
 157
157
-
 158
158
-
 159
159
-
 160
160
-
 161
161
-
 162
162
-
 163
163
-
 164
164
-
 165
165
-
 166
166
-
 167
167
-
 168
168
-
 169
169
-
 170
170
-
 171
171
-
 172
172
-
 173
173
-
 174
174
-
 175
175
-
 176
176
-
 177
177
-
 178
178
-
 179
179
-
 180
180
-
 181
181
-
 182
182
-
 183
183
-
 184
184
-
 185
185
-
 186
186
-
 187
187
-
 188
188
-
 189
189
-
 190
190
-
 191
191
-
 192
192
-
 193
193
-
 194
194
-
 195
195
-
 196
196
-
 197
197
-
 198
198
-
 199
199
-
 200
200
-
 201
201
-
 202
202
-
 203
203
-
 204
204
-
 205
205
-
 206
206
-
 207
207
-
 208
208
-
 209
209
-
 210
210


Ask a question and I''ll find the answer in the document
Finding information in a document is now easier with AI
Related papers
-
Motorola MOTO G60s User manual
-
Motorola EDGE BLACK 128 GB User manual
-
Motorola Edge 30 Ultra User manual
-
Motorola MOTO G8 User manual
-
Motorola MOTO G8 Power Lite User manual
-
Motorola ThinkPhone User manual
-
Motorola Edge 20 Lite User guide
-
Motorola Moto G5 Plus User manual
-
Motorola MOTO X Force Operating instructions
-
Motorola MOTO X Pure Edition Owner's manual
Other documents
-
Alcatel Fierce 4 - 5056N Owner's manual
-
Alcatel Tru User manual
-
T-Mobile REVVL 4 User manual
-
-
Verizon XT1030 User manual
-
TCL 30 XE User manual
-
-
-
Verizon Galaxy Galaxy Nexus User manual
-