Page is loading ...

Manual
CMOS Industrial Camera
LOGLUX
i5 CL
Version 1.08 (July 2004)

Version 1.08 (04/07)Manual: CMOS Industrial Camera LOGLUX
i5
Page 2 of 46KAMERA WERK DRESDEN GmbH
Table of Contents
LIST OF FIGURES..............................................................................................................................................3
LIST OF TABLES ...............................................................................................................................................3
REVISION INDEX...............................................................................................................................................3
INTRODUCTION..............................................................................................................................................4
THE CMOS INDUSTRIAL CAMERA LOGLUX
I5 CL..............................................................................................5
The CMOS large-area sensor IBIS5...........................................................................................................5
The dynamic (contrast) range of the IBIS5 sensor...................................................................................6
The shutter modes of the IBIS5 sensor...................................................................................................8
The look-up tables (LUTs) of the CMOS industrial camera LOGLUX
i5 CL................................................9
The CameraLink
™
image data interface......................................................................................................9
THE COMPLETE LOGLUX
I5 CL SET CAMERA SYSTEM.......................................................................................9
OPTIONAL ACCESSORIES...................................................................................................................................9
OPERATION OF THE COMPLETE LOGLUX
I5 CL SET CAMERA SYSTEM................................................10
SYSTEM REQUIREMENTS .................................................................................................................................10
INSTALLATION OF THE CAMERALINK
™
PC PLUG-IN CARD MATRIX VISION MVTITAN-CL...........................................10
INSTALLATION OF THE CMOS INDUSTRIAL CAMERA LOGLUX
I5 CL....................................................................11
INSTALLATION OF THE LOGLUX
LUXWARE CONFIGURATION TOOL.......................................................................11
DESCRIPTION OF THE LOGLUX
LUXWARE CONFIGURATION TOOL......................................................12
THE PHILOSOPHY...........................................................................................................................................12
THE START MENU...........................................................................................................................................13
THE CONFIGURATION MENU..............................................................................................................................14
THE 'CAMERA GLOBALS' MENU .........................................................................................................................15
THE 'PROFILE GLOBALS' MENU .........................................................................................................................16
THE USER PROFILE PARAMETERS......................................................................................................................17
The 'Region of Interest' profile menu ....................................................................................................17
The ‚Trigger‘ profile menu ....................................................................................................................18
The ‚Switchport‘ profile menu...............................................................................................................19
The ‚Sensor‘ profile menu ....................................................................................................................21
The ‚Output data‘ profile menu .............................................................................................................22
THE 'SPECIAL FUNCTION' MENU........................................................................................................................23
THE 'LOOK-UP TABLE X' MENU..........................................................................................................................24
THE 'TERMINAL' MENU ....................................................................................................................................25
THE 'FIRMWARE' MENU ...................................................................................................................................26
THE 'FRAMEGRABBER' MENU............................................................................................................................27
DESCRIPTION OF THE LOGLUX
I5 CL REGISTER SET..............................................................................29
FUNCTION GROUP ‚CAMERA CONFIGURATION‘.....................................................................................................29
FUNCTION GROUP ‚CAMERA PROFILES‘..............................................................................................................30
FUNCTION GROUP ‚WORKING PARAMETERS‘.......................................................................................................36
FUNCTION GROUP ‚LUT PROGRAMMING‘............................................................................................................37
GLOSSARY...................................................................................................................................................38
TECHNICAL SPECIFICATION.......................................................................................................................40
TECHNICAL DATA OF THE LOGLUX I5 CL (SURVEY)...........................................................................................40
PIN ASSIGNMENTS OF THE LOGLUX
®
I5 CL......................................................................................................40
PIN ASSIGNMENT OF THE SPLIT CABLE FOR THE LOGLUX
®
I5 CL..........................................................................40
WIRING OF THE LOGLUX
®
I5 CL TRIGGER INPUT...............................................................................................41
WIRING OF THE LOGLUX
®
I5 CL SWITCH OUTPUTS............................................................................................41
NOTES ON UPDATING THE FIRMWARE FOR THE LOGLUX
®
I5 CL CAMERA ...............................................................41
CHOOSING A LENS FOR THE LOGLUX
®
I5 CL....................................................................................................44
MATCHING THE FLANGE FOCAL LENGTH OF A LENS WITH THE LOGLUX
®
I5 CL........................................................44
FREQUENTLY ASKED QUESTIONS.............................................................................................................44
ADDING A NON-SUPPORTED CAMERALINK
™
FRAMEGRABBER.................................................................................45
USING SOFTWARE-SUPPORTED FRAMEGRABBERS ON THE SERIAL COM PORT OF THE LOGLUX
I5 CL CAMERA..........46

Manual: CMOS Industrial Camera LOGLUX
i5Version 1.08 (04/07)
KAMERA WERK DRESDEN GmbHPage 3 of 46
List of figures
FIGURE 1 : FRONT AND REAR VIEW OF THE CMOS INDUSTRIAL CAMERA LOGLUX
I5 CL............................................5
FIGURE 2 : BLOCK DIAGRAM OF THE CMOS INDUSTRIAL CAMERA LOGLUX
I5 CL.......................................................5
FIGURE 3 : EXAMPLE OF A VERY HIGH IMAGE CONTRAST RANGE...................................................................................6
FIGURE 4 : WORKING PRINCIPLE OF THE ROLLING/CURTAIN SHUTTER AND THE IMAGING OF MOVING OBJECTS ......................8
FIGURE 5 : WORKING PRINCIPLE OF THE CENTRAL/SNAPSHOT SHUTTER AND THE IMAGING OF MOVING OBJECTS...................8
FIGURE 6 : MATRIX VISION MVTITAN-CL PC PLUG-IN CARD...................................................................................10
FIGURE 1 : VIEW OF A SPLIT CABLE ....................................................................................................................131
FIGURE 8 : THE START MENU ...............................................................................................................................13
FIGURE 9 : THE CONFIGURATION MENU..................................................................................................................14
FIGURE 10 : THE 'CAMERA GLOBALS' MENU ...........................................................................................................15
FIGURE 11 : THE 'PROFILE GLOBALS' MENU ...........................................................................................................16
FIGURE 12 : THE 'REGION OF INTEREST' PROFILE MENU...........................................................................................17
FIGURE 13 : THE ‚TRIGGER‘ PROFILE MENU............................................................................................................18
FIGURE 15 : THE ‚EXPOSURE‘ PROFILE MENU.........................................................................................................20
FIGURE 16 : THE ‚SENSOR‘ PROFILE MENU ............................................................................................................21
FIGURE 17 : THE ‚OUTPUT DATA‘ PROFILE MENU.....................................................................................................22
FIGURE 19 : THE 'LOOK-UP TABLE X' MENU ............................................................................................................24
FIGURE 20 : THE 'TERMINAL' MENU.......................................................................................................................25
FIGURE 21 : THE 'FIRMWARE' MENU......................................................................................................................26
FIGURE 22 : THE 'FRAMEGRABBER' MENU..............................................................................................................27
List of tables
TABLE 1 : LIST OF CAMERA CONFIGURATION INSTRUCTIONS .....................................................................................28
TABLE 2 : PARAMETER NOTATION FOR CAMERA CONFIGURATION ..............................................................................28
TABLE 3 : REGISTERS OF THE FUNCTION GROUP 'CAMERA CONFIGURATION'...............................................................29
TABLE 4 : REGISTERS OF FUNCTION GROUP 'CAMERA PROFILES'..............................................................................31
TABLE 5 : LIST OF REGISTER INITIAL VALUES OF FUNCTION GROUP 'CAMERA CONFIGURATION'........................................32
TABLE 6 : REGISTERS OF FUNCTION GROUP 'WORKING PARAMETERS'.......................................................................36
TABLE 7 : REGISTERS OF FUNCTION GROUP 'LUT PROGRAMMING.............................................................................37
Revision index
VersionChanges, supplements, etc.
1.05 (May `04)
- Update of the LuxWare V. 1.1.3 program window dumps
- Addition of chapter ‚Frequently asked questions‘ + instructions for INI modifications
1.06 (June `04)
- Update of the LuxWare V. 1.2.1 program window dumps
- Addition of chapter ‚The ‚Switchport‘ profile menu‘
- Complete revision of chapter ‚Function group ‚Camera profiles‘‘, integration of the trigger and
switching module in the firmware-version camera [V.1.22 (uC), V.1.004 (FPGA)] (renaming
and addition of registers, address relocations, etc.)
- Addition of figure ‚View of a split cable‘ in chapter ‚Installation of the CMOS industrial camera
LOGLUX
®
i5 CL‘ and of item ‚LOGLUX
®
i5 CL split cable pin assignment‘ in chapter ‚Technical
specifications‘
- Addition of item ‚Technical data of the LOGLUX
®
i5 CL (survey)‘ in chapter ‚Technical
specifications‘
1.07 (July `04)
- Addition of item ‚Notes on the update of the LOGLUX
®
i5 CL firmware‘ in chapter ‚Technical
specifications‘
1.08 (July `04)
- Update of the LuxWare V. 1.2.4 program window dumps
- Addition of chapter ‘The ‚Special function’ profile menu’’
- Modification in chapter ’The ‚Framegrabber’ profile menu’ (addition of user initial setting of
framegrabber time-out for controlled image capture via external trigger signal, functional
extension by saving of image sequences and rename button label ‚Sequence’ instead of ‚AVI’)

Version 1.08 (04/07)Manual: CMOS Industrial Camera LOGLUX
i5
Page 4 of 46KAMERA WERK DRESDEN GmbH
Introduction
This manual describes the installation and functions of the CMOS industrial camera LOGLUX
i5 CL
made by KAMERA WERK DRESDEN GmbH, as well as the software and hardware components
which are additionally required for a camera system.
The below chapters will enable the user to operate a camera system including a CMOS industrial
camera LOGLUX
i5 CL, and to fully exploit the camera functions by applying the supplied LOGLUX
LuxWare configuration tool. Furthermore, the commands referred to herein permit the ambitious
programmer to configure the camera at CMOS sensor register level by means of the integral terminal.
Note: This manual was drawn up with utmost care. However, since the unit is constantly being
improved, no guaranty can be given that the information is complete and correct at any
time. We have made great efforts to provide you with a perfect product but in view of the
numerous computer configurations it is impossible to guarantee that your computer or your
application works trouble-free in all configurations and combinations.
We cannot guarantee that a specific application purpose is served. Within the framework of
the statutory regulations, any liability for direct damage, indirect damage and third-party
damage resulting from the purchase or operation of a LOGLUX i5 CL CMOS industrial
camera is excluded. Liability in cases of intent and gross negligence remains unaffected
therefrom. In any case, our liability is limited to the purchase price of the unit.
This manual is protected by copyright. All rights created thereby, in particular the right to translate, reprint or lecture, to use
figures or tables, to broadcast, microfilm or reproduce the contents or parts thereof in any other way or to store it partly or wholly
in data processing systems, are reserved. Also in individual cases, the manual or parts thereof are permitted to be reproduced
only within the scope of the Copyright Act of the Federal Republic of Germany of September 9, 1965 as amended. As a rule, a
fee is charged for any reproduction. Violations are subject to the penal provisions of the Copyright Act.
Copyright KAMERA WERK DRESDEN GmbH 2004
Even if no express reference is made thereto, the use or reproduction of model or trade names mentioned in this manual does
not justify the assumption that such names are free names within the meaning of the trademark and proprietary rights that could
be used by everyone.
Wherever direct or indirect reference is made in this manual to acts, regulations or standards (e.g. DIN, VDI, VDE), KAMERA
WERK DRESDEN GmbH cannot guarantee that they are correct and up-to-date. We recommend to consult the complete
regulations or standards as amended for the specific own application.
KAMERA WERK DRESDEN GmbH
Bismarckstrasse 56
D-01257 Dresden
Phone(0351) 2806 0
Fax (0351) 2806 392
eMail info@kamera-werk-dresden.de
Web www.kamera-werk-dresden.de

Manual: CMOS Industrial Camera LOGLUX
i5Version 1.08 (04/07)
KAMERA WERK DRESDEN GmbHPage 5 of 46
The CMOS industrial camera LOGLUX
i5 CL
The CMOS industrial camera LOGLUX
i5 CL is one of the latest and most modern products from the
‚industrial image processing CMOS camera‘ range of KAMERA WERK DRESDEN GmbH.
The camera can be considered a logically
consistent development of the well-known,
universally applicable predecessor model
LOGLUX
HDRC4.
Main features of the CMOS industrial camera
LOGLUX
i5 CL:
• CMOS camera with free pixel selection
(progressive scan) and CameraLink
™
data
interface
• Approx. 36 images/second (full frame), higher rates when a smaller frame size is used (up to
approx. 1500 images/second are possible)
• Resolution: 1280x1024 pixels, 10-bit greyscale
• >100 dB contrast/dynamic range
• Digital image data interface
• Possibility to pre-process the image data by means of the integral LUTs (look-up tables)
• Spectral working range from 400nm to 1000nm
• Sturdy continuously cast aluminum casing with C-type lens mount
• Possibility to configure and control the camera, and transfer the image data, by means of a cable
connected to the host system (PC).
The CMOS industrial camera LOGLUX
i5 CL is based on
a universal hardware concept which comprises a CMOS
large-area image sensor (FS), pre-processing unit (VV),
controller (SE), data interface (DS) and operating voltage
supply (SV).
In the pre-processing unit, the image data from the CMOS
image sensor can be linked up in real time with one of
three possible user-specific LUTs (look-up tables). In the
process, the image data can be replaced by function
values, e.g. arithmetic operations. By defining a greyscale
threshold in a LUT, for example, the camera can be made
to deliver the 'suitable' image material for a edge
recognition.
The camera firmware can be updated via an additional RS232 interface. Voltage is supplied from a
plug-type power supply unit (24V/6W; comes with the unit) or an SPS DIN rail power supply unit (24V
±10%).
The CMOS large-area sensor IBIS5
The sensor element used in the CMOS industrial camera LOGLUX
i5 CL is a type IBIS5 CMOS
image sensor made by Fillfactory (Mechelen/Belgium).
It is a photo-optical component of the latest CMOS image sensor generation. Being a typical SOC
(system-on-chip), the sensor does not only accommodate the sensor (pixel) elements proper, but also
all peripheral analog and digital components required to deliver a noise-corrected 10-bit greyscale
value as an output signal.
Main features of the sensor are its high resolution of 1280 x 1024 pixels (XGA resolution), the wide
dynamic (contrast) range of up to 100dB, the integrated FPN (fixed pattern noise) correction of the raw
image data, and two shutter modes (rolling/curtain shutter and synchronous/snapshot shutter).
As regards the conversion process, the IBIS5 is an integrating, photo-optical sensor.
For more technical data please refer to the latest IBIS5 data sheet.
The following paragraphs describe selected functions of the sensor. Understanding these functions is
imperative to the proper use of the various functional units.
Figure 2 : Front and rear view of the CMOS industrial camera
LOGLUX
i5 CL
Figure 3 : Block diagram of the CMOS
industrial camera LOGLUX
i5 CL
FS VV DS
SV SE

Version 1.08 (04/07)Manual: CMOS Industrial Camera LOGLUX
i5
Page 6 of 46KAMERA WERK DRESDEN GmbH
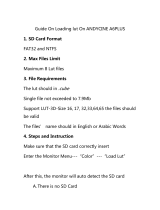
The dynamic (contrast) range of the IBIS5 sensor
In contrast to, say, CMOS sensors for multimedia applications, the IBIS5 has a very wide dynamic
(contrast) range. This parameter describes the sensor's capability to show both very bright and very
dark image parts in the active frame. The figure shows a CD ROM whose surface is diagonally lit by a
lamp from the front, with the LOGLUX
i5 CL set for a normal (approx. 67dB) and extended (approx.
100dB) contrast range, respectively.
Figure 4 : Example of a very high image contrast range
In the photo on the left side, neither the manufacturer's name nor the storage capacity nor the
maximum write speed can be read. On the right side, this information can be read without difficulty,
provided the printing quality is good. The photos were taken with the same overall integration time
(approx. 39ms).
Two dynamic ranges can be set on the IBIS5 sensor. In the first range of approx. 67dB, the sensor
exhibits an almost linear transmission function. The operating mode of the sensor is termed single
integration slope mode:
In the inactive state - the shutter of the sensor is 'closed' - a defined potential, i.e. electrical voltage, is
applied to the individual sensor cell which is shown simplified as a light-sensitive capacitor. When the
sensor shutter is 'opened', the photons hitting the sensor cell cause the potential to die away. When
the sensor shutter is re-closed after a defined time (integration or exposure time), the residual
potential of the sensor cell can be measured and translated into a digital numerical value.
By several successive integrations of the sensor cell potential with respect to time applying different
integration times, the second dynamic range - which is going to be described in more detail here - will
be extended to approximately 100dB. This working mode of the sensor is called multiple integration
slope mode and functions as follows:
The basis is the above described single integration slope mode. In contrast to it, however, at least one
more integration cycle is carried out in the multiple integration slope mode. After the expiry of the first
integration time, an initial potential which is approx. 18% lower than the potential before the first
integration cycle, is applied to the sensor cell. Before a third integration cycle and after the second
integration time, this initial potential is reduced by approx. 34%; and before a fourth integration cycle
and after the third integration time, the initial potential is reduced by approx. 54%.
Before a subsequent integration cycle, the above-mentioned initial potential is applied to those pixels
only which were completely discharged - i.e. over-exposed - in the previous integration cycle. The
residual potentials of all the other pixels are separately added to the residual potentials of the
subsequent integration cycles.
This means that very bright pixels require at least two, in some cases even four integration cycles with
the respective integration potentials and integration times, whereas very dark pixels may 'need' but a
single initial potential in up to four integration times to deliver evaluable residual potentials.

Manual: CMOS Industrial Camera LOGLUX
i5Version 1.08 (04/07)
KAMERA WERK DRESDEN GmbHPage 7 of 46
Upon the completion of the last integration cycle, the residual potentials of the pixels are inverted and
translated into digital numerical values.
Please note that the multiple integration slope mode does not work when the rolling shutter mode is
selected.
There are four registers (PROFILE_INIT0 / PROFILE_INIT1 / PROFILE_INIT2 / PROFILE_INIT3) that
allow the dynamic range of the IBIS5 sensor to be varied. They can be used to define both the number
of integration cycles and the integration time for the individual integration cycles. A valid integration
time is an integer number given in nanoseconds; if zero is entered in one of the above-mentioned
registers, the associated integration cycles is skipped.
Possible register settings are shown in the following examples:
This is a typical example of the single integration slope mode.
The only integration cycle is carried out at the highest initial
potential in 38.885ms.
The left photo of Figure 3 was taken with this setting.
This is an example of the multiple integration slope mode.
The first integration cycle is run at the third largest initial potential in
200µs. Thereafter, the second integration cycle is carried out at the
lowest initial potential in 10µs. Because of the first ‚long‘ integration
time, evaluable residual potentials are obtained for the dark pixels,
whereas in general very low residual potentials, or none at all, are
obtained for the bright pixels. As compared with the first integration cycle, slightly lower residual
potentials are obtained for the dark pixels as a result of the second 'short' integration time, while the
bright pixels now reach evaluable residual potential levels. This register setting is, thus, suitable for
images with primarily dark regions.
Another example of the multiple integration slope mode.
Four integration cycles are carried out here, with the integration
times being reduced by a power of ten each, starting from 35ms.
By a clever selection of the integration time length, a dynamic
(contrast) range of >100dB in the active frame can be implemented
in four integration cycles. The right-hand photo in Figure 3 was
taken with this setting.
When taking highly dynamic images, variations of the register settings may be necessary to get
optimum results.
The following procedure is recommended for setting the register:
First a suitable exposure time - preferably that in register PROFIL_INT3 - is set for the darkest region
of the frame. Thereafter, integration cycles are added one by one, preferably starting with register
PROFIL_INT2. The integration times of all integration cycles will then be summed up to give the
previously determined optimum exposure time for the darkest image regions.
Users of the LOGLUX
LuxWare configuration tool are also recommended to apply the above
procedure. However, they have to enter the individual integration times into input fields ‚Kneepoint
1...3‘ instead of directly into the registers PROFILE_INT0...2, and into input field ‚Remaining time‘
instead of directly into PROFIL_INT3, respectively. The overall integration time (current integration
time) is displayed in input field ‚Remaining time‘.

Version 1.08 (04/07)Manual: CMOS Industrial Camera LOGLUX
i5
Page 8 of 46KAMERA WERK DRESDEN GmbH
The shutter modes of the IBIS5 sensor
The IBIS5 has two shutter modes, viz. the rolling or curtain shutter mode and the synchronous or
snapshot shutter mode. The working principles and resultant characteristics of the two shutter modes
are described below.
The working principle of the rolling or curtain shutter can be described by means of the following
graphic representation:
As is shown in Figure 4 (left), an object is imaged by recording individual lines. The capturing of a line,
in turn, is subdivided into three phases: resetting all pixels of a line, integrating all pixels of a line, and
reading out all pixels of a line. The content of a picture element of an image is not fixed until the
integration phase is completed. It should be noted that the integration phase for line 7, for example,
will not start until the integration phase for line 1 is complete.
When the camera is set to the ‚rolling/curtain shutter‘ mode and an attempt is made to capture a
moving object whose motion vector is normal to the sensor line readout vector, it can easily be seen
that the image of the moving object is distorted (Figure 4, right side). The degree of image distortion is
determined by the relation between sensor line readout speed and object speed. In most cases, this
distortion effect is unacceptable for image processing.
For this reason, the ‚rolling/curtain shutter‘ mode should, where possible, only be used for imaging
objects that do not move, or move slowly relative to the sensor line readout speed. In this case,
however, the image can be captured at very high image rates.
The working principle of the central or snapshot shutter mode can be described by means of the
following graphic representation:
As is obvious from Figure 5 (left side), the object is here, too, produced by recording individual image
lines, and a line is also captured in three phases: resetting all picture elements of a line, integrating all
pixels of a line, and reading out all pixels of a line. But in contrast to the ‚rolling/curtain shutter‘ mode,
the reset and integration phases for all lines are connected up in terms of time. Only reading out the
individual lines is separate. This approach reveals a big advantage over the ‚rolling/curtain shutter’
mode: The image of a moving object is free of distortions (Figure 5, right side). However, this
advantage is at the price of the image rate: A comparison of Figures 4 and 5 (left sides) shows that the
‚central/snapshot shutter‘ mode does not permit a time-staggered readout of the sensor lines.
The ‚central/snapshot shutter‘ mode should be used whenever undistorted images of moving objects
are needed. Compared with the ‚rolling/curtain shutter’ mode, the image rate is lower.
Figure 5 : Working principle of the rolling/curtain shutter and the imaging of moving objects
Figure 6 : Working principle of the central/snapshot shutter and the imaging of moving objects

Manual: CMOS Industrial Camera LOGLUX
i5Version 1.08 (04/07)
KAMERA WERK DRESDEN GmbHPage 9 of 46
The look-up tables (LUTs) of the CMOS industrial camera LOGLUX
i5 CL
The possibility of immediate real-time data manipulation in the camera is a great advantage of the
CMOS industrial camera LOGLUX
i5 CL. In addition to the fixed-programmed functions such as bit
shifting operations, three user-specific, configurable look-up tables (LUTs) are available for the
purpose.
A LUT is a user-definable function value table in which a function value can be assigned to each of the
2
10
, i.e. 1024, 10-bit greyscale values of the IBIS5 sensor. At a constant 12ns signal delay, this value
assignment occurs almost in real time.
Using the LUTs is explained in more detail in section „Function group ‚LUT programming‘“ of chapter
„Description of the LUGLUX i5 CL register set“.
The CameraLink
™
image data interface
For a fast and safe transmission of the image data from the camera to the host system (PC/IPC), two
modern transmission concepts have been implemented in the CMOS industrial camera LOGLUX
i5
CL.
As an improved version of the LVDS (low voltage differential signal) technique, the CameraLink
™
standard, which features a large transmission bandwidth and a very good transmission safety, is
nowadays considered a quasi standard for data interfaces as used in industrial image processing. In
addition to the image data transmission from the camera to the host system, it is also possible to
control and configure the camera from the host system via up to four integral serial ports. A distance of
up to 10m between the camera and host system can be bridged without any auxiliary devices
(repeaters or the like) being necessary.
For further technical data see the technical documentation of the CameraLink
™
standard.
The complete LOGLUX
i5 CL SET camera system
The LOGLUX
i5 CL SET is a complete package designed to facilitate and speed up the
understanding and operation of the CMOS industrial camera LOGLUX
i5 CL.
The package includes an industrial camera LOGLUX
i5 CL (without lens), a PC plug-in card
(MATRIX Vision MVtitan-CL), a general data cable, an RS-232 data cable (3m long each), a split
adapter (for splitting up the power supply, RS-232, trigger input and switching outputs), a plug-in
power supply unit (24V/6W), and a CD ROM with driver and software for the Microsoft
Windows
operating systems 2000 and XP.
Optional accessories
Various CMOS industrial camera LOGLUX
i5 CL accessories are available from ourselves and third
parties, among others lenses, customized data cables, DIN/EN rail power supplies, media converters,
etc. Please see our current product range and links to other products on our website (www.kamera-
werk-dresden.de) or get in touch with our marketing department (telephone +49 351 2806 218 and
+49 351 2806 390; fax +49 351 2806 392).

Version 1.08 (04/07)Manual: CMOS Industrial Camera LOGLUX
i5
Page 10 of 46KAMERA WERK DRESDEN GmbH
Operation of the complete LOGLUX
i5 CL SET camera system
System requirements
The following host system (PC/IPC) requirements must be met for a safe and proper operation of the
complete LOGLUX
i5 CL SET camera system:
Minimum desktop PC systemOptimum desktop PC systemPortable PC system
(notebook)
Pentium
III or Athlon
processor >1.0GHz
Pentium
III/IV or AthlonXP
processor >2.0GHz
Pentium
III/IV or AthlonXP
mobile processor >2.0GHz
256MB PC133512MB PC400512MB PC400
>20GB hard disk with 1MB
cache
2x80GB hard disk with 2MB
cache in RAID0 mode
>40GB hard disk with 2MB
cache
Motherboard with UDMA133-IDE
interface
Motherboard with RAID
controller and FireWire
interface
-
PCI/AGP graphics card with
nVidia
400 or Radeon7000
chipset
PCI/AGP graphics card with
nVidia
440 or Radeon9200
chipset
Separate graphics solution with
nVidia
nForce2 or Radeon
mobility chipset
Min. 1 vacant PCI slotMin. 1 vacant PCI slot
PCMCIA / FireWire interface
CRT monitor or LC display with
min. contrast of 1:250
CRT monitor or LC display with
min. contrast of 1:500
LC display with min. contrast of
1:250
Operating system MS Windows
2000/XP
Operating system MS Windows
2000/XP
Operating system MS Windows
2000/XP
The system requirements for IPC systems are similar to those for desktop PC systems; for reasons of
the 'tougher' use conditions, more exclusive components may occasionally have to be chosen. For
configuring an IPC system, just contact a systems house of your choice.
With the exception of the real-time recording of large image data streams (e.g. AVI captures in full
frame and at full frame rate), normal operation of the camera will be basically possible also with a
minimum host system configuration, however, some difficulties might occur.
In view of the numerous existing PC/IPC system configurations it is impossible to guarantee that the
full scope of camera system functions can be used in every configuration. In any case, a sound basis
of a successful start-up and trouble-free operation is a minimally equipped host system (only the
graphics and framegrabber cards are installed) that meets the above-mentioned requirements and has
a newly installed operating system.
Installation of the CameraLink
™
PC plug-in card MATRIX Vision MVtitan-CL
The type MVtitan-CL CameraLink
™
PC plug-in
card is a universally applicable and powerful
framegrabbing card for any application. Its
main components are an integral image
processor (TM1300), a large memory for the
software and data (8MB standard, optional:
<=32MB), and two plug connectors for two
base and one medium CameraLink
™
ports.
Please consult the manufacturer's manual
when installing the PC plug-in card.
Note: You need to have administrator
rights for the respective PC if you want to
install hardware or software components!
Figure 7 : MATRIX Vision MVtitan-CL PC plug-in card

Manual: CMOS Industrial Camera LOGLUX
i5Version 1.08 (04/07)
KAMERA WERK DRESDEN GmbHPage 11 of 46
If no difficulties occurred during installation, the CameraLink
™
MVtitan-CL PC plug-in card is properly
installed.
Note: In general, no re-registration with Microsoft
, the maker of the Windows
operating system,
(Microsoft
safety system) will be necessary. Please make sure you use drivers certified by Microsoft
where possible. See also the information of the plug-in card manufacturer.
Installation of the CMOS industrial camera LOGLUX
i5 CL
Once the CameraLink
™
(see above) has been properly installed, the installation of the CMOS
industrial camera LOGLUX
i5 CL is very easy.
First mount the CMOS industrial camera LOGLUX
i5 CL in a safe and stable manner. Use the slot on
the bottom of the camera housing and the associated keys for the purpose, where possible, as these
allow safe fastening to various modular design systems having fitting counterparts.
Once the CMOS industrial camera LOGLUX
i5 CL has been safely mounted, connect the cables to
the host system (PC or IPC).
For the purpose, plug the properly laid
customized data cables into the
corresponding electrical/mechanical
connectors on the camera and into the
CameraLink
™
MVtitan-CL PC plug-in
card of the PC or IPC. Then connect the
split adapter (Fig. 7) to the 9-pole D-
SUB connector on the camera and
power supply unit (plug-type or DIN/EN
bus-bar power supply unit).
Furthermore, you may use the split
adapter to link the camera up with an
optional triggering system, e.g. the
switching output of a light barrier, in
order to trigger the framegrabbing
process in an event-controlled mode. The same plug connector is provided with two additional
switching outputs.
Once the plug connectors and data cables have been safely connected, the operating voltage (24 V
±10%) can be applied to the camera.
Caution: Always use the plug-type power supply unit supplied with the CMOS industrial camera
LOGLUX
i5 CL SET, or DIN bus-bar type 24V power supply units which are suitable for
industrial control systems (PLCs)! Always connect the camera to a separate power supply!
Readiness for operation is indicated by the continuously lit green status LED on the rear of the CMOS
industrial camera LOGLUX
i5 CL.
The CMOS industrial camera LOGLUX
i5 CL is now ready for operation. The next step is the
installation of the ‚LOGLUX
LuxWare‘ configuration tool.
Installation of the LOGLUX
LuxWare configuration tool
Once the CMOS industrial camera LOGLUX
i5 CL has been properly prepared, the installation of the
LOGLUX
LuxWare is very easy.
After booting the PC and logging into the Windows
operating system as administrator, the LOGLUX
LuxWare software is automatically started after insertion of the CD ROM if you have activated the auto
CD ROM start option on your computer.
If not, start ‚Setup.exe‘ in the main directory of the CD ROM manually.
In both cases, follow the instructions given by the installation software.
⇐ to camera
D-SUB 9-pole
RS-232 D-SUB 9-pole
to PC/IPC ⇒
to power supply ⇒
2-pole connector
Trigger inputs/
switching outputs ⇒
4-pole connector
Figure 8 : View of a split cable

Version 1.08 (04/07)Manual: CMOS Industrial Camera LOGLUX
i5
Page 12 of 46KAMERA WERK DRESDEN GmbH
Description of the LOGLUX
LuxWare configuration tool
The philosophy
The LOGLUX
LuxWare configuration tool automatically finds the interfaces of the PC/IPC system and
the cameras connected to the system. The user selects the camera to be configured.
Owing to the logical tree structure principle applied, the complex functions of the IBIS5 CMOS image
sensor used in the CMOS industrial camera LOGLUX
i5 CL are easy to understand and handle. A
plausibility check of the settings is made so that faulty operations are largely excluded. In many cases
only a mouse is required for setting the parameters.
Professional users have full access to all relevant sensor functions at register level by using a terminal
program which is an integral part of the LOGLUX
LuxWare. Moreover, this form of configuration is
fully scriptable, i.e. all settings can be logged and stored as an ASCII file and transferred from one
platform, e.g. Microsoft
Windows, to another, e.g. UNIX/Linux. It is primarily the programmers who
will benefit from this function.
All camera settings can be stored in so-called user profiles which are re-loaded when needed. These
user profiles remain stored in the camera itself even after disconnection from the power supply.
It is a special feature of the CMOS industrial camera LOGLUX
i5 CL that the user can manipulate the
image data in the camera using up to three selectable look-up tables. The LUT load and storage
functions required for the purpose are provided by the software.

Manual: CMOS Industrial Camera LOGLUX
i5Version 1.08 (04/07)
KAMERA WERK DRESDEN GmbHPage 13 of 46
The start menu
When starting the software for the first time, a
window will appear after some time that shows
the image processing (IP) hardware of the PC
which is connected to the existing
framegrabber, FireWire and/or RS-232 ports.
A query window will appear in all following
program starts, asking the user if the IP
hardware settings of the previous program start
are to be used again or if an IP hardware scan
as referred to above is to be made.
When selecting the LOGLUX
i5 CL cameras
connected to the respective ports (the camera
names are displayed), the following should be
noted:
Cameras plugged into RS-232 ports do not
deliver a live image with the configuration tool.
Where a camera image is needed, the viewing
software of the framegrabber or a suitable
third-party software should be used.
Cameras connected to the other ports deliver
an image right away when the configuration
tool is activated. All the user has got to do is
adjusting the image to a size that fits the
desktop PC.
A camera is activated by highlighting its name
in the 'Camera selection' window and then
clicking button 'Connect' . Should a camera not
be found, another hardware scan can be
started by clicking button 'Scan'. Pressing
button 'Cancel' will end the program.
Figure 9 : The start menu

Version 1.08 (04/07)Manual: CMOS Industrial Camera LOGLUX
i5
Page 14 of 46KAMERA WERK DRESDEN GmbH
The configuration menu
The configuration window is subdivided into four panels.
At the top of the window is a 'Disconnect'
button which is used to return to the IP
hardware scan. When the button is clicked, all
settings of the currently used camera are
stored. To the right of the button is an option
field 'Advanced features' which allows
additional configuration tools to be used, e.g.
the built-in terminal program; it should be
selected by experienced users only. The
symbol buttons on the right side may be used
to call up program information ('i') and online
help ('?'); the snapshot button (flash symbol)
serves to dump the live image window as a
PNG graphics file in the installation directory of
the program.
The left side displays the tree structure of the
parameters of the selected LOGLUX
i5 CL
camera and the IP hardware used
(framegrabber or FireWire ports). The
parameter branches can be opened ([+]) and
closed ([-]) by clicking the tree nodes with the
left mouse key. The selected parameter
branches are highlighted in a color or bold.
After the selection of a parameter branch in the
left half of the window (green arrow), the
contents of the branch will be displayed in the
right half of the window. All parameter settings
are made here, with menus, selection fields,
shifting bars (mouse etc. operation) or input
fields (keyboard entries) being available for the
purpose. The function of the selected
parameter branch is displayed in the green
heading block.
At the bottom of the window, to the right of the
KWD logo, is a status indicator window for
relevant output functions which is not
permanently visible.
Figure 10 : The configuration menu

Manual: CMOS Industrial Camera LOGLUX
i5Version 1.08 (04/07)
KAMERA WERK DRESDEN GmbHPage 15 of 46
The 'Camera globals' menu
This menu is used for renaming the selected camera, setting the communication speed, selecting the
camera profile, and displaying two camera temperature values.
The user can change the name of the selected
camera in the 'Camera Name' input field. All
upper-case and lower-case letters and
numerals as well as the separating character
'_' are available. The new name will be valid,
and the respective entry in the tree structure
updated, immediately upon leaving the input
field. The camera name may have up to 32
digit positions.
The 'Baudrate' option allows the
communication speed to be set. Once set, the
speed will be immediately available. It should
be noted that a baud rate of '9600' only is
available when the camera is configured via
the CameraLink
™
interface.
Under 'Active Profile', the user can select the
camera profile to be used from four different,
factory-set camera configurations. Selectable
are all profiles visible in the tree structure.
The currently used profile is displayed in the
tree structure with a preceding green arrow.
The 'Temperature' status field displays the
temperature measured at the sensor in the
camera.
Figure 11 : The 'Camera globals' menu

Version 1.08 (04/07)Manual: CMOS Industrial Camera LOGLUX
i5
Page 16 of 46KAMERA WERK DRESDEN GmbH
The 'Profile globals' menu
The menu is used for renaming the selected camera profile, initializing the selected profile with one of
the factory settings, or copying all parameters of a profile to the selected profile.
The user can change the name of the selected
profile in the 'Profile Name' input field. All
upper-case and lower-case letters and
numerals as well as the separating character
'_' are available for the purpose. The new
name will be valid, and the respective entry in
the tree structure updated, immediately upon
leaving the input field. The profile name may
have up to 32 digit positions
The 'Init profile' option allows the user to
initialize the selected profile with one of the
factory-set profiles. It should be noted here that
all settings of the chosen profile are
overwritten!
⇒ This option is ideal for user-specific
optimization purposes as suitable profile
parameters have already been pre-set for up to
four applications.
In 'Load profile', the user can load the selected
profile with all parameters of another profile. It
should be noted that settings of the selected
profile get lost!
⇒ This option is ideal for copying profiles of
identical contents.
Both options are activated by clicking button
'Init now' and 'Load now', respectively.
In panel 'Profile backup', the user can store the
active program in a backup file (.INI file) or
restore it from a backup file (.INI file).
Optionally, a backup file may also be stored in
a script file which can be called up in the built-
in terminal program by the restore function.
Figure 12 : The 'Profile globals' menu

Manual: CMOS Industrial Camera LOGLUX
i5Version 1.08 (04/07)
KAMERA WERK DRESDEN GmbHPage 17 of 46
The user profile parameters
The 'Region of Interest' profile menu
This menu is used for adjusting the image
region (on the sensor) which is of interest to
the user (region of interest), and for directly
setting the maximum possible frame readout
rate by means of the parameters X_Size (width
of the ROI) and Y_Size (height of the ROI)
since sensor pixels are scanned in the
specified region only (progressive scan).
The horizontal image geometry parameters
'distance of ROI from left' and 'width of the ROI'
are set in the 'Left' and 'Width' fields,
respectively. The associated scroll bars can
also be used for a coarse pre-adjustment. Only
integer values may be set.
The vertical image geometry parameters
'distance of ROI from top' and 'height of the
ROI' are set in the 'Top' and 'Height' fields,
respectively. The associated scroll bars can
also be used for a coarse pre-adjustment.
The maximum possible values of 'distance of
ROI from left' and 'distance of ROI from top' are
limited by the parameter settings 'width of the
ROI' and 'height of the ROI'.
The graphic 'ROI position' display gives an
indication of the position and size of the ROI
set relative to the full CMOS sensor area.
Figure 13 : The 'Region of Interest' profile menu

Version 1.08 (04/07)Manual: CMOS Industrial Camera LOGLUX
i5
Page 18 of 46KAMERA WERK DRESDEN GmbH
The ‚Trigger‘ profile menu
This menu is used for setting the trigger source and framegrabbing mode.
Either an external signal applied to the trigger input of the camera (level step 0V ⇒ 24V, see chapter
'Technical specifications') or a trigger mechanism built into the camera can be selected as trigger
source for framegrabbing. In the latter case, a free running or register-controlled trigger mechanism
can be chosen from.
Furthermore, the user can select the desired frame rate and the number of images to be captured
(single snapshot, snapshot sequence, continuous "snapshot").
Under 'Trigger Source' the user can choose
one of the following trigger sources:
• Off → Trigger is inactive (live image is
'frozen').
• External (falling edge) → The camera is
triggered by an external signal applied to the
trigger input of the camera. Triggering is
effected by the falling edge of the signal.
• External (rising edge) → The camera is
triggered by an external signal applied to the
trigger input of the camera. Triggering is
effected by the rising edge of the signal.
• CameraLink CC1 → The camera is
triggered by an external signal sent from the
CameraLink™ port (CC1, camera control 1).
• Register → The camera is triggered upon
entering the value 1 into the camera register
PARAM_TRIGGER. Alternatively, the 'Trigger
now' button can be used.
• Auto → The camera is continuously
triggered by an internal clock generator.
The 'Trigger Delay' box allows the user to enter
a delay time for the trigger signal.
Under 'Trigger Mode', the user can choose the
framegrabbing mode (single snapshot,
snapshot sequence or continuous mode).
If the sequence mode is selected, the number
of images to be captured can be entered in the
'Trigger sequence count' box.
Under 'Trigger Frequency' the user can specify
a desired trigger frequency in Hz. The
maximum frame rate (in Hz) that can be
reached in dependence of all relevant
parameters is displayed below the box .
It should be noted that the trigger port of the
camera is electrically isolated (see chapter
'Technical specifications'). The maximum
trigger frequency is largely dependent on the integration time of the individual image.
Figure 14 : The ‚Trigger‘ profile menu

Manual: CMOS Industrial Camera LOGLUX
i5Version 1.08 (04/07)
KAMERA WERK DRESDEN GmbHPage 19 of 46
The ‚Switchport‘ profile menu
This menu serves the setting of the signal sources, switch signal delay, switch signal length, and
polarity of a switch signal using one of the two camera switchports (0 and 1).
The source of a switch signal applied to a
switchport is selected under ‘Switch signal
source‘:
• Off → No signal source is assigned to the
selected switchport.
• Trigger → The external trigger input of the
camera is assigned to the selected switchport.
• Start of integration → The event ‚Start of
the integration cycle for one image‘ is assigned
to the selected switchport.
Note: In the rolling shutter mode, this option is
ineffective as there is no controlled integration
time available.
• End of integration → The event ‚End of the
integration cycle for one image‘ is assigned to
the selected switchport.
Note: In the rolling shutter mode, this option is
ineffective as there is no controlled integration
time available.
• CameraLink CC2 → A signal applied to the
CameraLink™ port (CC2, camera control 2) is
assigned to the selected switchport. For the
generation of this signal see your
Framegrabber Manual or the CameraLink™
standard.
• CameraLink CC3 → A signal applied to the
CameraLink™ port (CC3, camera control 2) is
assigned to the selected switchport. For the
generation of this signal see your
Framegrabber Manual or the CameraLink™
standard.
• Register → The camera register
PARAM_TRIGGER is assigned to the selected
switchport. Entering the value 1 in this register
will generate a switch pulse at the selected
switchport. Alternatively, the 'Set Switch' button
can be used for the purpose.
A switch delay (in milliseconds) for the selected switchport can be entered in the 'Switch signal delay'
box.
A switch signal pulse length (in milliseconds) can be entered in the 'Switch signal length' box for the
selected switchport.
The polarity of the switch signal at the selected switchport can be chosen under 'Switch signal
polarity':
• Low → The switch signal is low-active.
• High → The switch signal is high-active.
Figure 15 : The 'Switchport' profile menu

Version 1.08 (04/07)Manual: CMOS Industrial Camera LOGLUX
i5
Page 20 of 46KAMERA WERK DRESDEN GmbH
The ‚Exposure‘ profile menu
The conversion function of the camera in the central shutter mode is set in this menu; this means most
of the settings will not be available until the 'Synchronous shutter (snapshot)' mode is activated in the
'Sensor' profile menu.
For a reasonable and fast selection of the options in this menu, the respective chapter in the camera
manual (The dynamic (contrast) range of the IBIS5 sensor) is recommended to be thoroughly read.
With 'Exposure precalculation' and 'Manual
exposure configuration' the user is given two
independent possibilities of adjusting the
conversion characteristic of the camera sensor.
First the integration time base must be set
under 'Exposure precalculation', with the
choice being between the current integration
time or a new total integration time ('User') or
the maximum time possible under the current
auto trigger rate ('Trigger'). When selecting
'User' the user must give the 'Total time' in ms.
Then, by means of two functions (logarithm of
base x, root of base x), the user can
approximate the sensor conversion function for
up to another three integration times to choose
from. To this end, the user highlights under
'Mode' the desired conversion function to be
approximated, and enters the value of the base
of the conversion function to be approximated
under 'Scale' . Finally, the accuracy of the
conversion function approximation is defined
by selecting the number of integration steps in
the 'Slopes' box. All settings are activated by
clicking button 'Apply'.
Under 'Manual exposure configuration' the user
is given the possibility to define the shape of
the sensor conversion characteristic by
entering the integration time number and value
of up to three more integration steps. .Entering
a valid integration time in 'Last slope' - this is
absolutely necessary if the above option is not
made use of - results in an exposure at a single
integration time ('single integration slope'). By
entering more valid integration times, exposure
at up to four successive integration times can
be implemented. Below the 'Last slope' input
field are displayed the total exposure time and
the frame rate which depends on the camera configuration in the currently used profile. The value
shown in the figure can be considered a good value.
The raw (i.e. not pre-processed) sensor greyscale value versus object light intensity diagram gives a
survey of the sensor conversion function in the individual integration steps.
Figure 16 : The ‚Exposure‘ profile menu
/