
Document No: D100253
BFB-3000
Set Up and Operations Manual
[Version 3.0]

BFB-3000 Set Up and Operations Manual
Document No: D100253 2
1 Introduction
Thank you for purchasing your BFB-3000.
Before first use, the BFB-3000 needs careful setting up. The list below illustrates some of
the essential operations which must be carried out before operation:
Remove existing prints
Check the bed is clear of any build material
Check the bed is fitted correctly
Power up
Manual move
Check the hot-end nozzles are clean from plastic debris
Check the bed is level
Check the bed is referenced to the extruder nozzles
Load the extruders
Start a print
Print a successful raft
Print the first model
Failure to carry out all of the set-up procedures contained in this
document will damage the machine.
This document has been designed to illustrate the essential procedures and get you up and
running as quickly as possible. Please take time to understand how the process works and
complete each procedure in the order set out in this manual. Setting up can take from
20-60 minutes depending on the skill level of the operator.
Support is available by raising a ticket at www.bitsfrombytes.com
We welcome any feedback you may have, and wish you well in your 3D printing!

BFB-3000 Set Up and Operations Manual
Document No: D100253 3
2 Table of Contents
1 Introduction ................................................................................................................... 2
2 Table of Contents ........................................................................................................... 3
3 Manual symbols ............................................................................................................. 5
4 How this manual works .................................................................................................. 6
5 Process overview – how the BFB-3000 works ................................................................ 7
5.1 BFB-3000 ................................................................................................................... 7
5.2 Tool kit ....................................................................................................................... 8
5.3 Creating a 3D model .................................................................................................. 9
6 Initial set-up ................................................................................................................. 12
6.1 Remove existing prints ............................................................................................ 12
6.2 Check the bed is clear of any build material ............................................................ 13
6.3 Check the bed is fitted correctly .............................................................................. 14
6.3.1 Remove the bed ............................................................................................. 15
6.3.2 Fit the bed ...................................................................................................... 16
6.4 Power up ................................................................................................................. 17
6.5 Manual move ........................................................................................................... 18
6.6 Check the hot-end nozzles are clean from plastic debris ......................................... 20
6.7 Check the bed is level .............................................................................................. 21
6.8 Check the bed is referenced to the extruder nozzles ............................................... 28
6.9 Load the extruders................................................................................................... 31
6.9.1 Load the filament ........................................................................................... 31
6.9.2 Extruder control ............................................................................................. 37
6.9.3 Purge the extruder ......................................................................................... 38
6.10 Start a print .......................................................................................................... 40
6.11 Print a successful raft............................................................................................ 41
6.11.1 Print the raft check file ................................................................................... 43
6.11.2 Examine the raft check file ............................................................................. 44
6.11.3 Potential problems ......................................................................................... 45
6.11.4 Perfect the raft ............................................................................................... 46

BFB-3000 Set Up and Operations Manual
Document No: D100253 4
7 Print the first model ..................................................................................................... 47
7.1 Test print ................................................................................................................. 47
7.2 Essential post-print operations ................................................................................ 48
7.2.1 Bed flatness .................................................................................................... 48
7.2.2 Empty material waste bin ............................................................................... 49
8 Further printing ............................................................................................................ 50
9 Further operations ....................................................................................................... 51
9.1 SD card notes ........................................................................................................... 51
9.2 Reloading the extruders .......................................................................................... 51
9.3 Notes on materials .................................................................................................. 52
9.3.1 Properties ....................................................................................................... 52
9.3.2 Soluble support structure ............................................................................... 52
9.3.3 Storage ........................................................................................................... 52
9.4 Control panel functions ........................................................................................... 53
9.4.1 Run file ........................................................................................................... 53
9.4.2 Extruder mapping ........................................................................................... 53
9.4.3 Manual move ................................................................................................. 55
9.4.4 Extruder control ............................................................................................. 55
9.4.5 Home tool head .............................................................................................. 55
9.4.6 Settings........................................................................................................... 55
9.4.7 Set Z height .................................................................................................... 56
9.5 Maintenance operations.......................................................................................... 60
9.5.1 Updating your printer ..................................................................................... 60
9.5.2 Adjusting the nozzle wipe ............................................................................... 60
9.5.3 Fine adjustment to level the nozzles .............................................................. 62
9.5.4 Handling a ground-out filament ..................................................................... 64
9.5.5 Handling snapped filament in the delivery tube ............................................. 66
9.6 Troubleshooting ...................................................................................................... 73
9.7 Troubleshooting ...................................................................................................... 73
9.8 Specifications ........................................................................................................... 73

BFB-3000 Set Up and Operations Manual
Document No: D100253 5
3 Manual symbols
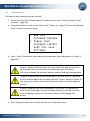
CAUTION: notes to prevent damage to the machine.
DANGER: notes to prevent injury to the operator.

BFB-3000 Set Up and Operations Manual
Document No: D100253 6
4 How this manual works
How the BFB-3000 3D
printing process
works
Initial setup of the
BFB-3000 machine
and testing
First print
Links for further
printing

BFB-3000 Set Up and Operations Manual
Document No: D100253 7
5 Process overview – how the BFB-3000 works
Before reading this section, please ensure that the unpacking instructions have been
completed.
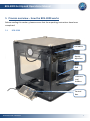
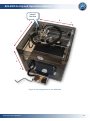
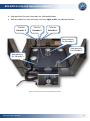
5.1 BFB-3000
Bed
Filament
reel
holders
Control
box
Nozzle
wipe box
Extruders

BFB-3000 Set Up and Operations Manual
Document No: D100253 8
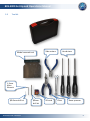
5.2 Tool kit
8mm spanner
Hex drivers
Side cutters
Model removal tool
Pliers
SD card
Ø3mm
drill bit
Ø0.5mm drill bit
1.5mm
Allen
Wrench

BFB-3000 Set Up and Operations Manual
Document No: D100253 9
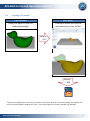
5.3 Creating a 3D model
CAD software
BFB “Axon”
Draw your object in your 3D
modelling package
1
Load your model into Axon to
automatically process the file.
1
Most CAD packages export to STL format. However, STL quality depends on the CAD package. Poor quality STLs
may need repairing before loading into “Axon”. STL fixing programs are readily available (e.g. NetFabb).
Save as…
*.STL
Save as…
*.BFB

BFB-3000 Set Up and Operations Manual
Document No: D100253 10
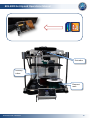
Extruders
Filament
reels
Delivery
tubes

BFB-3000 Set Up and Operations Manual
Document No: D100253 11
The extruders pull filament from the reel via the delivery tubes and drive through a hot-end
to produce a thin molten filament of plastic. The extruder draws each layer with this
filament. After each layer is produced the bed increments down so that a new layer can be
drawn on top of the last, building up the 3D model. A second (optional) extruder
automatically prints support filament for printing overhanging-features.
Hot-end

BFB-3000 Set Up and Operations Manual
Document No: D100253 12
6 Initial set-up
Follow all the steps in this section to ensure that the printer is correctly setup before
printing.
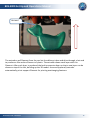
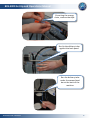
6.1 Remove existing prints
We do test prints on each BFB-3000 as part of our quality control. We leave these on the
print bed to show that the printer has been checked, and to demonstrate some basic prints.
Remove any previous prints with the model removal tool. Slide the edge between the bed
and the first layer to remove the entire print.
If the model is difficult to remove from the bed in situ, you can take the
whole bed out of the machine to make the removal process easier
(refer to “Remove the bed”, page 15).

BFB-3000 Set Up and Operations Manual
Document No: D100253 13
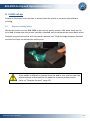
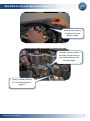
6.2 Check the bed is clear of any build material
Ensure that all build material is completely removed from the bed. Use the model removal
tool to remove any stuck-fast tracks.
It is normal for prints to leave marks on the bed, and for the model
removal tool to lightly scratch the surface of the bed. This will not
affect the printer’s operation. However, take care to avoid gouging the
surface with the material removal tool – the bed must be flat.
Clean: no build
material debris

BFB-3000 Set Up and Operations Manual
Document No: D100253 14
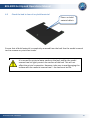
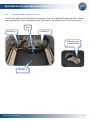
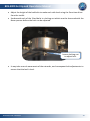
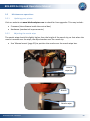
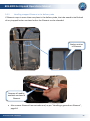
6.3 Check the bed is fitted correctly
Ensure that bed is correctly fitted to the printer. The three bed bolt heads should sit flush in
the countersinks. If not, remove the bed, then refit it - as shown in the next two sections.
Bed bolt 3
Bed bolt 1
Bed bolt 2
Bed
Bed bolt head
in countersink


BFB-3000 Set Up and Operations Manual
Document No: D100253 16
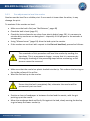
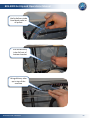
6.3.2 Fit the bed
Tip: fitting is easier if the bed is near the bottom of the machine. If it is too high, you
can manually lower the z-axis (see “Manual move”, page 18).
Check all bolt heads are fitted correctly (see “Check the bed is fitted correctly”,
page 14).
2
2
3

BFB-3000 Set Up and Operations Manual
Document No: D100253 17
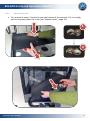
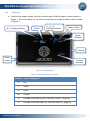
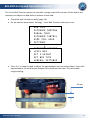
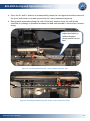
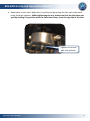
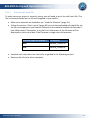
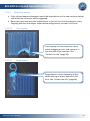
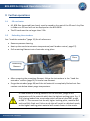
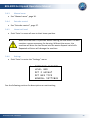
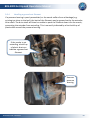
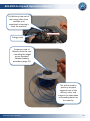
6.4 Power up
Connect the power supply from the control panel into the power socket shown in
Figure 1. Turn the supply on. Turn the control box on using the power switch shown
in Figure 1.
Figure 1: Control panel
Table 1: Buttons used for navigation
Button
Screen Navigation
+Y
Up
-Y
Down
+X
Enter
Esc
Escape
+Z
Extruder selection up (see ‘Extruder control’, page 36)
-Z
Extruder selection down (in ‘Extruder control’, page 36)
Power
socket
+Z, -Z, Escape buttons
Screen
+Y, -Y, -X,
+X/Enter buttons
buttons
Power switch
Power
indicator
SD card
indicator
SD card

BFB-3000 Set Up and Operations Manual
Document No: D100253 18
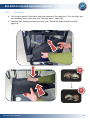
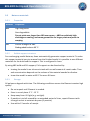
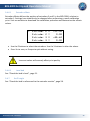
6.5 Manual move
Get familiar with moving the axes around:
Ensure that the bed is fitted properly to the machine (see “Check the bed is fitted
correctly”, page 14).
Using the buttons on the control panel (see “Power up”, page 17) select the ‘Manual
move’ function and press enter:
RUN FILE
EXTRUDER MAPPING
>
MANUAL MOVE
EXTRUDER CONTROL
HOME TOOL HEAD
SETTINGS
Use X, Y and Z buttons to move each axis respectively (axes designated in Figure 2,
page 19).
Caution: Always move the Z axis first to ensure that bed is away from
the extruder nozzles, and does not collide during an X/Y move.
Collisions between the extruder nozzles and the bed may damage both.
Caution: Observe each X/Y axis movement. In these axes, it is possible
to drive the extruders too far away from the “Home” position (Figure 2)
into the printer frame. Avoid this. Excessive collisions will damage the
printer.
Caution: Observe each Z axis movement. In this axis, it is possible to
drive the bed too high (into the extruder nozzles) or too low (into the
motor coupling). Avoid this. Excessive collisions will damage the
printer.
Press Escape to leave the function, and return to the main menu.

BFB-3000 Set Up and Operations Manual
Document No: D100253 19
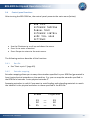
Figure 2: Axis designation for the BFB-3000
Y
Z
X
-
-
-
+
+
+
“Home”
Position

BFB-3000 Set Up and Operations Manual
Document No: D100253 20
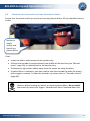
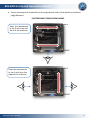
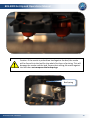
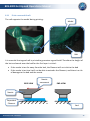
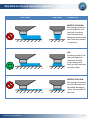
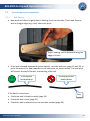
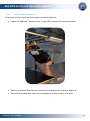
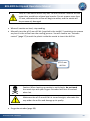
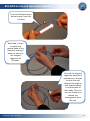
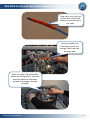
6.6 Check the hot-end nozzles are clean from plastic debris
Ensure that the metal nozzle tips are clean from any plastic debris. All tips should be clearly
visible.
If not:
Lower the bed to make access to the nozzles easy.
Position the extruders in approximately the middle of the machine (see “Manual
move”, page 18), to make access to the nozzles easy.
Pull away any light plastic debris away from the nozzle tip using the pliers.
If plastic debris is stubborn, you may need to heat the extruder to make the plastic
soft enough to remove. To heat the extruder up, please refer to “Extruder control”
(page 36).
Caution: When heating up nozzles to remove plastic debris, do not touch
the nozzle tips with your fingers. Extruders will burn if touched when hot.
Nozzle tip
clearly
visible, and
free of any
plastic debris
Page is loading ...
Page is loading ...
Page is loading ...
Page is loading ...
Page is loading ...
Page is loading ...
Page is loading ...
Page is loading ...
Page is loading ...
Page is loading ...
Page is loading ...
Page is loading ...
Page is loading ...
Page is loading ...
Page is loading ...
Page is loading ...
Page is loading ...
Page is loading ...
Page is loading ...
Page is loading ...
Page is loading ...
Page is loading ...
Page is loading ...
Page is loading ...
Page is loading ...
Page is loading ...
Page is loading ...
Page is loading ...
Page is loading ...
Page is loading ...
Page is loading ...
Page is loading ...
Page is loading ...
Page is loading ...
Page is loading ...
Page is loading ...
Page is loading ...
Page is loading ...
Page is loading ...
Page is loading ...
Page is loading ...
Page is loading ...
Page is loading ...
Page is loading ...
Page is loading ...
Page is loading ...
Page is loading ...
Page is loading ...
Page is loading ...
Page is loading ...
Page is loading ...
Page is loading ...
Page is loading ...
-
 1
1
-
 2
2
-
 3
3
-
 4
4
-
 5
5
-
 6
6
-
 7
7
-
 8
8
-
 9
9
-
 10
10
-
 11
11
-
 12
12
-
 13
13
-
 14
14
-
 15
15
-
 16
16
-
 17
17
-
 18
18
-
 19
19
-
 20
20
-
 21
21
-
 22
22
-
 23
23
-
 24
24
-
 25
25
-
 26
26
-
 27
27
-
 28
28
-
 29
29
-
 30
30
-
 31
31
-
 32
32
-
 33
33
-
 34
34
-
 35
35
-
 36
36
-
 37
37
-
 38
38
-
 39
39
-
 40
40
-
 41
41
-
 42
42
-
 43
43
-
 44
44
-
 45
45
-
 46
46
-
 47
47
-
 48
48
-
 49
49
-
 50
50
-
 51
51
-
 52
52
-
 53
53
-
 54
54
-
 55
55
-
 56
56
-
 57
57
-
 58
58
-
 59
59
-
 60
60
-
 61
61
-
 62
62
-
 63
63
-
 64
64
-
 65
65
-
 66
66
-
 67
67
-
 68
68
-
 69
69
-
 70
70
-
 71
71
-
 72
72
-
 73
73


3D Systems 3000 Owner's manual
- Type
- Owner's manual
- This manual is also suitable for
Ask a question and I''ll find the answer in the document
Finding information in a document is now easier with AI
Related papers
-
3D Systems CubePro User manual
-
-
-
3D Systems CUBEX User guide
-
-
-
Cubify 401383 User manual
-
-
-
Other documents
-
zortrax M200 User manual
-
 BFB RapMan 3.2 Operating instructions
-
 TRONXY X3A Operating
-
Cocoon HE161192 Quick start guide
-
 Hatchbox ALPHA User manual
-
Cocoon HE170703 Quick start guide
-
 Alunar R100-01 User manual
-
 Hamilton/Buhl 3x 3D Magic Pen User manual
-
Bresser 2010600 Owner's manual
-
Axon Body 3 User manual


