Alarm Removal
If tamper resist feature has been activated, refer to tamper
resist feature description on page 10 for removal
instructions.
Remove the alarm from the mounting plate by rotating the
alarm in the direction of the “OFF” arrow on the cover. To
disconnect the AC Quick-Connector harness, squeeze the
locking arms on the sides while pulling the connector
away from the bottom of the alarm (see Figure 2).
FOR ALARMS EQUIPPED WITH 9 VOLT BATTERY
BACKUP
After the alarm has been removed, you can open the
battery door and replace the battery. Battery installation
instructions are provided on the inside of the battery door.
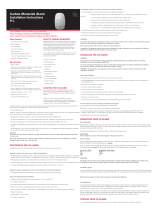
When installing the battery, orient the battery as shown on
unit label. Press the battery reminder tab down into the
battery compartment and install the battery (see Figure 4).
CAUTION! If the battery reminder tab is not held down in
the battery compartment by the battery, the battery door will
not close, the AC Quick-Connector will not attach to the
alarm, and the alarm will not attach to the mounting plate.
After installing or changing the battery, reinstall your alarm.
Test your alarm by using the Test/Reset button and check
that the green “Power” LED is on.
16 20 21191817
Battery Replacement (If Equipped)
Battery
tab
FIGURE 4
BATTERY REPLACEMENT
Maintenance
CAUTION: This unit is sealed. The cover is not removable.
To keep your alarm in good working order, you must fol-
low these simple steps:
• Test the alarm once a week by pressing the Test/Reset
button.
• Vacuum the alarm cover once a month to remove
accumulated dust.
• Never use detergents or solvents to clean the alarm.
Chemicals can permanently damage or temporarily
contaminate the sensor.
• Avoid spraying air fresheners, hair spray, paint or other
aerosols near the alarm.
• Do not paint the unit. Paint will seal the vents and
interfere with proper sensor operation.
Move the CO Alarm to a remote location, to prevent possi-
ble damage or contamination of the sensor, prior to per-
forming any of the following:
• Staining or stripping wood floors or furniture
• Painting or wall-papering
• Using aerosols or adhesives
WARNING: Reinstall the CO Alarm as soon as possible to
assure continuous protection.
The following is a list of substances that at high levels can
damage the sensor or cause temporary readings that are
not carbon monoxide readings:
Ethylene, ethanol, alcohol, iso-propanol, benzene, toluene,
ethyl acetate, hydrogen, hydrogen sulfide, sulfur dioxides.
Also most aerosol sprays, alcohol based products, paints,
thinners, solvents, adhesives, hair sprays, after shaves,
perfumes, auto exhaust (cold start) and some cleaning
agents.
Carbon Monoxide Alarm Procedure
1)
Operate the Test/Reset button;
2)
Call your emergency services (
Fire Department or 911);
3)
Immediately move to fresh air - outdoors. Do a head count
to check that all persons are accounted for. Do not re-enter
the premises until the emergency services have arrived, the
premises have been aired out, and the alarm remains in its
normal condition.
4)
After following steps 1-3, if the alarm reactivates within a 24
hour period, repeat steps 1-3 and call a qualified appliance
technician to investigate sources of CO from fuel burning
equipment and appliances, and to inspect for proper opera-
tion of equipment.
If problems are identified during this inspection, have the
equipment serviced immediately. Note any combustion
equipment not inspected by the technician and consult the
manufacturer’s instructions, or contact the manufacturer’s
directly for more information about CO safety and the equip-
ment. Make sure that motor vehicles are not, or have not
been, operating in a garage attached or adjacent to the resi-
dence.
Never restart the source of a CO problem until it has been
corrected. Never ignore the sound of the alarm!
Carbon Monoxide Safety
PHONE NUMBER
PHONE NUMBER
WARNING: Activation of the CO Alarm
indicates the presence of Carbon Monoxide
(CO) which can kill you.
CO alarms provide early warning of the presence of car-
bon monoxide, usually before a healthy adult would expe-
rience symptoms. This early warning is possible, however,
only if your Kidde CO alarm is located, installed and main-
tained as described in this manual.
This CO alarm is designed to act as a continuous monitor;
it is not designed for use as a short-term testing device to
perform a quick check for the presence of CO.
CO alarms have limitations. Like any other electronic
device, CO alarms are not fool-proof. CO alarms have a
limited operational life. You must test your CO alarm
weekly, because it could fail to operate at any time.
If your CO alarm fails to test properly, or if its self-
diagnostic test reveals a malfunction, immediately have the
unit replaced.
CO alarms can only sense CO that reaches the unit’s
sensor. Carbon monoxide may be present in other areas
without reaching the alarm. The rate at which CO reaches
the unit may be affected by doors or other obstructions. In
addition, fresh air from a vent or open window or any
other source may prevent CO from reaching the sensor.
Please observe cautions in Installation on page 5.
CO could be present on one level of the home and not
reach a CO alarm installed on a different level. For
example, CO in the basement may not reach an alarm on
the second level, near the bedrooms. For this reason, we
recommend you provide complete coverage by placing a
CO alarm on every level of the home.
CO alarms should not be used to detect the presence of
natural gas (methane), propane, butane, or other
combustible fuels.
Carbon Monoxide Safety
Replacement of Alarm
Seven years after initial power up, this unit will "chirp"
every 30 seconds to indicate that it is time to replace the
alarm.
A label has been provided that has “Replace by:” printed
on it. Write the replace-by date on the label and affix it to
the front of the alarm so it is visible after mounting. The
date written on the label should be after seven (7) years of
cumulative power.
REPLACE IMMEDIATELY! IT WILL NOT DETECT CO IN
THIS CONDITION!
General CO Information
Carbon monoxide (CO) is a colorless, odorless, and tasteless
poison gas that can be fatal when inhaled. CO inhibits the
blood’s capacity to carry oxygen.
Periodically review this alarm manual and discuss your CO
alarm emergency procedure with all the members of your
family. Never ignore a CO alarm. A true alarm is an indica-
tion of potentially dangerous levels of carbon monoxide.
CO alarms are designed to alert you to the presence of
carbon monoxide before an emergency - before most peo-
ple would experience symptoms of carbon monoxide poi-
soning, giving you time to resolve the problem calmly.
Determine if anyone in the household is experiencing
symptoms of CO poisoning. Many cases of reported CO
poisoning indicate that while victims are aware they are
not well, they become so disoriented they are unable to
save themselves by either exiting the building or calling
for assistance. Also young children and household pets
may be the first affected. You should take extra
precautions to protect high-risk persons from CO exposure
because they may experience ill effects from carbon
monoxide at levels that would not ordinarily affect a
healthy adult.
Carbon Monoxide Safety Carbon Monoxide Safety
Symptoms of CO Poisoning
The following common symptoms are related to carbon
monoxide poisoning and should be discussed with ALL
members of the household. Learn the difference between
dangerous, high, mid and low levels:
Mild Exposure: Slight headache, nausea, vomiting, fatigue
(often described as “flu-like” symptoms).
Medium Exposure: Severe throbbing headache, drowsi-
ness, confusion, fast heart rate.
Extreme Exposure: Unconsciousness, convulsions, cardio-
respiratory failure, death.
If you experience even mild symptoms of CO poisoning,
consult your doctor immediately!
Because carbon monoxide is a cumulative poison, long-
term exposures to low levels may cause symptoms, as well
as short-term exposures to high levels. This Kidde unit has
a time-weighted alarm - the higher the level of carbon
monoxide present, the sooner the alarm will be triggered.
This CO alarm can only warn you of the presence of CO.
It does not prevent CO from occurring, nor can it solve an
existing CO problem. If your unit has alarmed and you’ve
provided ventilation by leaving your windows and doors
open, the CO buildup may have dissipated by the time
help responds. Although your problem may appear to be
temporarily solved, it’s crucial that the source of the CO is
determined and that the appropriate repairs are made.
15
Battery Replacement (If Equipped)
THIS CO ALARM IS NOT BATTERY OPERATED.
FOR ALARMS EQUIPPED WITH 9V BATTERY BACK-UP,
THE 9 VOLT BATTERY IS TO SUPPLY SHORT TERM
BACKUP DURING POWER OUTAGE.
When replacing the battery, use one of the following
approved brands:
Duracell MN1604 or MX1604
Energizer 522
Gold Peak 1604A
These batteries can be purchased where you bought the
alarm or at a local hardware store. Use of a different
battery may have a detrimental effect on the alarm
operation.
The 9 volt battery is not rechargeable. If the 9 volt battery
is missing, disconnected, or if the battery’s power is low, a
red LED flash will occur once every 15 seconds,
accompanied by an audible beep. If this happens, the
battery must be replaced.
IMPORTANT: Constant exposures to high or low humidity
may reduce battery life. A good safety measure is to
replace the battery at least once a year, or at the same
time as you change your clocks for daylight saving time.