Page is loading ...

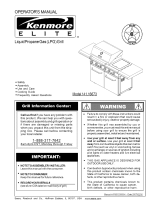
Operator's Manual:
Heavy Duty Rotisserie Kit for 314/5 Bumer
Kenmore Elite & Kenmore Premium Grills
Model 141.158033
CAUTION: It is recommended that you do not exceed 10 pounds when using your rotisserie.
Heavier foods can cause the rotisserie spit to flex excessively causing the rotisserie motor to be
overloaded due to imbalanced operation. Foods heavier than 10 pounds can be cooked by the
indirect method instead of using the rotisserie.
IMPORTANT SAFEGUARD
1. Read all instructions.
2. Always attach the assembled Rotisserie to your grill first, then plug the Cord
into an outlet. To disconnect, turn the Rotisserie "OFF" then remove the
Plug from outlet.
3. Most grill surfaces and Rotisserie parts are hot during and after cooking.
Use reasonable care around your grill and Rotisserie and wear insulated
cooking mitts.
4. To protect against electrical shock, do not immerse Electrical Cord, Plug or
Motor in water or expose to rain. Protect electrical elements from burners,
hot grill surfaces and grease.
5. Do not operate the Rotisserie if the cord or plug becomes damaged, or if
the Rotisserie malfunctions or has been damaged in any manner.
6. Do not let children operate your grill or Rotisserie. Do not let children play
nearby.
7. Unplug the Rotisserie from electrical outlet when not in use and before
cleaning. Allow to cool before adding or removing parts. When the Rotisserie
is not in use, store it indoors in a dry place.
8. The use of accessory attachments (baskets, rib racks, etc) is not recom-
mended by the manufacturer and may cause injuries. Do not use Rotisserie
for other than intended use.
9. When rotisserie cooking place a Cooking Pan under the food to be cooked.
This will capture the drippings and keep your grill clean of excess grease
which could cause a fire. Use caution when moving a Cooking Pan contain-
ing hot oils.
10. Never line the bottom of your grill bowl with aluminum foil, sand or any
grease absorbent substance.
11. Should a grease fire occur, turn the burners and gas off and leave the grill
lid CLOSED until the fire is out.
12. The Rotisserie Motor is set for 120V, 60 Hz AC current.
13. This Rotisserie is for outdoor use only.
14. A power-supply cord is provided to reduce the risk resulting from becoming
entangled in or tripping over a longer cord.
15. If necessary, longer detachable power-supply cords or extension cords are
available and may be used if care is exercised in their use.
1
P80132014H Rev:2007102116

16.
If a longer detachable power-supply cords or extension cord is used, (1) The
marked electrical rating of the cord set or extension cord should be at least
as great as the electrical rating of the appliance, and (2) The cord should
be arranged so that it will not drape over the countertop or tabletop where it
can be pulled on by children or tripped over unintentionally.
17. If the appliance is of the grounded type, the extension cord should be a
grounding-type 3-wire cord.
18. Outdoor extension cords should be used with outdoor use products and are
surface marked with suffix letters "W-A" and with a tag stating "suitable for
use with outdoor appliances."
19. The connection to an extension cord should be kept dry and off the
ground.
20. Store products indoors when not in use and out of the reach of children.
21. Do not clean this product with a water spray or the like.
22. SAVE THESE INSTRUCTIONS.
/_ WARNING
Your grill and rotisserie will get very hot. Never lean over the cooking area
while using your grill. Do not touch cooking surfaces, grill housing, grill lid or any
other grill parts or accessories while the grill is in operation, or until you are certain
the grill has cooled down after use. Failure to comply with these instructions may
result in serious bodily injury.
KEEP THIS OPERATOR'S MANUAL FOR FUTURE REFERENCE

Heavy Duty Rotisserie Assembly
Instructions
Tools required for assembly:
Adjustable wrench or pliers and either a Flat Head or Phillips Head Screwdriver.
Pre-Assembly Instructions
Before assembling your Rotisserie, use the parts list below to check that all necessary parts
have been included. Inspect parts for damage as you proceed. Do not assemble or operate
your Rotisserie if it appears damaged. If you are missinq parts or have questions durinq the
assembly process, call 1-888-317-7642, 8am -8pm CST, Monday throuqh Friday.
141.158033
KEY PART DESCRIPTION PART # QTY
1 Motor Bracket P03307002G 1
2 UNC Phillips Head Screws #10-24x3/4" $112G10124 2
3 UNC Hex Nut #10-24 $362G10124 2
4 Plain Washer 3/16" $411G03084 2
Chrome Spit: For 4 and 5 Burner P05508164F 1
5
6.5" Extension Chrome Spit: For 5 Burner Gas Grill P05508166F 1
6 Holding Forks P05508031A 2
7 Thumbscrews 1/4"x 1/2" $196G04081 2
8 Collar P05508032F 1
9 Bushing P05508033F 1
10 P,C Rotisserie Motor P07101025A 1
11 Thumbscrews 10x1/2" $196G10084 1
12 Spring Washer for 6.5" Extension Spit $431G04064 1
13 Extension Bracket P03308008C 1
14 Phillips Head Screws 3/8"x1/2" $112G06084 2
15 Phillips Head Screws 3/16"x7/8" $112G03144 2
16 Plain Washer 3/16" $411G03084 2
17 UNC Hex Nut #10-24 $362G10124 2
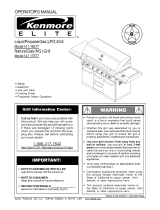
UNC Phillips Head Thumbscrews Thumbscrews
Screws #10-24x3/4" 1/4"xl/2" 10xl/2"
KEY #2 KEY #7 KEY #11
Phillips Head Screws
3/8"xl/2"
KEY #14
Phillips Head Screws
3/16"x7/8"
KEY #15
Extension Bracket
KEY #13
If your grill lid overlaps the side of the grill bowl where you would normally mount the rotisserie
mounting bracket, simply add extension bracket P03308008C to the side of your grill bowl and
then mount the rotisserie mounting bracket to this extension bracket. See Page 3, Figure 2

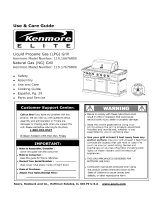
Assembling The Motor Bracket
Attach the Motor Bracket on the outside of the left grill bowl panel. Align the two holes of the
Bracket with the holes on the grill bowl. Tighten securely using two #10-24 x 3/4" UNC screws,
washers and nuts provided. (See fig. 1).
For some Kenmora grills with lid side panels that ovedap grill bowl side panels (See fig. 2)
Attach Extension Bracket on the outside of the lef_ grill bowl panel. Align the two holes of the bracket
with the holes on the grill bowl. Tighten securely using two Phillips Head Screws 3/16"x7/8", washer
and nuts provided. Then attach the Motor Bracket to the Extension Bracket using two Phillips Head
Screws 3/8"xl/2" and tighten securely.
Fig 1. Fig 2.
2
Outside of left
gdll bowl panel
1
14
13 Extension
Bracket
Outside of left
grill bowl panel_
15
0
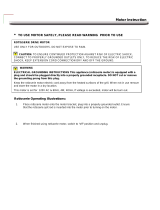
Assembling The Rotisserie
Slide the Spit through the piece of meat or poultry and the Holding Forks onto each end of
the Rotisserie Spit. Adjust spacing between Skewers to accommodate your food, then tighten
the Thumbscrews to keep the Food Skewers in position. Slide the Collar and Bushing onto the
threaded end of the Spit. Do not tighten the Collar Thumbscrew until the Rotisserie is placed
into your grill.
5
7
11
9
7
8

For Model 141.158033 31415 Burner Grill Rotisserie: It is
recommended that you add the extra 6.5" Extension Spit if you
are using Grill Models 16671, 16673 or 16235.
Screw the two Spit sections together using one Spring Washer. Tighten the sections together
using two wrenches. Slide the Holding Forks onto each end of the assembled Rotisserie Spit. Adjust
spacing between Skewers to accommodate your food, then tighten the Thumbscrews to keep the Food
Skewers in position. Slide the Collar and Bushing onto the threaded end of the Spit. Do not tighten
the Collar Thumbscrew until the Rotisserie is placed into your grill.
5
11
8
Extension Spit
Installing The Rotisserie Motor
Install the AC (altemating current) Rotisserie Motor onto the Motor Bracket as shown below. The
Motor attaches to the Bracket with the electrical cord DOWN, This installation ensures that Rotisserie
Motor is properly installed onto the Motor Bracket.
Rotisserie Motor
with electrical cord DOWN
Spit must be inserted
into the Motor

Installing The Rotisserie
Insert the assembled Rotisserie into the Motor as shown below. The Motor should be on the
left side of your grill. Place the Bushing into the slot opening on the right side of your grill
bowl, then tighten the Collar Thumbscrew to the left of the Bushing. The Collar will stabilize
the Rotisserie during the cooking process and the Bushing allows the Rotisserie Spit to turn
smoothly. Plug the Rotisserie into an outlet and tum on to test.
Thumbscrew Holding Forks Thumbscrew
Bushing
Spit Collar
The bushinq and collar must always be used with this Rotisserie.
BASIC TIPS FOR ROTISSERIE COOKING:
When Rotisserie cooking, use the Indirect Cooking Method. In other words, the burners at each end
of the grill are lit and the food is placed centrally on the Rotisserie, with no direct heat source
underneath. Some grill models offer a Rotisserie / Back Burner. In this case we do not recommend
the use of any Main Burners when you use the Rotisserie/Back Burner. To catch any drips from
the Rotisserie cooked food it will be necessary to remove the Cooking Grid(s) then place a drip
pan directly under the food. These drippings can be used for making gravies and other sauces to
accompany the cooked meats. This drip pan also collects grease which could otherwise collect in
your Grill Bowl and cause a grease fire.
Once your Rotisserie, food and drip pan are in position with the indirect heat source on, close the
grill lid. Cooking times on a Rotisserie will be approximately the same as for oven cooking. However,
temperature factors can affect actual cooking times. Watch the temperature carefully and monitor
your food frequently for best results. It is recommended that you use a meat thermometer to test
for the desired well-doneness of any foods prepared on a rotisserie.
ROTISSERIE COOKING CAN BE CONSIDERABLY SLOWER THAN DIRECT HEAT COOKING, BUT
THE RESULTS CAN BE WELL WORTH THE TIME AND EFFORT
Use caution and wear insulated cooking mitts when using your Grill, Rotisserie or Optional Cooking
accessories.
For more comprehensive information, refer to the Cooking Instructions and Cooking Guide in your
grill Operators Manual.
Sears Parts & Service
call anytime day or night:
1-800-4-MY-H OM E®
(1-800-469-4663)
/