Page is loading ...

FOR YOUR SAFETY
“WHAT TO DO IF YOU SMELL GAS”
• Do not try to light any appliance.
• Do not touch any electrical switch; do not use any
phone in your building.
• Immediately call your gas supplier from a neighbor’s
phone. Follow the gas supplier’s instructions.
• If you cannot reach your gas supplier, call the fire
department.
Do not use this LP Gas control on a Natural Gas
water heater. Improper operation could occur, re-
sulting in personal injury and/or death due to Car-
bon Monoxide poisoning, fire, or explosion. Check
for proper gas type as listed on the rating plate
affixed to the water heater.
This gas control is equipped with LEFT-HAND threads in
the outlet for use on LP gas water heaters where the
connection between the gas control and the main burner
manifold are with LEFT-HAND threads.
FAILURE TO READ AND FOLLOW ALL INSTRUCTIONS BEFORE INSTALLING OR OPERATING THIS
CONTROL COULD CAUSE PROPERTY DAMAGE, PERSONAL INJURY AND/OR DEATH.
RETAIN INSTRUCTIONS FOR FUTURE REFERENCE.
NOTE
WARNING
!
1. This control must be installed or serviced only by a
professional.
2. Do not use force when moving the gas control knob. If
you cannot turn the knob with hand pressure only, the
control must be replaced.
3. Do not use the control if the knob will not “pop up” after
being depressed while the knob is in the PILOT posi-
tion. The mechanism is damaged and the control must
be replaced. Shut off gas to the water heater.
4. For your safety, this control is supplied with tamper
resistant screws. Do not attempt to repair or adjust the
control. If you experience problems, replace the control
immediately. Continuing to use a damaged control
could result in fire and/or explosion.
5. LP gas is heavier than air. Leaking gas will settle near
the ground and will tend to accumulate.
6. An odorant has been added to the gas to help you
detect it. Before lighting, search for the odor of gas by
sniffing at floor level around the water heater.
7. In some situations, the gas may lose its odor. To detect
unodorized gas, you must have a gas detector which
can be purchased from your gas company. If you do not
have a detector and have the slightest suspicion that
gas may be present, get out of the house and call the
gas company. DO NOT RELY TOTALLY ON YOUR
NOSE.
8. If any problems or questions are encountered about the
safe use of LP gas, contact your local gas supplier.
Scald burns occur in under one second with 160°
water, which this thermostat will deliver if the
temperature dial is set at “VERY HOT”. Lower
settings of the temperature dial will reduce the risk
of scald and will reduce your fuel bill.
WARNING
!
A
B
C
P
I
L
O
T
L
I
G
H
T
I
N
G
L
O
W
H
O
T
V
E
R
Y
RISK OF SCALDING
INCREASES WITH
HOTTER WATER
CAUTION:
Printed in U.S.A.
WHITE-RODGERS DIVISION
EMERSON ELECTRIC CO.
9797 REAVIS ROAD
ST. LOUIS, MISSOURI 63123-5398
PART NO. 37-6093A
9912
37C72U
Water Heater Thermostat Control
Installation Instructions
(Left-Hand Outlet Thread Model)
FOR LP GAS ONLY
WHITE-RODGERS
Fixed Adjustment Main and Pilot Regulators
The main and pilot gas regulators require no field
service. They automatically control and maintain the
outlet main and pilot burner gas pressure.

2
INSTALLATION
REPLACEMENT INFORMATION
REMOVING OLD CONTROL
1. Shut off gas to water heater.
2. Shut off water at cold water inlet.
3. Connect hose to heater drain cock. Drain water to a
nearby drain. Open a hot water faucet for faster drain-
ing.
4. Disconnect gas line at union (figure 1). Remove piping
from old control.
5. Disconnect the:
a. Thermocouple (left side).
b. Pilot burner (small tube on the right side)
c. Main burner (large tube in the middle).
6. Remove the control by turning it counterclockwise
( ). If needed, a short piece of
1
/2” black iron pipe
can be screwed into the control inlet to increase lever-
age.
SPECIAL INSTALLATION NOTE
If replacing a Unitrol or Robertshaw control, install exten-
sion adaptor fitting provided into the outlet of the control.
INSTALLING NEW CONTROL
All piping must comply with local and state ordinances or
with the National Fuel Gas Code (ANSI Z223.1–NFPA 54),
whichever applies.
Dirt or contamination in the gas line can block the control
from operating creating a risk of explosion, injury or death.
To protect the control from dirt/contamination, a drip leg or
sediment trap (see Figure 1) must be installed in the piping
leading to the control.
1. Apply pipe joint compound to the male threads of
control, leaving the first two or three threads clean.
2. Install control in tank. Turn clockwise ( ). Use a
short piece of pipe to help in turning. Align the control so
that burner and pilot tubes may be connected.
NOTE
This control is equipped with LEFT-HAND threads on the
outlet of the control. Check the fitting on the burner assem-
bly to make sure the threads are also the LEFT-HAND type.
If the threads are not LEFT-HAND type, return the control to
the dealer and obtain an LP gas control with RIGHT-HAND
threads on the outlet.
3. Make burner, pilot, and thermocouple connections. Do
not use pipe joint compound or teflon tape. Thermo-
couple nut should be hand tightened and then turned an
additional
1
/4 turn with a small wrench. DO NOT OVER-
TIGHTEN.
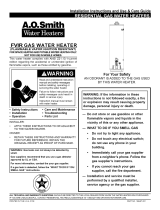
Figure 1. Typical gas connection
To pilot
burner
To main burner
To thermocouple
Drip leg
(sediment trap)
Pipe cap
Tee
Union
(metal-to-metal)
Gas shut-off
valve
Gas supply
pipe
A
B
C
P
I
L
O
T
L
I
G
H
T
I
N
G
L
O
W
H
O
T
V
E
R
Y
H
O
T
RISK OF SCALDING
INCREASES WITH
HOTTER WATER
CAUTION:
4. Connect gas line. Use new black iron pipe that has been
properly reamed. If old pipe is used, be sure it is clean
and free from rust and scale. Use pipe joint compound
on male threads only. (Use a pipe joint compound
approved for natural gas service.) Do not use TEFLON
tape. Do not apply compound to first two threads.
5. DO NOT use joint compound or tape on the union
connection.
6. To fill the water heater with water:
a. Close the water heater drain valve by turning the
handle to the right (clockwise). The drain valve is on
the lower front of the water heater.
b. Open the cold water supply valve to the water
heater.
NOTE
The cold water supply valve must be left open
when the water heater is in use.
c. To ensure complete filling of the tank, let air exit by
opening the nearest hot water faucet. Allow water to
run until a constant flow is obtained. This will let air
out of the water heater and the piping.
d. Check all new water piping for leaks. Repair as
needed.

3
Never use this water heater unless it is completely
filled with water. To prevent damage to the tank,
the tank must be filled with water. Water must flow
from the hot water faucet before turning ON gas to
the water heater.
7. Open gas shutoff valve.
8. BEFORE LIGHTING THE PILOT, CHECK THE GAS
LINES FOR LEAKS:
a. Use a soapy water solution. DO NOT test for gas
leaks using a match or open flame.
b. Brush the soapy water solution on all gas pipes,
joints, and fittings.
c. Check for bubbling soap. This means you have a
leak. Turn OFF the gas and make the necessary
repairs.
TO LIGHT APPLIANCE
6. Turn gas control knob counterclockwise
to “PILOT”.
7. Depress control knob all the way and hold down.
Immediately light the pilot with a match. Continue to
hold knob down for approximately one (1) minute after
pilot is lit. Release knob and it will pop back up. Pilot
should remain lit. If pilot goes out, repeat steps 2, 3, 6
and 7.
• If knob does not pop up when released, turn knob
clockwise to “OFF”. STOP and immediately call
your service technician or gas supplier.
• If the pilot will not stay lit after several tries, turn gas
control knob to “OFF” and call your service techni-
cian or gas supplier.
8. Replace inner and outer burner doors.
9. At arm's length away, turn gas control
knob counterclockwise to the full “ON”
position.
10. Align the water temperature dial mark ( ) with the
temperature pointer on the cover. This mark, indicative
of approximately 120°F, is the preferred starting point.
If hotter water is desired, see TEMPERATURE REGU-
LATION on page 4.
11. Check for leaks at the pilot and main burner fittings on
the gas control with the main burner firing. Use a soapy
water solution. If a leak is detected, turn the gas supply
off and make repairs.
NOTE
d. Recheck for leaks.
e. Rinse off soapy solution and wipe dry.
DO NOT USE OPEN FLAME OR ANY KIND OF
SPARK TO CHECK FOR LEAKS. Serious injury or
death from fire or explosion could result.
9. Affix the new Lighting Instruction label on the water
heater to cover the existing label.
The rating plate must be left visible for future reference.
1. Set control to lowest setting by turning the water tem-
perature dial clockwise ( ) to the “PILOT LIGHT-
ING” position. DO NOT FORCE.
2. Turn gas control knob clockwise to “OFF”.
Gas control knob must be depressed slightlyto turn
from "PILOT" to "OFF". Do not use tools or exces-
sive force.
3. Wait at least five (5) minutes to clear out any gas, and
then smell around the appliance area. If you smell gas,
STOP! Follow instructions “What to do if you smell
gas” on the first page of this instruction sheet. If you do
not detect gas, continue with the next step.
4. Remove inner and outer burner doors located on the
water heater under gas control unit.
5. Find pilot - follow small metal
tubes from gas control. The
pilot is located near the main
burner.
P
I
L
O
T
A
B
C
P
I
L
O
T
L
I
G
H
T
I
N
G
H
O
T
L
O
W
H
O
T
V
E
R
Y
H
O
T
RISK OF SCALDING
INCREASES WITH
HOTTER WATER
CAUTION:
GAS
CONTROL
KNOB
WATER
TEMPERATURE
DIAL
TEMPERATURE
POINTER
Figure 2. Gas Control Knob and
Water Temperature Dial
O
N
O
F
F
P
I
L
O
T
O
N
O
F
F
P
I
L
O
T
CAUTION
!
WARNING
!
NOTE
O
N
O
F
F
P
I
L
O
T
PILOT
BURNER
THERMO-
COUPLE

TEMPERATURE REGULATION
After the gas connections are made, water is in the heater
and the pilot light is ignited, the control must be set to the
desired water temperature.
The recommended water temperature dial setting is at the
arrow ( ). The water temperature out of the heater at this
setting will be approximately 120°F.
If you use hot water frequently and in short spurts, water
temperature can occasionally exceed the temperature set-
ting by up to 30°F because of the dynamics of the appliance.
The arrow ( ) setting is the safest and most economical. If
you want hotter water, rotate the water temperature dial
counterclockwise ( ) to a higher setting. Approximate
water temperature delivered at the different settings is
shown in the following table.
TO TURN OFF GAS TO APPLIANCE
Set the control to lowest setting by turning water tempera-
ture dial clockwise ( ) to the “PILOT LIGHTING”
position on dial (as shown in Figure 3). DO NOT FORCE.
Turn gas control knob clockwise to “PILOT”.
Turn gas control knob clockwise to “OFF”.
Gas control knob must be depressed slightly. Do not use
tools or excessive force.
NOTE
WARNING
!
O
N
O
F
F
P
I
L
O
T
To avoid scald injury, set the control at the lowest setting
which will still deliver your needed hot water.
The hotter the water the greater the risk of scald
injury and the shorter the time to cause injury.
Be sure to protect babies and the infirm or others with
impaired mobility who cannot get out of the hot water
quickly. They are the people most commonly hurt in
scald injuries and in need of lower temperature and other
protection like supervision, point-of-use temperature
control equipment or a system mixing valve. A point-of-
use valve or a system mixing valve can be obtained from
your plumber.
Never allow small children to use a hot water tap,
or to draw their own bath water. Never leave a child
or impaired person unattended in a bathtub or
shower. Scald burns can result.
APPROXIMATE APPROXIMATE
SETTING TEMPERATURE TIME TO
(°F) CAUSE INJURY
( ) 120° ±10° 5 Minutes
A 130° ±10° 30 Seconds
B 140° ±10° 5 Seconds
C 150° ±10° 1.5 Second
VERY
160° ±10° Under 1 Second
HOT
Review and leave these instructions with the consumer!
O
N
O
F
F
P
I
L
O
T
P
I
L
O
T
A
B
C
P
I
L
O
T
L
I
G
H
T
I
N
G
H
O
T
L
O
W
H
O
T
V
E
R
Y
H
O
T
RISK OF SCALDING
INCREASES WITH
HOTTER WATER
CAUTION:
WATER
TEMPERATURE
DIAL
TEMPERATURE
POINTER
Figure 3. Water Temperature Dial
WARNING
!
/