Edelbrock Edelbrock Supercharger Kit #15885 For Ford Coyote 5.0 V8 Swap Installation guide

Type
Installation guide

This manual is also suitable for

Edelbrock Edelbrock Supercharger Kit #15885 For Ford Coyote 5.0 V8 Swap is a universal supercharger system, featuring Eaton’s Gen VI 2650 TVS Supercharger rotors for maximum flow, quiet operation, and superior reliability. It's designed for 2011-2019 Ford Coyote 5.0L engines and allows for easy fitment under the hood and cowl without sacrificing performance. The kit includes a uniquely styled plenum with matching side covers for a sleek look. Installation requires a front-mount, Low Temperature Radiator (LTR) not included with the kit.

Edelbrock Edelbrock Supercharger Kit #15885 For Ford Coyote 5.0 V8 Swap is a universal supercharger system, featuring Eaton’s Gen VI 2650 TVS Supercharger rotors for maximum flow, quiet operation, and superior reliability. It's designed for 2011-2019 Ford Coyote 5.0L engines and allows for easy fitment under the hood and cowl without sacrificing performance. The kit includes a uniquely styled plenum with matching side covers for a sleek look. Installation requires a front-mount, Low Temperature Radiator (LTR) not included with the kit.

Edelbrock Supercharger
Universal Supercharger for 2011-2019 Ford Coyote 5.0L Engines
Part #: 15885
Picture for reference only. Additional equipment not included.
WARNING!
The supercharger bypass valve is factory installed and adjusted intended to be vacuum oper-
ated only. DO NOT move the solenoid actuator lever by hand or adjust the stop point. Moving
the lever manually will damage the solenoid and the system will not function properly. Dam-
age to the bypass assembly from manual movement will not be covered under manufacture
warranty.
Edelbrock Universal Supercharger System
2011-2019 Ford Coyote 5.0L
Installation Instructions
Page 3
©2019 Edelbrock LLC
Part #15885
Brochure #63-15885
Rev. 8/27/19 - TB
Thank you for purchasing the Edelbrock Supercharger System for the 2011-2019 Coyote 5.0L. This Edelbrock
Supercharger System utilizes Eaton’s Gen VI 2650 TVS Supercharger rotors, featuring 4 x 4 lobe design with 160° of twist
for maximum flow, minimum temperature rise, quiet operation, and superior reliability. The supercharger is inverted,
expelling the air upward. Boost pressure then builds in the plenum before being pushed through the intercooler that
is oriented horizontally above the supercharger outlet. After passing through the intercooler core twice, the air travels
through the long runners which route straight down into the cylinder head ports. This configuration allows for a compact
package that can more easily fit under the hood and cowl of vehicles without sacrificing runner length or intercooler area.
The supercharger features a uniquely styled plenum and includes matching side covers so it looks as good as it performs.
Installation time: Will vary depending on vehicle application.
INTRODUCTION
TOOLS REQUIRED
l Jack and Jack Stands OR Service Lift
l Ratchet and Socket Set including 7mm, 8mm (deep),
10mm, 10mm (deep), 12mm, 13mm, 15mm
l 5mm & 6mm Allen Sockets
l 19mm Wrench
l 3/8” Breaker Bar
l Screwdrivers
l 90° Power Drill
l Pliers OR Hose Clamp Pliers
l Blue Thread Lock Fluid
l O-ring Lube
l Masking Tape
l Torque Wrench
l Shop Vac
l Side cutters
l Dremel tool or equivalent
l Motocraft Antifreeze/Coolant (quantity depends on
radiator used)
l VC-3DIL-B Orange Pre-Diluted (quantity depends on
low temp radiator used)
This universal supercharger requires a front-mount, Low Temperature Radiator (LTR) also
known as a heat exchanger that is not included with this kit. Edelbrock offers a variety of heat
exchanger sizes to fit your custom application. See the Universal Heat Exchanger section of our
catalog or visit www.edelbrock.com for details.
Edelbrock Universal Supercharger System
2011-2019 Ford Coyote 5.0L
Installation Instructions
Page 4
©2019 Edelbrock LLC
Part #15885
Brochure #63-15885
Rev. 8/27/19 - TB
Due to the complexity of the Edelbrock Supercharging system, it is recommended that this system only be
installed by a qualified professional with access to a service lift, pneumatic tools, and a strong familiarity with
automotive service procedures. Please contact the Edelbrock Technical Support department if you have any
questions regarding this system.
Proper installation is the responsibility of the installer. Improper installation will void all
manufacture’s standard warranties and may result in poor performance and engine or vehicle
damage.
Inspect all components for damage that may have occurred in transit before beginning
installation. If any parts are missing or damaged, contact Edelbrock Technical Support, not your
parts distributor.
This supercharger kit requires a custom ECM calibration. Failure to use an appropriate ECM cali-
bration will result in engine failure.
WARNING: Installation of this supercharger will result in a significant change to the
performance characteristics of your vehicle. It is highly recommended that you take some
time to familiarize yourself with the added power, and how it is delivered, in a controlled
environment. Take extra care on wet and slippery roads, as the rear tires will be more likely
to lose traction, with the added power. It is never recommended to turn off your vehicles
traction control system.
IMPORTANT WARNINGS
91 octane or higher gasoline is required at all times. If your vehicle
has been filled with anything less, it must be run until almost dry and
refilled with 91 or higher octane gasoline twice prior to installation.
Any failures associated with not using premium 91 octane gasoline
or higher, will be ineligible for warranty repairs.
It is recommended that you check the Edelbrock Tech Center Website for any updates to this installation
manual. Please refer to the lower right hand corner to verify that you have the latest revision of this
installation manual before beginning the installation.
Tech Center: http://www.edelbrock.com/automotive_new/misc/tech_center/install/index.php
Edelbrock Authorized Installer Disclaimer
Authorized installers of Edelbrock products are independent companies over which Edelbrock has no right of control. Edelbrock
LLC makes no claims regarding the abilities, expertise or competency of individual employees of any authorized installer. Each
authorized installer is an independent company and makes its own independent judgments. Edelbrock LLC specifically disclaims
any responsibility to any party including third parties for the actions, or the failure to act, of individuals, agents or a company
authorized in the installation of Edelbrock LLC products.
Edelbrock Universal Supercharger System
2011-2019 Ford Coyote 5.0L
Installation Instructions
Page 5
©2019 Edelbrock LLC
Part #15885
Brochure #63-15885
Rev. 8/27/19 - TB
INSTALLATION HARDWARE IDENTIFICATION GUIDE
(Parts Are Not To Scale)
BAG #1 - MANIFOLD HARDWARE
Item P/N QTY. Description Torque Spec
1 36-1508 10 Bolt, Hex Flange, M6 x 30mm 8 ft/lbs
2 36-1575 2 Bolt, Hex Flange, M6 x 25mm N/A
3 38-0186 8 Bracket, Injector N/A
4 51-7092 1 Rubber Plug N/A
5 68-0095 16 Bolt, BHCS, M4 x 4mm N/A
6 36-1528 4 Bolt, SHCS, M6 x 16mm N/A
BAG #2 - FEAD HARDWARE
Item P/N QTY. Description Torque Spec
1 36-4056 1 Bolt, Hex Flange, M10 x 110mm 22 ft-lbs
2 36-4012 1 Bolt, Hex Flange, M10 x 65mm 32 ft-lbs
3 36-4018 3 Bolt, Hex Flange, M8 x 20mm N/A
4 36-1507 1 Bolt, Hex Flange, M6 x 16mm N/A
5 36-3812 3 Bolt, SHCS, M8 x 90mm 22 ft-lbs
6 36-4013 1 Bolt, SHCS, M10 x 45mm 22 ft-lbs
7 36-4041 1 Bolt, SHCS, M8 x 40mm 22 ft-lbs
8 36-4057 1 Bolt, SHCS, M8 x 20mm 22 ft-lbs
9 36-4014 1 Bolt, Countersunk, M8 x 25mm 22 ft-lbs
10 82-0120 3 M8 Washer N/A
11 36-4060 1 Brass Shim N/A
12 51-7058 1 Tap, 8 x 1.25, D5 Pitch Dia N/A
13 51-7059 1 Size H Drill Bit N/A
BAG #3 - INTERCOOLER HARDWARE
Item P/N QTY. Description Torque Spec
1 51-7056 1
10mm Quick Disconnect to
Barb Fitting
N/A
2 46-2155 8 3/4” Hose Clamp N/A
3 51-7045 2 1/2” Hose Clamp N/A
4 51-4141 1
3/8” ID X 7/8” OD Rubber
Grommet
N/A
5 36-1518 1
M8 x 1.25 x 30mm Hex Flange
Bolt
N/A
6 36-1507 4
M6 x 1 x 16mm Hex Flange
Bolt
N/A
7 36-1545 3
M6 x 1 x 12mm Hex Flange
Bolt
N/A
8 36-1546 2
#8-16 X 3/8”
Thread Forming Screw
N/A
Edelbrock Universal Supercharger System
2011-2019 Ford Coyote 5.0L
Installation Instructions
Page 6
©2019 Edelbrock LLC
Part #15885
Brochure #63-15885
Rev. 8/27/19 - TB
WIRE HARNESS GUIDE
Power
Supply Wire
EVAP Solenoid
Engine Harness
(EVAP Connector)
ACT Sensor
MAF Sensor
Engine Harness
(MAF Connector)
Fuse
Relay
Ground Strap
Intercooler
Water Pump
WIRE HARNESSES
Item P/N QTY. Description
1 37-6627 1 ACT/MAF Sensor Harness
2 37-6626 1 ETC Extension Harness
3 37-1574 1 Water Pump/EVAP Harness
Edelbrock Universal Supercharger System
2011-2019 Ford Coyote 5.0L
Installation Instructions
Page 7
©2019 Edelbrock LLC
Part #15885
Brochure #63-15885
Rev. 8/27/19 - TB
INTERCOOLER HOSE ROUTING GUIDE
Hose routing will differ from the diagram above depending on the application. Use the above diagram
as a guide for bulk hose routing that is supplied with this kit.
©2019 Edelbrock LLC
Part #15885
Brochure #63-15885
Rev. 8/27/19 - TB
Edelbrock Universal Supercharger System
2011-2019 Ford Coyote 5.0L
Installation Instructions
Page 8
6. If applicable, disconnect the brake aspirator hose from
the manifold PCV hose.
7. If applicable, use a flathead screwdriver to loosen the
two (2) worm clamps securing the air inlet tube and
remove.
8. Disconnect the connector and hose from the EVAP
solenoid.
SUPERCHARGER INSTALLATION
NOTE: These installation instructions are meant to be a
general guideline that covers installation of Edelbrock
supplied components. Some of the following steps
may not apply to your specific application. Additional
materials and procedures may be required to complete
this installation.
1. Disconnect the negative battery terminal and place it
away from the battery. Cover the post to avoid accidental
contact during the installation.
2. Drain the coolant by loosening the petcock located on
the radiator.
3. If applicable, remove the brake aspirator hose from the
air inlet tube.
4. If applicable, remove the driver side PCV hose from the
air inlet tube.
5. If applicable, remove the additional brake aspirator hose
from the air inlet tube.
2015-17
2018+
©2019 Edelbrock LLC
Part #15885
Brochure #63-15885
Rev. 8/27/19 - TB
Edelbrock Universal Supercharger System
2011-2019 Ford Coyote 5.0L
Installation Instructions
Page 9
13. Using an 10mm socket, remove four (4) bolts securing
the heater hose retaining brackets.
14. Remove the retaining brackets and the foam insulators
from the fuel rails.
15. Disconnect eight (8) fuel injector connectors.
9. If applicable, use a hose clamp tool and pliers to remove
the brake aspirator hose from the intake manifold.
10. If applicable, remove the brake aspirator hose assembly
from the brake booster and set aside as it will be reused later.
11. Remove the passenger side PCV hose from the valve
cover and the intake manifold.
12. Disconnect the throttle body connector.
©2019 Edelbrock LLC
Part #15885
Brochure #63-15885
Rev. 8/27/19 - TB
Edelbrock Universal Supercharger System
2011-2019 Ford Coyote 5.0L
Installation Instructions
Page 10
16. Place a rag underneath the fuel input line. Lift up the
blue locking tab and disconnect the fuel line from the rail.
17. Using a 10mm socket, remove four (4) bolts securing
the fuel rail and manifold. TIP: It’s not required to fully
remove the fuel rails.
18. Using an 8mm socket, remove six (6) manifold bolts.
19. With the manifold bolts removed, carefully position the
manifold forward and remove four (4) sensor connectors
and two (2) harness clips.
20. Clean the cylinder head flanges as needed and tape up
the ports to prevent debris from falling into the ports.
21. Rotate the belt tensioner counterclockwise using a
15mm breaker bar and remove the drive belt.
©2019 Edelbrock LLC
Part #15885
Brochure #63-15885
Rev. 8/27/19 - TB
Edelbrock Universal Supercharger System
2011-2019 Ford Coyote 5.0L
Installation Instructions
Page 11
22. Remove the two (2) indicated engine cover bolts on the
using a 10mm socket. Using a 90˚ drill and the supplied drill
bit, drill out the indicated hole on the front engine cover
1.01” deep. (NOTE: The center hole on some vehicles
will already be drilled and tapped by the factory. Please
inspect your front cover and avoid drilling this hole if
already tapped.) If not already tapped, the hole in the
center should be drilled .72” deep. All holes should be
tapped to M8 x 1.25 with the supplied tap.
.72” Deep
1.01” Deep
Engine Cover Bolt
Drill and Tapped
by Factory
Engine Cover Bolt
23. Secure the new tensioner bracket to the bosses that
were just drilled and tapped with bolts supplied in Bag # 2.
(NOTE: When installing the countersunk bolt, place the
.045” thick brass spacer between the bracket and the
front engine cover if the hole was drilled and tapped by
the factory.)
24. Apply blue thread lock fluid to threads and loosely install
the following four (4) bolts from Bag # 2, starting with the
M8 x 25mm countersunk bolt into the countersunk feature
of the bracket located on the left side of the bracket. Install
the M8 x 90mm bolt through the engine cover hole at the
top, then install the M8 x 40mm bolt through the hole below
and to the right. Use an M8 x 90mm bolt in the counter bore
feature at the lower left section of the bracket. Proceed by
tightening the countersunk bolt first and then tightening the
remaining surrounding bolts. Torque all bolts to 22 ft-lbs.
90mm
25mm (CS)
40mm
90mm
25. Using a 13mm socket, remove the factory tensioner
adjacent to the alternator and balancer.
©2019 Edelbrock LLC
Part #15885
Brochure #63-15885
Rev. 8/27/19 - TB
Edelbrock Universal Supercharger System
2011-2019 Ford Coyote 5.0L
Installation Instructions
Page 12
26. Remove both the engine cover bolt using a 10mm
socket and the bolt through the ear of the alternator using
a 15mm socket.
27. Secure the idler bracket by installing bolts from Bag #
2. The M10 x 110mm bolt through the ear of the alternator,
the M8 x 90mm bolt into the top front cover hole, and the
M8 x 45mm bolt through the lower hole that was used to
secure the stock tensioner. Use blue thread lock fluid on all
of the bolt threads and torque all bolts to 22 ft-lbs.
110mm
45mm
90mm
28. Install and secure the 76mm idler pulley onto the
center of the idler bracket by using the M8 Washer and
the M8 x 20mm bolt supplied in Bag # 3 using a 12mm
socket. Use blue thread lock fluid on the bolt threads and
torque to 18 ft-lbs.
29. Verify that the tensioner is clocked correctly by sliding
the index through the hole on the bracket. Install the supplied
belt around the tensioner pulley and torque the 65mm bolt
supplied in Bag # 3 with a 15mm socket to 32 ft-lbs.
30. Using the M8 x 20mm bolts and M8 washers supplied
in Bag # 2, install two idler pulleys to the tensioner bracket.
The top idler pulley is 65mm and the lower idler is 76mm.
Add a small amount of blue thread lock fluid to the threads
ONLY, do not allow excess thread lock fluid to drip onto the
pulley’s bearings. Torque the bolts to 18 ft-lbs.
31. Remove the OEM coil covers on each valve cover
to access the ignition coils and spark plugs. Unclip each
connector and use an 8mm socket to unbolt each coil
pack. Label and remove each coil pack so that they are
re-installed in the correct cylinder. Remove the spark plugs
with a 5/8” spark plug socket and replace them with the
supplied spark plugs. NOTE: Gap the supplied spark
plugs to .035. Reinstall the plugs and torque them to 9 ft-
lbs., then reinstall the OEM coils and coil covers.
©2019 Edelbrock LLC
Part #15885
Brochure #63-15885
Rev. 8/27/19 - TB
Edelbrock Universal Supercharger System
2011-2019 Ford Coyote 5.0L
Installation Instructions
Page 13
32. Gen I & II Only: Trim off the square coil harness
retaining tabs located on the top of both valve covers.
File down any rough edges. Also, trim off the top
of the rear round edge of the passenger side valve
cover. Carefully remove all debris with a shop vac.
33. Place a rag under the passenger side heater hose and
remove the heater hose from the fitting located on the
cylinder head. Repeat for the driver side heater hose.
34. Remove the passenger side heater hose fitting with an
8mm socket. Repeat for the driver side heater hose fitting.
Temporarily plug the holes with a rag.
35. Remove the O-ring manifold gaskets from the
factory manifold and install them onto the supercharger
runners. Apply a small amount of O-ring lubricant
to the exposed area of the gaskets. This will help
prevent tears during installation of the supercharger.
36. If using side covers (not included) Apply blue thread
lock fluid onto the threads of the eight (8) M6 x 12mm SHCS
bolts from the side cover kit and loosely screw on the side
cover brackets to the underside of the supercharger lid.
37. For proper bracket alignment, test fit the side covers
onto the brackets using eight (8) M6 X 25mm bolts
from the side cover kit. While pushing the side covers
forward, fully tighten the bracket bolts. Once all brackets
are aligned and tightened, remove the side covers.
©2019 Edelbrock LLC
Part #15885
Brochure #63-15885
Rev. 8/27/19 - TB
Edelbrock Universal Supercharger System
2011-2019 Ford Coyote 5.0L
Installation Instructions
Page 14
41. Apply fuel resistant thread sealer to the threads of
the fuel pressure sensor adapter. Thread the adapter
into the supercharger fuel rail until snug. Ensure not to
overtighten and strip threads. Apply the same thread
sealer to the fuel pressure sensor and thread it into the
adapter. Prevent the adapter from twisting in further
with a second wrench. Optionally continue to twist
the sensor once snug until it aligns with fuel rail.
42. Temporally install the fuel rail assembly onto the
supercharger manifold.
43. Be sure that the engine bay is clean and free of debris,
then remove the masking tape used to protect the intake
ports from contamination. NOTE: Gen I Coyote Engines
will require the water neck to be clearanced on the left
side of the engine for supercharger runner clearance.
44. With the help of an assistant, carefully lower the
supercharger manifold onto the cylinder heads. Be
especially careful not to pinch any wires between the
supercharger and the cylinder heads. (RHD vehicles may
require additional trimming for supercharger lid
clearance).
38. Using O-ring lube, install the fuel caps onto the fuel
rails. Attach the supplied fuel crossover to the rear of both
rails. Insert the straight fittings into the fuel rails as shown.
NOTE: For cars without Direct Injection. you must block
off all ports on the fuel rails except for the driver side
barb. Use the supplied -6AN plugs provided in this kit.
Passenger
Side
Driver
Side
39. Apply O-ring lube to both ends of the fuel injectors
(not included), then install them into the supplied fuel rails,
oriented so the electrical connectors will face away from
the supercharger.
Steps 40 and 41 are for 5.2L and Gen III Coyote Engines.
40. Remove the factory fuel pressure sensor from the
driver side factory fuel rail.
©2019 Edelbrock LLC
Part #15885
Brochure #63-15885
Rev. 8/27/19 - TB
Edelbrock Universal Supercharger System
2011-2019 Ford Coyote 5.0L
Installation Instructions
Page 15
45. Dismount the fuel rails and move them away from the
supercharger to access the supercharger manifold bolts.
Secure the supercharger manifold to the cylinder heads
using a 10mm swivel socket to install ten (10) M6 x 30mm
intake manifold bolts supplied in hardware Bag # 1. Using
the torque sequence below, torque the bolts to 8 ft-lbs.
46. Install the fuel rails and secure using four (4) M6 x 16mm
bolts from Bag # 1. Bolt holes are located beneath the fuel rail.
Start fuel rail bolts BY HAND first and make sure thread
engagement is smooth before tightening with tool.
47. Reconnect the injector connectors to the appropriate
fuel injectors. WARNING: Never attempt to rotate the
injectors.
48. Install the passenger side heater hose fitting.
49. Connect the passenger side heater hose.
50. Use a 3/8” breaker bar to rotate the tensioner clockwise,
finish installing the supplied belt according to the routing
diagram shown below.
IDLER
S/C
IDLER
CRANK
WATER
PUMP
TENSIONER
IDLER
ALT.
IDLER
51. Attach the water pump to the water pump bracket by
sliding the rubber isolator over the pump motor then onto
the bracket. NOTE: Bracket shown not actual.
52. Mount the water pump/bracket assembly in a coinvent
location as close to the LTR as possible.
©2019 Edelbrock LLC
Part #15885
Brochure #63-15885
Rev. 8/27/19 - TB
Edelbrock Universal Supercharger System
2011-2019 Ford Coyote 5.0L
Installation Instructions
Page 16
56. Using an appropriate length of bulk hose, connect the
water pump outlet to the LTR inlet and secure each end
with a 3/4” hose clamp from Bag #3. Image for
representation only.
57. Using an appropriate length of bulk hose, connect the
manifold outlet (passenger side top fitting) to the reservoir
and secure each end with a 3/4” hose clamp from Bag #3.
Image for representation only.
58. Using an appropriate length of bulk hose, connect the
LTR to manifold inlet (passenger side bottom fitting) and
secure each end with a 3/4” hose clamp from Bag #3.
Image for representation only.
53. Mount the low temperature radiator (LTR) in the front
of the vehicle so that it is not restricted from airflow.
NOTE: LTR NOT Included.
54. Attach the surge tank bracket to the surge tank using
two (2) M6 x 12mm bolts from Hardware Bag # 3 and mount
the tank/bracket assembly in an appropriate location.
55. Using an appropriate length of bulk hose, connect the
intercooler reservoir to the water pump inlet and secure
both ends with a 3/4” hose clamp from Bag #3. Image for
representation only.
©2019 Edelbrock LLC
Part #15885
Brochure #63-15885
Rev. 8/27/19 - TB
Edelbrock Universal Supercharger System
2011-2019 Ford Coyote 5.0L
Installation Instructions
Page 17
63. Connect the factory EVAP connector onto the “Engine
Harness” end of the “Water Pump/EVAP Harness” and
the “EVAP Solenoid” end onto the EVAP solenoid.
64. Route the water pump harness to the electric water
pump and instert the connector.
65. Secure all water pump harness wires away from any
moving parts or sharp objects.
66. Using a 8mm socket, Install the adapter and
throttle body of your choice. Two adapters have been
provided to cover most throttle body configurations.
67. Reconnect the throttle body using the provided
extension harness.
68. Plug the MAF/ Temp wiring harness into the Temp
sensor located at the back of the manifold on the passenger
side. Route the harness from the passenger side to the
driver side behind the manifold. Then route the remaining
length along the driver side heater hose.
59. Using a razor blade, or equivalent, remove the 90°
quick connect fitting on the factory passenger side PCV
hose.
60. Attach the 90° fitting onto the supplied 1/2” Cadbar
hose. Connect the quick connect fitting to the passenger
side valve cover and the other end of the hose to the barb
on the supercharger nose.
61. Mount the water pump/EVAP harness in an appropriate
location.
62. Route the Power (+) wire on the water pump harness
to positive battery power. Attach the Ground (-) wire on the
water pump harness to an appropriate location on the body
of the vehicle. Images for representation only.
©2019 Edelbrock LLC
Part #15885
Brochure #63-15885
Rev. 8/27/19 - TB
Edelbrock Universal Supercharger System
2011-2019 Ford Coyote 5.0L
Installation Instructions
Page 18
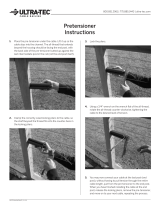
69. Connect the 90° fitting on the supplied driver side PCV
hose to the driver side valve cover. Connect the other end
to the fitting (supplied in bag #3) to your choice of air intake
piping. The grommet in bag #3 is for use with the 10mm
fitting. Image for representation only.
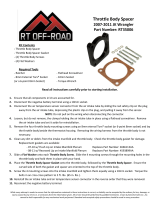
70. Install the factory MAF sensor into the supplied MAF
housing using the included pan head screws in Bag #3.
71. Using the provided worm clamps, attach the MAF
housing to your choice of intake piping and secure the
provided air filter.
72. Connect the engine harness to the connector on the
MAF/Temp harness then attach the MAF/Temp harness to
the MAF Sensor.
73. If applicable, reinstall any brake booster/aspirator and
EVAP hoses to an appropriate location.
NOTE: The following installation steps are for the
optional coil covers, part# 41149. They can be purchased
separately through www.edelbrock.com, or your local
distributor.
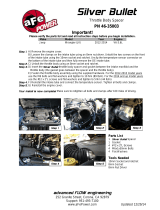
74. Using the eight (8) M6 x 25mm bolts from the side
cover kit, secure the side covers to the side cover brackets
previously installed (See steps 35 & 36). Note that the
passenger side cover will have a clearance notch.
75. Install four (4) M6 x 8mm bolts from the side cover kit
to both side covers as shown.
76. Verify that the coolant petcock is closed, then refill the
coolant system.
77. Fill the supercharger surge tank with a 50/50 coolant
and water mixture. NOTE: Please see “How to Prime
the Edelbrock Intercooler Systems” at the end of
these instructions for detailed instructions.
78. Turn the ignition on but do not start the engine. Check
for any fuel or coolant leaks. If leaks are present, shut the
ignition off immediately and repair leaks before continuing.
Verify that water is flowing briskly through the recovery
tank.
79. After a proper engine calibration is loaded, start the
engine and let the it come up to operating temperature,
then shut it off and recheck all fluid levels. Top fluids off
if necessary.
Congratulations on the installation of your new Edelbrock
Supercharger System. If you have any questions, please
call our Technical Support hotline and one of our technicians
will be happy to assist you.
©2019 Edelbrock LLC
Part #15885
Brochure #63-15885
Rev. 8/27/19 - TB
Edelbrock Universal Supercharger System
2011-2019 Ford Coyote 5.0L
Installation Instructions
Page 19
How to Prime the Edelbrock Intercooler Systems.
The electric water pump used on this Edelbrock Supercharger System has a built-in micro-
processor that will vary pump cycle speed when air bubbles are present in the system. If a
significant amount of air is trapped in the system, the pump may cycle at a slower speed and
pulsations are likely to occur resulting in poor cooling performance.
For the best result, it is highly recommended to use a Radiator Cooling System Vacuum Purge and Refill Kit to properly
evacuate the air from the intercooler system before filling with a 50/50 mixture of coolant and distilled water. If one is not
available, the following procedure will be adequate.
1. Using the Lisle 24680 Spill-Free Funnel, or equivalent, secure the appropriate filler neck adapter to the surge tank.
2. Attach the funnel and fill with a 50/50 mixture of coolant and distilled water until the funnel is half full.
3. Turn the ignition to the ON position and listen for the pump’s electric motor to cycle. Air bubbles will begin to purge from
the system as the coolant level drops. Add coolant to the funnel as necessary. NOTE: Do NOT let the coolant level in
the funnel run empty as this may introduce air into the system.
4. To build more pressure in the intercooler system, try squeezing the intercooler hoses while the pump is cycling. Building
pressure in the system will help purge the trapped air from the intercooler system.
5. Cycle the ignition OFF and wait a few seconds for the pump to come to a stop.
6. Cycle the ignition ON again and repeat until the sound of the electric pump is continuous without any pulsation. NOTE:
During water pump start-up, it is normal for a slight pulsation to occur. Once the pump has reached its maximum cycle
speed, no pulsations should be present.
7. Periodically inspect the water pump flow after a few drive cycles and re-fill the intercooler system as necessary.
8. Several drive cycles may be required to completely purge the air from the intercooler system. During a drive cycle, the
intercooler system will build up pressure as the supercharger temperature increases. Any residual air trapped in the
system will gradually bleed out of the surge tank as the system reaches a pressure above 5psi.
WARNING: Always avoid removing the surge tank cap when the engine is hot. The hot coolant is under
pressure and may spray out causing burns.
  • Page 1 1
  • Page 2 2
  • Page 3 3
  • Page 4 4
  • Page 5 5
  • Page 6 6
  • Page 7 7
  • Page 8 8
  • Page 9 9
  • Page 10 10
  • Page 11 11
  • Page 12 12
  • Page 13 13
  • Page 14 14
  • Page 15 15
  • Page 16 16
  • Page 17 17
  • Page 18 18
  • Page 19 19

Edelbrock Edelbrock Supercharger Kit #15885 For Ford Coyote 5.0 V8 Swap Installation guide

Type
Installation guide
This manual is also suitable for

Edelbrock Edelbrock Supercharger Kit #15885 For Ford Coyote 5.0 V8 Swap is a universal supercharger system, featuring Eaton’s Gen VI 2650 TVS Supercharger rotors for maximum flow, quiet operation, and superior reliability. It's designed for 2011-2019 Ford Coyote 5.0L engines and allows for easy fitment under the hood and cowl without sacrificing performance. The kit includes a uniquely styled plenum with matching side covers for a sleek look. Installation requires a front-mount, Low Temperature Radiator (LTR) not included with the kit.

Ask a question and I''ll find the answer in the document

Finding information in a document is now easier with AI