Page is loading ...

PRO-93GXi
User Guide
MAXIMUM
PERFORMANCE
Laser/Radar Detector

2
Welcome
Thank you for choosing a Whistler product. We are dedicated to
providing products that represent both quality and value. Please
read the User Guide carefully before using this product. If you have
additional questions visit our website at
www.whistlergroup.com
Tel (479) 273-6012
8am to 5pm CT, Monday through Friday
to speak to a Customer Service Representative.
Whistler has utilized its Maximum Performance antenna design and
added new features made specifically for the European market. This
model not only includes features common with Whistler’s high end
models such as Ka Max Mode, RSID, LSID and Real Voice
®
but also
includes the following new features not found in USA models;
• Ka Narrow
• Adjustable Laser Segments (which include: TraffiPatrol XR,
Riegl, Jenoptik, Laveg, Truespeed and laser guns with “Stealth”
modes)
• Selectable Ramp Mode
• Selectable Speed Volume
• Selectable Speed Mute
To utilize your unit to its full potential, we recommend reading this
entire manual or visit our FAQ page on our web site
www.whistlergroup.com.
Enjoy your new Whistler Radar Detector and please drive safely.
Sincerely,
The Whistler Group, Inc.
INTRODUCTION

3
TABLE OF CONTENT
Model Features Summary ........................................................ 5 - 7
Installation ..................................................................................8 - 11
• Mounting Guidelines
• Windshield Mounting
• Power Cord Connection
• Installing the Hardwire Kit
• Fuse Replacement
Operation ............................................................................... 12 - 29
• Power On and Self-Test
• Setting Saver
• Memory/Beep Confirmation
• Auto Level Adjustment
• Speed Mute
• Speed Volume
• Auto Quiet/Quiet Modes
• Highway Mode
• Understanding the Display
• City/City 1/City2 Modes
• Selectable Signal Strength Meter
• Alert Periscopes
• Dim/Dark/Auto Dim Modes
• Integrated Real Voice
• INTELLICORD
®
Ready
• Redlight / Speed Camera Detection
• Getting Satellite Lock
• Camera Alerts
• Manual Entry
• Updating Database
• Updating Firmware
• Vehicle Battery Saver Mode
• Teach/Tutorial Mode
• X/K Filter Mode
• Ka Filter Mode
• FDSR/TFSR Rejection Modes

4
TABLE OF CONTENT
• Ka Max Mode
• Ka Narrow Mode
• Radar Signature ID (RSID) w/Voice Prompts
• Laser Signature ID (LSID)
• Adjustable Laser
• POP™ Mode Detection
• VG-2 Detection Mode
• Alert Priority
• Option Select Mode
• Stay Alert™
Radar/Laser Alerts ......................................................................... 30
• Laser/Radar Alerts
• Laser Audio/Visual Alerts
• Pulse Protection
®
Reset Features ................................................................................ 31
Troubleshooting ..................................................................... 32 - 33
• Care and Maintenance
Speed Monitoring Technologies ......................................... 34 - 37
• Are Detectors Legal?
• POP™ Mode
• Laser Facts
• Laser Tips
• Radar Facts
• Other Speed Detection Systems
• Radar Detector Detectors
Warranty Information ............................................................ 38 - 40
Specifications .................................................................................. 41
Accessories ...................................................................................... 42

5
FEATURES
Feature Listings of PRO-93GXi
14
1
2
6
7
8
9
10
11
13
3
4
5
11
15
16
17
12

6
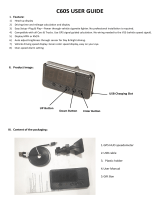
Whistler’s ergonomic and user-friendly design provides a new
level of operating convenience. Special features include:
1. Bracket Release Button - provides quick and easy
release of the mounting bracket.
2. Speaker - provides distinct audio warnings for X, K, Ka
band radar, Safety Warning System, and laser.
3. Mounting Bracket Location - slot holds mounting
bracket firmly.
4. Radar Antenna - compact, high-efficiency antenna
receives radar signals.
5. Front Laser - high gain optical lens provides increased
sensitivity and field of view for leading-edge laser detection.
6. Rear Laser - an integrated optical waveguide provides
superior detection of laser signals transmitted from behind.
7. City Button - reduces the annoyance of false alerts
typically encountered in urban driving areas.
8. Quiet Button - pressing QUIET before a signal is
detected engages Auto Quiet Mode which automatically
reduces the audio level after the initial warning to a low
audio level setting.Pressing QUIET during a radar/laser
encounter silences audio alerts, while allowing visual
alerts to keep you informed.
FEATURES

7
9. Power/Volume Control - gently press this button in to
turn the unit on/off. Move back or forward to adjust the
audio level.
10. Dim/Dark - engages Dim/Dark modes.
11. Menu Button - enters Option Select Mode.
12. Blue OLED Text Display - provides better contrast,
brightness and color/shows alerts detected, signal
strength, and indicates engaged modes of operation.
13. Alert Periscopes - provide an additional attention getting
visual alert.
14. GPS Antenna - provides Traffic Camera alerts as well as
other speed selective settings.
15. Power Jack - provides connection for the power cord.
16. USB Jack - provides connection to a PC for data updates.
17. External Audio Jack - a 2.5mm size jack for external
audio use.
FEATURES

8
Mounting Guidelines
• Mount the unit as low as possible near the center of the
windshield.
• Do not mount the unit behind wipers, ornaments,
mirrored sunscreens, etc. These obstructions have metal
surfaces which can affect radar and laser signals and
reduce critical warning time. (Regular tinted glass does
not affect reception).
• Some windshields have an Instaclear
™
or Electriclear
™
type
coating, which affect radar signals. Consult your dealer or
the owner’s manual supplied with your vehicle to determine if
your windshield has this coating.
• Avoid placing the unit in direct contact with the windshield.
• To reduce the possibility of theft, conceal the unit when
not in use.
IMPORTANT: Make sure the unit is level
Windshield
Mounting
INSTALLATION

9
Windshield Mounting
• Install the two suction cups and rubber bumper onto the
bracket by fitting them into their holes.
• Press the suction cups onto the windshield at the location
you have chosen.
IMPORTANT: Some newer cars have a plastic safety coating
on the inside of the windshield. The windshield bracket may
leave permanent marks on this type of surface. To find out if
your vehicle has this type of windshield, check the vehicle’s
owner’s manual or ask your dealer. We recommend that you
do not leave the suction cup bracket on the window in direct
sunlight. If the detector is removed, this may cause blistering
of the dash in some vehicles.
• Slide the detector onto the bracket until it locks into place.
• If necessary, the unit may be leveled by bending the
windshield bracket. Press the bracket release button and
remove the detector before bending.
Rubber
Bumper
INSTALLATION

10
Power Cord Connection
• Plug the small end of the power cord into the unit’s power
jack.
• Plug the large end into the vehicle’s cigarette lighter socket.
NOTE: Cord fits tightly into detector. When installing the
cord, expect some resistance.
Installing the Hardwire Kit
The “U” type connector must be secured to a metal surface
that is electrically connected to the battery ground (negative)
terminal.
The spade type connector can connect to either live 12 volts
or switched 12 volts at your fuse panel accessory port. If no
port is available, cut off the spade terminal, expose 1/4 to 1/2
inch of wire, and splice into a source of 12 volt power.
INSTALLATION

11
Fuse Replacement - power cord
The lighter socket plug is equipped with a replaceable 3 amp
fuse located behind the silver tip. To replace the fuse, carefully
unscrew the tip of the plug.
IMPORTANT: Unscrew slowly. The tip contains a spring which
may fly out when disassembling. Insert the new fuse with the
spring and screw on the tip. With use, screw cap on plug may
loosen. Retighten occasionally.
Fuse Replacement - hardwire kit
The inline fuse holder on the power cable is equipped with a
replaceable 2 amp, 3AG fuse located inside the fuse holder.
To replace the fuse, carefully twist the holder to open it to gain
access to the fuse.
INSTALLATION

12
Power On and Self-Test
To turn the unit ON or OFF, gently press the center of the Power/
Volume button into the side of the unit.
Each time your Whistler detector is turned on, an automatic
self-test sequence confirms that the speaker, visual displays are
functional along with many of the saved settings.
Setting Saver
Stores your personalized settings so that when the detector
is turned off and then on again, you do not have to re-enter
them.
Memory/Beep Confirmation
All features selected (except Stay Alert and Quiet) are retained
in memory. Each time a button is pressed one beep confirms
feature “on”, two beeps confirm feature “off”.
Audio Level Adjustment
To change the audio level:
• Move Power/Volume button back to increase audio
level.
• Move Power/Volume button forward to decrease audio
level.
As audio level is adjusted, beeps are provided and the display
indicates volume level.
OPERATION

13
Speed Mute
When traveling below the speed selected in option mode, no
audio will be given to an alert but the display will still continue
to provide a visual warning.
Speed Volume
When selected, the audio will adjust with your speed. Set the
volume to the maximum and the unit will adjust accordingly.
NOTE: Speed Mute and Speed Volume are selectable in
Option Mode.
Auto Quiet Mode
Auto Quiet mode reduces the selected audio level approximately
5 seconds after a radar or safety radar signal is detected. The alert
for any new signal within 20 seconds will resume at the lower level.
Auto Quiet mode does not affect laser alerts.
• Press Quiet (before a signal is detected) to engage Auto
Quiet mode.
• Once the Auto Quiet mode is engaged, you may cancel
the audio alarm by pressing Quiet.
• Press Quiet (when the unit is not alarming) to cancel Auto
Quiet mode.
NOTE: Speed selectable Auto Quiet is selectable in Option
Mode.
OPERATION

14
Highway Mode
Highway mode provides full audio warnings any time radar or
laser signals are detected, and is recommended for open road
driving.
For more information on City and Highway modes, please visit
our FAQ page on our website: www.whistlergroup.com
Understanding the Display
The unit’s display can be set up to indicate a Cardinal Point
Heading* and Mode of Operation (Highway and City modes).
In-between the Heading and Mode of Operation the clock is
displayed when vehicle is not moving. Clock will change to
speed when vehicle exceeds 5 kmh.
City/City 1/City 2 Modes
Whistler’s City Modes are designed to reduce the annoyance
of automatic door openers, intrusion alarms and other devices
which share frequencies with police radar. Generally, X band
is used for these devices.
• Press City to cancel Highway Mode and engage City Mode.
• Press City again to enter City 1 Mode.
• Press City again to enter City 2 Mode.
• Press City a fourth time to cancel City 2 Mode and returns
the unit to Highway Mode.
*Heading
Mode of Operation
OPERATION

15
In City Mode, weak speed/safety radar signals give an initial
alarm of two beeps, and then remain quiet until the signal
becomes very strong. When the signal strength increases, two
additional beeps are provided. City 1 and City 2 Modes operate
the same as Highway Mode, but in City 1 Mode, only the X band
is lowered. In City 2 Mode, X-band is not detected.
CAUTION: Some towns/small cities may still be using X band
radar. City Modes do not change the audio alert for laser.
Selectable Signal Strength Display
There are two settings available in Option Mode that
effect how a received radar signal strength is displayed.
The “RMP STD” (ramp standard) option uses our standard
signal progression from level 1 to 9. The “RMP FST” (ramp
fast) option increases the progression from level 1 to 9.
RMP FST increases the response of the signal strength
meter for all bands.
Alert Periscopes
Whistler’s Alert Periscopes provide an added attention getting
visual alert. The two extra LEDs flash on and off when the unit
alarms to provide a unique visual alert.
1 = weak signal, 9 = strong signal
OPERATION

16
This alert can be programmed, through the Option Select Mode
to:
1. flash for all alarms
2. remain on
3. turn LEDs off completely
Dim/Dark Modes
Dim/Dark Mode reduces the illumination of the display.
• Briefly press and release the Dark button to reduce
illumination to a Dim setting.
• Briefly press and release the Dark button a second time
engages Dark Mode. In Dark Mode, the display goes
dark for as long as a signal is being detected and for 20
seconds after, then the display returns to the dim setting.
Dim Modes can be engaged during an alert.
• Briefly press and release the Dark button a forth time to
restore full illumination to the display.
Auto Dim
The Auto Dim feature automatically switches the illumination
of the text display between bright and dim settings according
to the GPS time of 7am and 7pm. To manually override the
auto dim feature, use the dark button on the unit. Enter
Option Select Mode to turn on/off the auto dim feature.
Integrated Real Voice
®
Real Voice
®
will be used to articulate the following:
• Band Identification
• Feature Selection
OPERATION

17
INTELLICORD
®
Ready
The INTELLICORD
®
power cable allows the user to remotely
control two of the following detector features (Power On/Off,
City Modes, Dim/Dark, Waypoint and Quiet/Auto Quiet)
with a press of a button. See option mode for selecting the
functions to work with the INTELLICORD
®
.
Red Light / Speed Camera Detection
The PRO-93GXi is capable of alerting to these locations with
the preinstalled updatable database.
Getting a Satellite Lock
Powering up, the unit will begin its search for satellites. During
this time, the unit will flash the satellite icon on the display.
Please allow several minutes for the unit to lock onto the
satellites. This delay is normal when the unit is turned on at
least 500 kilometers from when the unit last received a satellite
lock or if several days have passed since its last usage.
NOTE: Driving while initially searching for satellites will take
longer than if you are stationary. Acquiring satellites takes
much longer the first time.
Camera Alerts
When approaching a known camera, the unit will provide the
type of alert (Red Light Camera, Traffic Camera, Speed Camera,
or User Location). Example: the display will show TRF CAM then
count down the distance to the camera. Once past the camera
location, the unit will provide a beep-beep audio tone and the
word PASS will be shown on the display.
OPERATION

18
Manual Entry
The unit will save a special location (i.e., a new red light
camera or even a “trap”) if you enter it manually. The unit will
store 1000 user locations.
NOTE: Manual entries must be approximately 100 meters
apart to prevent overlapping locations. To manually enter a
location, simply press and hold the POWER button and the
unit will announce “user point logged”. When detecting
this position, the unit will announce “caution” the next time
it approaches this location. Manual entries can be deleted
within a certain radius (selected in Option Select Mode).
Once a radius is selected (400, 600, 800, 1000) the data can be
deleted within the selected Radius or they all can be deleted
completely from memory.
OPERATION

19
Updating the Database
Follow the steps below to update the Laser-Radar Detector.
Step 1: Remove the Laser-Radar Detector from the vehicle
and bring it to your PC. Note: You do not need to power the
Laser-Radar Detector to update it.
Step 2: Download the update program and install it on your
PC. Note: Program is not MAC compatible.
Step 3: Download and save the .cdb file downloaded to
your PC. Create a folder for the unit so you can store future
updates and save this file into the newly created folder. DO
NOT RENAME THE .cdb FILE OR TRY TO OPEN IT!
Step 4: Open the update program and plug the USB cable
into the Laser-Radar Detector.
Step 5: Click the “DB Update” button on the update
program and locate the saved file from Step 3. Click the
“Update” button to install the file.
Step 6: When update is complete, close the update program,
unplug the USB cable and the Laser-Radar Detector is ready
with the new updates.
OPERATION

20
Updating the Firmware
Follow the steps below to update the Laser-Radar Detector.
Step 1: Remove the Laser-Radar Detector from the vehicle
and bring it to your PC. Note: You do not need to power the
Laser-Radar Detector to update it.
Step 2: Download the update program and install it on your
PC. Note: Program is not MAC compatible.
Step 3: Download and save the .bin file downloaded to
your PC. Create a folder for the unit so you can store future
updates and save this file into the newly created folder. DO
NOT RENAME THE .bin FILE OR TRY TO OPEN IT!
Step 4: Open the update program and plug the USB cable
into the Laser-Radar Detector.
Step 5: Click the “F/W Update” button on the update
program and locate the saved file from Step 3. Click the
“Update” button to install the file.
Step 6: When update is complete, close the update program,
unplug the USB cable and the Laser-Radar Detector is ready
with the new updates.
OPERATION
/