Summit FF63BDTPUBADA User manual
- Category
- Wine coolers
- Type
- User manual

Write Model and Serial Numbers here:
Model _________________________
Serial No. ______________________
PUB CELLARS
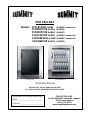
Models: CFF7LBLPUB series (SUMMIT Commercial)
FF29KDTPUB series (SUMMIT)
FF63BDTPUB series (SUMMIT)
SCR312LPUB series (SUMMIT Commercial)
SCR600BLPUB series (SUMMIT Commercial)
SCR2466PUB series (SUMMIT)
M405 CM411L
Instruction Manual
BEFORE USE, PLEASE READ AND FOLLOW
ALL SAFETY RULES AND OPERATING INSTRUCTIONS
FELIX STORCH, INC.
An ISO 9001:2015 registered company
770 Garrison Avenue
Bronx, NY 10474
www.summitappliance.com
FF7LBLPUB SCR600BLPUB

1
Table of Contents
Introduction ........................................................................................................ 2
Important Safeguards .................................................................................. 3 - 4
Description of Models ............................................................................... 5 – 10
FF7LBLPUB series ........................................................................................ 5
FF29KDTPUB series ..................................................................................... 6
FF63BDTPUB series ..................................................................................... 7
SCR312LPUB series ..................................................................................... 8
SCR600BLPUB series ................................................................................... 9
SCR2466PUB series ................................................................................... 10
Installation Instructions ........................................................................... 11 - 17
Before Using Your Appliance ...................................................................... 11
Installing the Pub Cellar ........................................................................ 11 - 12
Electrical Connection ................................................................................... 12
Extension Cord ............................................................................................ 12
Reversing the Door Swing .................................................................... 12 - 16
Door Handle Installation ........................................................................ 16 - 17
Operating Your Pub Cellar ....................................................................... 17 - 21
Digital Thermostat ............................................................................... 17 – 19
Shelves for SCR2466PUB Models ....................................................... 19 - 20
Defrosting Your Appliance ........................................................................... 20
Door Lock .................................................................................................... 20
Important Notes .................................................................................... 20 - 21
Care and Maintenance .............................................................................. 21 - 22
Cleaning Your Appliance ............................................................................. 21
Power Failure .............................................................................................. 21
Vacation Time ............................................................................................. 21
Moving Your Appliance ................................................................................ 22
Energy-Saving Tips ..................................................................................... 22
Troubleshooting ............................................................................................... 22
Limited Warranty .............................................................................................. 23

2
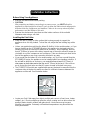
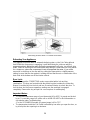
Introduction
SUMMIT’s line of Pub Cellars offers the ideal conditions for storing and displaying
bottled and canned beer, as well as wines. These units are especially suited to the
storage of craft beers. The digital thermostat is set to a warmer temperature range
(41 to 65 or 71ºF) to ensure the right conditions for these specialty brews, as well as
for lagers and dark ales.
Bottled beers should never be stored under bright lights, especially not fluorescent or
sunlight, because bright light can quickly “skunk” the beer, especially if stored in
green or clear bottles. Many of our Pub Cellars have solid doors, and those with
glass doors are available with various degrees of tinting to prevent overexposure to
light.
Bottled beers should be stored standing straight up on their bases – and not on their
sides like wine. Storing upright ensures that any sediment common in many styles of
craft beer will settle to the bottom of the bottle. With the sediment at the bottom, you
have the choice of leaving it in the bottle or pouring it into the glass. Our Pub Cellars
have adjustable shelving to allow your bottled beer to be stored upright.
Storing a beer perfectly can be tricky. You want to keep it cool enough that
fermentation doesn’t get out of hand and shorten the lifespan of the beer, while
keeping it too cold puts your beer at risk of having a constant cloudy look.
Specifically, strong beers tend to prefer temperatures of 55 to 60°F. Standard ales
and stouts do better at slightly chillier temperatures of 50 to 55°. Lighter beers need
temperatures of 45 to 50°F. SUMMIT’s Pub Cellars can accommodate all of these
temperature ranges and more.
Whichever model you’ve chosen, you’re assured of quality construction, attractive
appearance and an experienced staff of SUMMIT professionals to back up our
product. Cheers!

3
IMPORTANT SAFEGUARDS
Before the refrigerator is used, it must be properly positioned and installed as
described in this manual, so read the manual carefully. To reduce the risk of fire,
electrical shock or injury when using the refrigerator, follow basic precautions,
including the following:
Plug into a grounded 3-prong outlet, do not remove grounding prong, do not use an adapter,
and do not use an extension cord.
It is recommended that a separate circuit, serving only your refrigerator be provided. Use
receptacles that cannot be turned off by a switch or pull chain.
Never clean refrigerator parts with flammable fluids. These fumes can create a fire hazard or
explosion.
Do not store or use gasoline or other flammable vapors and liquids inside or in the vicinity of
this or any other appliance. The fumes can create a fire hazard or explosion.
Do not use inflammable sprays in the vicinity of the refrigerator.
Before proceeding with cleaning and maintenance operations, make sure the power line of
the unit is disconnected.
Do not connect or disconnect the electric plug when your hands are wet.
Unplug the refrigerator or disconnect power before cleaning or servicing. Failure to do so can
result in electrical shock or death.
Do not attempt to repair or replace any part of your refrigerator unless it is specifically
recommended in this manual. All other servicing should be referred to a qualified technician.
Regarding the FF29KDTPUB and SCR2466PUB model series:
These appliances are CFC- and HFC-free and contain small quantities of Isobutane
(R600a) which is environmentally friendly, but flammable. It does not damage the ozone
layer, nor does it increase the greenhouse effect. Care must be taken during
transportation and setting up of the appliance that no parts of the cooling system are
damaged. Leaking coolant can ignite and may damage the eyes.
In the event of any damage:
- Avoid open flames and anything that creates a spark,
- Disconnect from the electrical power line,
- Air the room in which the appliance is located for several minutes, and
- Contact the Service Department for advice.
The more coolant there is in an appliance, the larger the room it should be installed in. In
the event of a leakage, if the appliance is in a small room, there is the danger of
combustible gases building up. For every ounce of coolant at least 325 cubic feet of room
space is required. The amount of coolant in the appliance is stated on the data plate on
the back of the appliance. It is hazardous for anyone other than an Authorized Service
Person to carry out servicing or repairs to this appliance.
Take serious care when handling, moving, and using the appliance to avoid either
damaging the refrigerant tubing or increasing the risk of a leak.
Replacing component parts and servicing shall be done by factory authorized service
personnel so as to minimize the risk of possible ignition due to incorrect parts or improper
service.

4
Use two or more people to move and install the refrigerator. Failure to do so can result in
back or other injury.
To ensure proper ventilation for your refrigerator, the front of the unit must be completely
unobstructed. Choose a well-ventilated area with temperatures above 60°F (16°C) and
below 90°F (32°C). This unit must be installed in an area protected from the elements, such
as wind, rain, water spray or drips.
The refrigerator should not be located next to ovens, grills or other sources of high heat.
The refrigerator must be installed with all electrical, water and drain connections in
accordance with state and local codes. A standard electrical supply (115 V AC only, 60 Hz),
properly grounded in accordance with the National Electrical Code and local codes and
ordinances is required.
Do not kink or pinch the power supply cord of the refrigerator.
The fuse (or circuit breaker) size should be 15 amperes.
It is important for the refrigerator to be leveled in order to work properly. You may need to
make several adjustments to level it.
Check for leaks after connection.
Never allow children to operate, play with or crawl inside the refrigerator.
This appliance is not intended for use by persons (including children) with reduced physical,
sensory or mental capabilities, or lack of experience and knowledge, unless they have been
given supervision or instruction concerning use of the appliance by a person responsible for
their safety.
IMPORTANT: Do not use mechanical devices or other means to accelerate the defrosting
process, other than those recommended by the manufacturer.
IMPORTANT: Do not damage the refrigerant circuit.
IMPORTANT: Do not use electrical appliances inside the storage compartment of the
appliance, unless they are of the type recommended by the manufacturer.
Do not use solvent-based cleaning agents or abrasives on the interior. These cleaners may
damage or discolor the interior.
Do not use this apparatus for other than its intended purpose.
Risk of child entrapment
Child entrapment and suffocation are not problems of the past. Junked or abandoned
refrigerators and freezers are still dangerous, even if they will “just sit in the garage a few
days.”
Before you throw away your old refrigerator or freezer: Take off the doors. Leave
the shelves or drawers in place so that children may not easily climb inside.
Never allow children to operate, play with, or crawl inside the refrigerator/freezer.
- SAVE THESE INSTRUCTIONS -

5
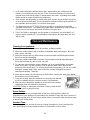
Description of Models
WARNING: For these models, be sure the light switch is off when you close the door.
Technical Details
Model Series
FF7LBLPUB
Brand
SUMMIT Commercial
Capacity
5.5 cubic feet
Unit dimensions, HxWxD
33.5” * x 23.63” x 23.5”
Shipping weight
107 lbs
Shelves
4 glass shelves
Door
Solid, reversible
Installation
Free-standing or built-in (BI models)
Rated voltage/frequency
120V AC / 60 Hz
Rated current
1.3 amps
Refrigerant
R134a, 1.8 oz
Defrost
Automatic
* Height of ADA models is 32”
Light switch
Solid door
Front ventilation
slots (kick plate)
Leveling legs
Adjustable glass
shelves
Defrost water
outlet
NOTE: Lock on FF7LBLPUB series models is located on
the front of the door, near the top center.
Handle
Digital
thermostat
FF7LBLPUB series

6
These models are suitable for use on a countertop. They have two glass shelves
and a solid door with door racks. There is no lock and no interior light.
Technical Details
Model Series
FF29KDTPUB
Brand
SUMMIT
Capacity
2.4 cubic feet
Unit dimensions, HxWxD
24.63" × 18.5" × 17.75"
Weight
40 lbs
Shelf type
Glass
Door
Reversible, with 2 racks
Installation
Countertop
Rated voltage/frequency
115V AC / 60 Hz
Rated current
0.6 amps
Refrigerant
R600a, 0.63 oz
Defrost
Automatic
FF29KDTPUB series

7
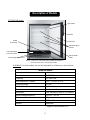
Technical Details
Model Series
FF63BDTPUB
Brand
SUMMIT
Capacity
5.5 cubic feet
Unit dimensions, HxWxD
32.63” * x 23.63” x 23.0”
Shipping weight
110 lbs
Shelves
4 glass shelves, 1 wire wine rack
Door
Reversible with racks
Installation
Free-standing or built-in (BI models)
Rated voltage/frequency
115V AC / 60 Hz
Rated current
1.0 amps
Refrigerant
R134a, 1.7 oz
Defrost
Automatic
FF63BDTPUB series
Wine rack
Glass shelves
Front ventilation
slots (kick plate)
Digital thermostat
Leveling legs)
Crisper
Door with
storage racks
Handle
* Height of ADA models is 32”
NOTE: These models have an interior light that illuminates when the door is opened.
The crisper and door racks can be used to store fruit or snacks you might wish
to serve with your beer or wine.

8
WARNING: To maintain the quality of your stored beers and wines, it is important to
keep these glass-door models out of direct sunlight.
Technical Details
Model Series
SCR312LPUB
Brand
SUMMIT Commercial
Capacity
2.5 cubic feet
Unit dimensions, HxWxD
25.75" × 17.13" × 19.0"
Weight
80 lbs
Shelving
4 wire shelves
Door
Glass, not reversible
Installation
Countertop
Rated voltage/frequency
115V AC / 60 Hz
Rated current
1.3 amps
Refrigerant
R134a, 1.82 oz
Defrost
Automatic
SCR312LPUB series
Handle
Control panel including
digital thermostat
and light switch
Adjustable wire
shelving
Lock
Leveling legs
Double-pane
tempered
glass door

9
WARNING: To maintain the quality of your stored beers and wines, it is important to
keep these glass-door models out of direct sunlight.
Technical Details
Model Series
SCR600BLPUB
Brand
SUMMIT Commercial
Capacity
5.5 cubic feet
Unit dimensions, HxWxD
33.5” * x 23.63” x 23.5”
Shipping weight
125 lbs
Shelves
4 glass shelves
Door
Double-pane glass, reversible
Installation
Free-standing or built-in (BI models)
Rated voltage/frequency
115V AC / 60 Hz
Rated current
1.3 amps
Refrigerant
R134a, 1.8 oz
Defrost
Automatic
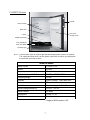
SCR600BLPUB series
Lock
Handle
Double-pane
tempered
glass door
Switch for
interior light
Adjustable glass
shelves
Digital
thermostat
Leveling legs
Front ventilation
slots (kick plate)
* Height of ADA models is 32”

10
SCR2466PUB series
Technical Details
Model Series
SCR2466PUB
Capacity
5.43 cu.ft. (154 liters)
Unit Dimensions, HxWxD
34.0” x 23.63” x 23.63”
Temperature Range
41°F to 72°F
Shelves
2 wire, 1 glass, 1 wood
Door
Double-pane, reversible
Rated Voltage/frequency
110V AC / 60Hz
Rated Current
1.1A
Power Input
95W
Refrigerant
R600a (45g, or 1.6 ounce)
Sound Level (db)
43
Climate Type
N
Installation
Free-standing or built-in
Net Weight
110 lbs (49.5kg)
Gross Weight
119 lbs (54kg)
Defrost Type
Automatic
Handle
Control panel including
digital thermostat
and light switch
Adjustable wire
shelving (2)
Lock
Leveling legs
Double-pane
tempered
glass door
Glass shelf
Wooden shelf
Ventilation grille

11
Installation Instructions
Before Using Your Appliance:
Remove the exterior and interior packing.
CAUTION:
After unpacking and before connecting to a power source, you MUST allow this
appliance to stand upright for at least 2 hours to allow the lubricant and refrigerant to
drain back into the compressor and stabilize. Failure to do so may adversely affect
performance and the lifetime of this unit.
Remove the shelves and clean them and the interior surfaces of the unit with
lukewarm water using a soft cloth.
Installing the Pub Cellar:
Place the unit on a floor or other surface that is strong enough to support the
appliance when it is fully loaded. To level the unit, adjust the two leveling legs at the
front.
Unless your particular model has the letters BI (built-in) in the model number, or if you
have a model from the SCR2466PUB series, the appliance is designed to be free-
standing only and not recessed or built into an enclosure. When installing, allow at
least 4” (102mm) of space at the sides, top and rear of the unit to allow for proper air
circulation to cool the compressor and condenser. Take care that any air vents at the
front of the appliance are never covered or blocked in any way.
If your model has the letters BI in its model number, or if you have a model from the
SCR2466PUB series, the appliance can be installed either free-standing or built-in. If
the unit will be built into an enclosure, you must still allow at least 3/16” (5mm) of
clear space on both sides and at the top, and 2” (51mm) at the back. If the unit has
an air vent at the front, take care that it is never covered or blocked in any way.
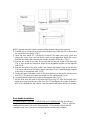
The FF63BDTPUB models are supplied with spacers that must be mounted onto the
condenser tube at the back to make sure there is sufficient clearance between the
appliance and the wall. See illustration below.
Locate your Pub Cellar away from direct sunlight and sources of heat (oven, heater,
radiator, etc.). Direct sunlight may affect the acrylic coating and can also reduce the
quality of items stored in models with glass doors. Heat sources may increase
electrical consumption. Extremely cold ambient temperatures may also affect the
unit's performance.

12
Improper use of the grounded plug can result in the risk of electrical shock. If the power
cord is damaged, have it replaced by the manufacturer, its service agent or similarly
qualified persons in order to avoid a hazard.
Avoid locating the unit in moist areas. Too much moisture in the air will cause frost to
form quickly on the evaporator, requiring more frequent defrosting of the interior.
Plug the unit into an exclusive, properly installed and grounded wall outlet. Do not
under any circumstances cut or remove the third (ground) prong from the power cord.
Any questions concerning power and/or grounding should be directed toward a
certified electrician or authorized service center.
Electrical Connection:
The unit should be properly grounded for your safety. The power cord is equipped with a
three-prong plug that mates with a standard three-prong wall outlet to minimize the
possibility of electrical shock.
Do not under any circumstances cut or remove the third ground prong from the power
cord supplied. For personal safety, this appliance must be properly grounded.
This unit requires a standard 115-volt AC/60Hz electrical outlet with three-prong ground.
Have the wall outlet and circuit checked by a qualified electrician to make sure the outlet
is properly grounded. When a standard 2-prong wall outlet is encountered, it is your
responsibility and obligation to have it replaced with a properly grounded 3-prong wall
outlet.
To prevent accidental injury, the cord should be secured behind the unit and not left
exposed or dangling.
The unit should always be plugged into its own individual electrical outlet that has a
voltage rating that matches the rating label on the appliance. This provides the best
performance and also prevents overloading house wiring circuits that could cause a fire
hazard from overheated wires. Never unplug the unit by pulling on the power cord.
Always grip the plug firmly and pull straight out from the receptacle. Repair or replace
immediately any power cord that has become frayed or otherwise damaged. Do not use
a cord that shows cracks or abrasion damage along its length or at either end. When
moving the unit, be careful not to damage the power cord.
Extension Cord:
Do not use an extension cord with this appliance. If the power cord is too short, have a
qualified electrician or service technician install an outlet near the appliance.
Reversing the Door Swing:
The door swing of the SCR312LPUB models cannot be reversed, but all of the other
models described in this manual have reversible doors. If you find the direction of
opening the door of your appliance inconvenient, you can change it. Holes on the
opposite side have already been prepared at the factory.
Aside from SCR312LPUB models, each appliance can be opened from either the right
side or the left. By default, the door hinge is on the right side. If you prefer it on the left,
please follow the instructions on the following pages for the appropriate model.
Remember that all of the parts that are removed must be kept for re-installation of the
door.

13
For FF7LBLPUB and FF63BDTPUB series models:
1. Take off the upper hinge cover from the door and remove the screws that hold the top
hinge.
2. Lift the hinge straight up to free the hinge pin from the socket in the top of the door.
3. Lift the door up and away to free its bottom socket from the hinge pin.
4. Remove the screws to the bottom hinge.
5. Remove the decorative caps from the opposite side and plug the holes from the
original side with the decorative caps.
6. Move the bottom hinge to the opposite side and tighten the screws. Use any lock
washers or nuts if they were installed in the original installation.
7. Replace door onto the hinge pin on the bottom hinge. Place top hinge pin into door.
Insert screws into the top hinge and tighten.
If you notice the door not hanging straight, loosen the top hinge screws, adjust the door
until it is level and tighten the screws.
FF29KDTPUB series models:
Refer to the set of diagrams below if you wish to reverse the door opening direction for these
models.

14
SCR600BLPUB series models:
1. Unscrew the lower hinge and take off the door.
2. Push the kick plate to the right in the new position, being careful not to damage the
wires connected to the back of the digital thermostat.
3. Undo the upper hinge fastener and fix it to the opposite side of the housing, where you
have already removed and replaced the fastener with the hole to the opposite side.
4. Put the door on the upper hinge fastener.
5. Fix the lower hinge in the new position.
6. Unscrew the handle and place it on the opposite side.
7. Some screws are covered with caps. Take off these caps before undoing the screws.
8. Check the door gasket. It should not be creased and should seal well.
1. Upper hinge fastener 4. Handle
2. Lower hinge 5. Door hinge fixture
3. Kick plate 6. Door hinge fixture plug

15
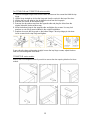
SCR2466PUB series models:
To reverse the door opening direction, please follow these illustrations and instructions:

16
NOTE: All parts removed must be saved to allow the door swing to be reversed
1. Carefully use a sharp tool to pry up the decorative cap on the top of the cabinet and
the cap of the door spindle. (Fig 1)
2. Open the door about 90°, unscrew the screw of the upper door hinge cover and
remove the cover, then unscrew all the screws on the upper door hinge. Be sure to
hold the door firmly after removing the screws, and take off the door. (Fig 2)
3. Remove the screw of the lower door hinge and the left side screw of the front vent
(Fig 3), then install the lower door hinge at the designated position on the opposite
side.(Fig 4)
4. Remove the screw of the door handle, then remove the bottom screw on the left side
of the door and remove the lower support of the door (Fig 5). Install the lower support
of the door on the opposite side. (Fig 6)
5. Gently pull open the middle section of the door gasket; you will see the handle screw
hole (Fig 7). Remove the handle and install it on the opposite side.(Fig 8)
6. Loosely install the upper door hinge on the opposite side. (Fig 9)
7. Set the door onto the shaft of the lower door hinge (Fig 10), then fit the shaft of the
upper door hinge into the top of the door (Fig 11) and tighten the screws. Adjust the
door so it is aligned with the cabinet. Level the cabinet and tighten all the lock screws.
Door Handle Installation:
For model series FF7LBLPUB, FF63BDTPUB and SCR600BLPUB, the door has two
screw holes on each side, allowing you to install a handle (included). To do so, align the
handle with the screw holes on the side you prefer. Fix the handle in place with the
included screws, then cover the screw heads with the handle seal (included).

17
For the model SCR312LPUB series,
install the handle as follows:
1. Remove the door gasket on the side you wish to
install the handle - you can see two designated
holes for handle installation. The gasket is easily
displaced by hand; no tools are necessary.
2. Install the handle tightly as shown with two screws,
lock washers and flat washers provided. (DO NOT
over tighten as this will cause damage to the handle
and stainless steel door frame).
3. Replace the door gasket to its original position.
For the model SCR2466PUB series, the handle installation directions are included in the
instructions for reversing the door swing.
The model FF29KDTPUB series does not have a removable handle.
Operating Your Pub Cellar
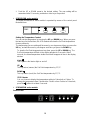
Digital Thermostat:
The temperature inside your appliance is controlled by a digital thermostat located at the
front of the unit. Normally, the LED display shows the current temperature inside the
unit.
The preset temperature range of the thermostat is 41 to 65ºF (5 to18°C) except for the
SCR2466PUB models where the range is 41 to 72°F (5 to 22°C). The operating
temperature is factory-set at 45ºF (7°C). If you find that it is necessary to change the
temperature setting (Set Point) for your appliance, refer to the appropriate instructions
below.
Series models FF7LBLPUB, FF29KDTPUB, FF63BDTPUB and SCR600BLPUB:
The front panel of the thermostat for these models is illustrated here:
To see the SET POINT:
Push and immediately release the SET key. The display will show the Set Point
value. Wait 5 seconds and the interior temperature will display again.
To change the SET POINT:
1. Push and hold the SET key for more than 3 seconds to change the Set Point
value. The value of the Set Point will be displayed.
Handle
Door Frame
Gasket
Screw
Lock Washer
Flat Washer

18
2. Push the UP or DOWN arrow to the desired setting. The new setting will be
memorized after 15 seconds, provided no other keys are pushed.
SCR312LPUB series models:
The digital thermostat for these models is operated by means of the control panel
illustrated here:
TEMP
Setting the Temperature Control:
You can set the temperature by pressing the UP and DOWN keys. When you press
the two keys for the first time, the LED readout will show the Set Point temperature
chosen previously.
The temperature you are setting will increase by one degree each time you press the
UP key, and will decrease by one degree each time you press the DOWN key.
To view the Set Point temperature at any time, press the UP or DOWN key. The
Set Point temperature will flash in the display window for 5 seconds. After 5
seconds, the actual temperature inside the unit will reappear in blue in the display
window.
Light
This key turns the interior light on and off.
UP
This key raises (warms) the Set Point temperature by 1°F/°C.
DOWN
This key lowers (cools) the Set Point temperature by 1°F/°C.
ºF/ºC Selector
You can choose to display the temperature setting in Fahrenheit or Celsius. To
change the temperature from Fahrenheit to Celsius or from Celsius to Fahrenheit,
press the button for at least 5 seconds.
SCR2466PUB series models:
Control Panel

19
ON/OFF Power
Connect the power cord to a properly grounded outlet. To turn the appliance on or off,
press the ON/OFF button.
NOTE: This unit has a protective delay function. The compressor will start to work about
3 to 5 minutes after it is powered on.
RUN Light
This light indicates when the compressor is working. While the compressor is operating,
the red light is on. During down time in the operating cycle, this light is off.
SETTING Window
Displays the temperature you set. The range of temperature setting is 41 to 72 degrees
Fahrenheit (5 to 22°C).
CHAMBER Window
Displays the temperature inside the cabinet. The range of the temperature display is 32
to 99 degrees Fahrenheit (0 to 37°C).
SET Button
Temperature setting button; once you press the button, the temperature increases 1°C
or 1°F. Setting range is between 41 and 72 degrees Fahrenheit (5 to 22°C).
Light Button
You can turn the interior light on or off by pushing the button marked LIGHT.
NOTE: The light goes off automatically after 10 minutes.
°C/°F Button
Celsius / Fahrenheit conversion button
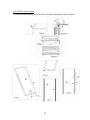
Shelves for SCR2466PUB models:
SCR2466PUB series models are equipped with 2 wire beverage shelves, 1 glass
beverage shelf and 1 wooden wine bottle shelf.
To prevent damaging the door gasket, be sure the door is open all the way when
pulling a shelf out of the rail compartment.
For easy access to the stored contents, you can pull the shelf approximately 30% out
of the rail compartment. The unit was designed with a stopper on each side of the
shelf track to prevent the shelf from pulling out all the way, allowing bottles to fall.
You can remove each beverage shelf (wired and glass) by first emptying the shelf,
then lifting up and pulling it out smoothly.
To remove the wooden wine shelf, pull the shelf out as far as it will go. Use a long
flat screwdriver to press down the right plastic notch as shown in Figure A (on the
next page) and at the same time lift the left plastic notch as shown in Figure B. Then
proceed to pull out the shelf slowly. Contact our service department if assistance is
needed.
Page is loading ...
Page is loading ...
Page is loading ...
Page is loading ...
-
 1
1
-
 2
2
-
 3
3
-
 4
4
-
 5
5
-
 6
6
-
 7
7
-
 8
8
-
 9
9
-
 10
10
-
 11
11
-
 12
12
-
 13
13
-
 14
14
-
 15
15
-
 16
16
-
 17
17
-
 18
18
-
 19
19
-
 20
20
-
 21
21
-
 22
22
-
 23
23
-
 24
24


Summit FF63BDTPUBADA User manual
- Category
- Wine coolers
- Type
- User manual
Ask a question and I''ll find the answer in the document
Finding information in a document is now easier with AI
Related papers
-
Summit FF7LBLKBIPUBSSTB User manual
-
-
-
-
Summit SWC1840BCSS User manual
-
Summit Appliance SWC182Z User manual
-
Summit Appliance SWC530BLBISTCSS User manual
-
-
-
Other documents
-
-
Haier WS53GDA User manual
-
Unbranded SWC1840 User guide
-
-
Pittsburgh Corning 121910 Installation guide
-
LG GCW141BXG Owner's manual
-
AccuCold FF28LWH Owner's manual
-
-
Zanussi ZRW110N User manual
-
Wine Enthusiast 268 68 80 01 User guide